E8. Wearable AR: Multimodal Input

Learning Outcomes
- Explain the purpose of multiple input modalities in spatial AR. Before class, review the concepts of modality, natural user interfaces, and context-aware interaction, then connect them to examples where voice, gaze, and gesture work together in an AR experience.
- Configure and recognize controller inputs in Magic Leap 2 development. Ahead of the session, learn how to access inputs via the
MagicLeapInputssystem and identify key input actions such asTrigger,Bumper, andTouchpad.- Set up and map voice commands in Unity for AR applications. In preparation, understand how voice intents are linked to commands, what permissions are required, and optionally create a Voice Intents Configuration asset to practice the setup process.
- Describe supported hand gestures and their applications in AR. For your pre-class task, learn how gestures like pinch, grasp, and spread are detected, and explore how the
XRIHandControllerenables natural manipulation in AR environments.- Explain how gaze enhances multimodal interaction in AR. Before coming to class, understand how eye tracking supports hover selection and combined modalities like look-and-speak or look-and-pinch, and review how gaze rays are configured in Unity.
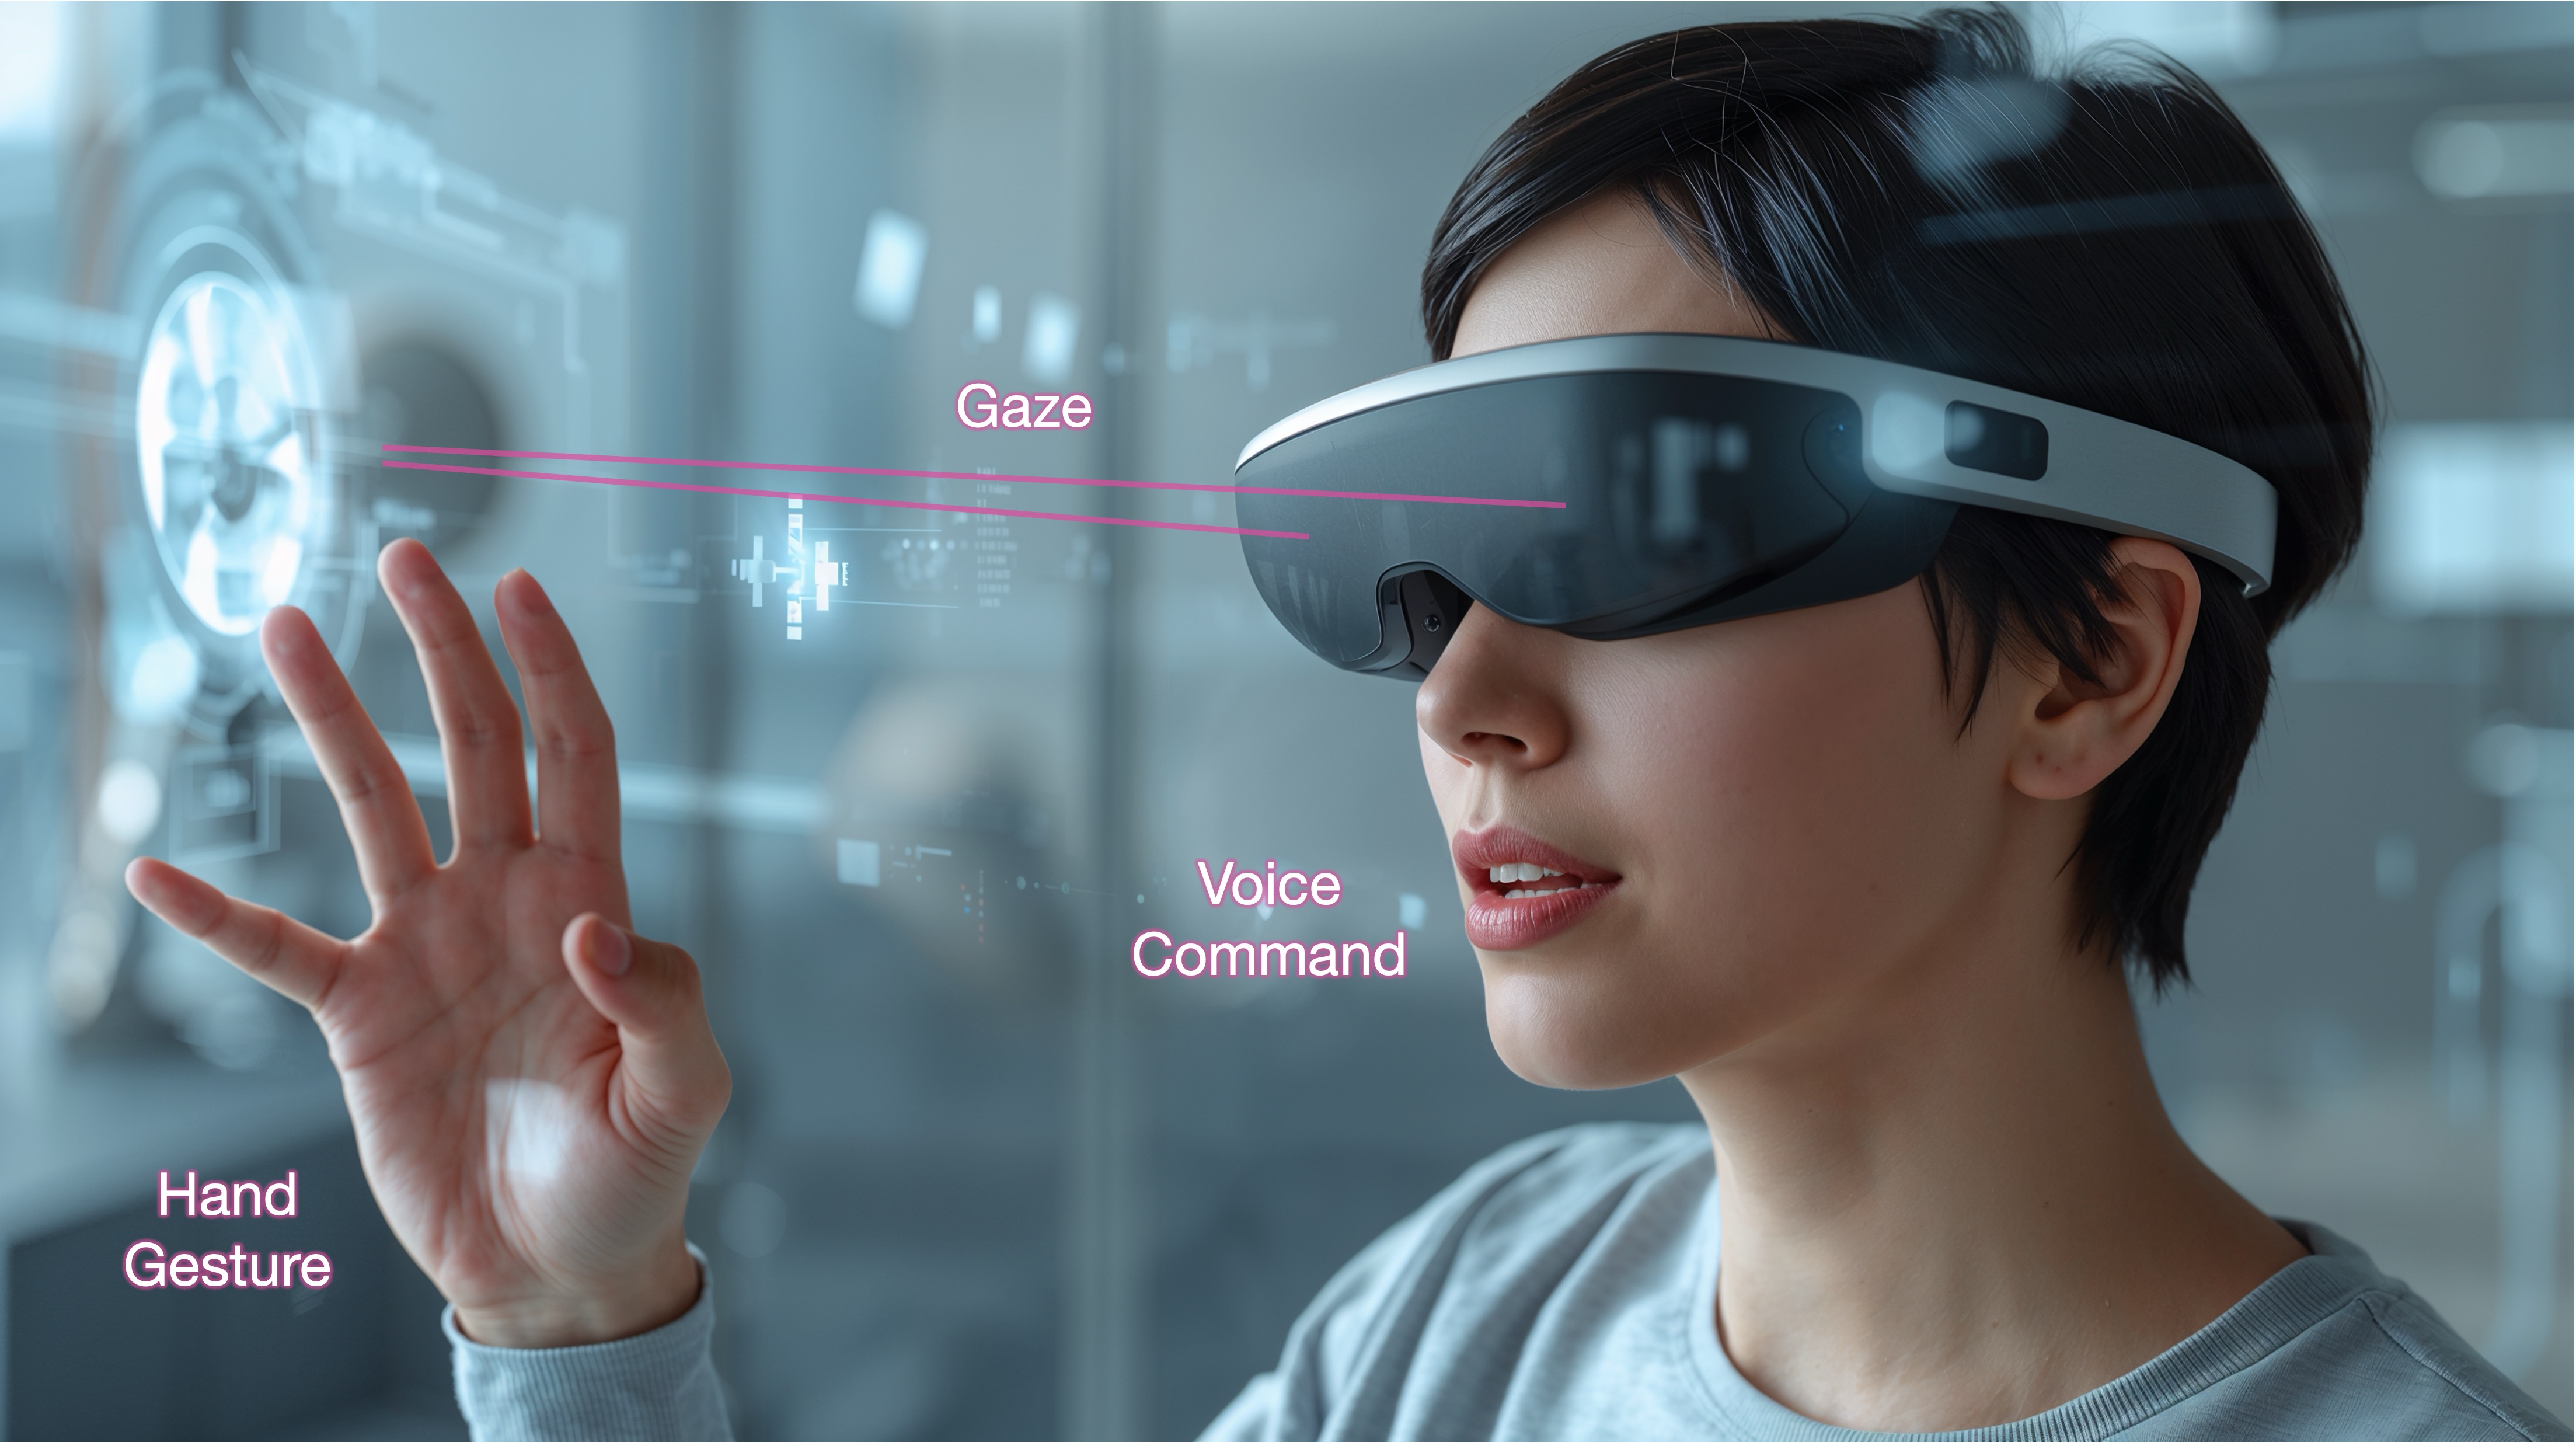
Why Multiple Input Modalities?
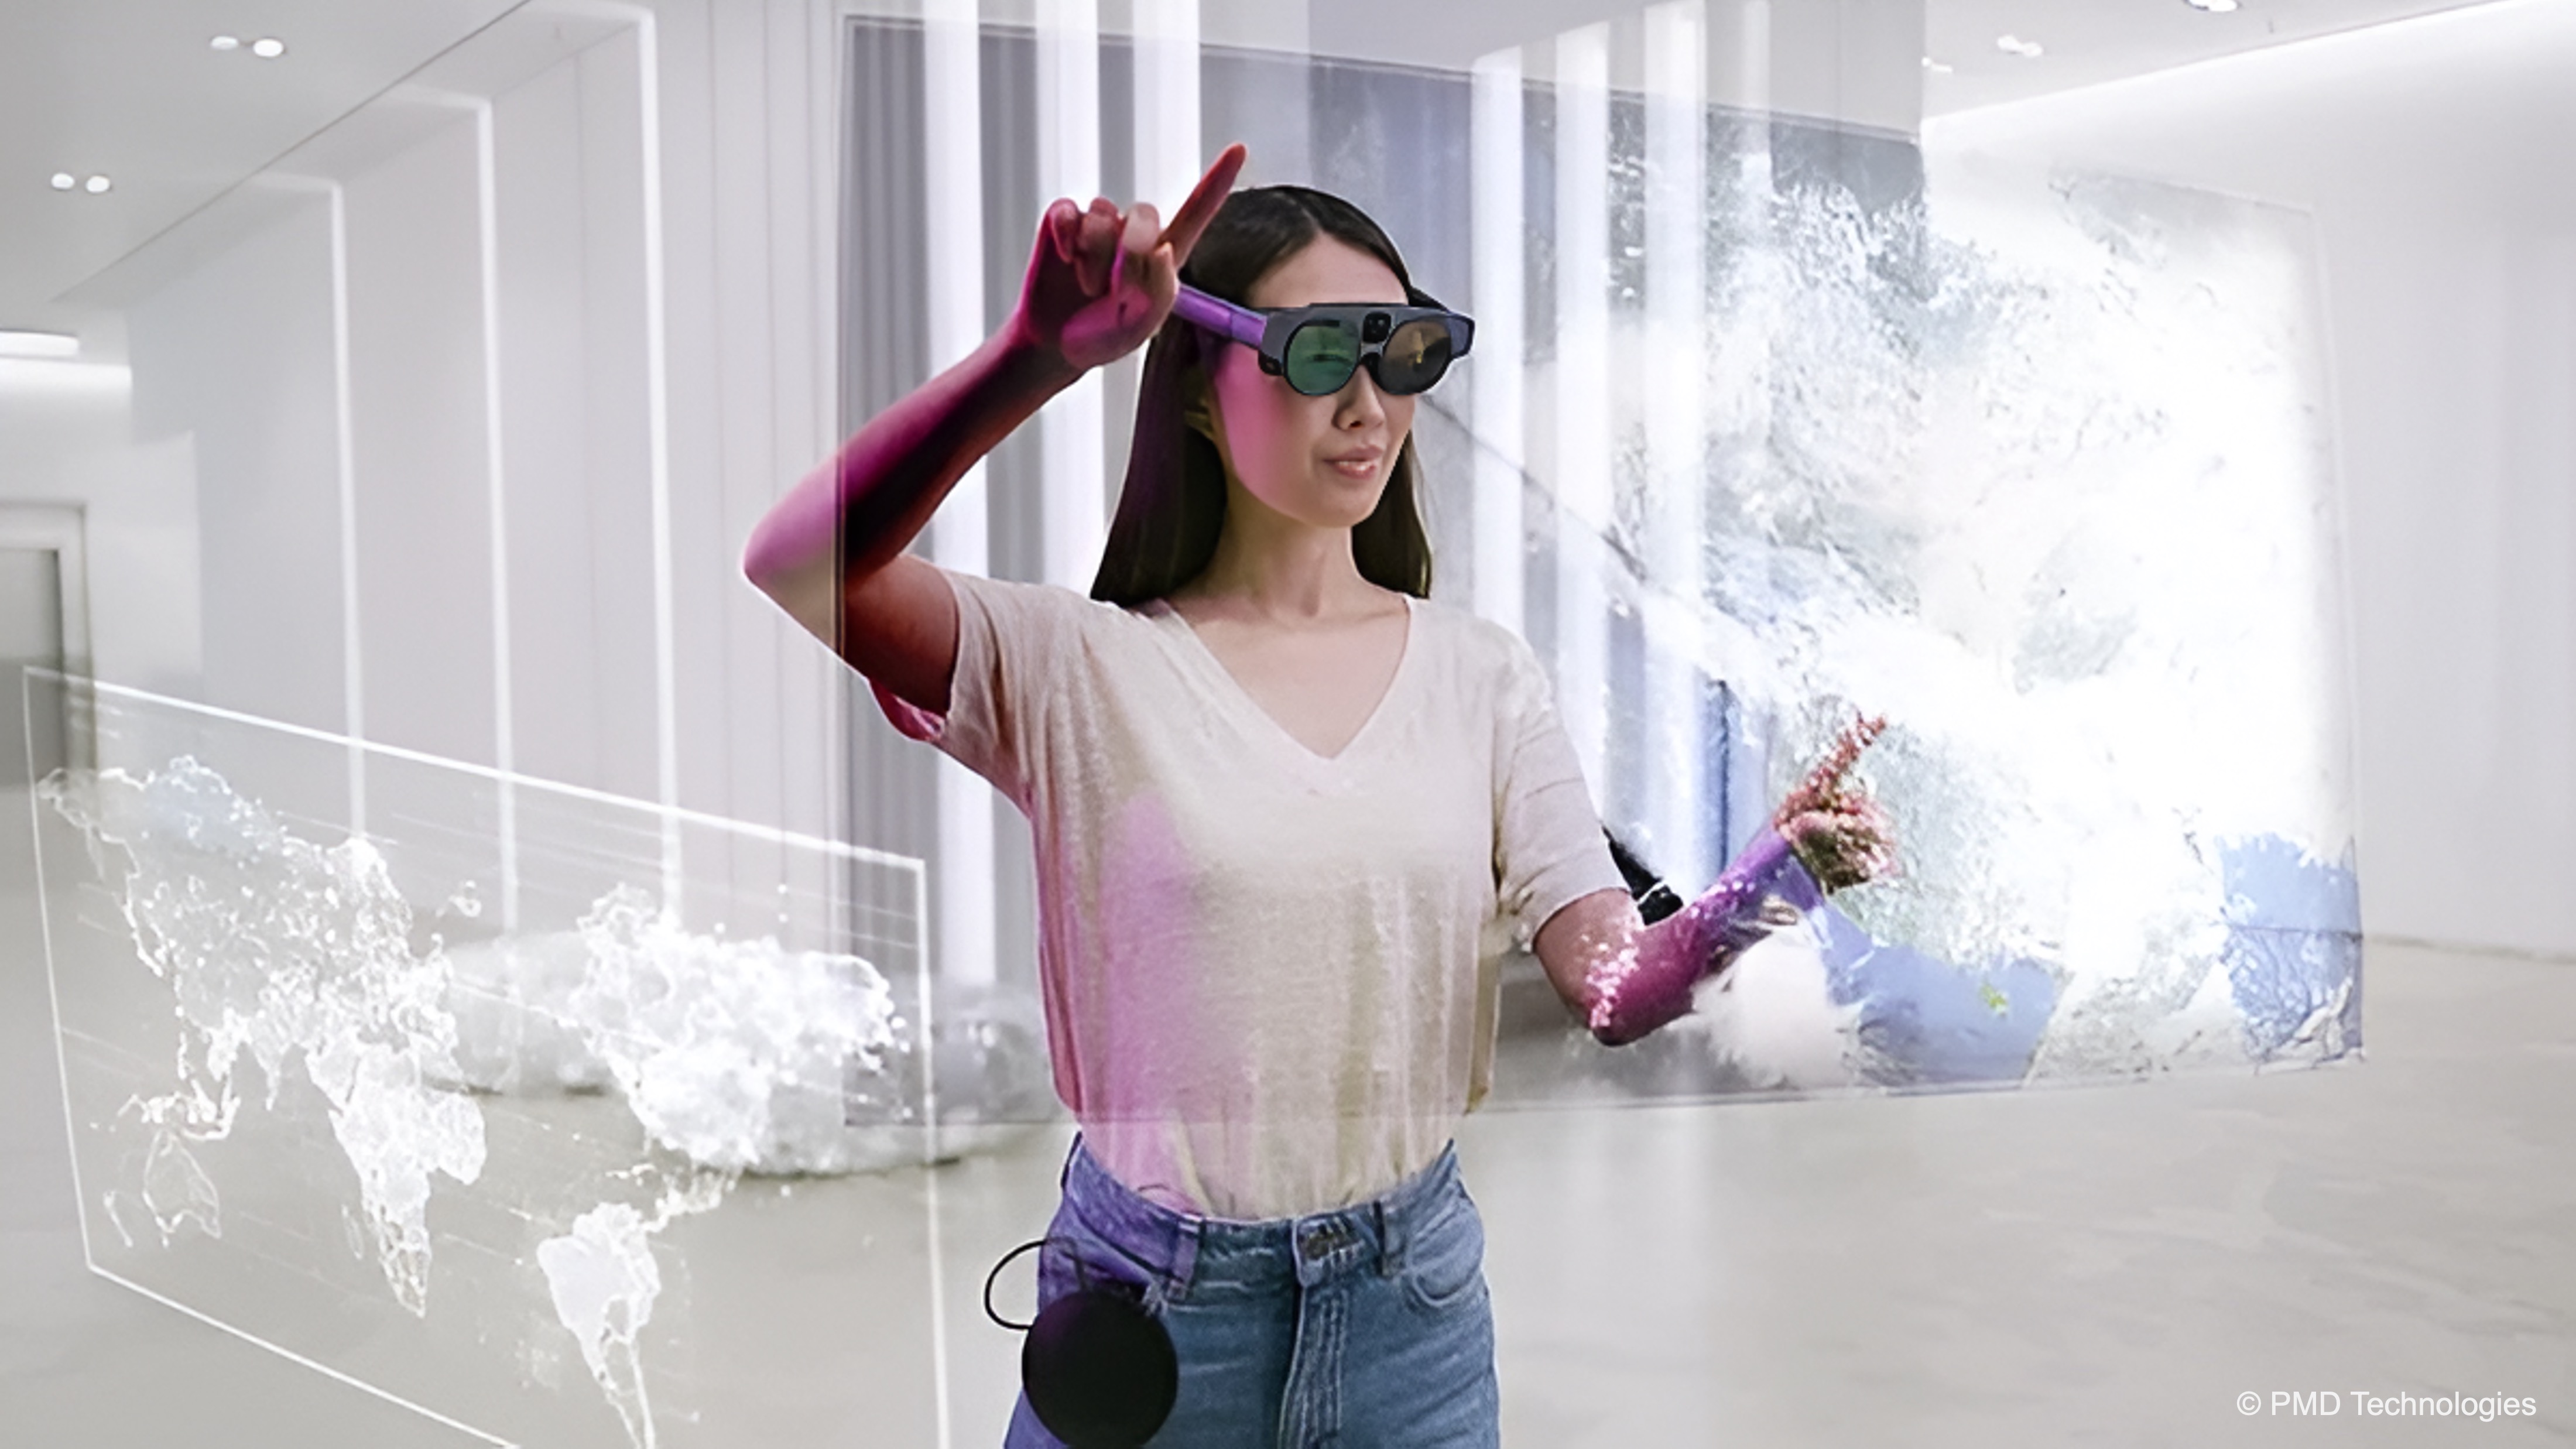
Multimodal input refers to the use of multiple simultaneous or interchangeable input methods—such as voice commands, hand gestures, eye gaze, and physical controllers—to interact with augmented content in spatial AR environments. Multimodal interaction matters because it enables more natural, intuitive, and efficient communication between users and AR systems, empowering users to act in ways that best fit the context, their physical capabilities, or environmental constraints. By combining inputs intelligently, developers can create adaptive, context-aware interfaces that respond fluidly to user intent and elevate the overall immersive experience.
Definitions
-
Multimodal Input: The integration of two or more distinct input methods—such as gesture, speech, gaze, or controller—into a single interactive system. In AR, this allows users to combine inputs (e.g., look and speak) or switch fluidly between them to perform tasks in the most convenient way, enhancing interaction flexibility and reducing effort in complex tasks.
-
Input Modality: A specific channel or method through which a user provides input to the system, such as visual (gaze), auditory (voice), or tactile (gesture). Each modality engages different human senses or motor skills, and their combination can increase input flexibility and reduce cognitive effort, ultimately enhancing the user’s control and interaction experience.
-
Natural User Interface (NUI): An interface paradigm that leverages natural human behaviors and expressions (like talking, pointing, or looking) for input. NUIs aim to reduce the abstraction between user intent and system recognition, making AR interactions feel more organic, thus improving usability by aligning with how users naturally interact with the world.
-
Intent Recognition: The system’s ability to infer what the user wants to do based on multimodal cues. Accurate intent recognition is critical for delivering responsive and intuitive AR experiences, especially when inputs are imprecise or ambiguous, ensuring that the system can act in alignment with the user’s expectations even in dynamic environments.
-
Sensor Fusion: The technique of combining data from multiple input sensors—such as depth cameras, microphones, and eye trackers—to create a more accurate and reliable understanding of user actions. Sensor fusion improves robustness, reduces ambiguity, and helps disambiguate conflicting signals across modalities, leading to more precise interactions and improved system reliability.
-
Context-Aware Input: Input that is interpreted with awareness of the surrounding environment, user activity, and system state. For example, a voice command may behave differently if the user is looking at a specific object, making the interaction more relevant and precise, and adapting the system’s response based on real-time situational factors.
-
Input Synchronization: The temporal coordination of multiple input signals that are meant to be interpreted together. For instance, when a user says “place here” while pointing, the system must link the speech with the gesture in time to determine the correct action, ensuring the system’s response aligns perfectly with the user’s intended interaction.
Design Principles
-
Complementarity: Modalities should enhance one another by covering each other’s weaknesses—e.g., using gaze for selection and voice for confirmation creates a more efficient input method than using either alone, leveraging the strengths of each modality to create a more intuitive and seamless experience.
-
Redundancy: Critical interactions should be accessible through multiple modalities so that users can choose the most convenient method—e.g., voice or gesture for the same command—especially important in variable environments, ensuring that users are not hindered by environmental constraints like noise or physical limitations.
-
Contextual Appropriateness: Modalities must suit the context of use. For instance, in a noisy factory, gesture might be preferred over voice, while in hands-busy scenarios, gaze or voice becomes more practical, ensuring that the chosen modality optimally matches the user’s environment and task at hand.
-
Responsiveness and Latency: Multimodal systems must process input quickly and synchronize responses to maintain immersion. Even slight delays can break user flow or cause confusion in high-tempo tasks, so the system must prioritize low latency to preserve smooth, real-time interaction.
-
Learnability and Intuitiveness: Inputs should align with user expectations and mimic real-world behaviors where possible. For example, reaching to grab a hologram should mimic the physical motion of grabbing an object, ensuring that the interaction feels natural and requires minimal effort to understand and use.
-
Error Tolerance and Recovery: The system must gracefully handle missed or incorrect inputs and provide users with clear feedback and options to retry or cancel actions without friction, helping to avoid frustration and ensuring users can quickly get back on track.
-
Modality Independence and Switching: Users should be able to switch seamlessly between input modes depending on preference or circumstance. This flexibility supports accessibility and enables more personalized interaction styles, giving users greater control over how they engage with the system.
Controllers
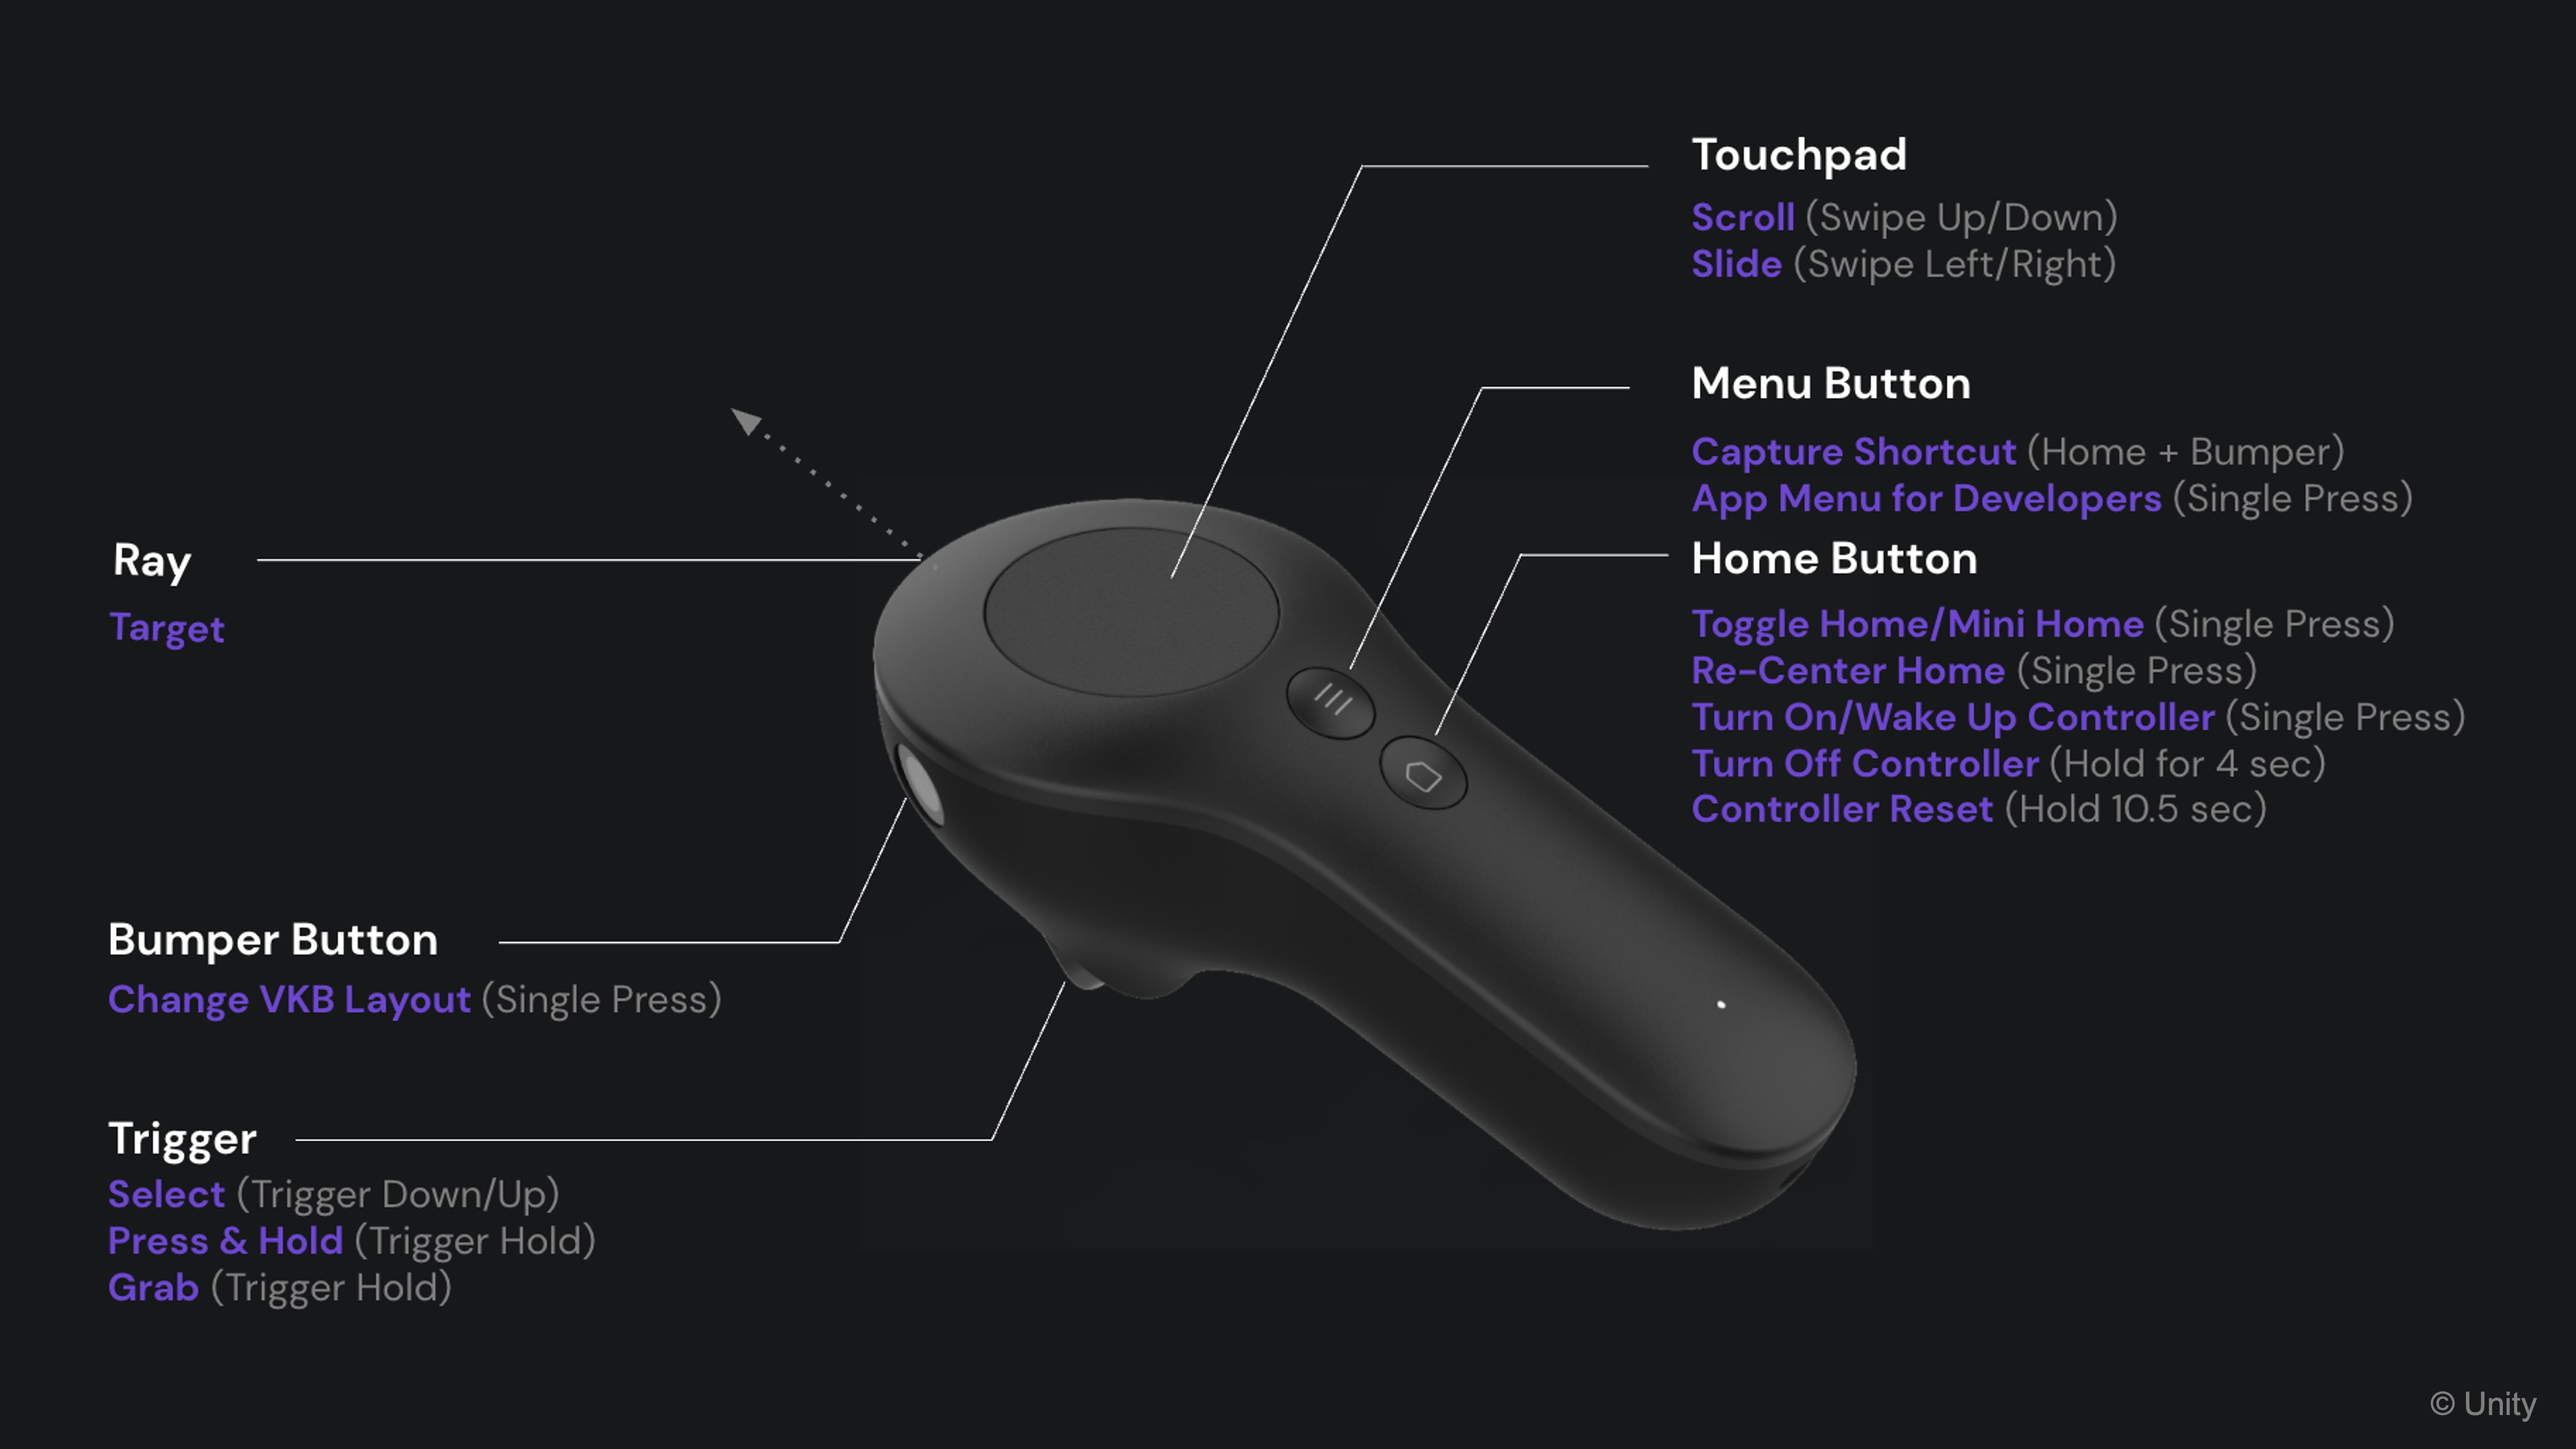
Controllers are handheld input devices that provide precise, tactile interaction in spatial AR environments. These devices are essential in spatial AR systems, enabling users to interact with virtual objects using hardware buttons, motion sensors, and touch interfaces. Controllers offer more stability and fine control compared to hands-free methods like gesture or gaze input—especially in environments where precision and reliability are critical, such as engineering applications. In Magic Leap 2, the controller is especially useful for interacting with spatial elements in augmented environments. The Magic Leap 2 controller has five main controls:
- Touchpad: Supports position sensing, pressure, and gestures like tap, swipe, and scroll.
- Bumper: A digital button with a click action.
- Trigger: An analog input (value ranges from 0–1) for variable control (e.g., scaling objects).
- Menu Button: Application-defined use for toggling interfaces or switching modes.
- Home Button: Reserved by the system for exiting the app (not available for custom use). While the Home Button is not available for customization, all other inputs—including controller pose (position and rotation), button presses, and gestures—can be accessed at runtime and mapped to drive complex application logic.
Core Concepts
-
MagicLeapInputs: AnInput Action Assetthat contains mappings for Magic Leap 2 controller, HMD pose tracking, eye tracking, and hand gestures. It centralizes all supported input modalities for use in your Unity application. -
ControllerActions: A sub-object ofMagicLeapInputsthat specifically provides access to controller-related actions such as button presses, touchpad gestures, trigger values, and pose tracking. -
InputAction.CallbackContext: A data structure passed to input event handler methods. It contains context about the input event—such as timing, value, and control state—that can be used to drive in-app interactions. -
Enable()/Disable(): Lifecycle methods used to start and stop the input system. CallingEnable()begins listening for input events, whileDisable()suspends input processing. -
Performed,Canceled,Started: These are the phases of an input action’s lifecycle.Startedis triggered when an input begins (e.g., trigger pulled slightly),Performedis triggered when the action completes (e.g., button fully pressed), andCanceledoccurs when the input is interrupted or incomplete.
Review this Magic Leap documentation to learn more about the controller.
Controller Components
The Controller GameObject of Magic Leap 2’s ML Rig is preconfigured with components that handle tracking, input, ray-based interactions, and visual feedback using Unity’s XR Interaction Toolkit and Magic Leap Input System. This GameObject represents the user’s physical controller in the virtual environment. It includes the following critical components:
-
Tracked Pose Driver (Input System): This component ensures the virtual controller accurately reflects your real-world movement. It tracks the position and rotation of the controller using Unity’s Input System. Make sure bothPositionandRotationare enabled.Update Typeshould generally be set toUpdateorUpdate and Before Renderfor smooth tracking.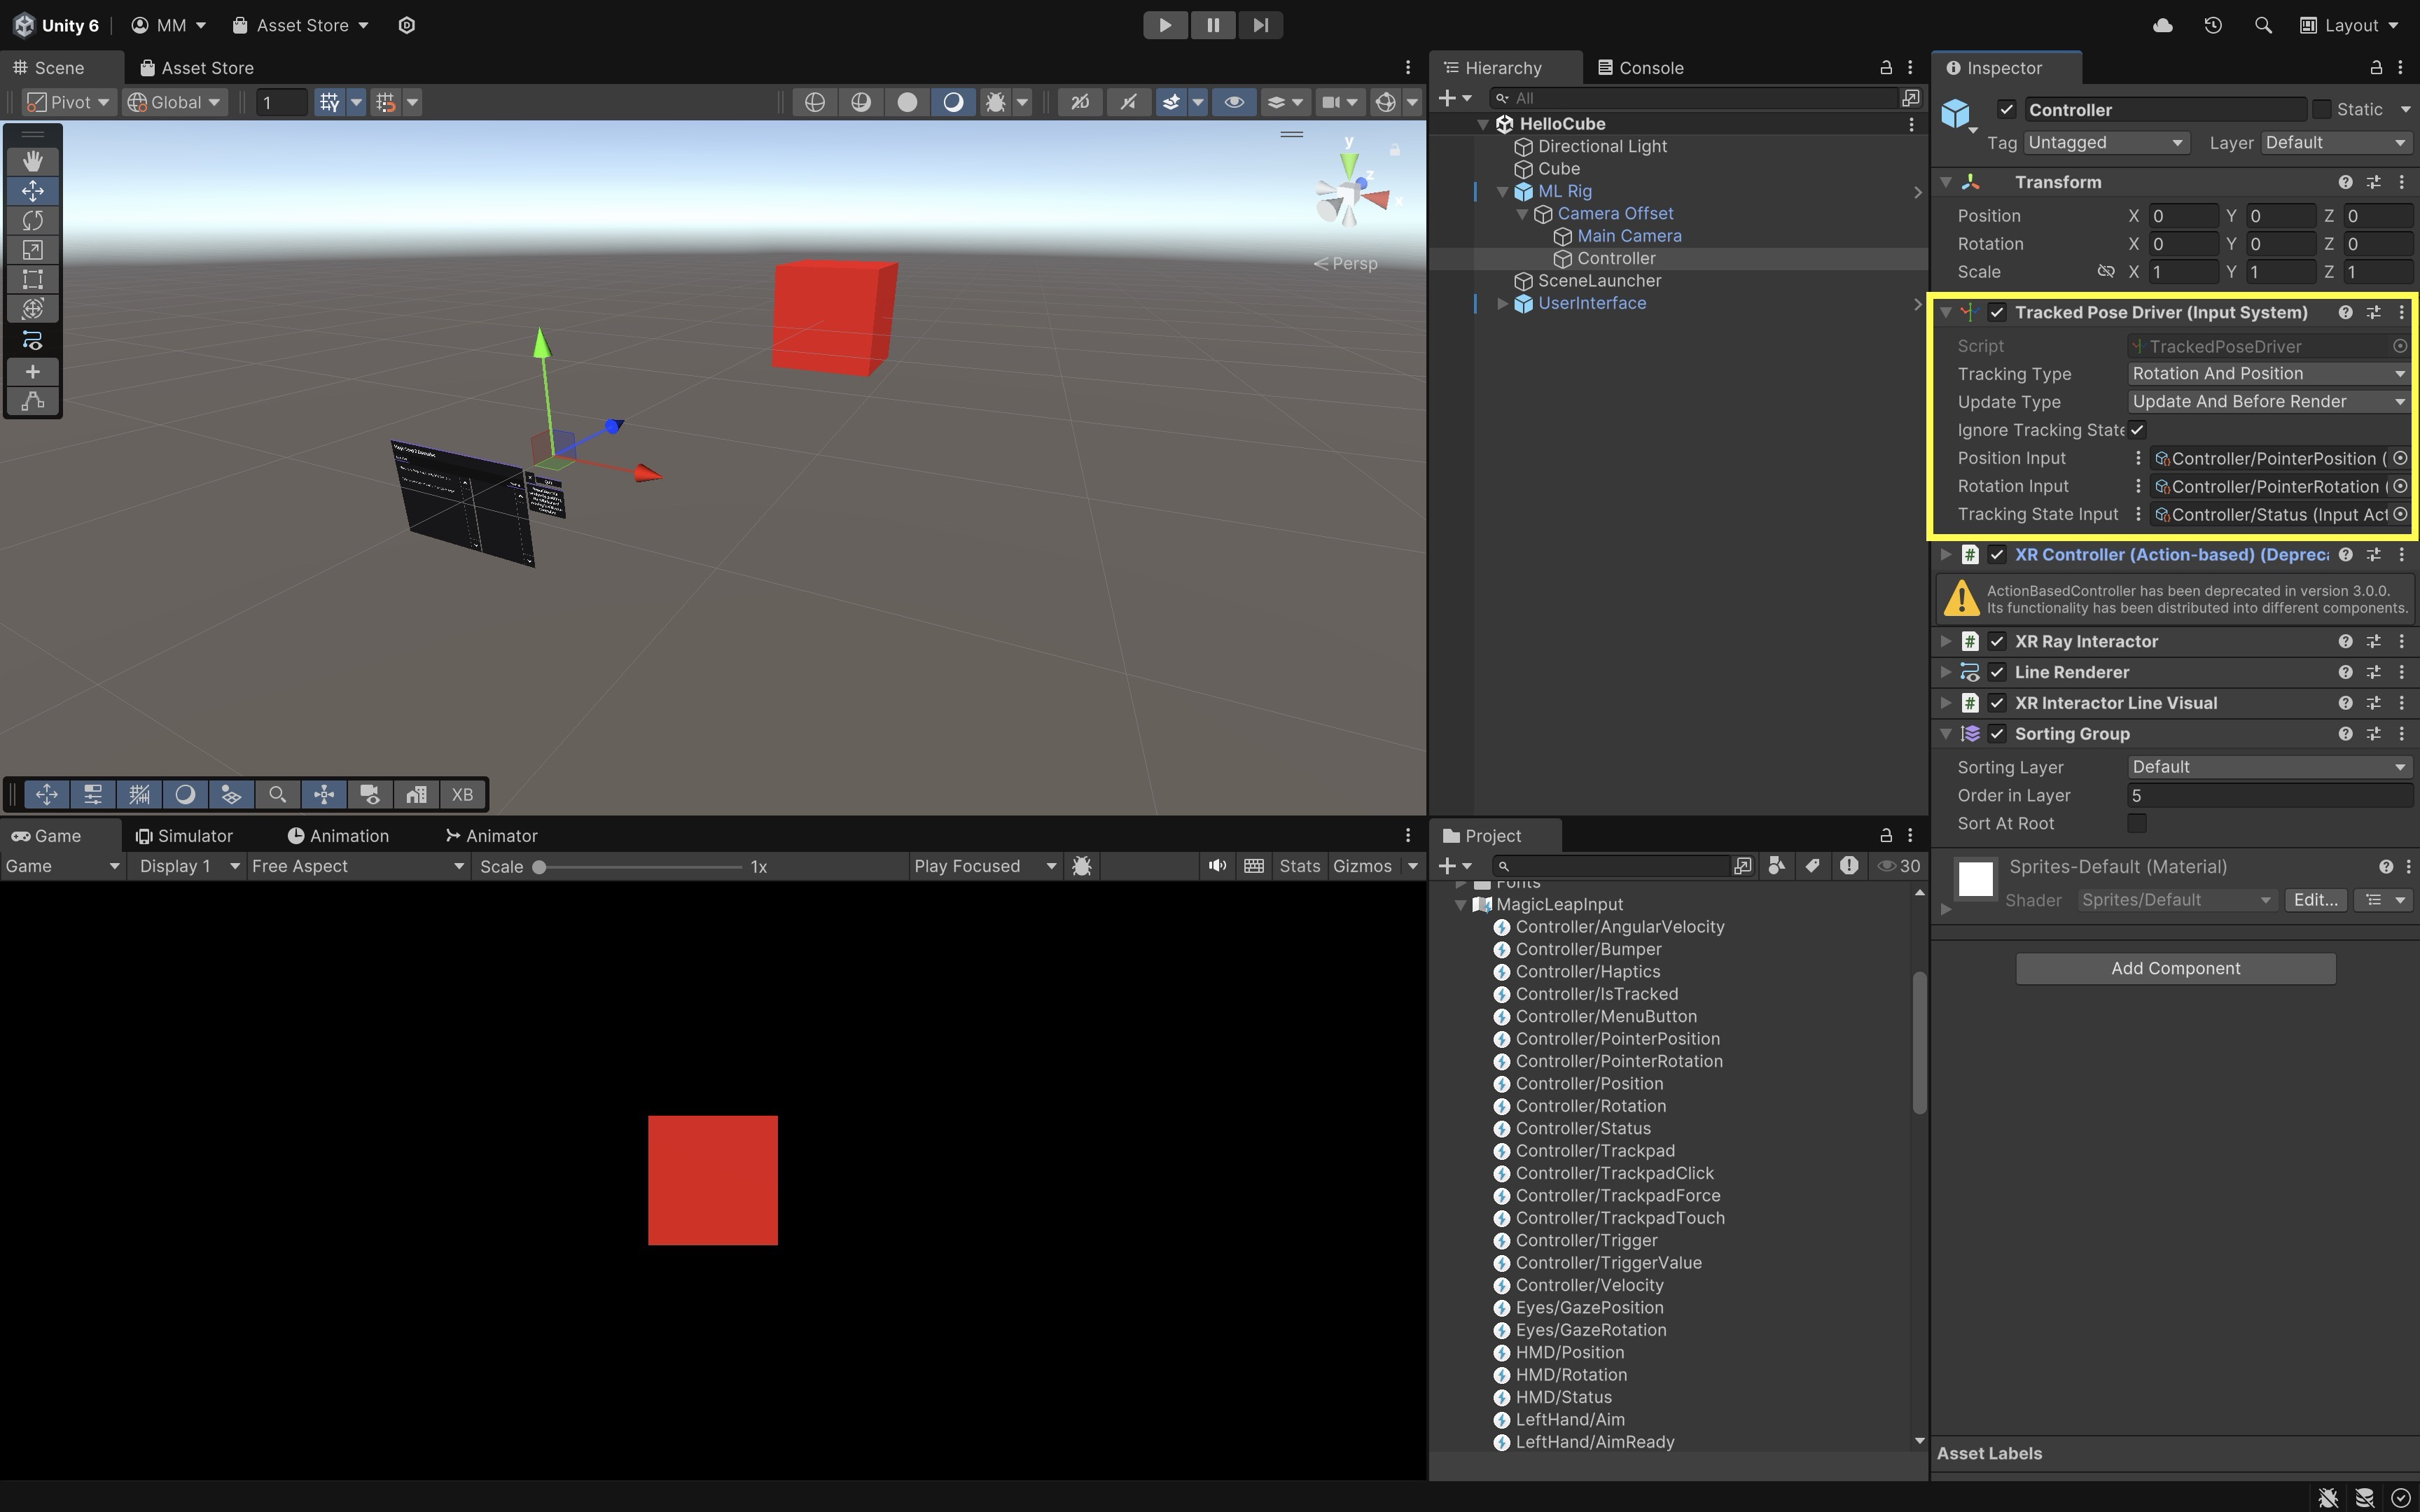
-
XR Controller (Action-based): This component enables logic for “what should happen when the trigger is pulled or the bumper is pressed.” It manages input bindings (trigger, bumper, touchpad, etc.) using Unity’s Input System.Select Actionis often mapped toTrigger.Activate Actionis optionally mapped toBumper.UI Press Actionis optional for UI elements. It uses theMagicLeapInputsasset for action definitions.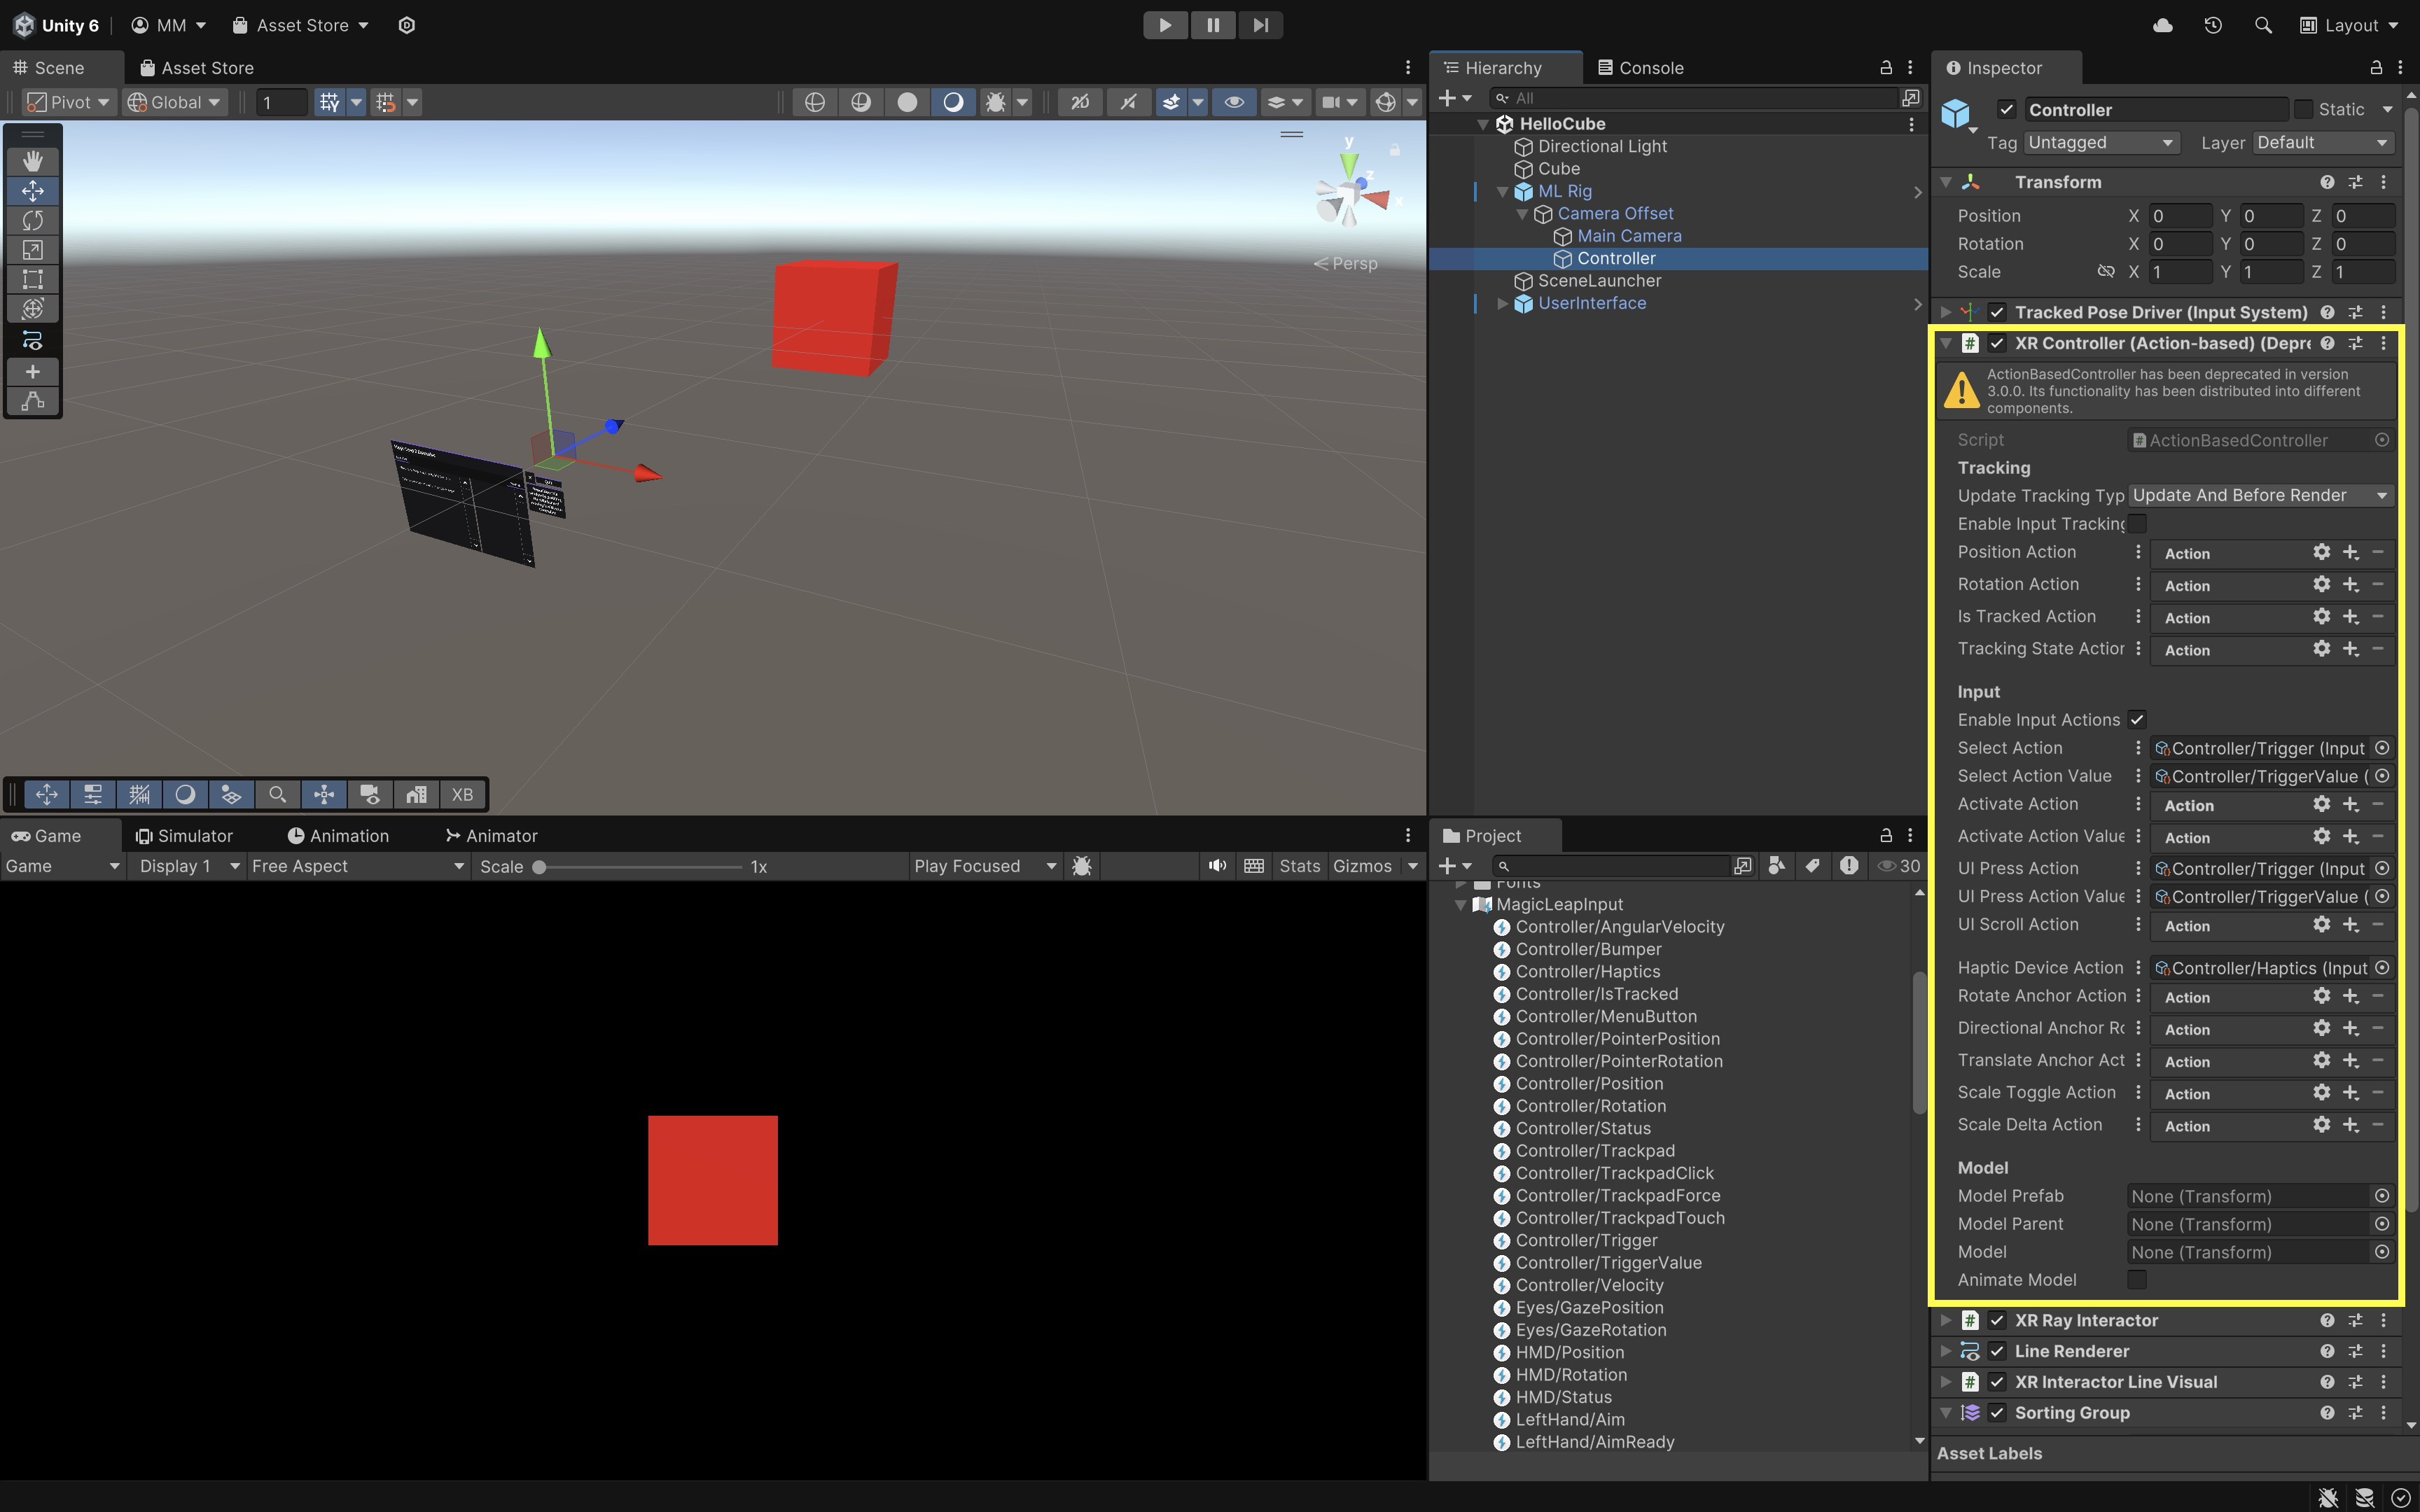
-
XR Ray Interactor: Think of this component as your virtual “finger” — it’s how you point and click in XR. It projects an interactive ray (laser pointer) into the scene for selecting 3D objects or UI.Interaction Layer Maskcontrols which objects the ray can interact with.Raycast Configurationspecifies key settings likeLine TypeandRaycast Mask. Hover and select options are available for targeting objects that useXR Interactablecomponents.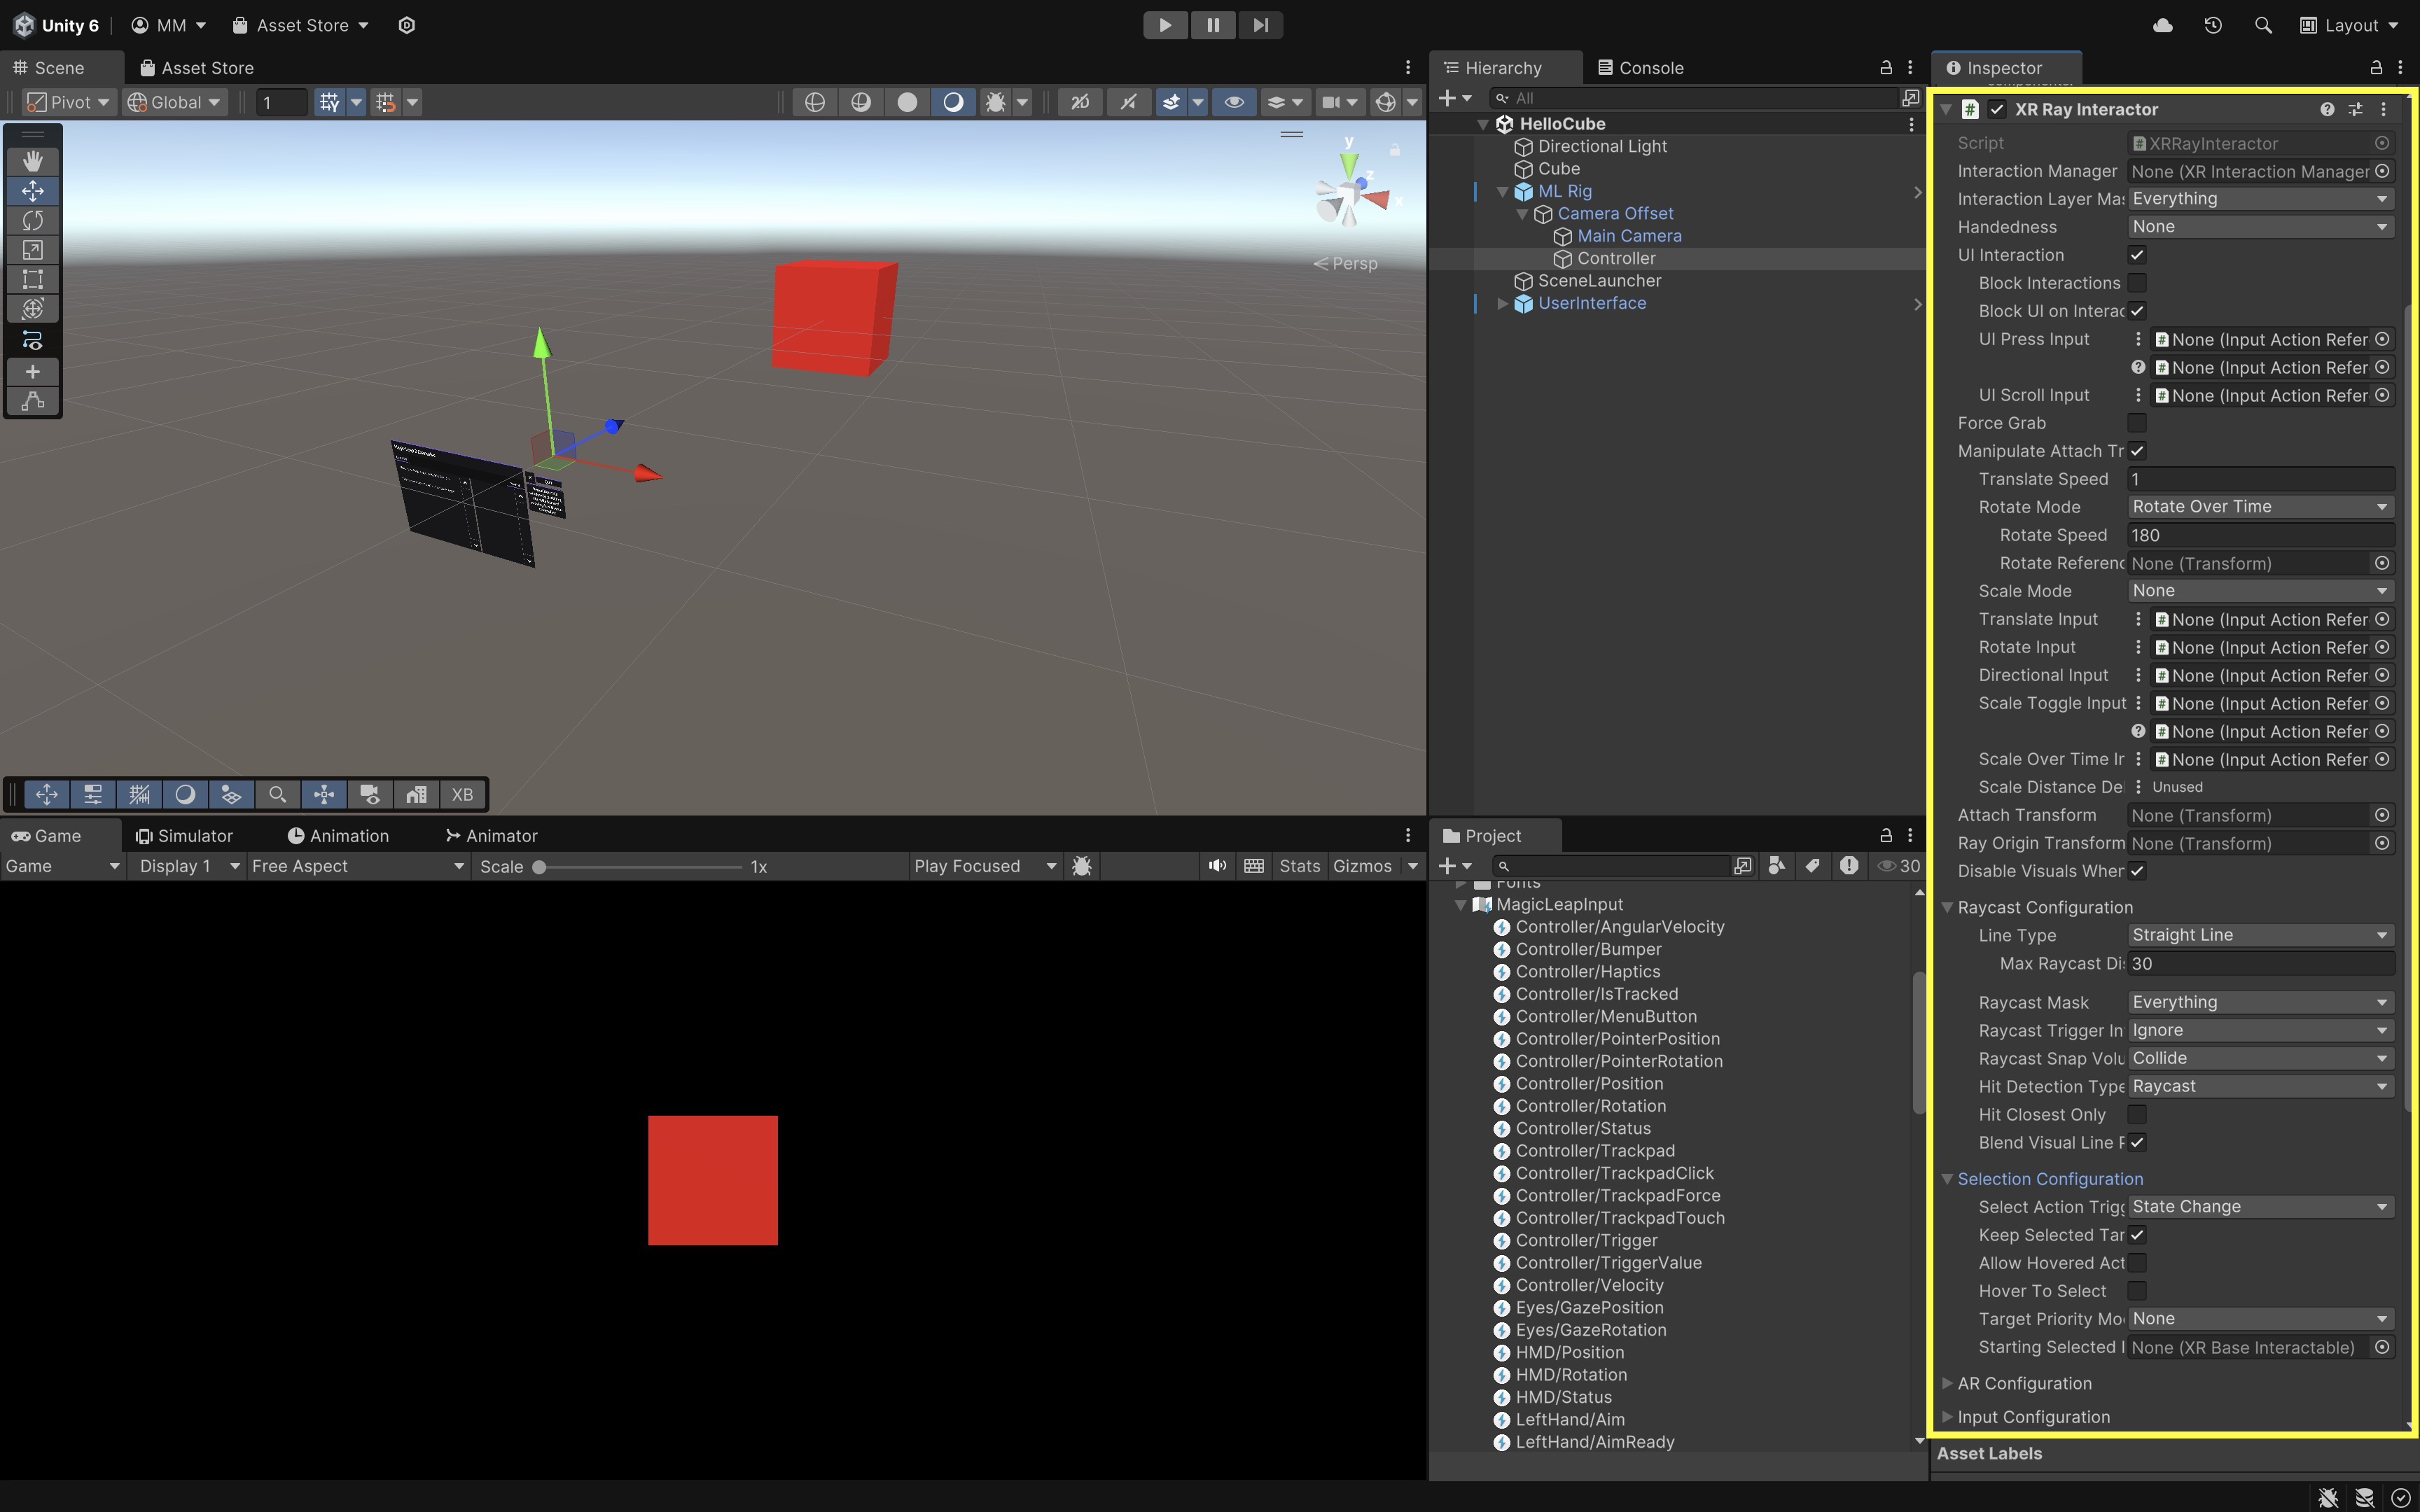
-
Line Renderer: This component is used to display a visible beam from the controller to wherever it’s pointing. It visually renders the line that represents the raycast.Color Gradientadds color transitions or highlighting.Materialcontrols visual appearance (e.g., glowing line).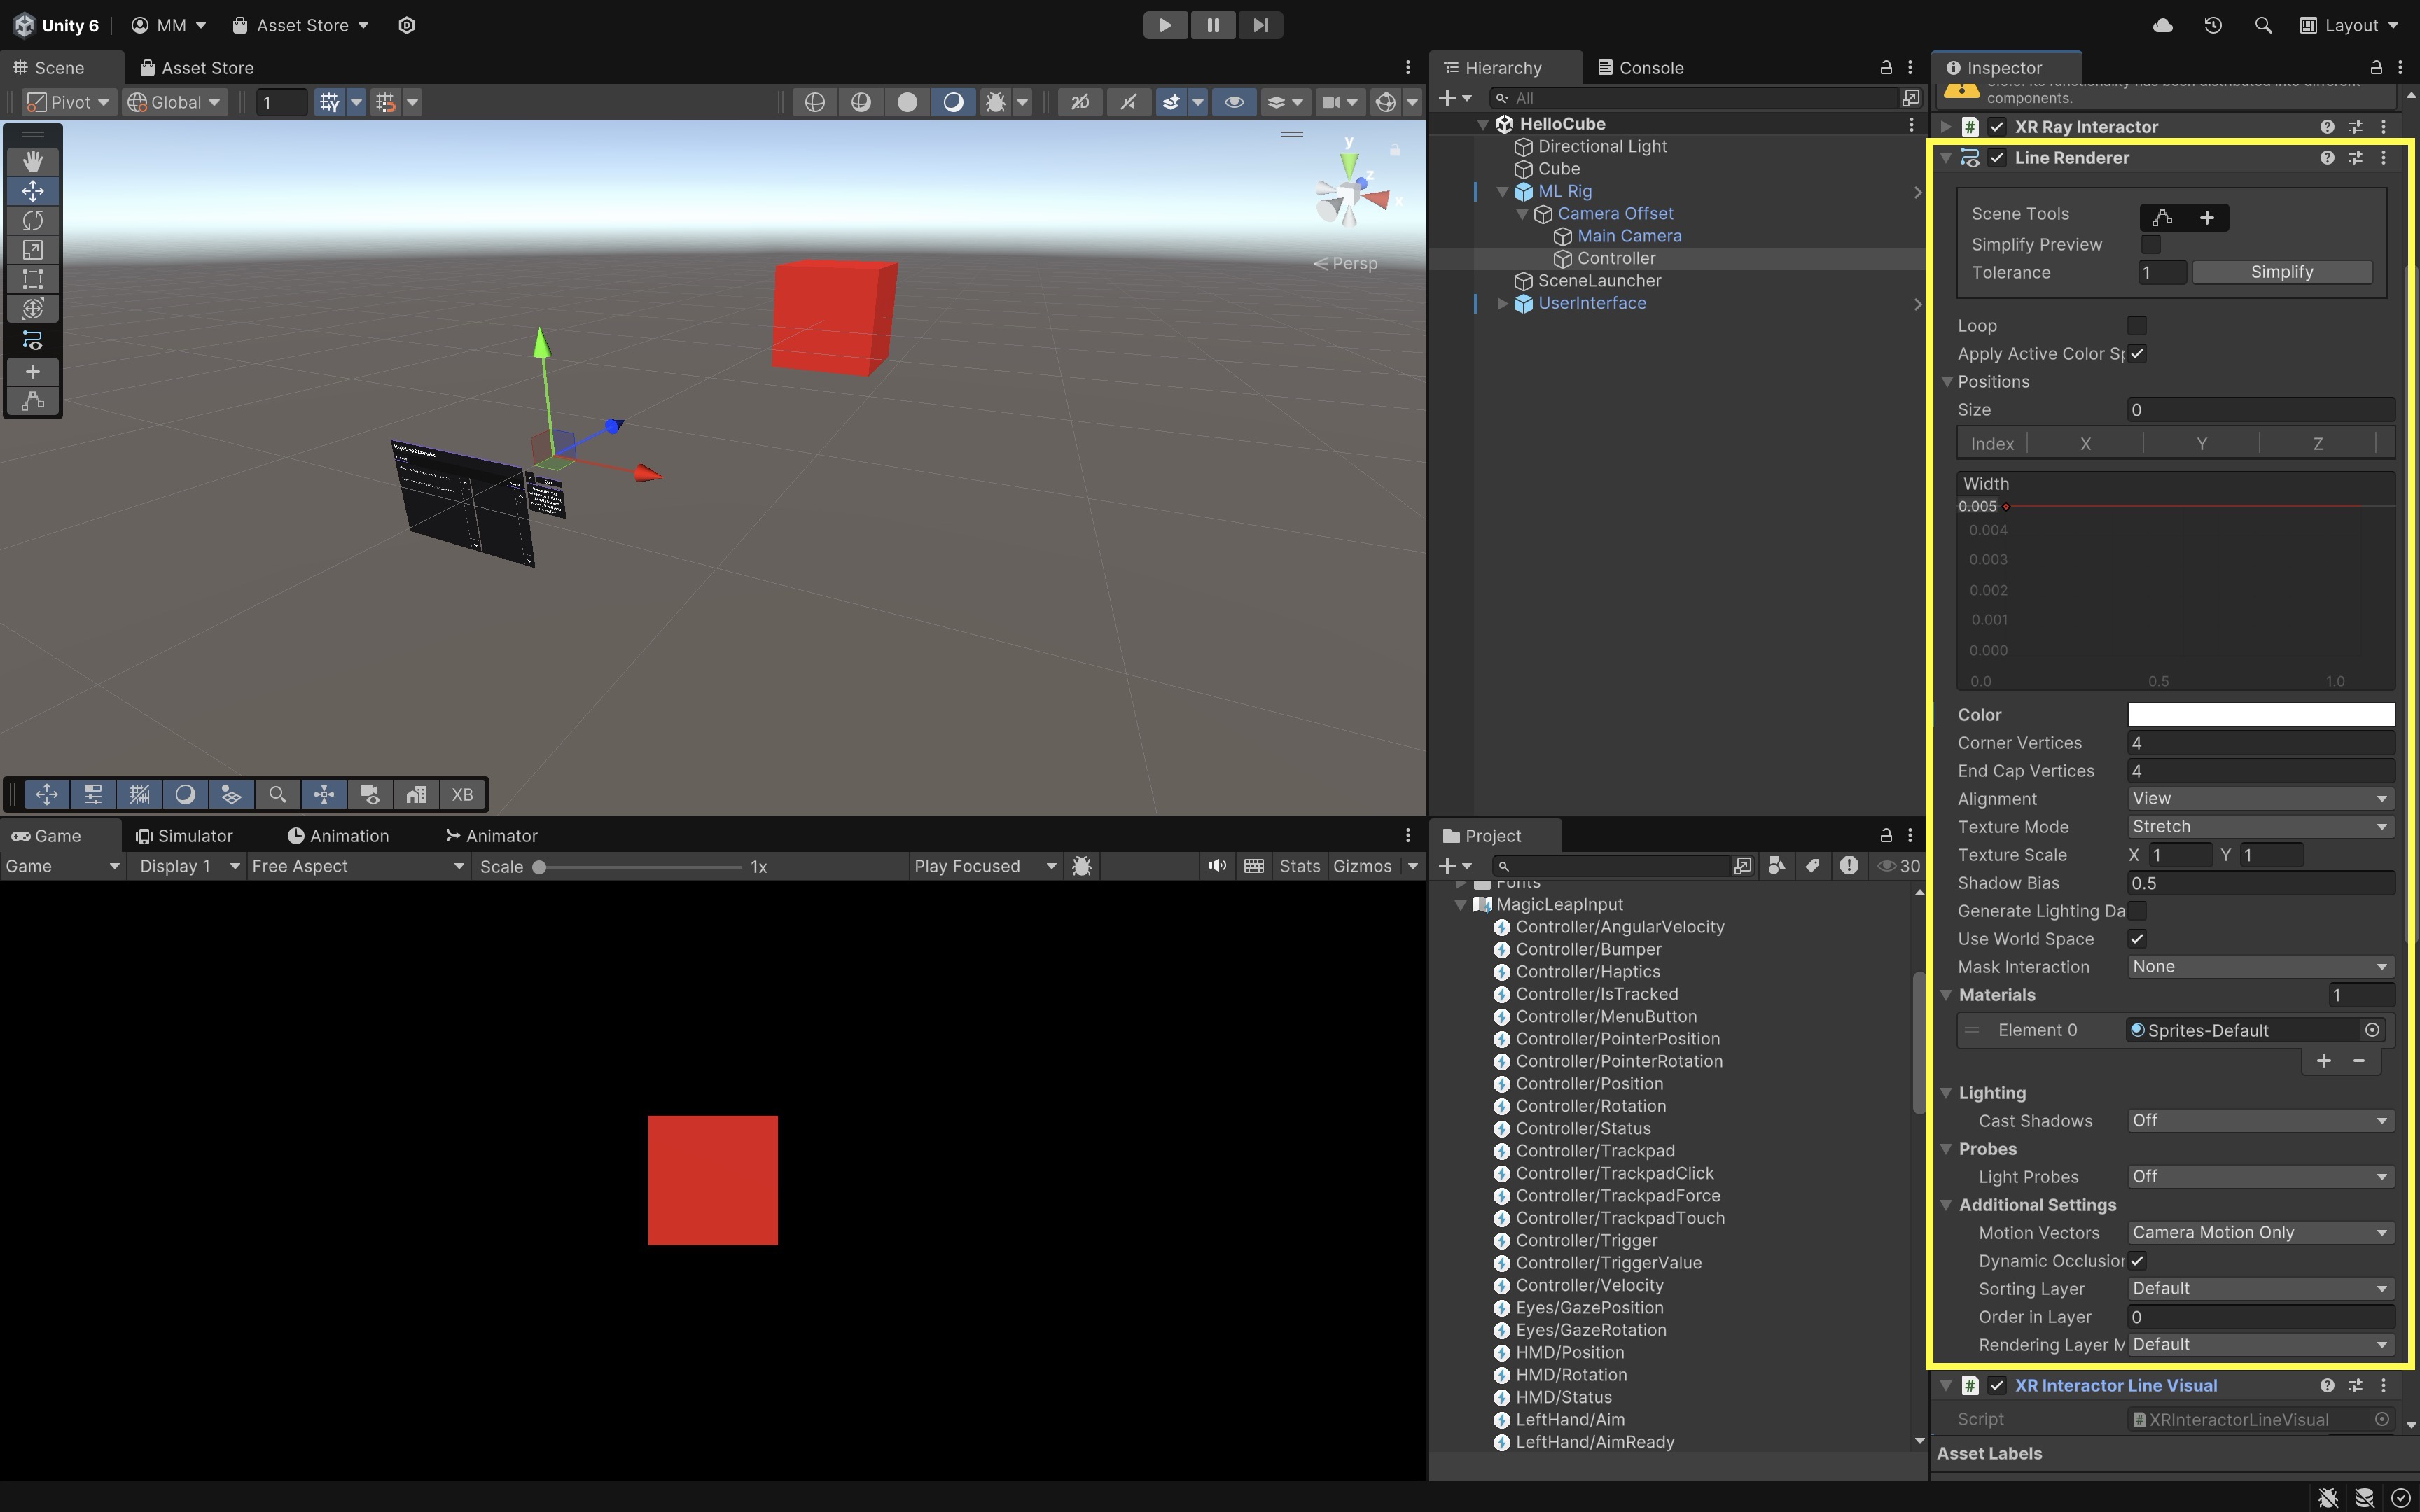
-
XR Interactor Line Visual: This component makes the interaction ray look and feel responsive — it adds polish and feedback to user input. It provides a dynamic and styled visual response to interactions (e.g., when hovering or selecting). Modifies the appearance of the line during interactions. Can enable reticle, fade effects, and hit point visuals. It works in conjunction with theLine RendererandXR Ray Interactor.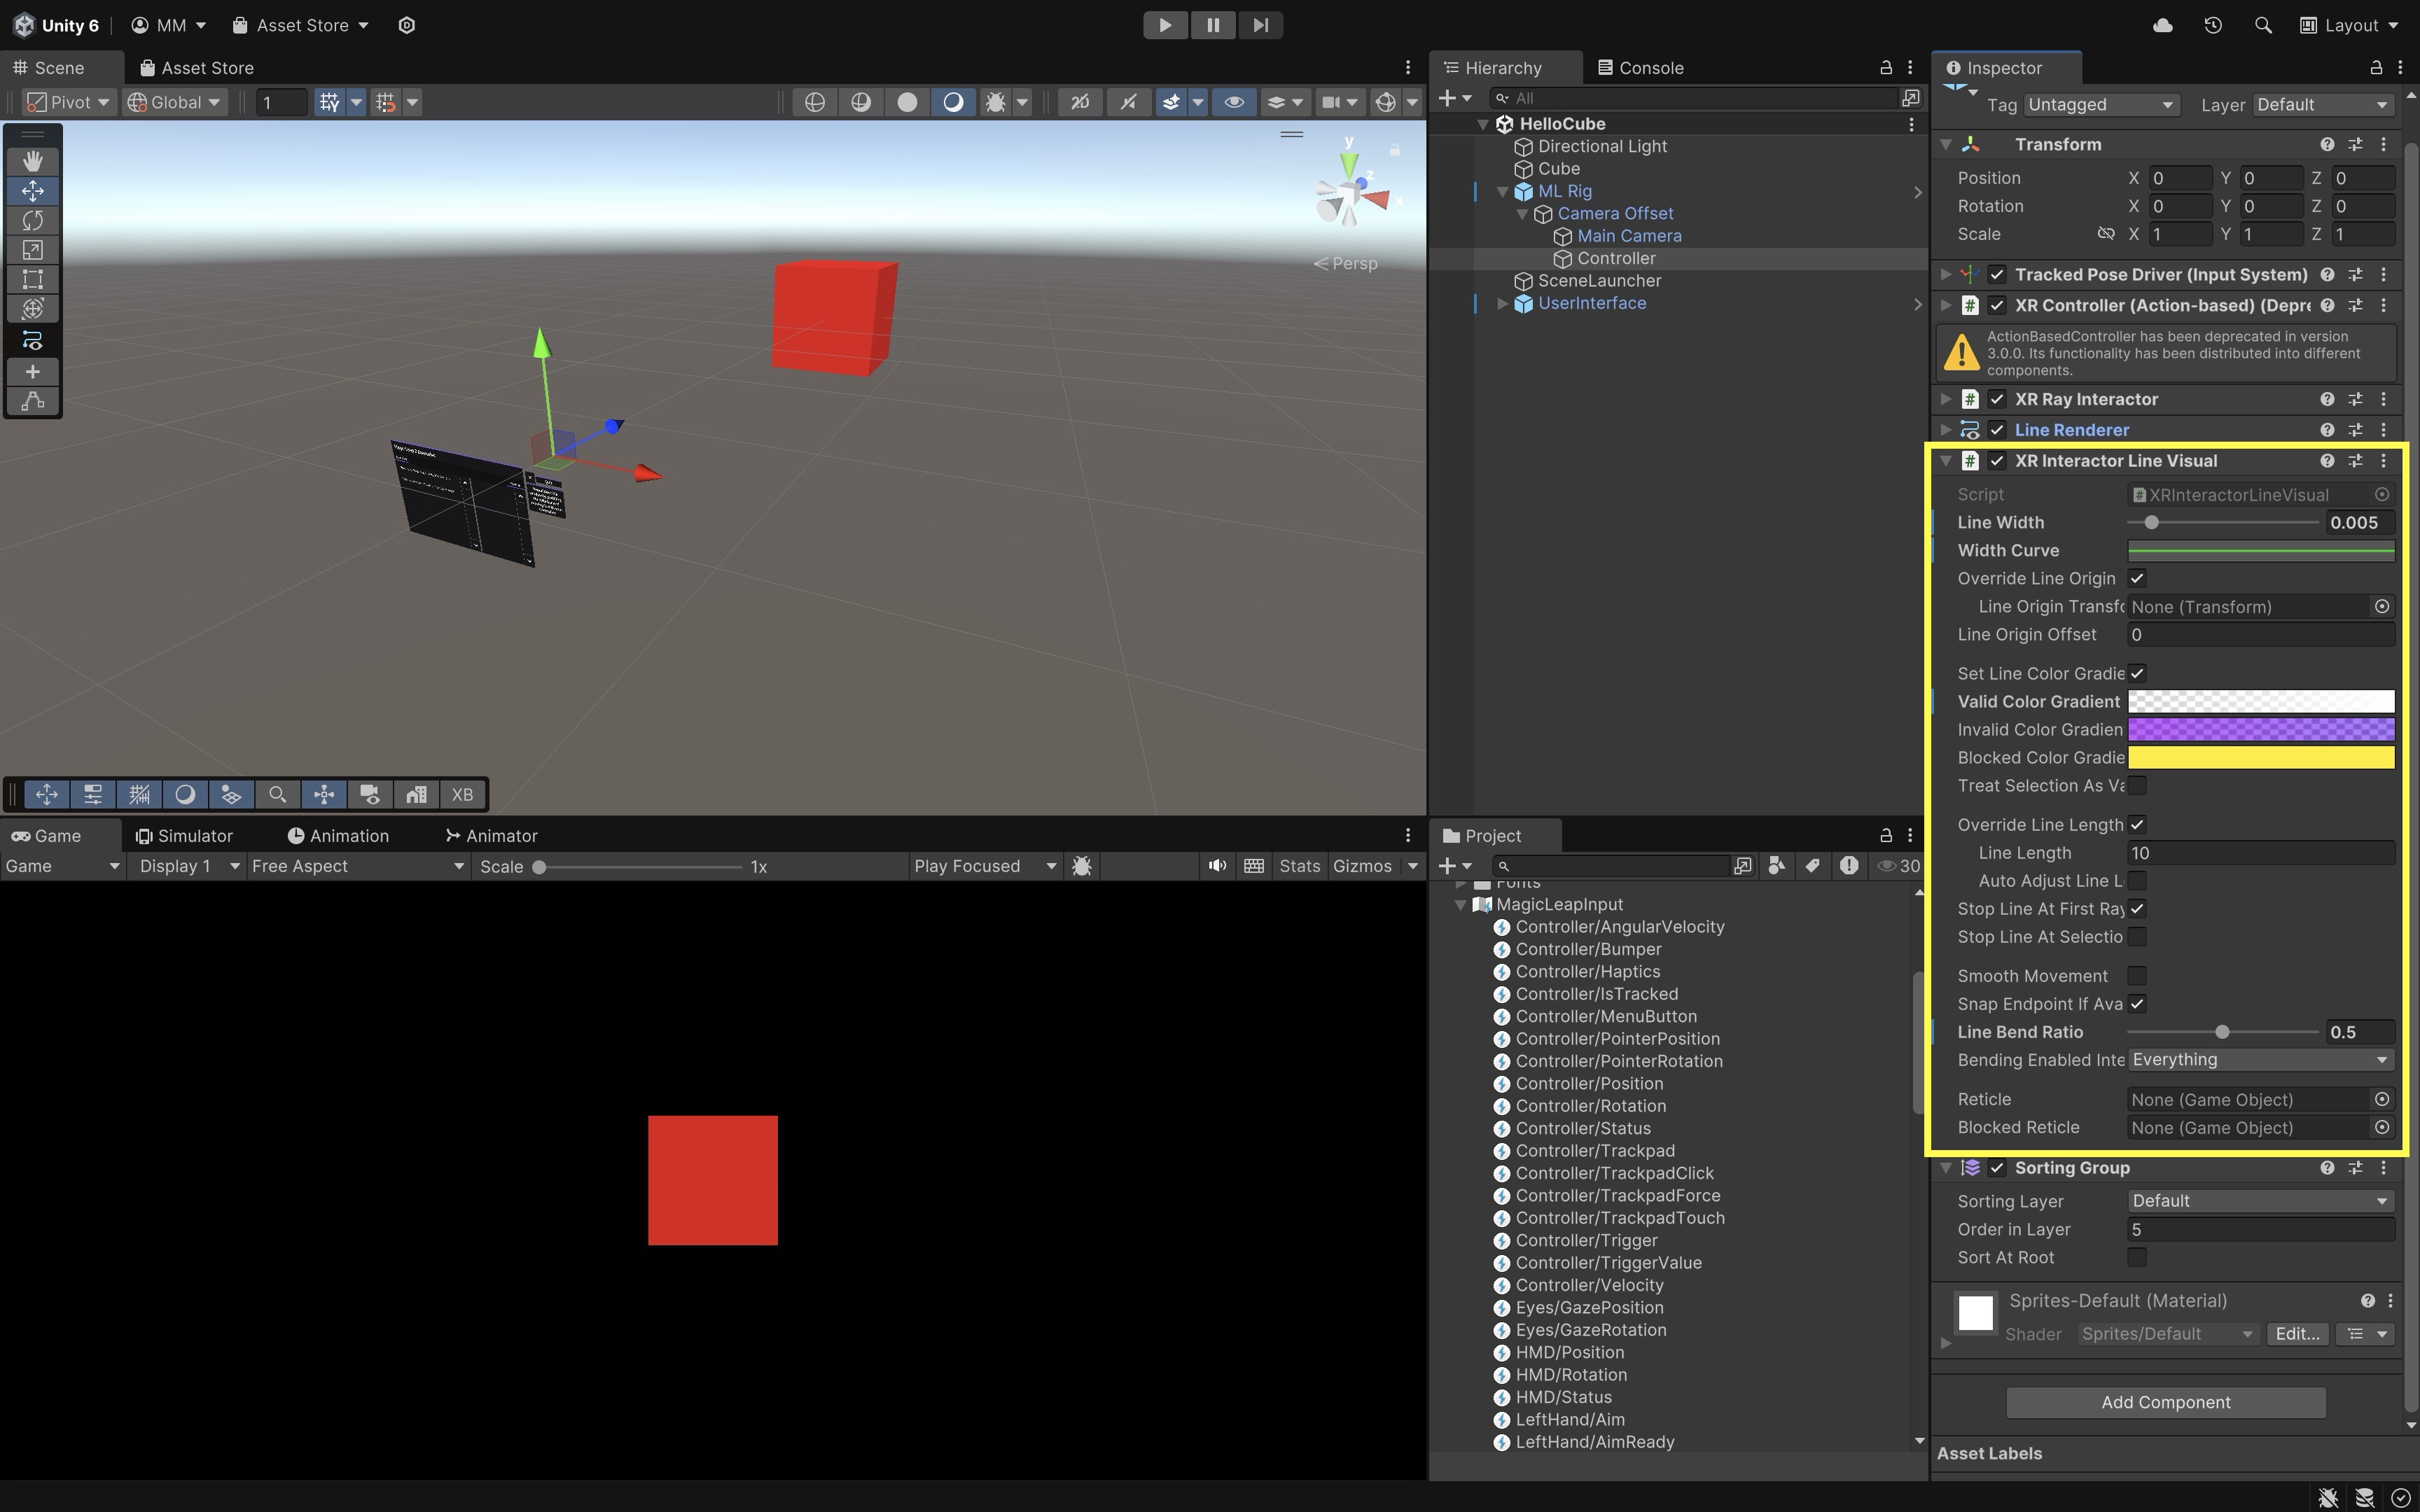
Custom Controller Inputs
Now, let’s use the preconfigured controller in the HelloCube.unity scene to trigger simple visual responses, like changing the color of a drone GameObject, applying a scaling effect, and rotating it using the touchpad. We will use Bumper to apply the scaling effect, Touchpad to rotate the drone based on swipe direction, and Trigger to change the drone’s color, specifically the first material (Element 0) of the Body and Fan Base child objects of the drone. Note that this tutorial assumes you are using the Magic Leap examples project, which includes a ready-to-use XR Rig and controller setup.
- Configure the Scene:
- Open the
HelloCube.unityscene. - Save it as
MultimodalInput.unityinAssets > Scenes > XRE Tutorials. - Remove the
CubeGameObject. - Drag and drop
Drone Assembly InputsfromAssets > Drone > Prefabsinto the scene and place it visibly in front of the camera. The drone will be the target of your controller interactions.
- Open the
- Assign Input Bindings with
MagicLeapInputs:- Open the
MagicLeapInputsassetAssets > MagicLeapInputs.inputactions. - Explore the
Controlleraction map. Triggeris set to analog press input (float value).Bumperis set to digital button press (bool).TouchpadPositionis set to 2D touchpad input (Vector2).
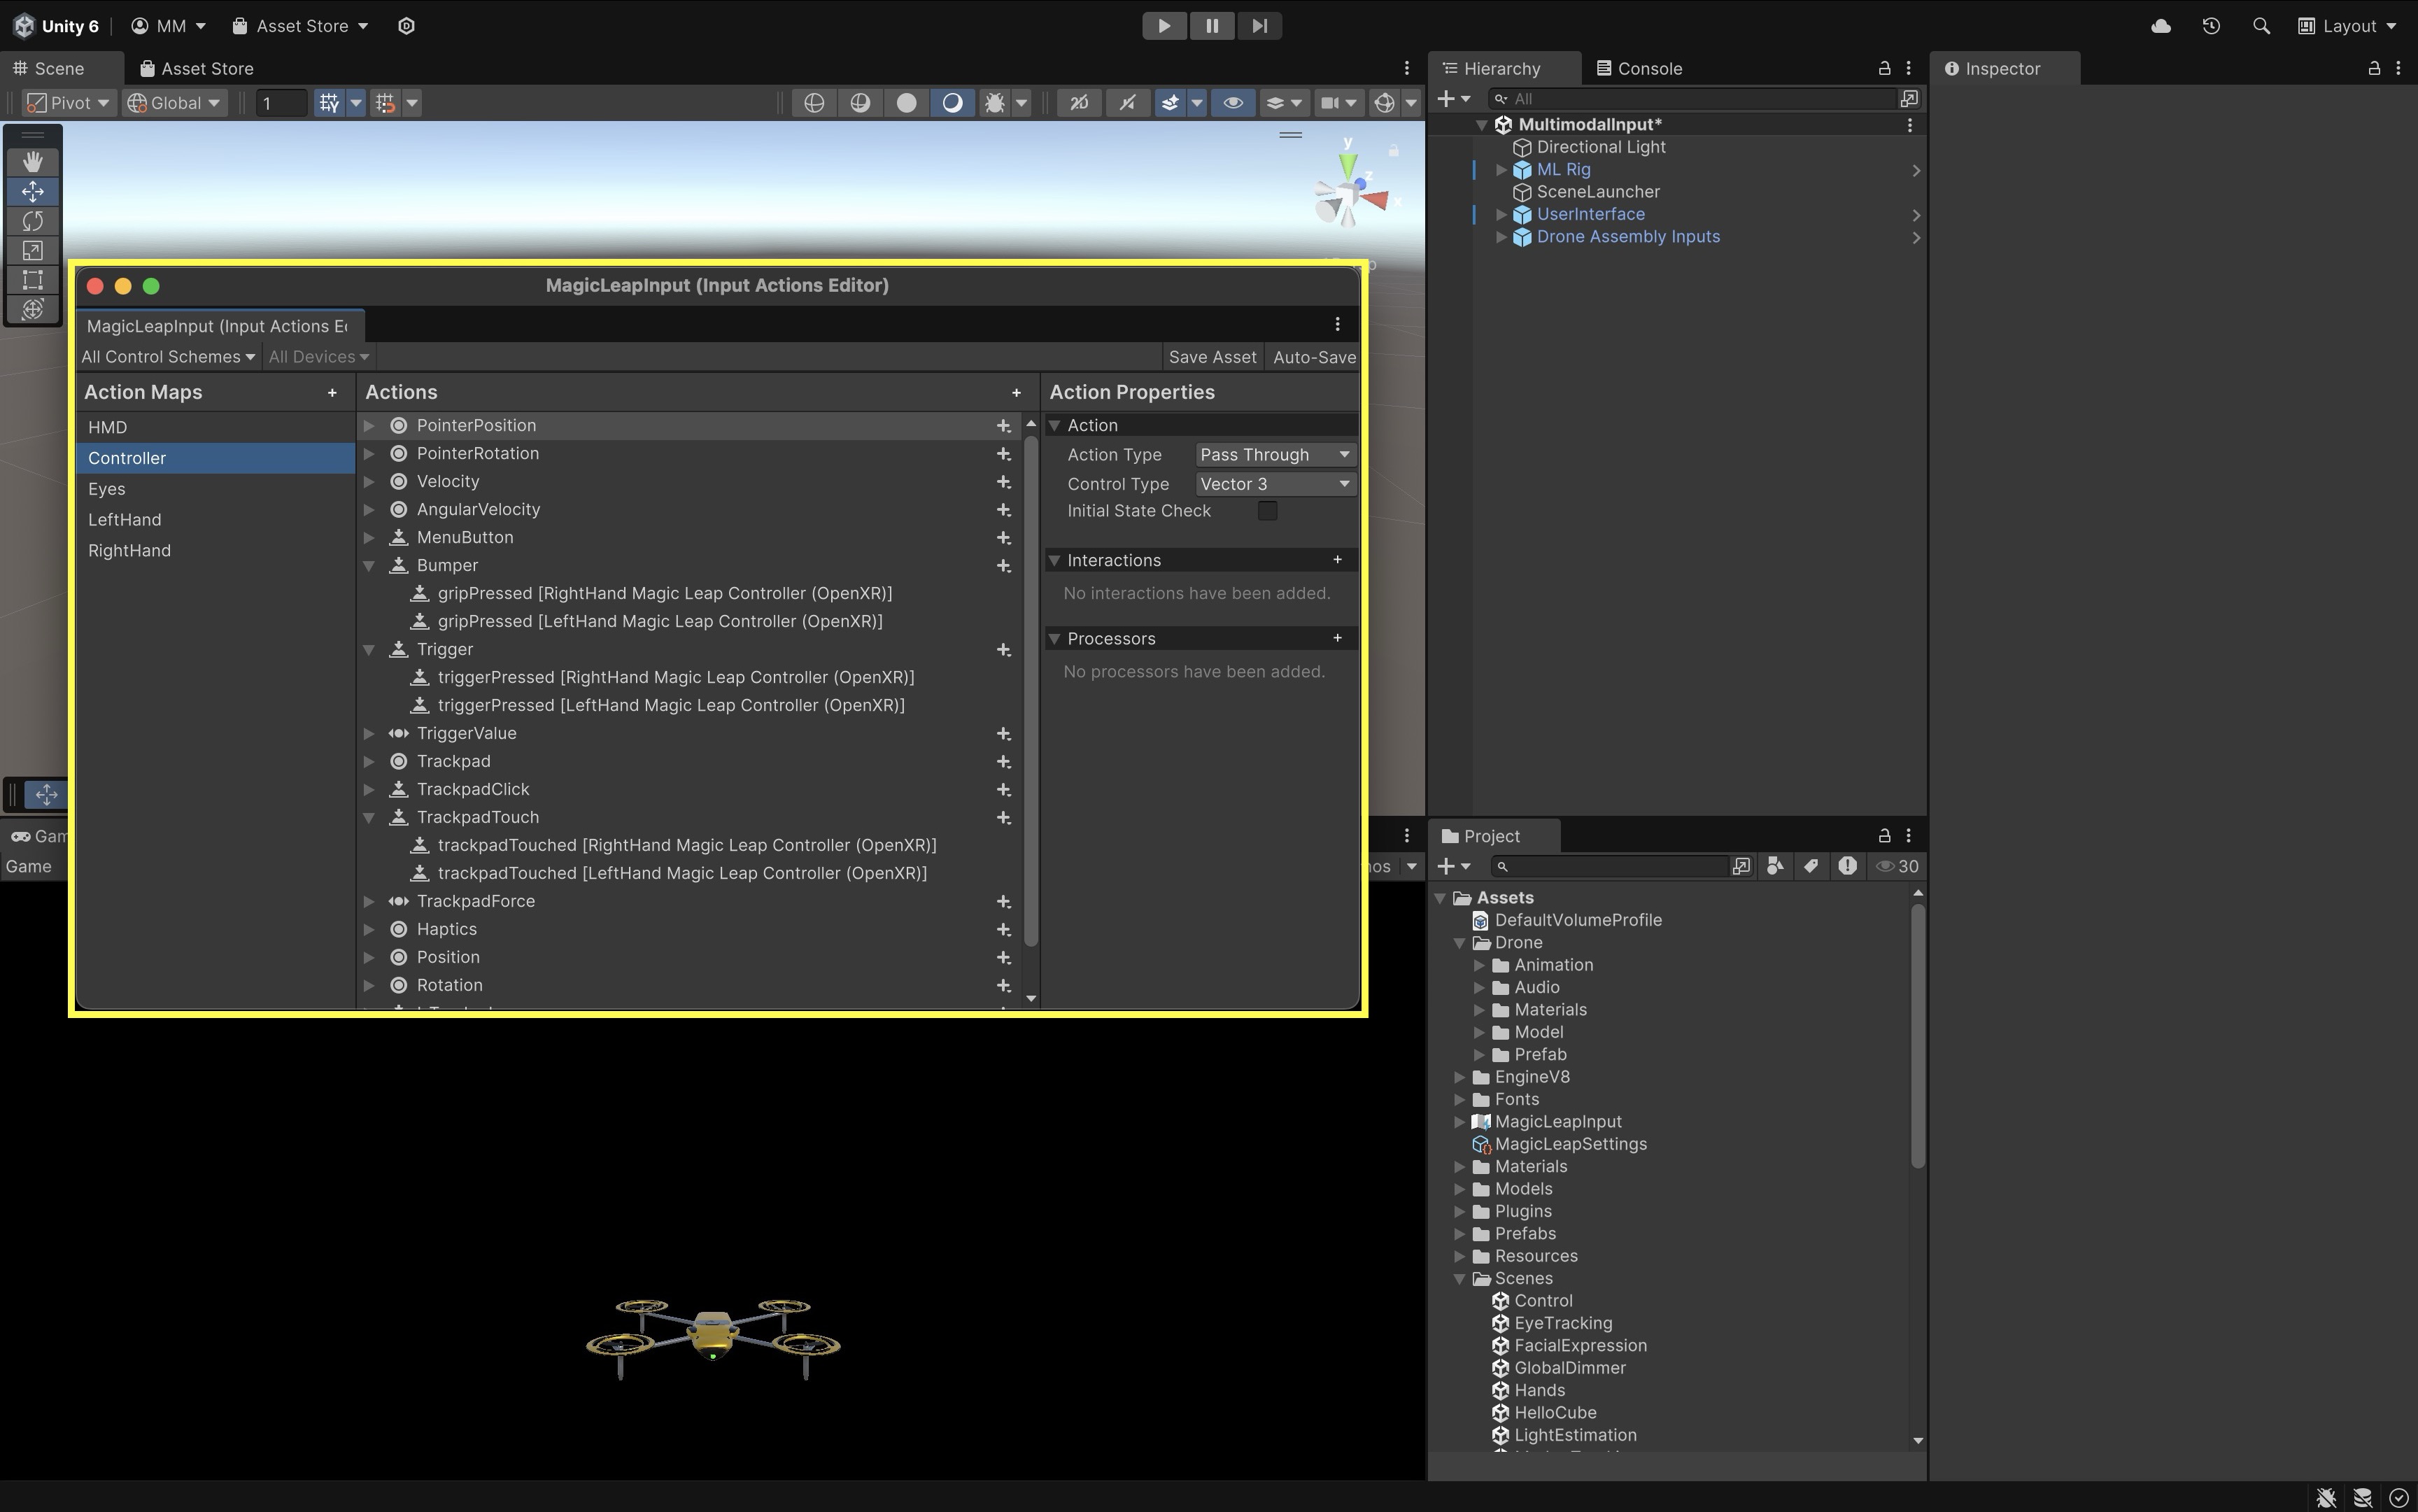
The Magic Leap SDK provides a ready-made Input Actions asset called
MagicLeapInputs, which maps physical controller inputs to Unity events. No changes are needed here — the controller is already using these bindings. - Open the
- Create the Interaction Script:
- Create a new C# script named
ControllerInput.cs.
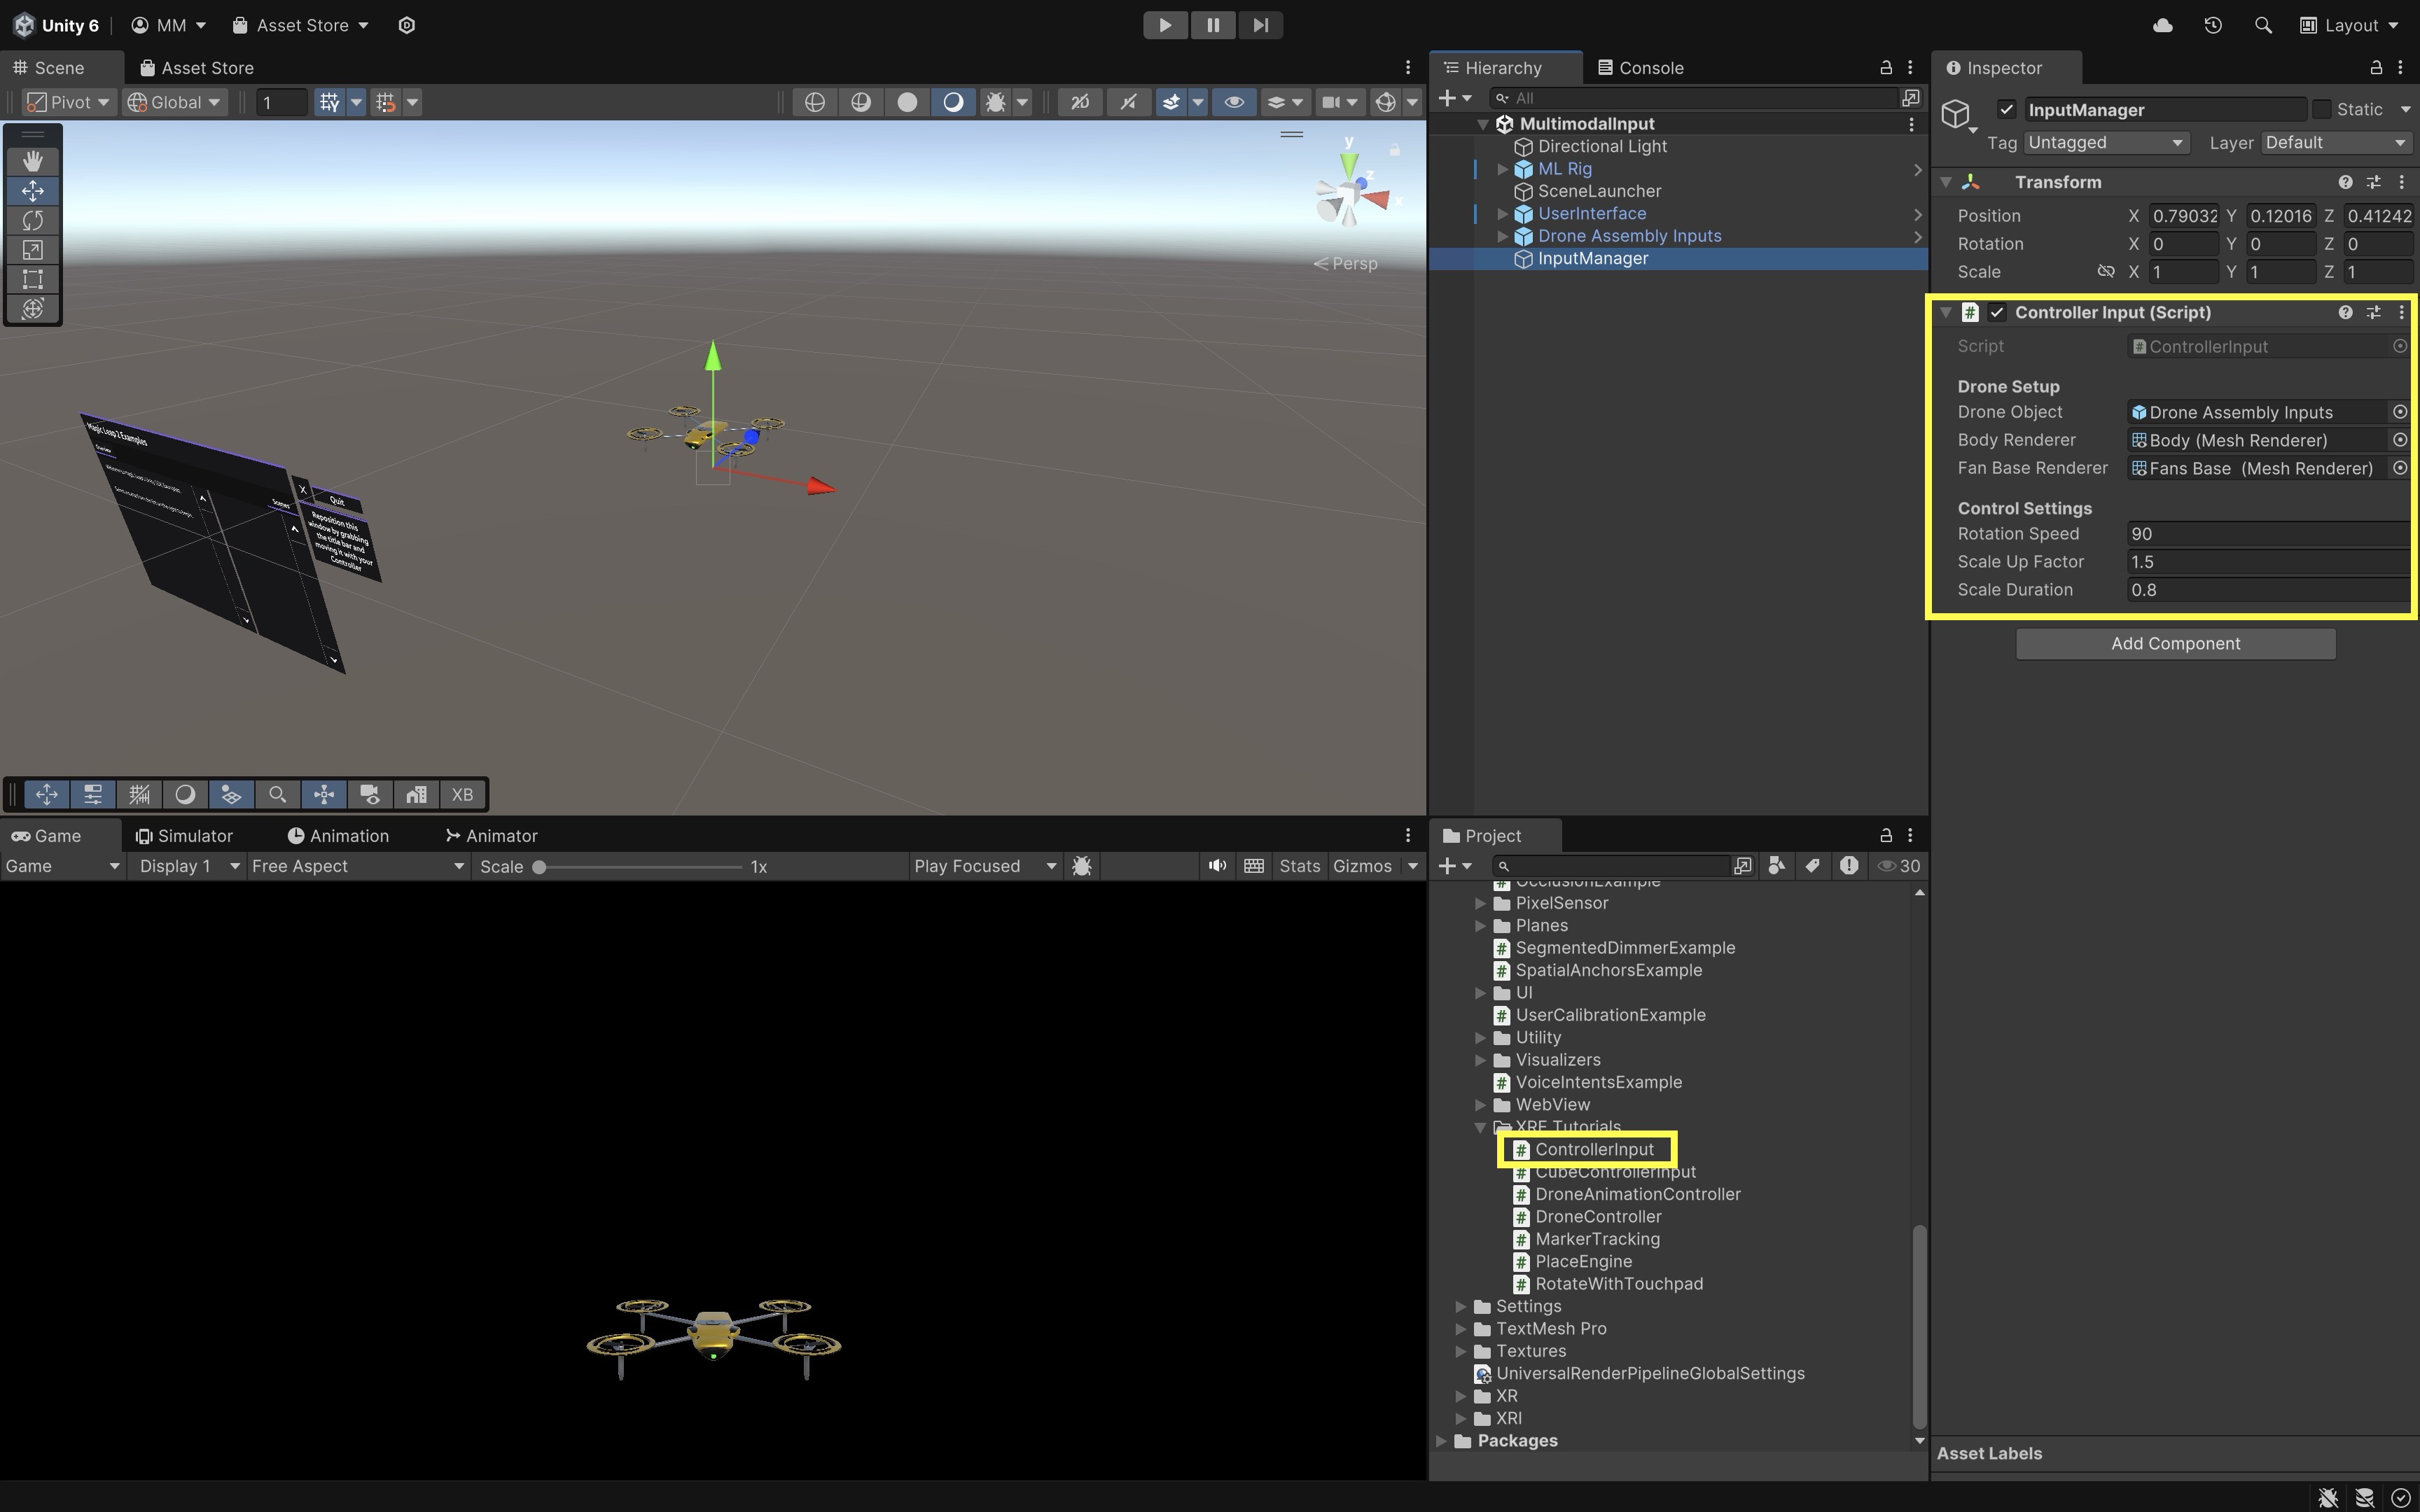
using UnityEngine; using UnityEngine.InputSystem; public class ControllerInput : MonoBehaviour { [Header("Drone Setup")] public GameObject droneObject; public Renderer bodyRenderer; public Renderer fanBaseRenderer; [Header("Control Settings")] public float rotationSpeed = 60f; public float scaleUpFactor = 1.2f; public float scaleDuration = 0.2f; private Material bodyMat0; private Material fanBaseMat0; private MagicLeapInputs mlInputs; private MagicLeapInputs.ControllerActions controller; void Start() { // Validate assignments if (droneObject == null || bodyRenderer == null || fanBaseRenderer == null) { Debug.LogError("Drone or renderer references are not assigned."); return; } // Cache Material[0] for both renderers bodyMat0 = bodyRenderer.materials[0]; fanBaseMat0 = fanBaseRenderer.materials[0]; // Setup input system mlInputs = new MagicLeapInputs(); mlInputs.Enable(); controller = new MagicLeapInputs.ControllerActions(mlInputs); controller.Trigger.performed += OnTriggerPressed; controller.Bumper.performed += OnBumperPressed; controller.Bumper.canceled += OnBumperReleased; controller.TouchpadPosition.performed += OnTouchpadSwipe; } private void OnTriggerPressed(InputAction.CallbackContext ctx) { // Change Material[0] color of Body and Fan Base Color newColor = new Color(Random.value, Random.value, Random.value); bodyMat0.color = newColor; fanBaseMat0.color = newColor; } private void OnBumperPressed(InputAction.CallbackContext ctx) { // Scale up drone droneObject.transform.localScale = Vector3.one * scaleUpFactor; Invoke(nameof(ResetScale), scaleDuration); } private void OnBumperReleased(InputAction.CallbackContext ctx) { ResetScale(); } private void ResetScale() { droneObject.transform.localScale = Vector3.one; } private void OnTouchpadSwipe(InputAction.CallbackContext ctx) { Vector2 swipe = controller.TouchpadPosition.ReadValue<Vector2>(); float rotationY = swipe.x * rotationSpeed * Time.deltaTime; droneObject.transform.Rotate(Vector3.up, rotationY, Space.World); } void OnDisable() { controller.Trigger.performed -= OnTriggerPressed; controller.Bumper.performed -= OnBumperPressed; controller.Bumper.canceled -= OnBumperReleased; controller.TouchpadPosition.performed -= OnTouchpadSwipe; } } - Create a new C# script named
- Configure the Script:
- In the
Hierarchy, right-click and selectCreate Empty. Rename toInputManager. - Drag and drop the
ControllerInput.csscript onto theInputManagerGameObject. - Go to the
Inspector. - Drag in
Drone Assembly Inputsprefab intoDrone Object,Bodychild intoBody Renderer, andFan Basechild intoFan Base Renderer. - Adjust
Rotation Speed,Scale Up Factor, andScale Durationas needed.
- In the
- Play and Test:
- Build and deploy the scene to your Magic Leap 2 device.
- Launch the app.
- Press the Trigger button to randomly change the color of Material Element 0 on the
BodyandFan Baseparts of the drone. - Press and hold the Bumper button to apply a temporary scaling effect. The drone will scale up slightly while the bumper is pressed and return to its original size when released.
- Swipe left or right on the Touchpad to rotate the entire drone horizontally around the Y-axis.
Functions like
OnTriggerPressed,OnTouchpadSwipe, andOnBumperPressedprovide a flexible foundation for handling controller-based interactions in Magic Leap 2 applications. These input callbacks can be used in your future development projects to trigger animations or mechanical simulations, interact with UI panels or AR tooltips, grab, place, or manipulate virtual objects, or control audio playback or visual effects.
Voice Commands
Voice commands allow users to interact with spatial AR systems through spoken language, offering a hands-free, intuitive, and natural input modality. This form of input is particularly powerful in wearable AR experiences, where users may need to operate in hands-busy, real-world environments, require fast access to core commands or UI functions without navigating complex menus, have limited mobility or cannot use traditional inputs. Voice input supports structured command phrases, enabling applications to trigger specific actions, control interfaces, or manipulate objects without physical touch. On Magic Leap 2, voice can also be fused with gaze or hand tracking to clarify user intent and facilitate multimodal interaction that mirrors real-world human communication.

Core Concepts
-
MLPermissions: Magic Leap API for handling runtime permissions like microphone access. It ensures that the application has the necessary user consent to access sensitive features like voice input. -
VOICE_INPUT: A required permission to enable voice command input. Without this permission, voice-related functionality will be disabled, even if intents are configured correctly. -
MLVoice: The main namespace for voice intent handling and event dispatch. It provides the core methods to initialize, subscribe to, and manage voice recognition events in real time. -
MLVoiceIntentsConfiguration: A ScriptableObject used to define custom voice command phrases and their corresponding event IDs. This configuration allows developers to map specific spoken phrases to actionable logic within their application. -
OnVoiceEvent: Event triggered when a registered voice command is successfully recognized. It returns a result containing the spoken text and associated event ID so that you can drive specific behaviors. -
SettingsIntentsLauncher: Utility to redirect users to enable voice input settings on their device. This is particularly useful if voice input is disabled at the system level and must be turned on manually for the app to function.
Review this Magic Leap documentation to learn more about voice intents.
Custom Voice Commands
Let’s extend the functionality of your InputManager system from the previous example to support voice input using Magic Leap Voice Intents. Voice input will serve as a redundant input modality that mirrors controller inputs:
- “Change Color” → same as controller Trigger
- “Scale” → same as controller Bumper
- “Turn” → same as controller Touchpad
This design approach gives users the flexibility to interact using whichever input modality best fits their context — voice or controller — and reinforces the principles of multimodal and redundant interaction in extended reality environments. You will also add two new voice commands. Saying “Animate” will step through the drone’s disassembly animation (one part per command), while saying “Reset” will reassemble the drone. Note that the Drone Assembly Inputs prefab must already be present in your scene and configured.
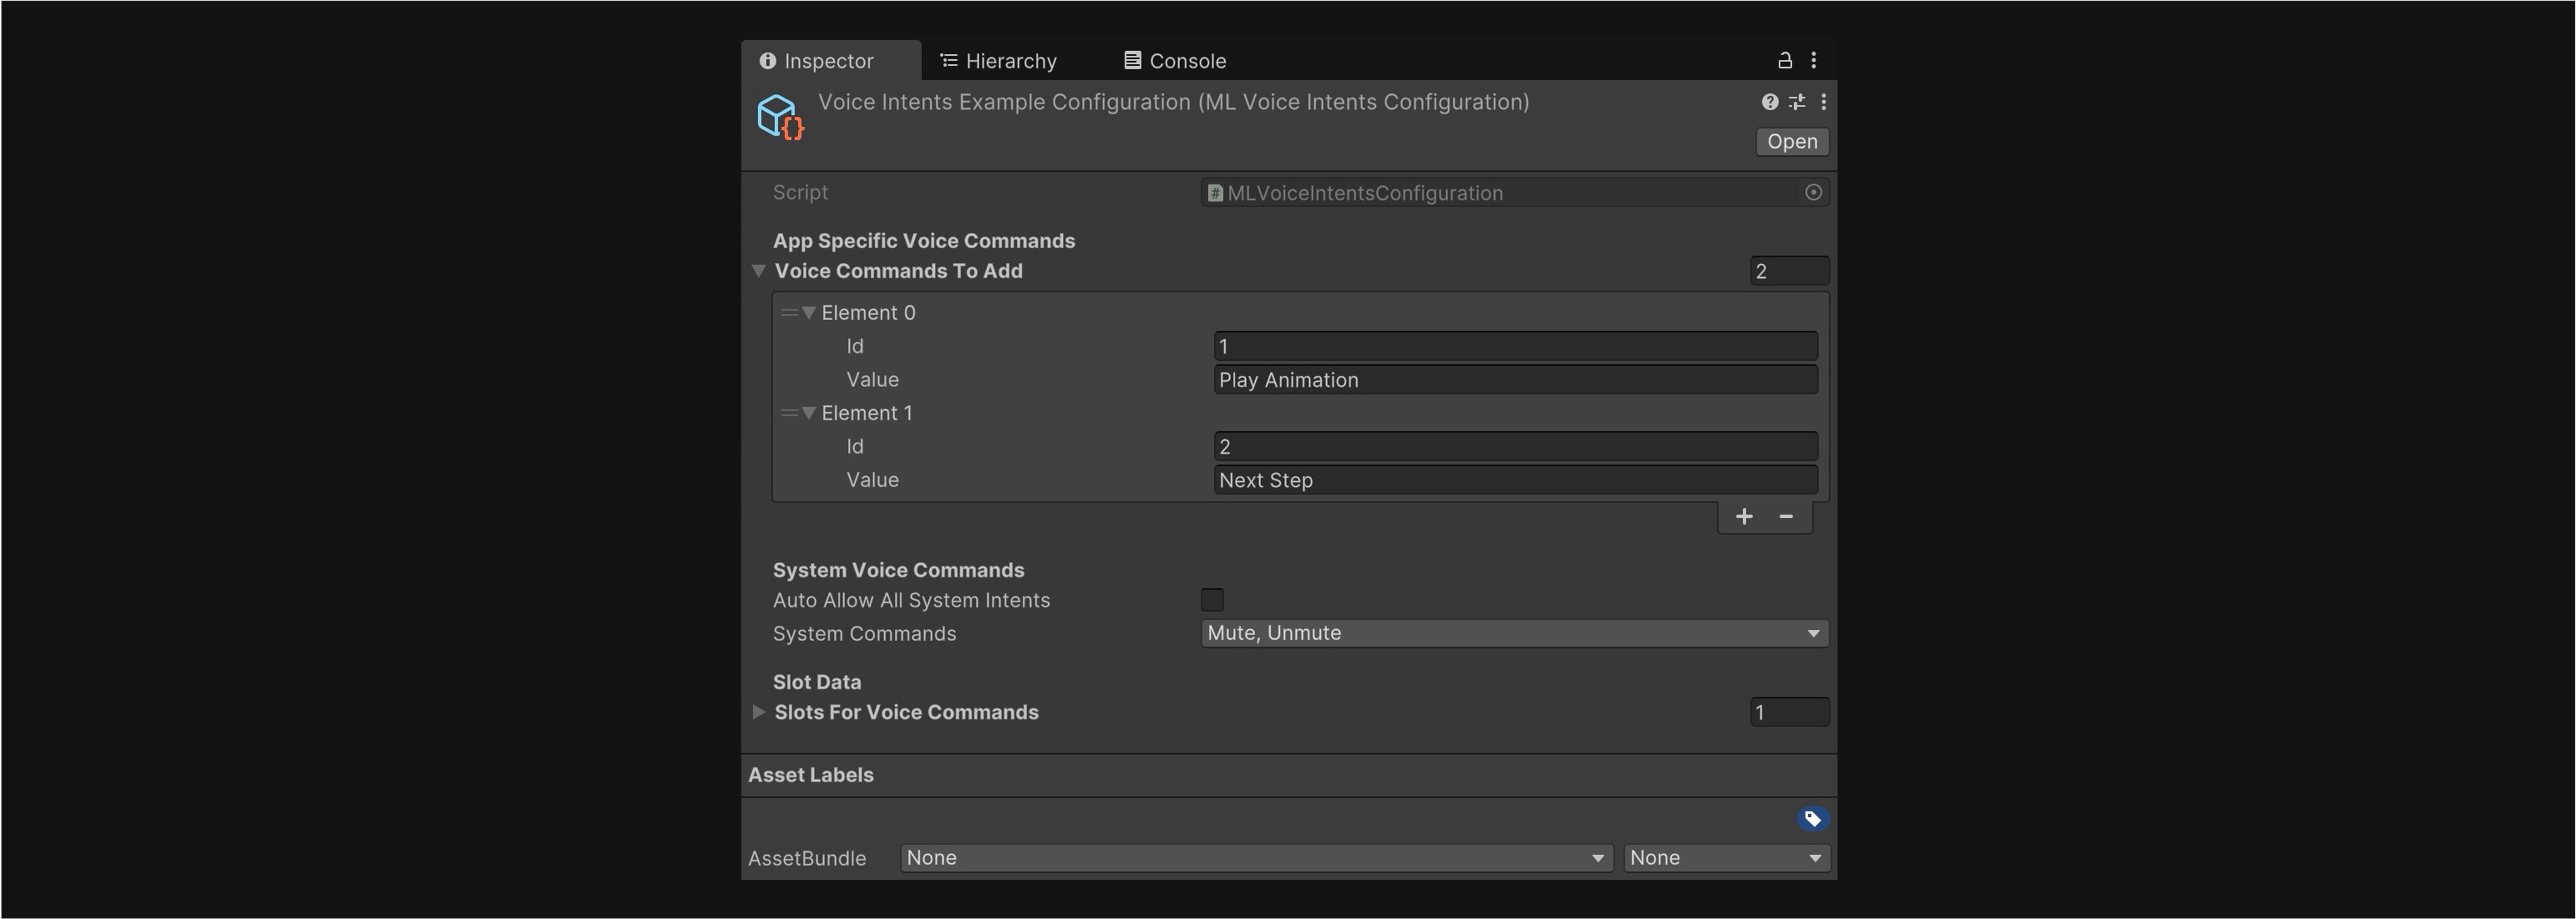
- Create a Voice Configuration File:
- Open the
MultimodalInput.unityscene. - In the
Projectwindow, right-click and go toCreate > Magic Leap > Voice Intents Configuration. - Name the new asset
DroneVoiceConfig.mlvoice. - Under
Voice Commands to Add, click the+button six times to add the following commands as ‘Value’ inputs (optionally, assign an ‘Id’ to each):Change Color,Scale,Turn,Animate, andReset. These are app-specific commands and will be matched exactly. Keep them lowercase or title case for clarity.
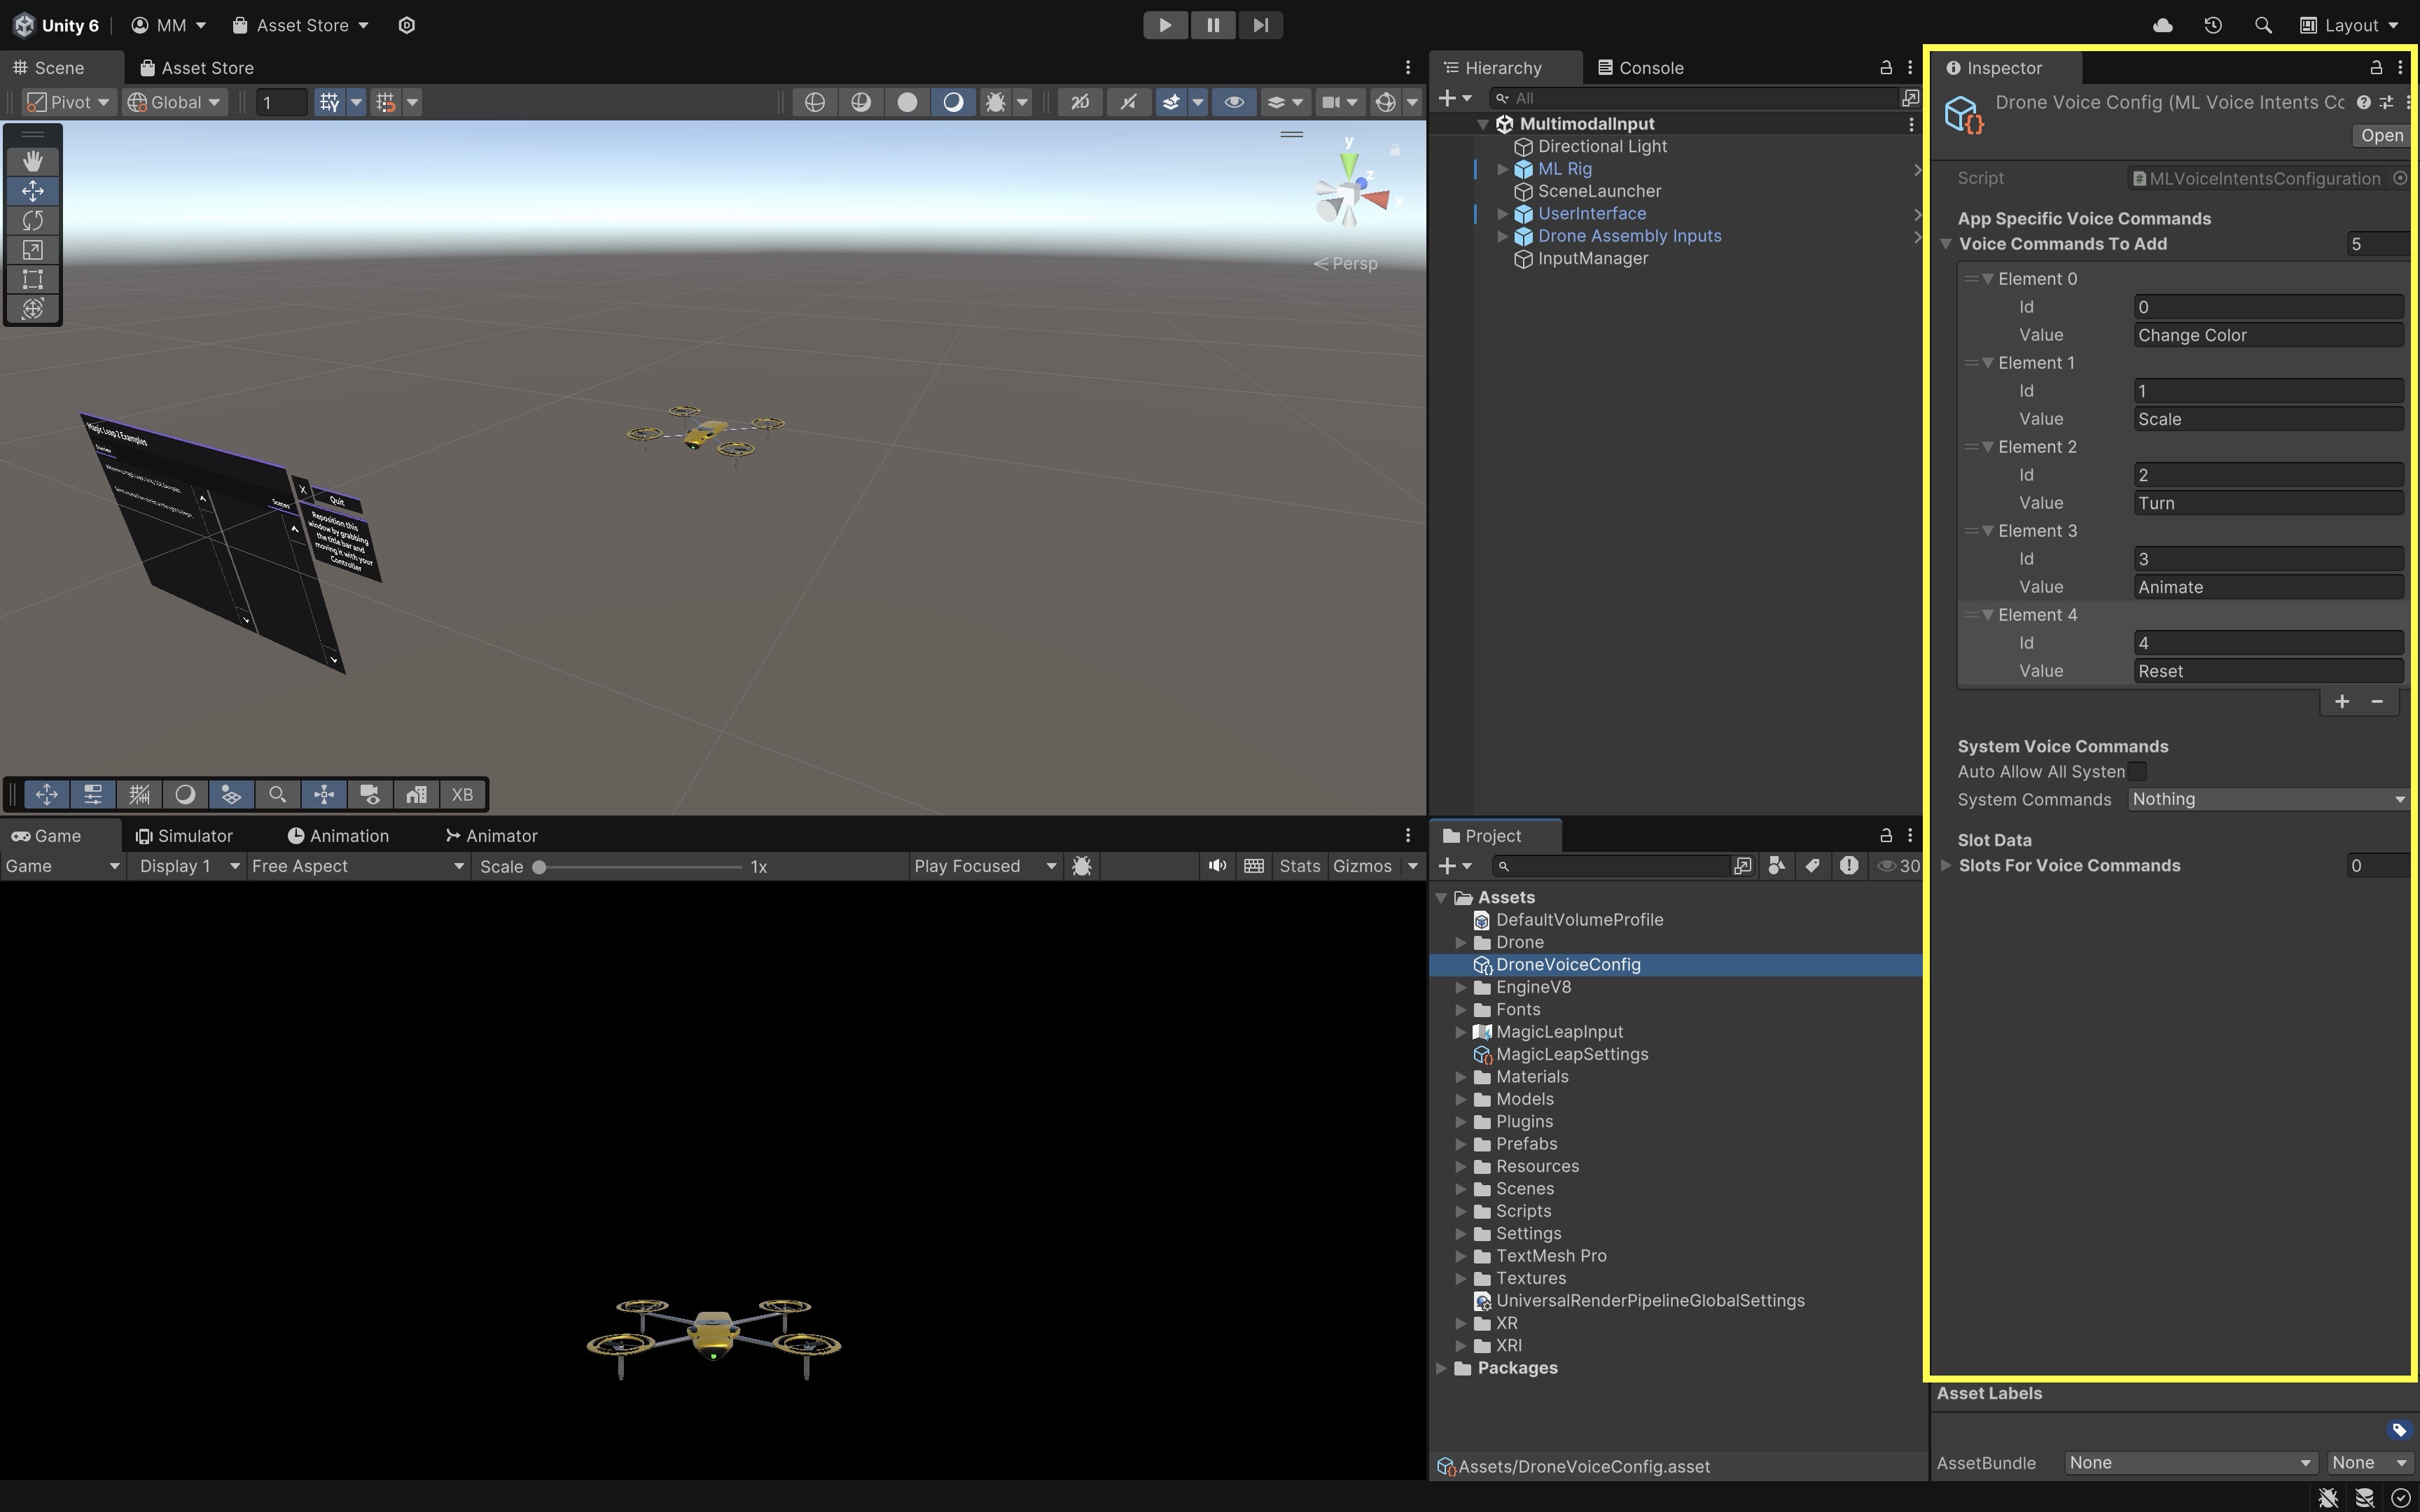
- Open the
- Create a Voice Command Controller Script:
- Create a new script in
Assets > Scripts > XRE Tutorials. - Name it
VoiceCommandController.csand paste the following code into it:
using MagicLeap.Android; using System.Collections; using System.Collections.Generic; using System.Linq; using UnityEngine; using UnityEngine.XR.MagicLeap; public class VoiceCommandController : MonoBehaviour { [Header("Drone Setup")] public GameObject droneObject; public Renderer bodyRenderer; public Renderer fanBaseRenderer; [Header("Animator")] public Animator droneAnimator; [Header("Voice Configuration")] public MLVoiceIntentsConfiguration voiceConfig; [Header("Rotation Settings")] public float rotationStepDegrees = 30f; [Header("Scaling Settings")] public float scaleUpFactor = 1.2f; public float scaleDuration = 0.3f; private Material bodyMat0; private Material fanBaseMat0; private bool isProcessing = false; private int animationStep = 0; private readonly string[] disassemblyTriggers = new string[] { "Fan 1", "Fan 2", "Fan 3", "Fan 4", "Fans Base", "Body" }; private void Start() { if (!Permissions.CheckPermission(Permissions.VoiceInput)) { Permissions.RequestPermission( Permissions.VoiceInput, OnPermissionGranted, OnPermissionDenied ); return; } if (!MLVoice.VoiceEnabled) { Debug.LogError( "Voice is not supported on this device." ); return; } bodyMat0 = bodyRenderer.materials[0]; fanBaseMat0 = fanBaseRenderer.materials[0]; MLResult result = MLVoice.SetupVoiceIntents(voiceConfig); if (result.IsOk) { isProcessing = true; MLVoice.OnVoiceEvent += OnVoiceCommand; } else { Debug.LogError( "Failed to set up voice intents: " + result ); } } private void OnVoiceCommand( in bool wasSuccessful, in MLVoice.IntentEvent voiceEvent ) { if (!wasSuccessful) return; switch (voiceEvent.EventName.ToLower()) { case "change color": ChangeDroneColor(); break; case "scale": ScaleDrone(); break; case "turn": RotateDrone(); break; case "animate": AnimateSequence(); break; case "reset": ResetAnimation(); break; default: Debug.Log( "Unrecognized command: " + voiceEvent.EventName ); break; } } private void ChangeDroneColor() { Color newColor = new Color( Random.value, Random.value, Random.value ); bodyMat0.color = newColor; fanBaseMat0.color = newColor; } private void ScaleDrone() { StopAllCoroutines(); StartCoroutine(ScaleRoutine()); } private IEnumerator ScaleRoutine() { droneObject.transform.localScale = Vector3.one * scaleUpFactor; yield return new WaitForSeconds(scaleDuration); droneObject.transform.localScale = Vector3.one; } private void RotateDrone() { droneObject.transform.Rotate( Vector3.up, rotationStepDegrees, Space.World ); } private void AnimateSequence() { if (animationStep < disassemblyTriggers.Length) { StartCoroutine(PlayAnimationSequence()); } } private IEnumerator PlayAnimationSequence() { while (animationStep < disassemblyTriggers.Length) { string triggerName = disassemblyTriggers[animationStep]; droneAnimator.SetTrigger(triggerName); animationStep++; yield return new WaitForSeconds(2f); // Delay between triggers } } private void ResetAnimation() { if (droneAnimator != null) { droneAnimator.ResetTrigger("Fan 1"); droneAnimator.ResetTrigger("Fan 2"); droneAnimator.ResetTrigger("Fan 3"); droneAnimator.ResetTrigger("Fan 4"); droneAnimator.ResetTrigger("Fans Base"); droneAnimator.ResetTrigger("Body"); droneAnimator.SetTrigger("Assembly"); } animationStep = 0; } private void OnDestroy() { if (isProcessing) { MLVoice.OnVoiceEvent -= OnVoiceCommand; MLVoice.Stop(); } } private void OnPermissionGranted(string permission) { Start(); // Retry setup } private void OnPermissionDenied(string permission) { Debug.LogError("Voice permission denied."); } } - Create a new script in
- Set Up the Voice Manager in the Scene:
- In the
Hierarchy, create an empty GameObject and rename it toVoiceManager. - Attach the
VoiceCommandControllerscript to theVoiceManager. - Go to the
Inspector. - Drag the
Drone Assembly Inputsprefab into theDrone Objectfield. - Expand the drone prefab and drag the
BodyGameObject into theBody Rendererfield. - Drag the
Fan BaseGameObject into theFan Base Rendererfield. - Drag the
Animatorcomponent from theDrone Assembly Inputsroot into theDrone Animatorfield. - Drag the
DroneVoiceConfig.mlvoicefile (created earlier) into theVoice Configfield. - Adjust other parameters as appropriate.
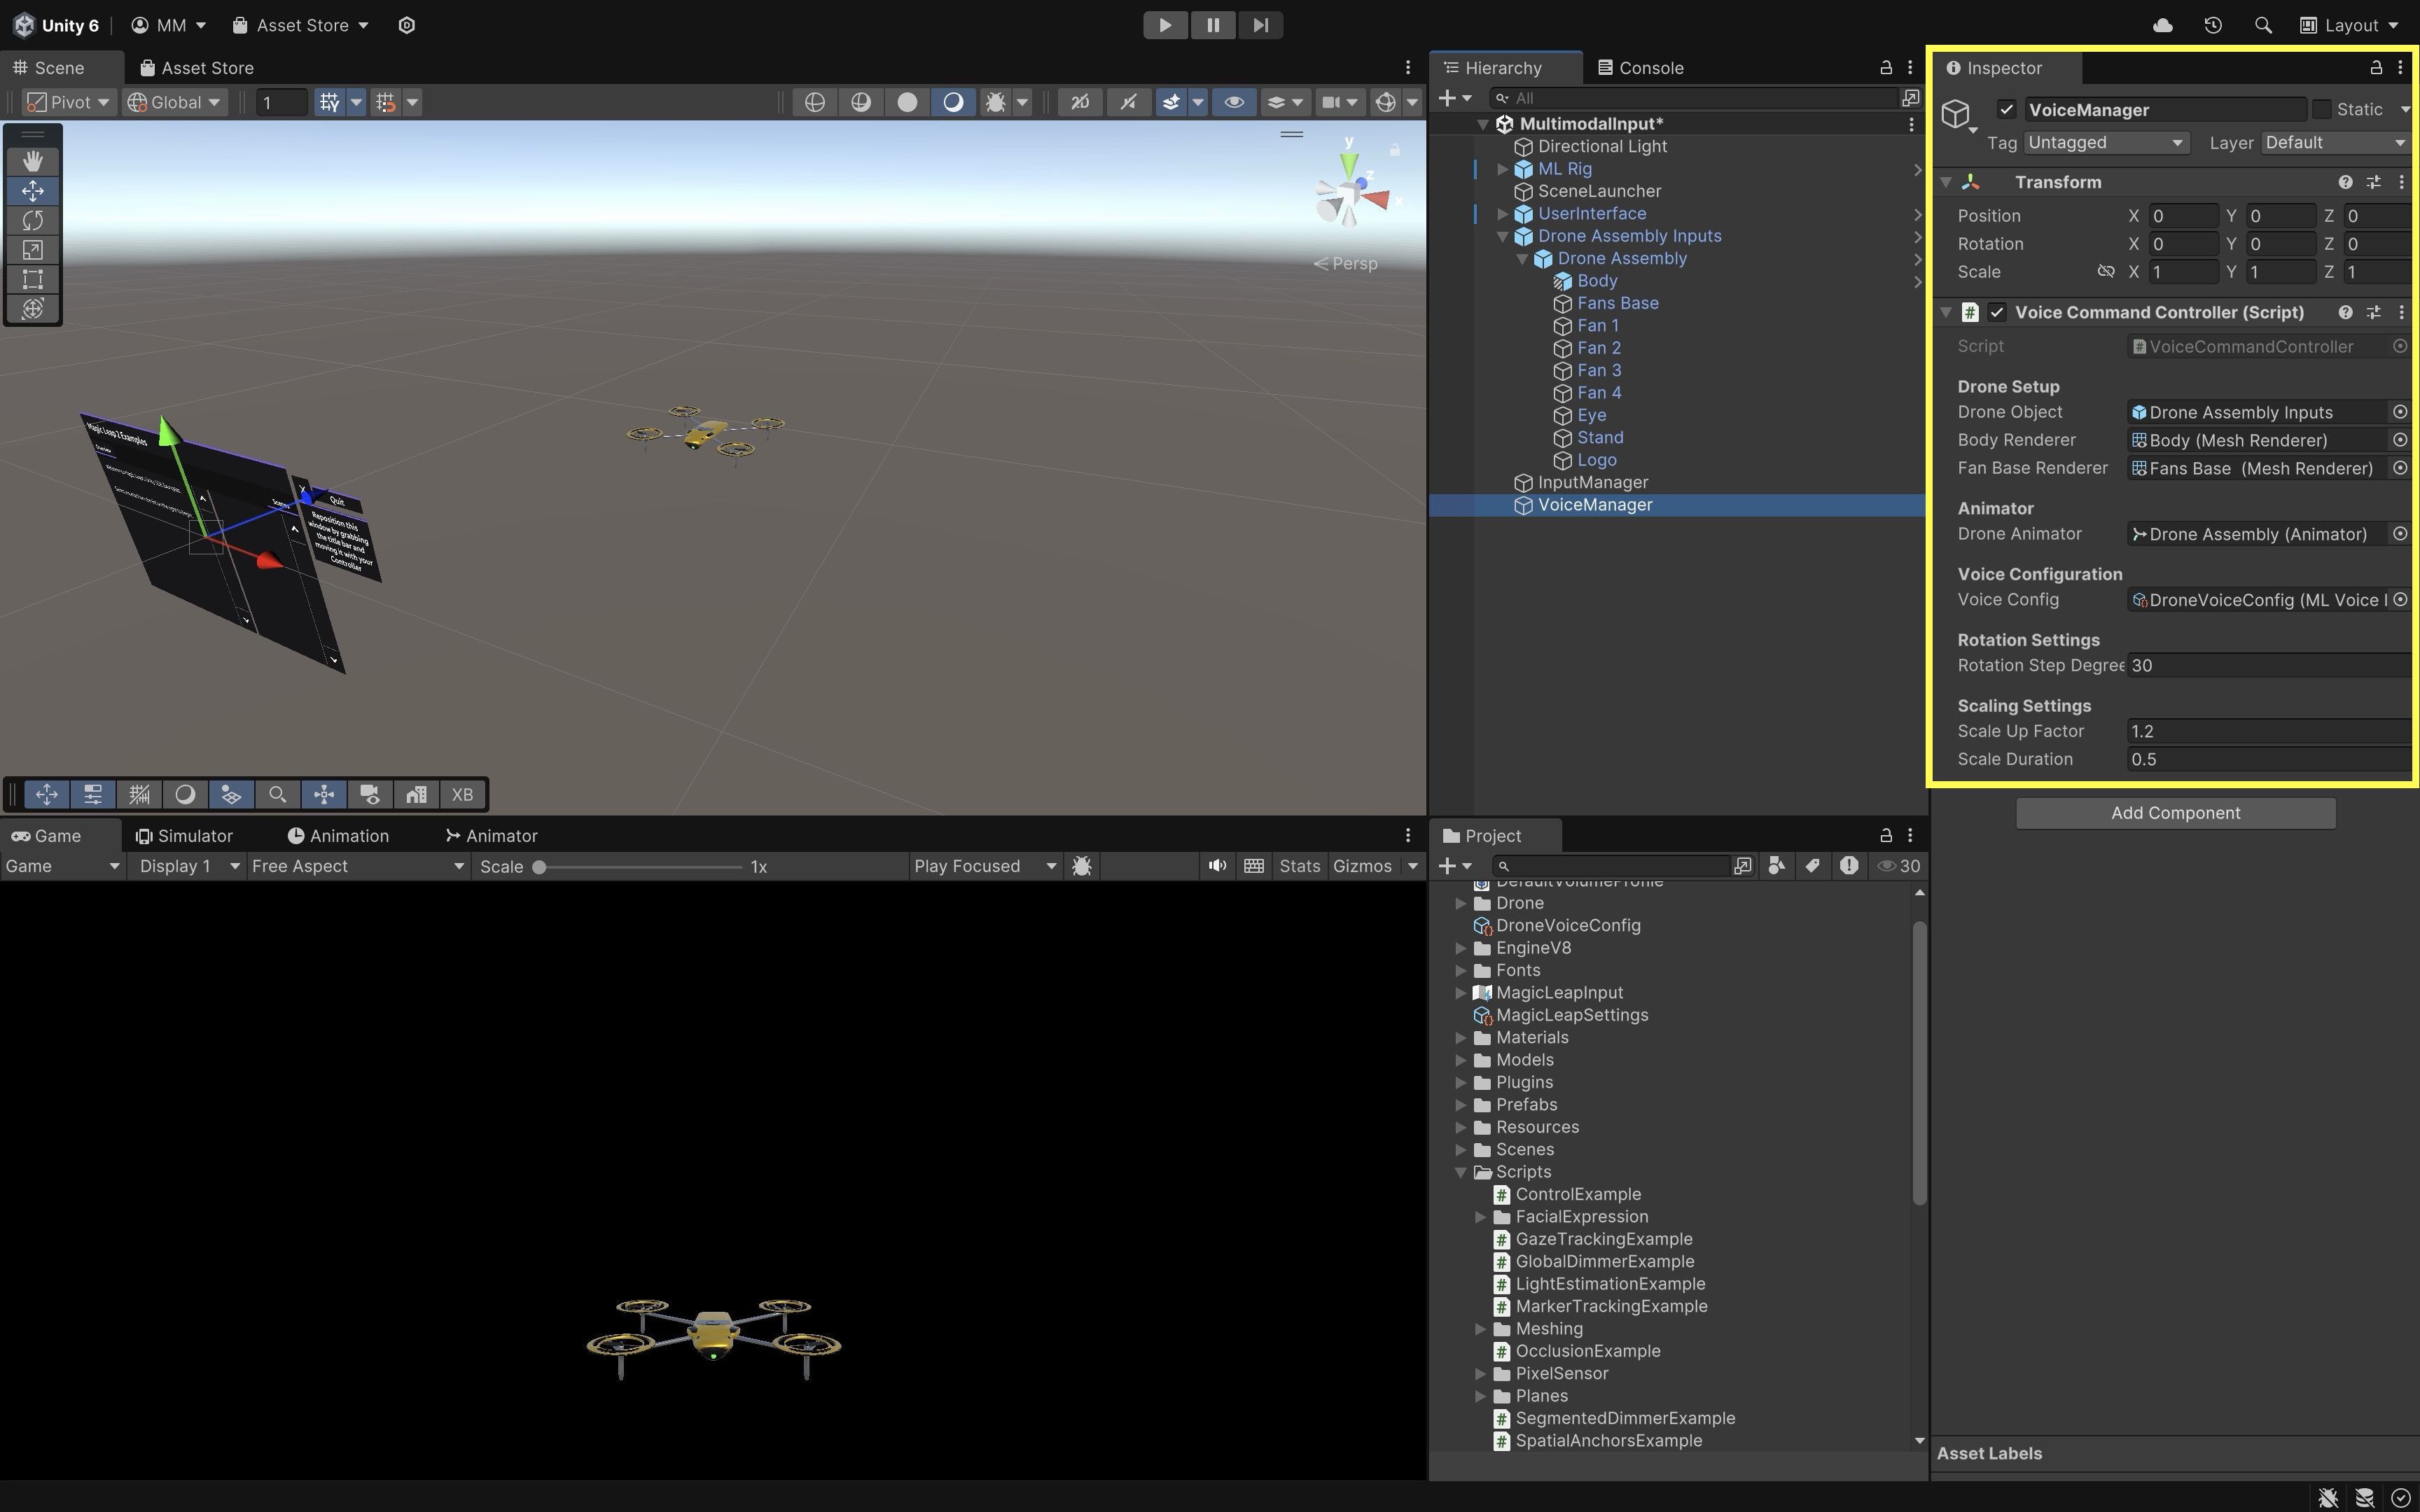
Be sure the drone prefab is already placed and visible in the scene.
- In the
- Build and Test:
- Build and deploy your Unity project to the Magic Leap 2 device.
- Launch the application on the headset.
- Say “Change Color” to change the color of the drone’s Body and Fan Base materials.
- Say “Scale” to make the drone temporarily scale up and then return to its original size.
- Say “Turn” to rotate the drone 30 degrees to the right on the Y-axis.
- Say “Animate” to begin stepping through the drone’s disassembly animations, one part at a time.
- Say “Reset” to reassemble the drone and return it to the default state using the
Assemblyanimation trigger.
These are app-specific commands. If system voice activation is required, begin by saying “Hey Magic Leap” before the command.
Hand Gestures
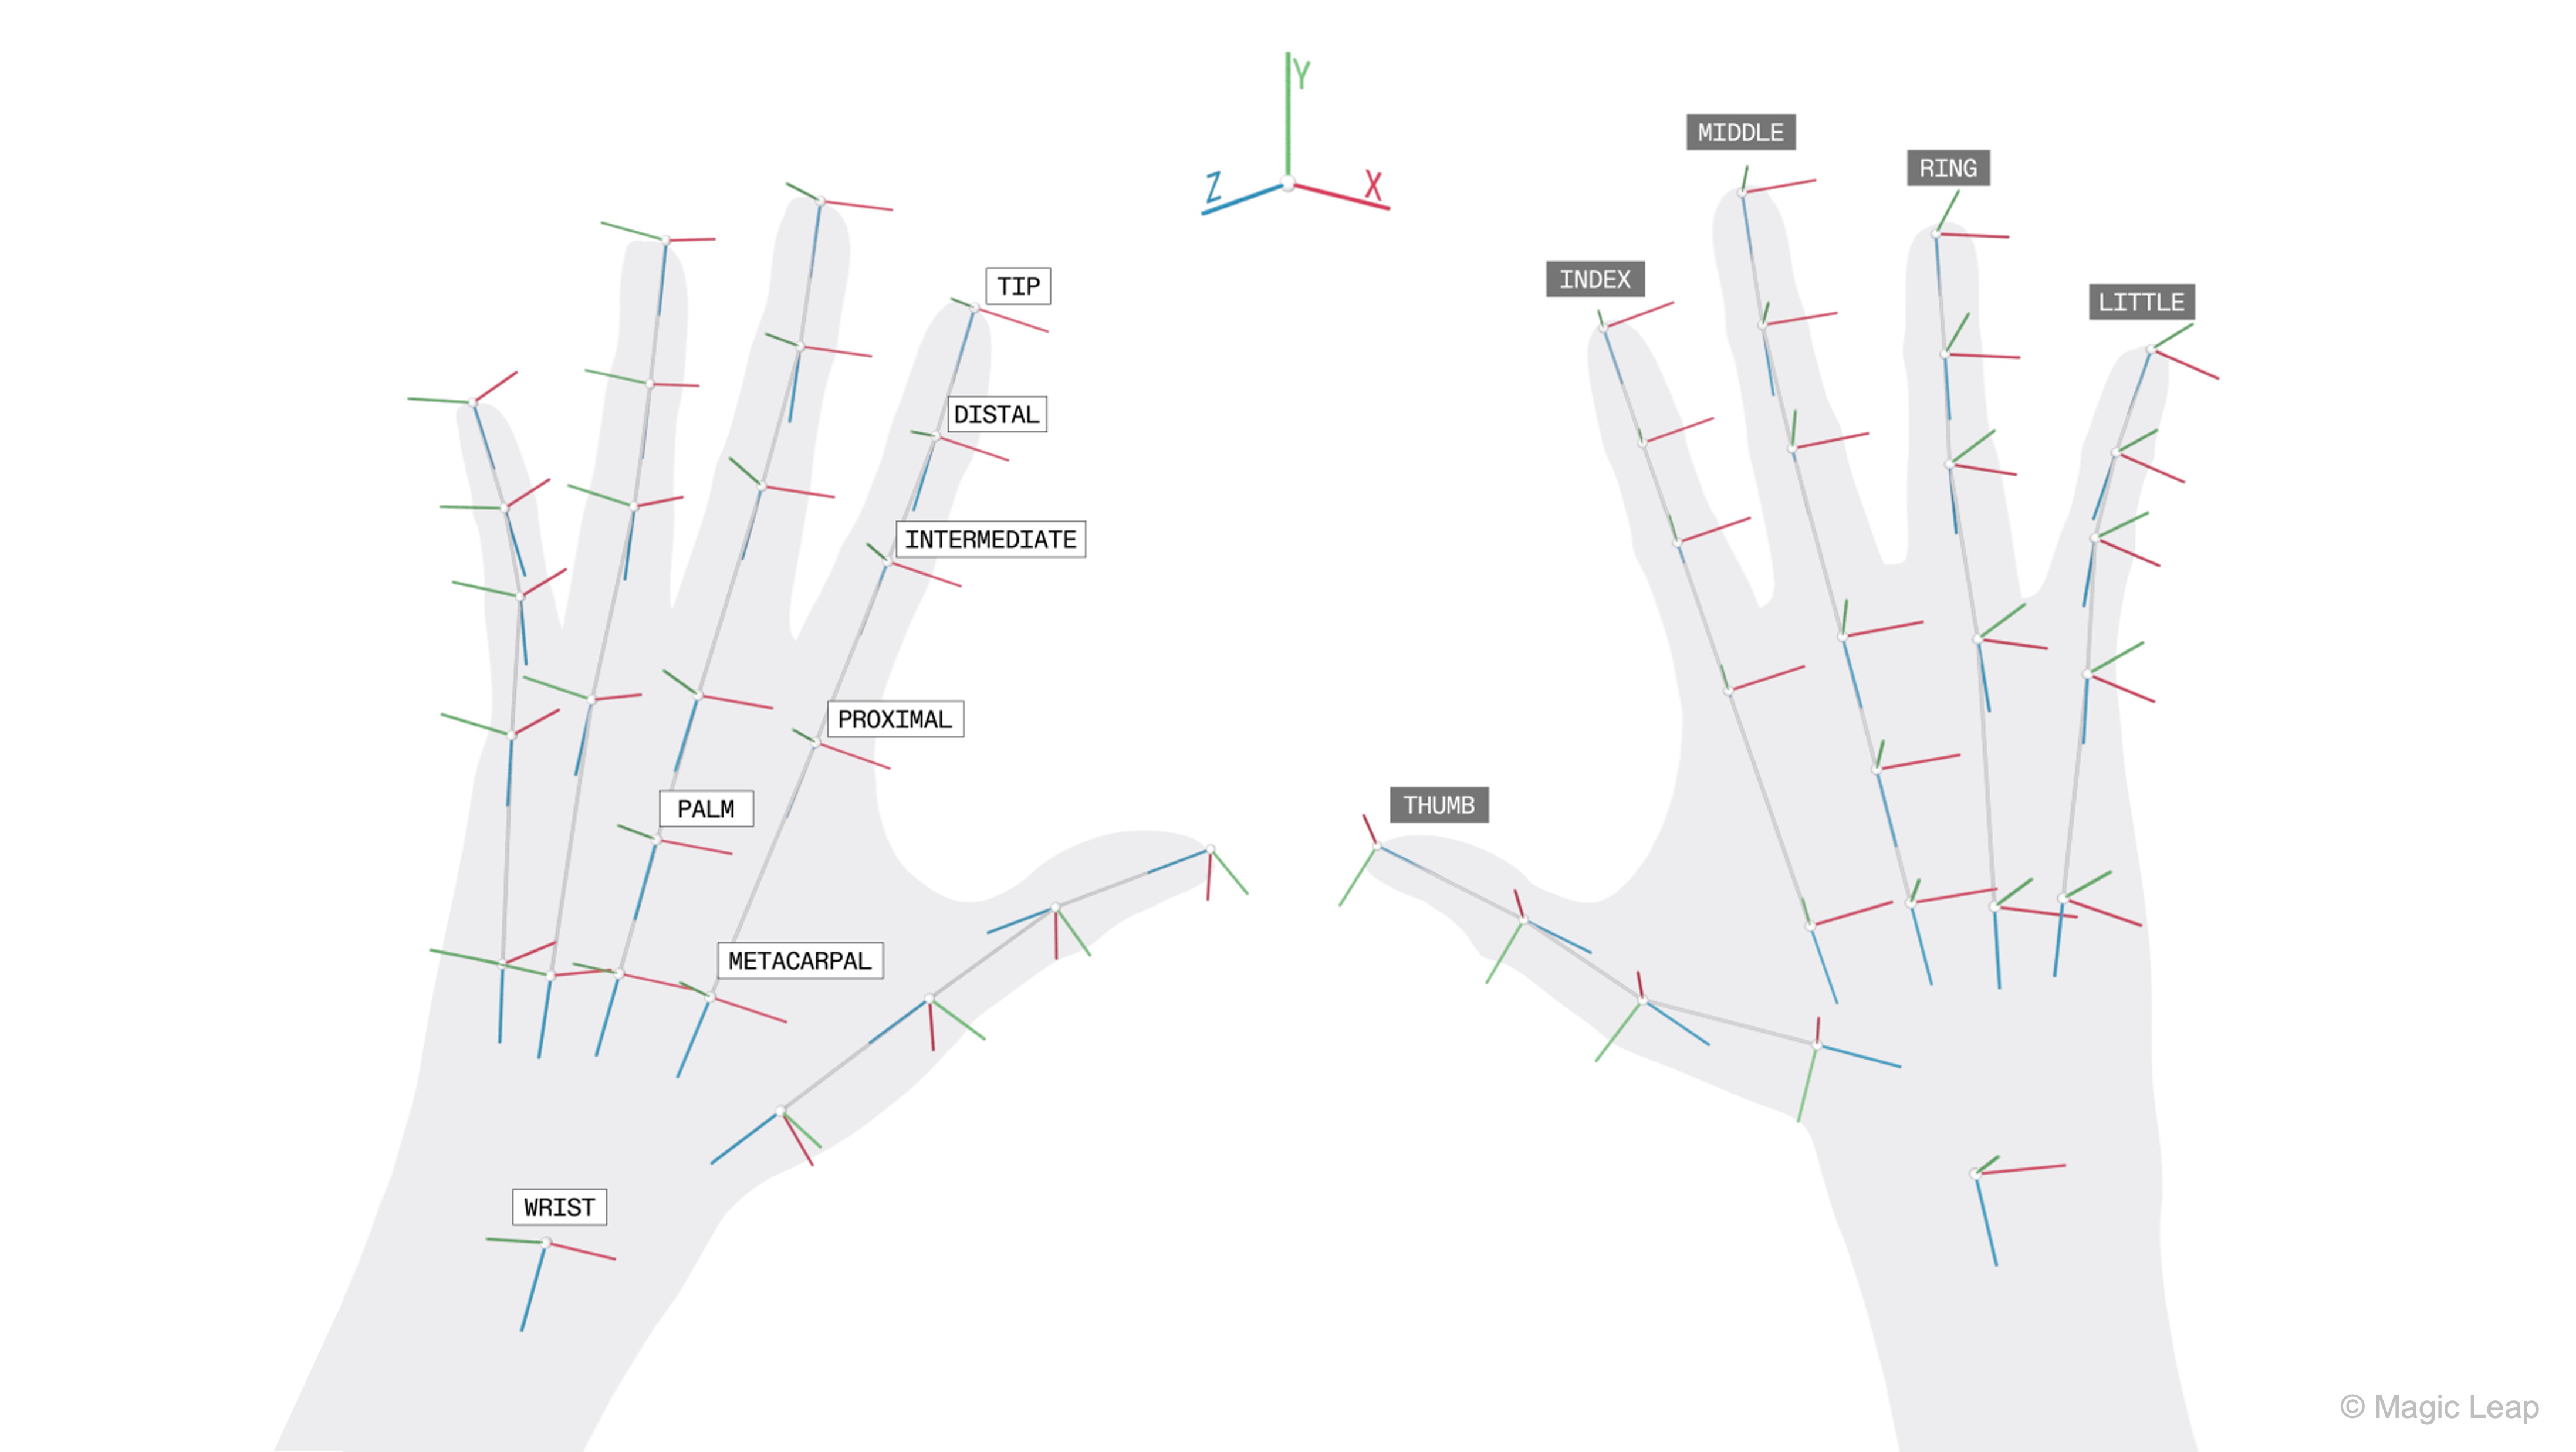
Hand gestures use natural hand movements to control and manipulate digital content in spatial AR environments. Through a combination of cameras and depth sensors, AR headsets like Magic Leap 2 and HoloLens 2 track hand poses and finger movements in 3D space—allowing users to interact with digital elements as if they were physically present. Magic Leap 2 provides robust, markerless hand tracking with high-fidelity skeletal mapping (down to individual finger joints and angles), enabling intuitive, controller-free interactions. Gesture recognition builds upon real-time hand tracking by detecting specific hand poses or transitions (e.g., pinch, grasp, point). Hand gestures are a key modality due to enabling natural and hands-free interactions in AR. They are also ideal for users who can’t easily use buttons, joysticks, or triggers.
Core Concepts
-
HandController: A subclass of the XR Interaction Toolkit that substitutes controller input with tracked-hand input. It maps finger gestures and hand poses to XR input actions, enabling natural interactions like grabbing or pointing. -
HandVisualizer: A script that renders joint meshes or markers to visualize hand bones. This is especially useful for debugging gesture recognition or for providing visual feedback to users in the AR environment. -
XR Rig: The main AR rig including camera, origin, and interaction managers. It serves as the foundation for positioning the user’s viewpoint and managing spatial input within the scene. -
HAND_TRACKING: A required manifest permission to enable real-time hand tracking. Without this permission, the system cannot access or process hand joint data from the headset’s sensors. -
XR Grab Interactable: A component that allows virtual objects to be grabbed, moved, and released with hands or controllers. It supports gesture-based interactions like pinching or grasping, and works seamlessly with both hand tracking and physical controllers.
Review this Magic Leap documentation to learn more about developing custom hand tracking capabilities for Magic Leap 2.
Custom Hand Gestures
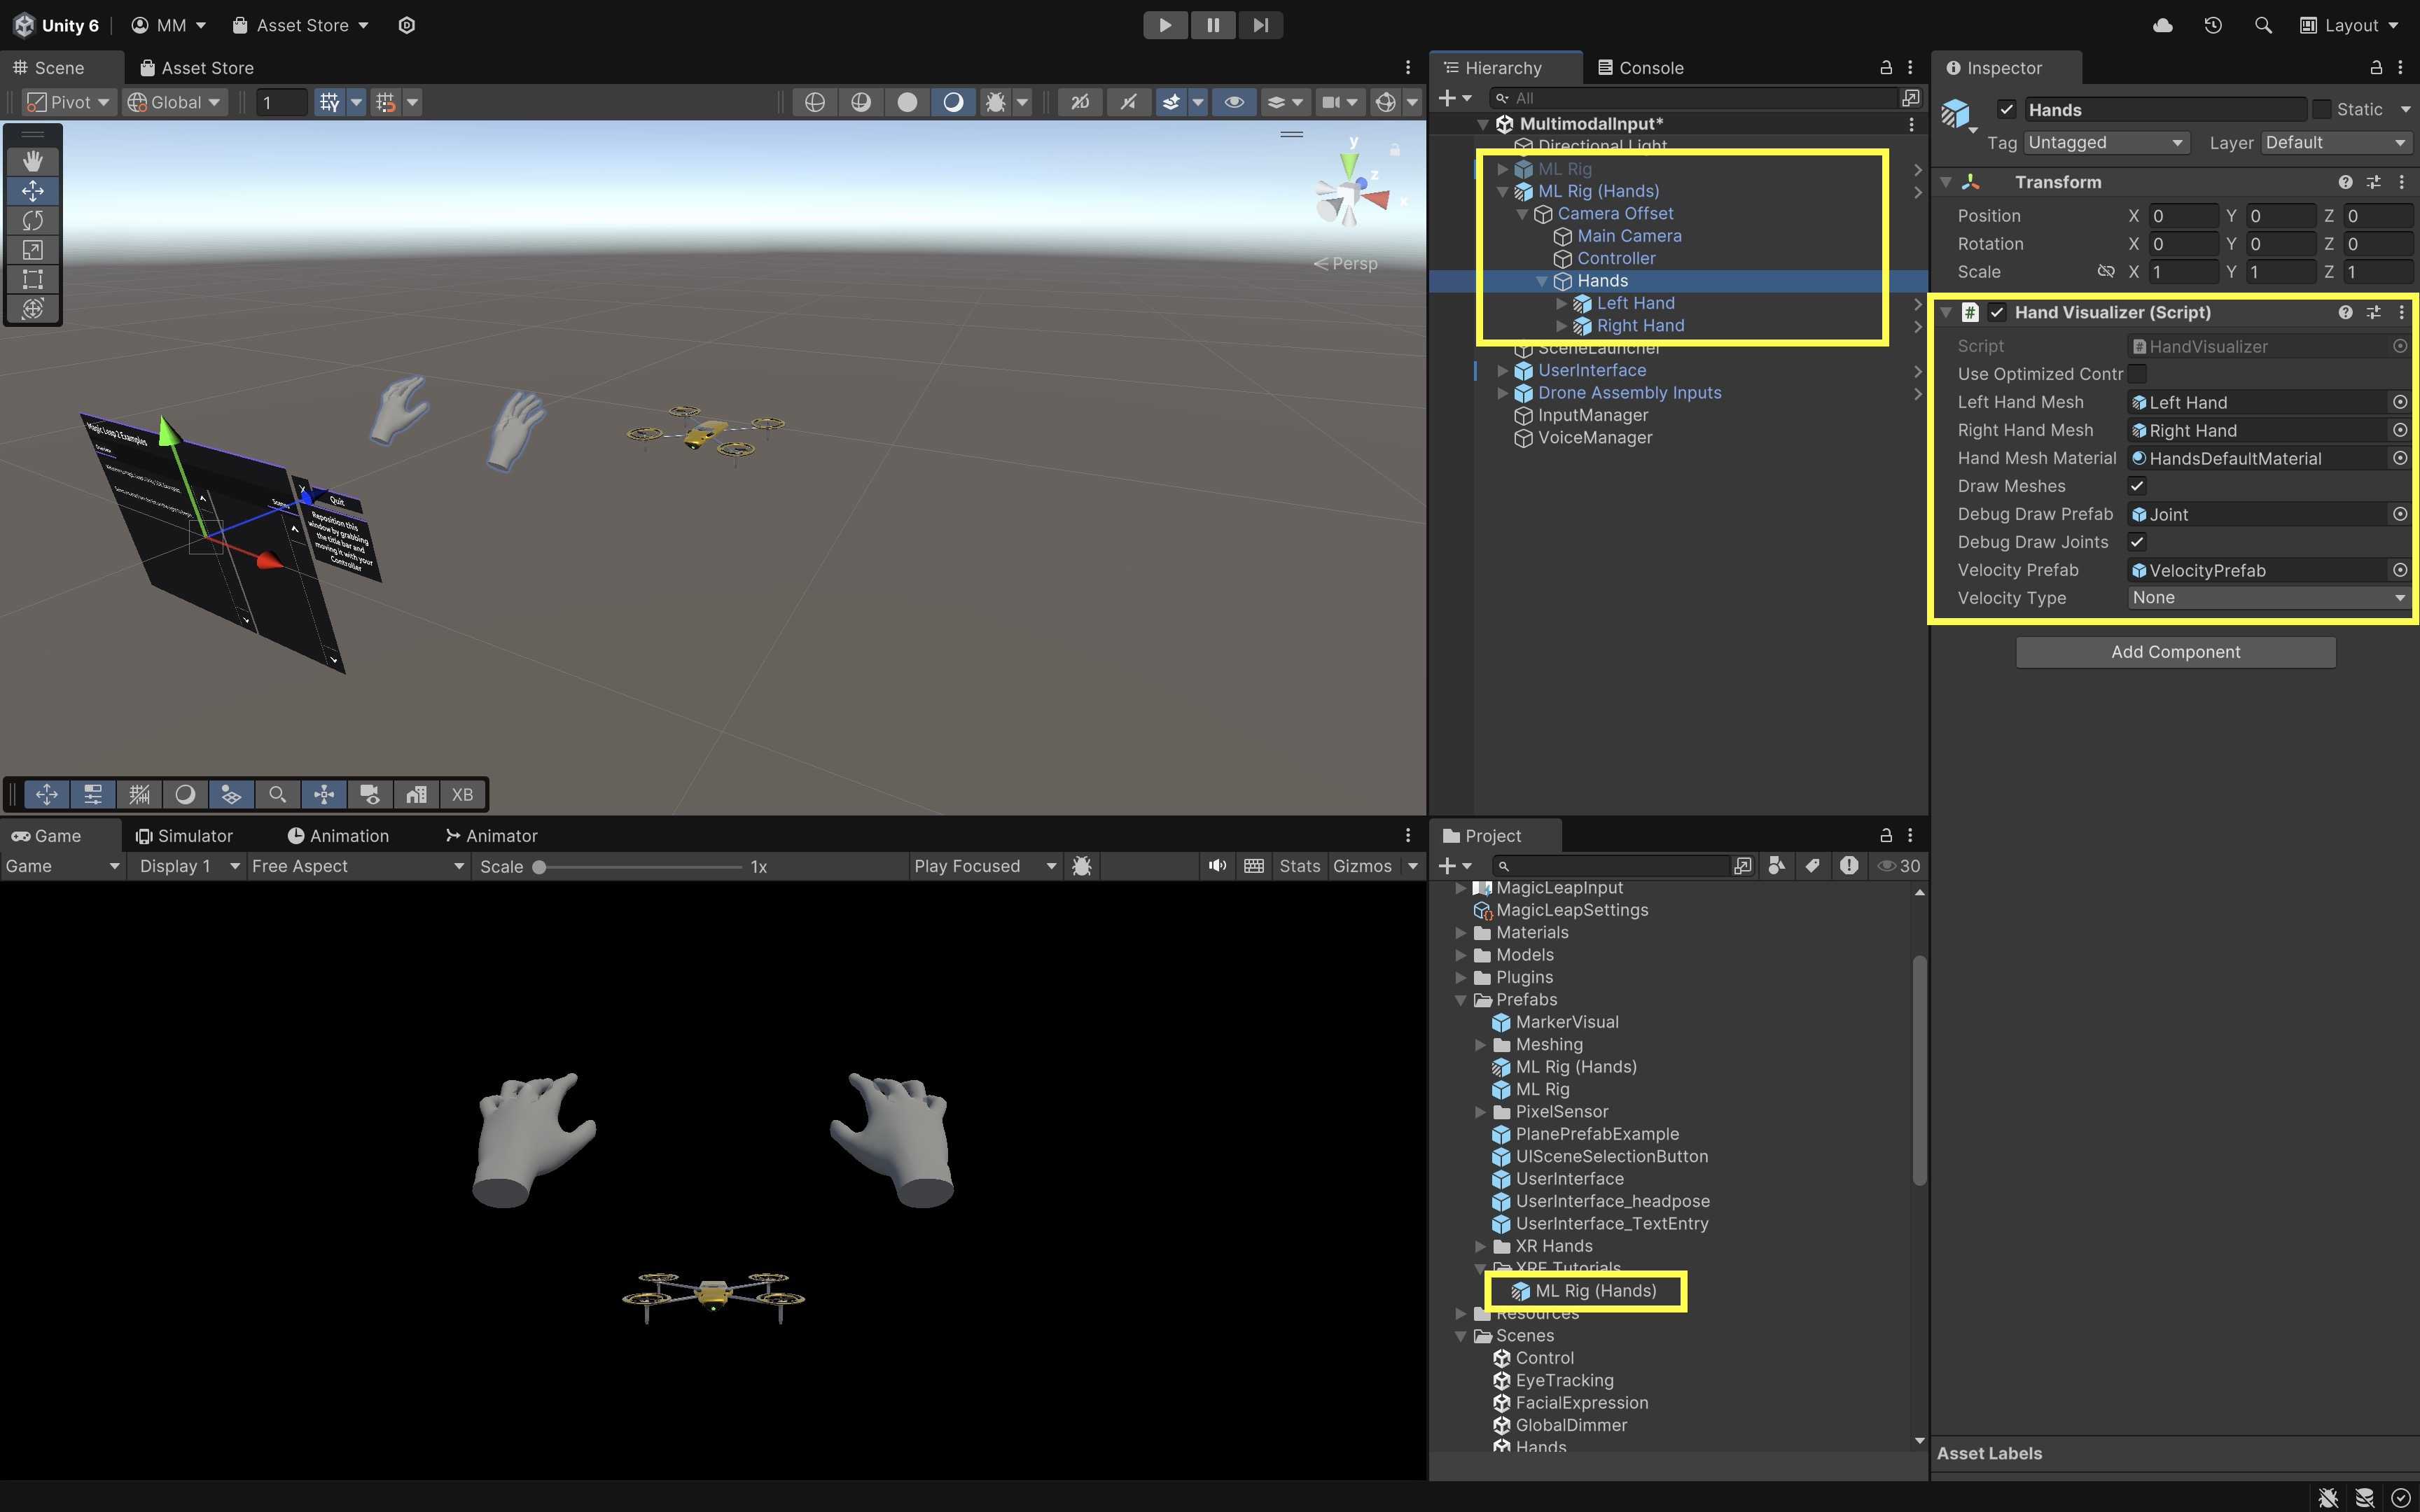
Now, let’s add hand tracking and pinch-to-grab functionality to our existing Magic Leap scene that already supports controller and voice commands. Users will be able to pinch with their index finger and thumb to grab a drone part, move it around using their hand, and release the pinch to drop the part, which then returns smoothly to its original position.
- Prepare the Hand Tracking Rig:
- Open the provided
Hands.unityscene underAssets > Scenes > Hands.unity. - In the
Hierarchy, locate the GameObject namedML Rig (Hands). - Drag it to
Assets > Prefabs > XRE Tutorialsto save it as anOriginal Prefab(ML Rig (Hands).prefab). - Open your main scene (e.g.,
MultimodalInput.unity). - Delete or disable the existing
ML Rig. - Drag the newly saved prefab
ML Rig (Hands)into theHierarchyand position it appropriately. This prefab includes aHand Visualizercomponent and the required tracking setup.
- Open the provided
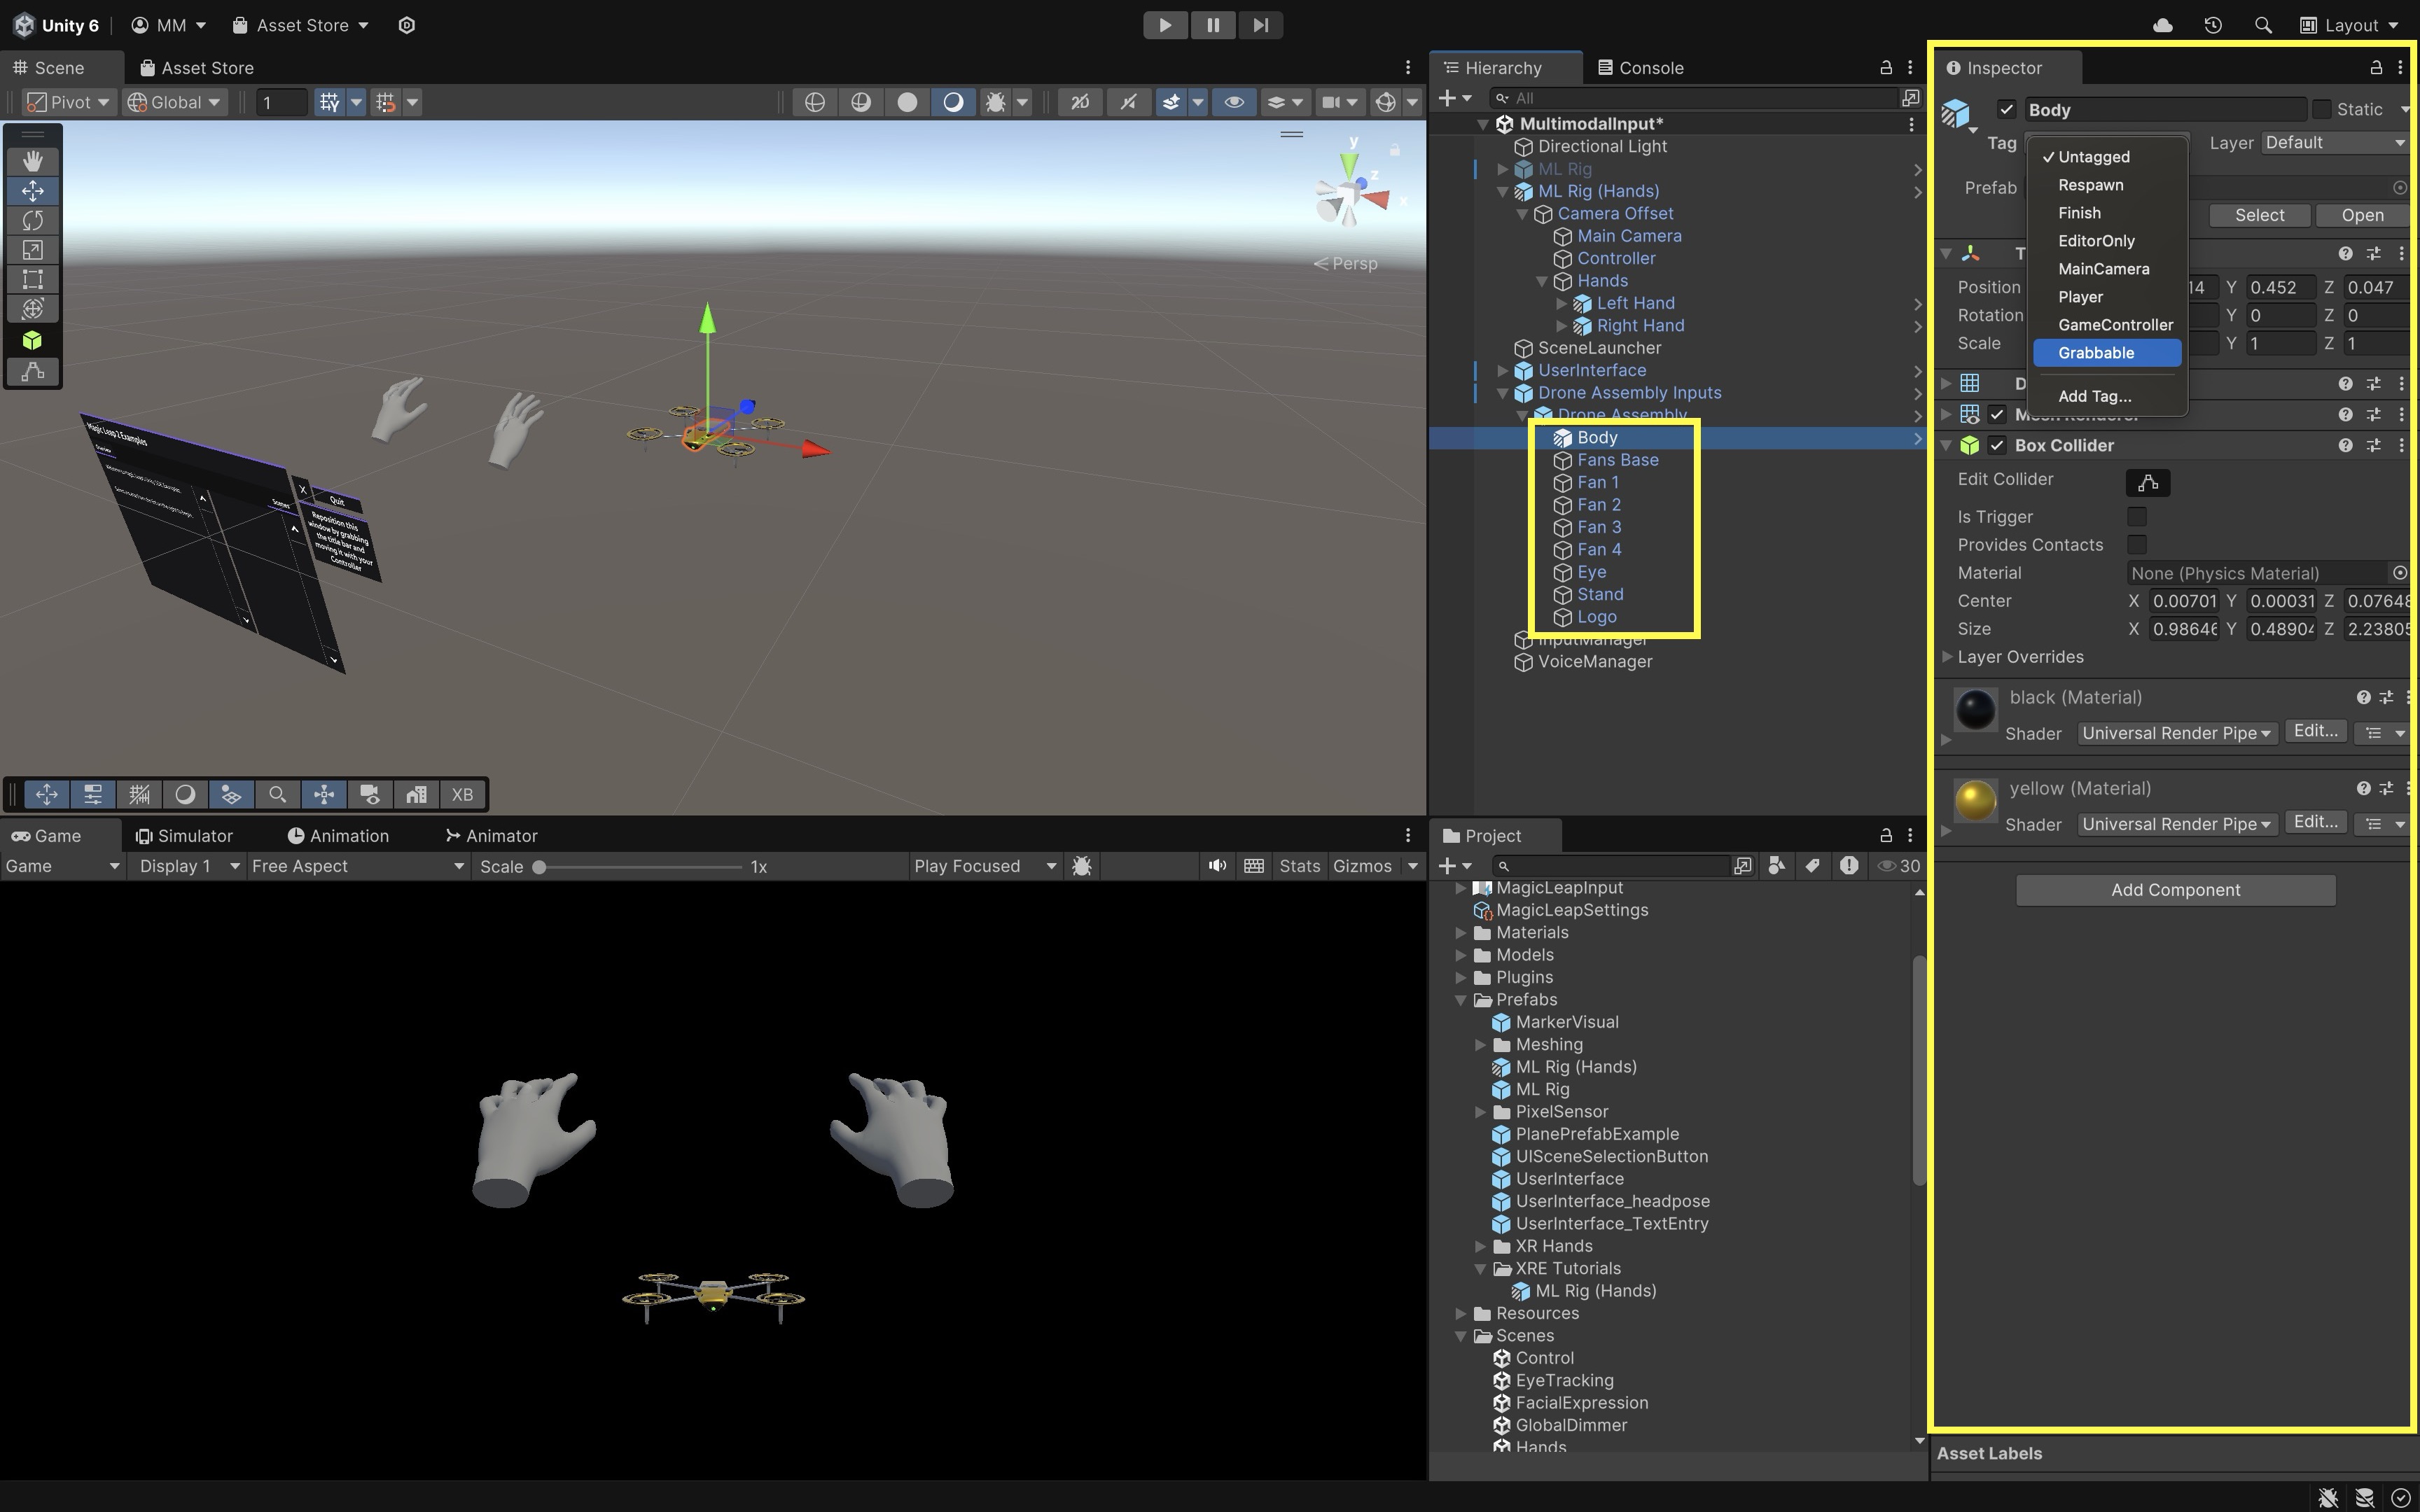
- Add Grabbable Drone Parts:
- Select the drone parts you want to make grabbable (e.g.,
Fan 1,Body, etc.). - For each part add a
BoxColliderorSphereColliderif one doesn’t exist. - With the parts still selected, open the
Tagdropdown in theInspectorand selectAdd Tag.... - Create a new tag called
Grabbable. - Then assign it under the objects’
Tagdropdown.
- Select the drone parts you want to make grabbable (e.g.,
- Create the Grabbing Script:
- Create a new script in
Assets > Scripts > XRE Tutorials - Name it
HandGrabManager.csand paste the following code:
using System.Collections.Generic; using UnityEngine; using UnityEngine.InputSystem; using UnityEngine.InputSystem.XR; using UnityEngine.XR.Interaction.Toolkit.Inputs; using System.Collections; public class HandGrabManager : MonoBehaviour { [SerializeField] private Camera mainCamera; [SerializeField] private float grabDistance = 0.1f; [SerializeField] private float returnSpeed = 2f; [SerializeField] private Animator animatorToControl; [SerializeField] private float animatorReactivateDelay = 1.5f; private InputActionMap leftHandMap; private InputActionMap rightHandMap; private InputAction leftPinchPose; private InputAction leftPinchValue; private InputAction leftPinchReady; private InputAction rightPinchPose; private InputAction rightPinchValue; private InputAction rightPinchReady; private Transform grabbedObject = null; private Vector3 originalPosition; private Quaternion originalRotation; private bool isGrabbing = false; private Coroutine reenableAnimatorCoroutine; private enum HandSide { Left, Right } private HandSide activeHand; private void Start() { var inputManager = FindObjectOfType<InputActionManager>(); var inputAsset = inputManager.actionAssets[0]; leftHandMap = inputAsset.FindActionMap("LeftHand"); rightHandMap = inputAsset.FindActionMap("RightHand"); leftPinchPose = leftHandMap.FindAction("Pinch"); leftPinchValue = leftHandMap.FindAction("PinchValue"); leftPinchReady = leftHandMap.FindAction("PinchReady"); rightPinchPose = rightHandMap.FindAction("Pinch"); rightPinchValue = rightHandMap.FindAction("PinchValue"); rightPinchReady = rightHandMap.FindAction("PinchReady"); leftHandMap.Enable(); rightHandMap.Enable(); } private void Update() { HandlePinch( leftPinchPose, leftPinchValue, leftPinchReady, HandSide.Left ); HandlePinch( rightPinchPose, rightPinchValue, rightPinchReady, HandSide.Right ); UpdateReturn(); } private void HandlePinch( InputAction poseAction, InputAction valueAction, InputAction readyAction, HandSide hand ) { var ready = readyAction.ReadValue<float>() > 0f; var value = valueAction.ReadValue<float>(); if (!ready) return; PoseState poseState = poseAction.ReadValue<PoseState>(); Vector3 pinchPos = poseState.position; if (value > 0.9f) { if (!isGrabbing) { Collider[] hits = Physics.OverlapSphere( pinchPos, grabDistance ); foreach (var hit in hits) { if (hit.CompareTag("Grabbable")) { grabbedObject = hit.transform; originalPosition = grabbedObject.position; originalRotation = grabbedObject.rotation; isGrabbing = true; activeHand = hand; // Stop any pending reactivation if (reenableAnimatorCoroutine != null) { StopCoroutine(reenableAnimatorCoroutine); reenableAnimatorCoroutine = null; } // Disable animator immediately if (animatorToControl != null && animatorToControl.enabled) { animatorToControl.enabled = false; } break; } } } if (isGrabbing && hand == activeHand && grabbedObject != null) { grabbedObject.position = pinchPos; } } else if (isGrabbing && hand == activeHand) { isGrabbing = false; // Start delayed animator re-enable if (animatorToControl != null) { reenableAnimatorCoroutine = StartCoroutine( ReenableAnimatorAfterDelay( animatorReactivateDelay ) ); } } } private void UpdateReturn() { if (!isGrabbing && grabbedObject != null) { grabbedObject.position = Vector3.Lerp( grabbedObject.position, originalPosition, Time.deltaTime * returnSpeed ); grabbedObject.rotation = Quaternion.Slerp( grabbedObject.rotation, originalRotation, Time.deltaTime * returnSpeed ); float distance = Vector3.Distance( grabbedObject.position, originalPosition ); if (distance < 0.001f) { grabbedObject.position = originalPosition; grabbedObject.rotation = originalRotation; grabbedObject = null; } } } private IEnumerator ReenableAnimatorAfterDelay(float delay) { yield return new WaitForSeconds(delay); if (animatorToControl != null) { animatorToControl.enabled = true; } reenableAnimatorCoroutine = null; } } - Create a new script in
- Attach and Configure the Script:
- In the
Hierarchy, create an empty GameObject and name itHandGrabManager. - Attach the
HandGrabManager.csscript to this GameObject. - In the
Inspector, drag theMain Camera(from yourML Rig (Hands)) into theMain Camerafield. - Drag the
Drone AssemblyGameObject (or the object containing the Animator component) into theAnimator To Controlfield. - Adjust
Grab DistanceandReturn Speedas needed. - Make sure each drone part you want to grab has a collider (Box or Mesh) and the tag
Grabbable.

The
Animatoris temporarily disabled during grab interactions to prevent animation overrides from interfering with object manipulation. It is automatically re-enabled after a short delay when the grab ends. - In the
- Build and Test:
- Build and deploy the scene to the Magic Leap 2 device.
- Look at the drone in the scene.
- Pinch your index finger and thumb near a part to grab a drone part when close. Works for both hands.
- Move it around in 3D space.
- Release the pinch. The part will smoothly return to its original position.
You can combine this with voice commands (e.g.,
"Grab Body") or gestures (e.g., open palm = highlight). This completes your multimodal interaction stack: controller + voice + hand tracking.
Gaze
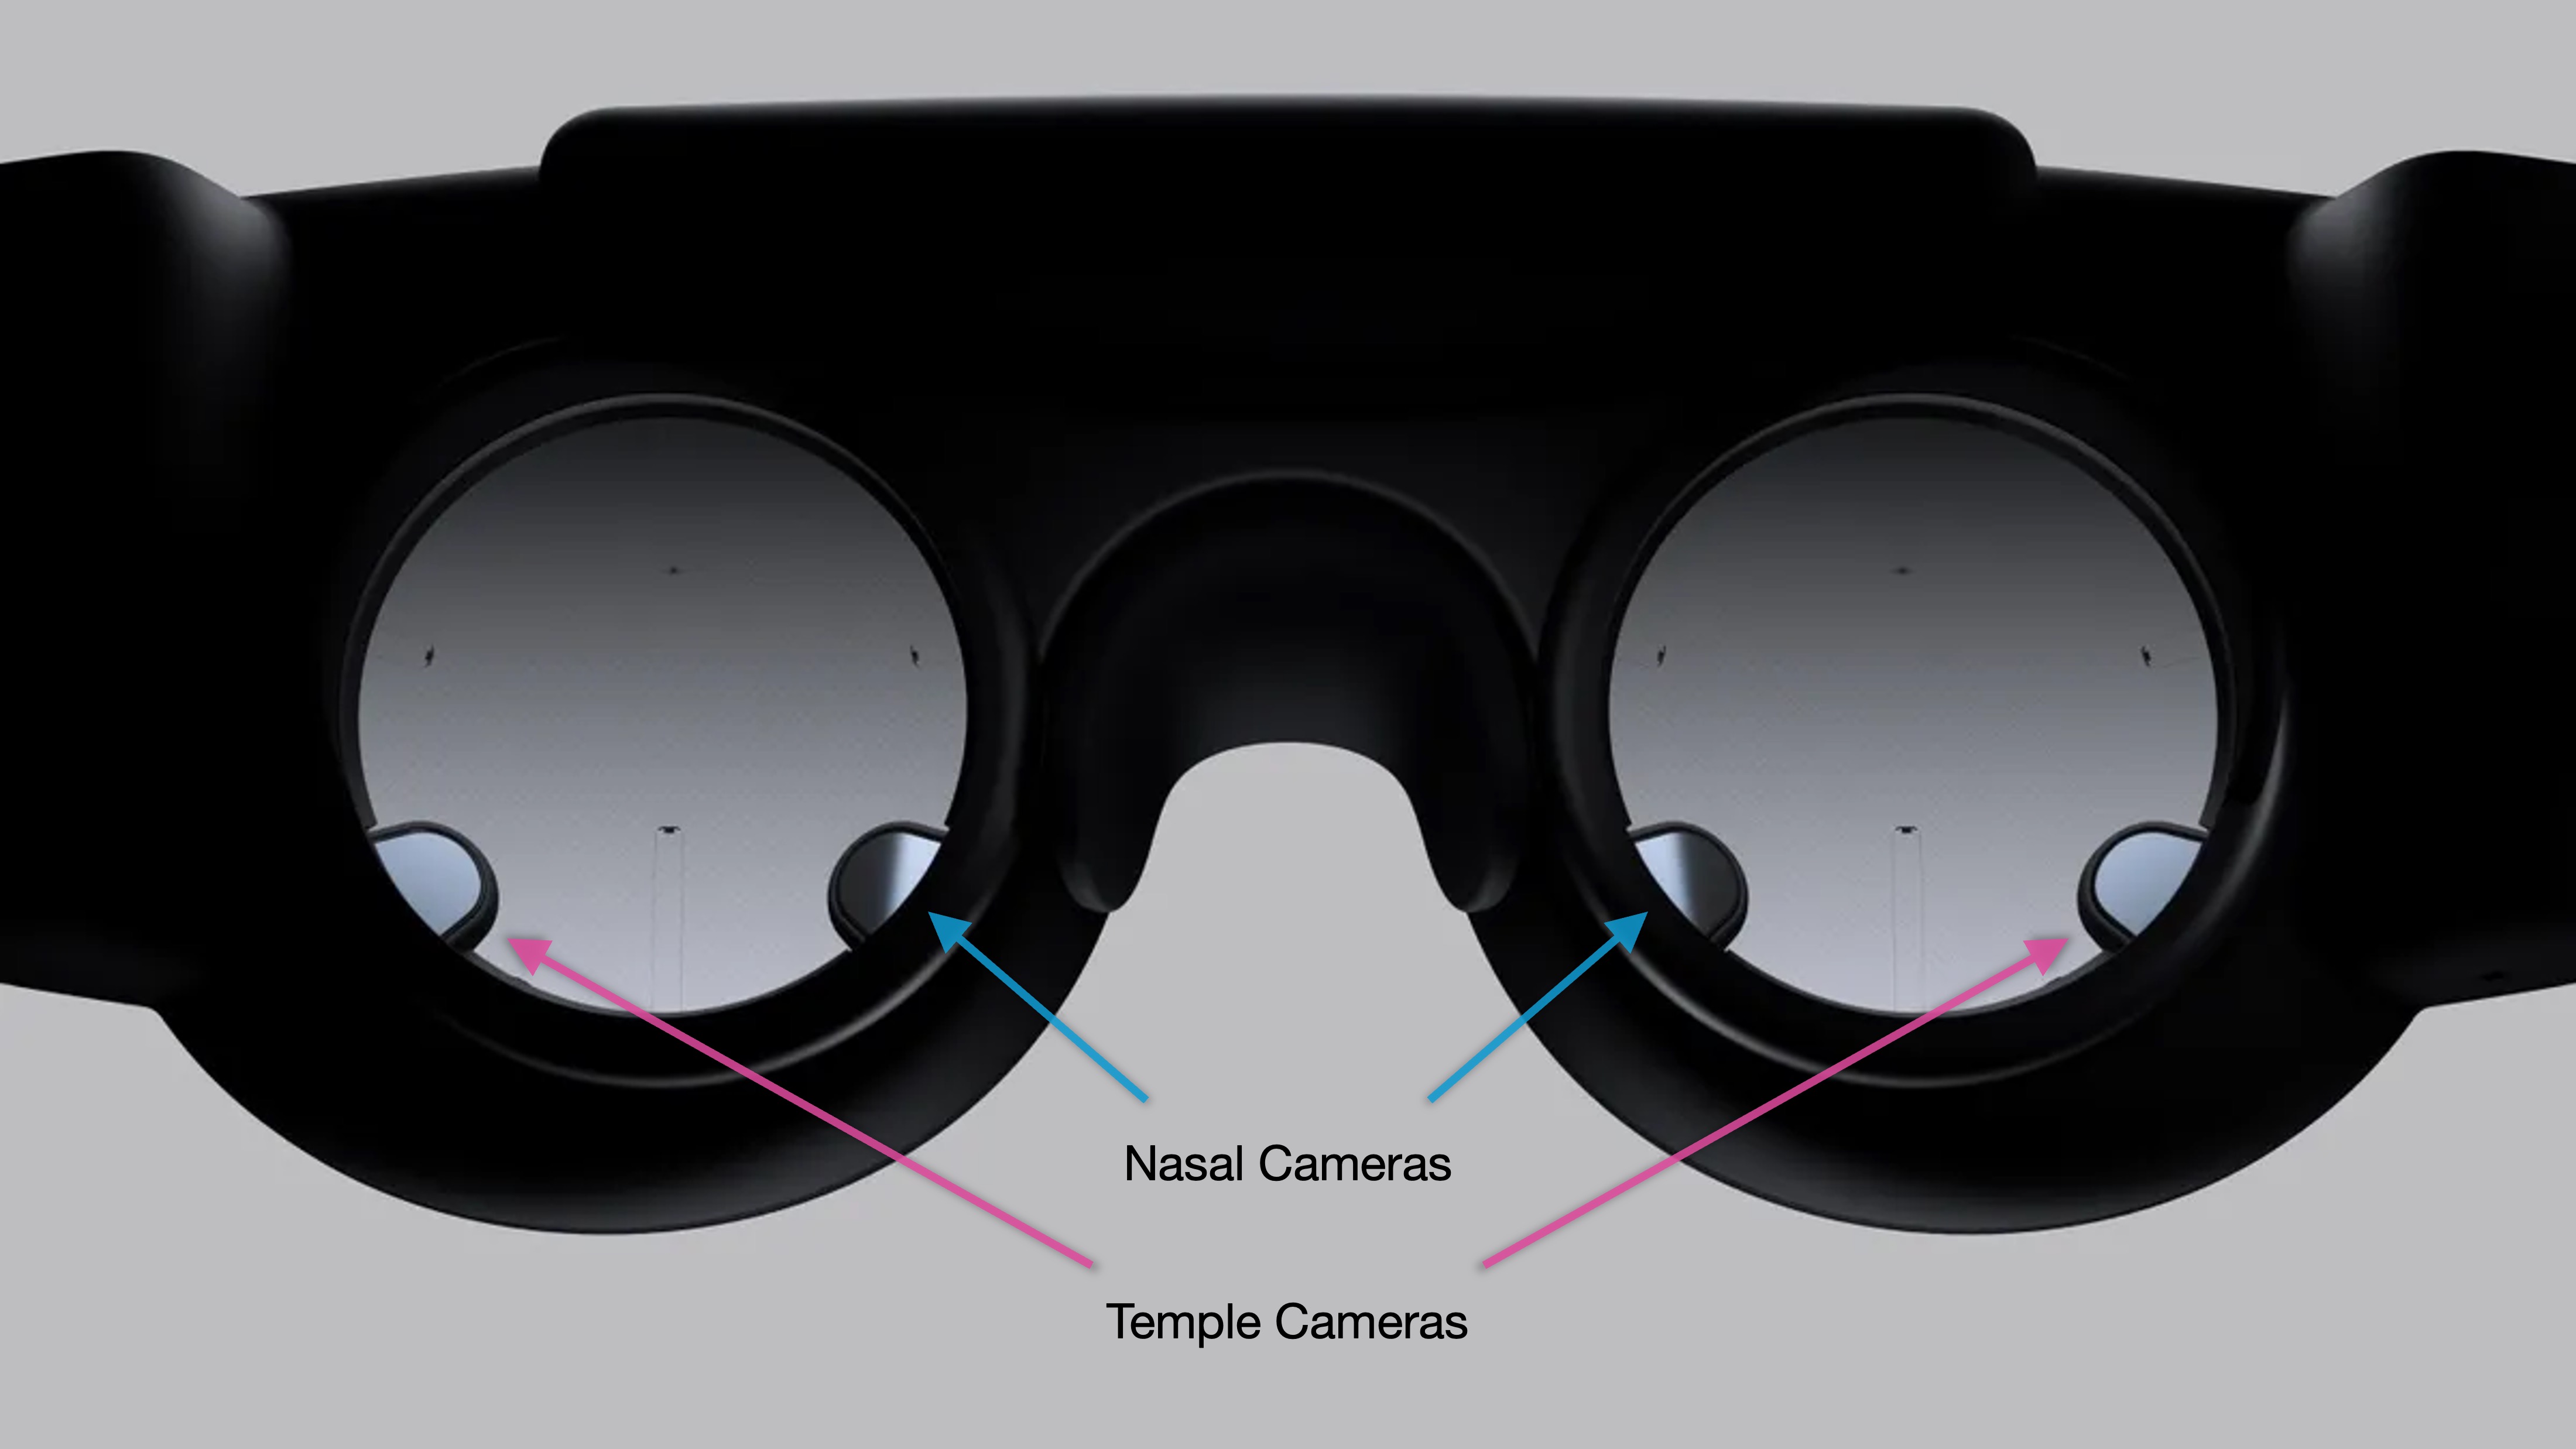
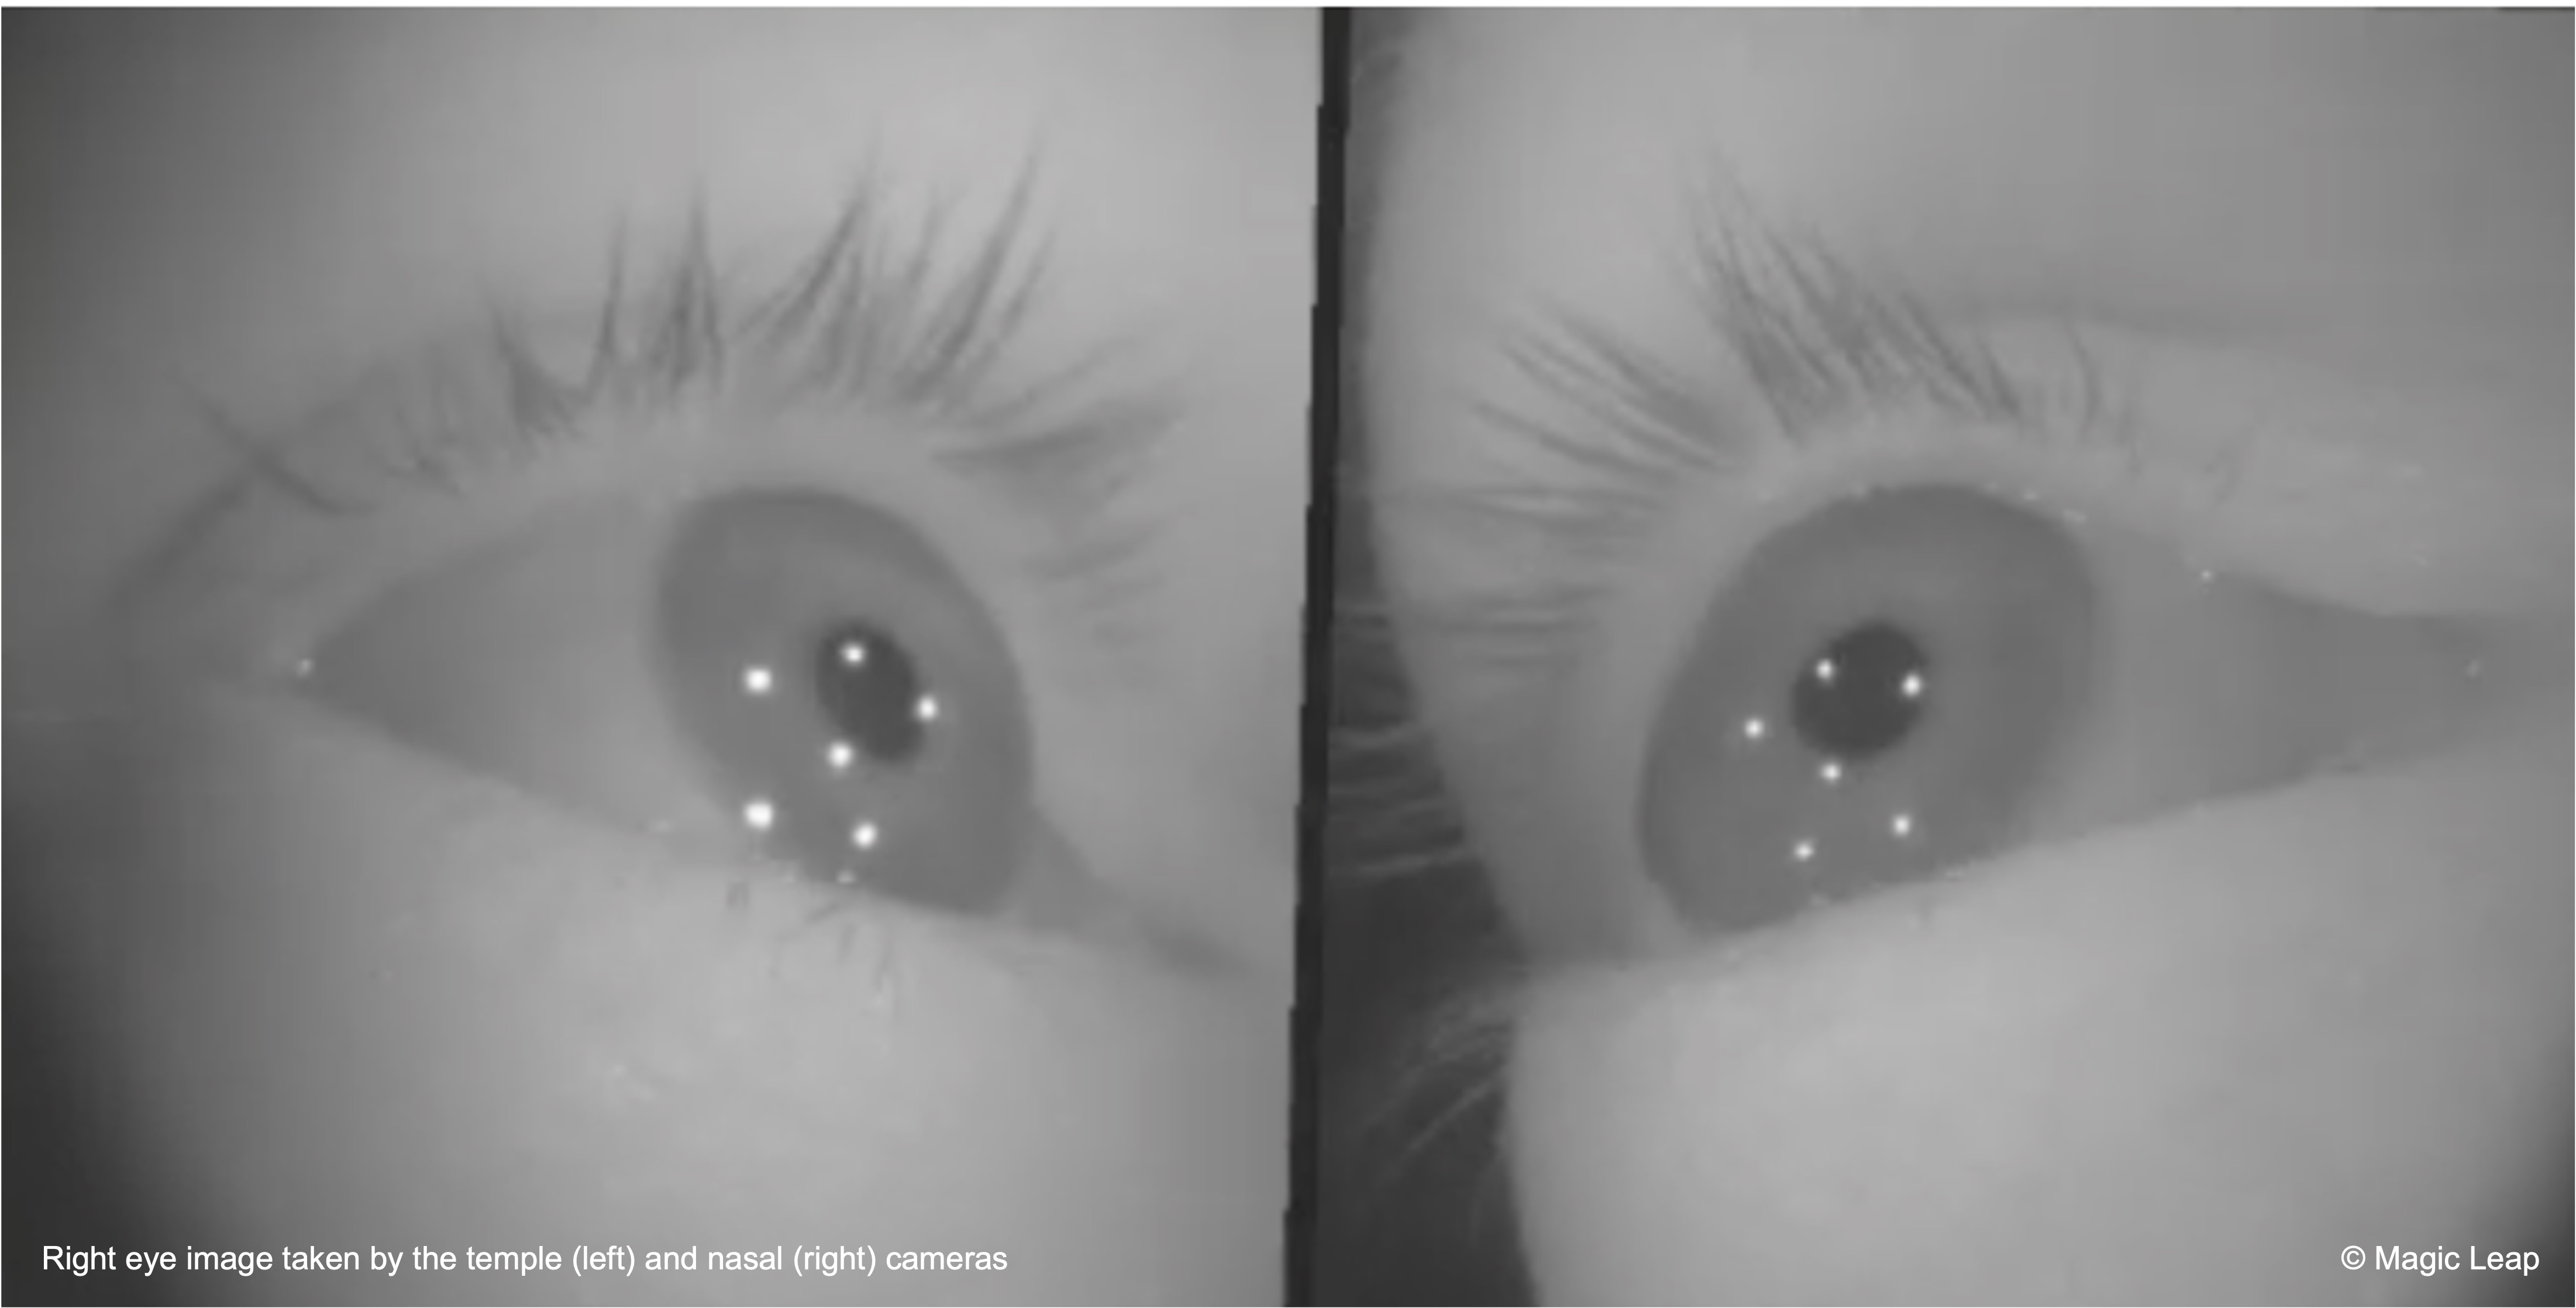
Gaze input leverages eye tracking to determine where the user is looking, enabling spatial AR systems to infer focus, intent, or interest. In immersive environments, this input modality is fast, subtle, and intuitive—ideal for hands-free interaction, attention-aware interfaces, and multimodal workflows. This enables gaze-driven interactions such as selecting UI elements, highlighting objects, triggering context-sensitive actions, or augmenting other inputs like speech, gesture, or controller. Magic Leap 2 includes high-fidelity eye tracking with support for gaze direction and origin, fixation points, pupil size and dilation, blink detection, and confidence metrics for each eye. Common use cases of gaze-based input include:
- Gaze-Driven UI: Streamline selection by simply looking at UI elements or 3D models.
- Passive Observation: Gather analytics about what users focus on and for how long.
- Multimodal Context: Use gaze to enhance gestures (look-and-pinch) or speech (look-and-say).
- Natural Interaction: Mimics real-world attention mechanics.
Gaze-based interaction in Magic Leap 2 provides a powerful, subtle way to select and inspect digital content without using hands or controllers, enhance voice or gesture-based workflows with contextual awareness, and build intuitive, immersive interfaces for immersive and hands-free engineering applications.
Core Concepts
-
Eyes Controller: XR Interaction Toolkit GameObject that behaves like a controller but is driven by gaze direction. It acts as a proxy input device, allowing developers to treat eye gaze similarly to hand-held controllers in XR interactions, simplifying integration into existing input systems.
-
GazeRayInput: A custom controller subclass that maps eye gaze to ray-based input in the XR Interaction Toolkit. This enables eye gaze to control UI elements or interactable objects by casting an invisible ray from the user’s eye position into the 3D scene, useful for point-and-select actions. -
MLPermissions: API for requesting runtime permissions such as eye tracking. It ensures that user consent is granted before accessing sensitive system features, supporting best practices in privacy and security. -
MLPermission.EyeTracking: Specific permission required to enable Magic Leap’s eye tracking system. This must be explicitly granted by the user or application at runtime to activate and use eye-tracking data, forming a crucial step in initializing gaze-driven functionality. -
MLEyes: Subsystem API for starting and stopping eye tracking functionality. It provides access to low-level gaze data such as direction, fixation, and blink state, allowing developers to build custom behaviors and analytics based on visual attention. -
XR Ray Interactor: Core component used to raycast from gaze direction and interact with virtual objects. Often used in conjunction with gaze input, it determines what the user is “looking at” by projecting a ray into the environment and detecting collisions with objects, enabling gaze-based selection and interaction.
Review this Magic Leap documentation to learn more about developing custom eye tracking capabilities for Magic Leap 2.
Custom Gaze Input
Let’s explore how to use gaze fixation combined with a voice command (“Inspect”) to interact with drone parts. When the user fixates on a part for one second and says “Inspect”, the part will smoothly move toward the user, rotate for a few seconds, and then return to its original position. This approach ensures intentional interaction and avoids false activations from gaze alone.
- Prepare the Scene and GameObjects:
- Open the
MultimodalInput.unityscene. - Locate the
Drone Assembly InputsGameObject. - Expand the prefab in the
Hierarchyand ensure each child object (e.g.,Fan 1,Fan Base,Body) has aCollidercomponent (Box, Mesh, etc.) to detect gaze hits.
- Open the
- Create the Gaze Input Script:
- Create a new C# script named
GazeInput.cs. - Replace the contents with the following:
using System.Collections; using System.Collections.Generic; using UnityEngine; using UnityEngine.InputSystem; using UnityEngine.InputSystem.XR; using UnityEngine.XR.Interaction.Toolkit.Inputs; public class GazeInput : MonoBehaviour { [Header("Drone Parts")] public List<Transform> droneParts; [Header("Gaze & Gesture Settings")] public float fixationDuration = 1f; public float focusDistance = 0.5f; public float rotationDuration = 3f; public float moveSpeed = 3f; public float rotateSpeed = 30f; [Header("Hand Input")] public PinchGesture.Hands hand = PinchGesture.Hands.Right; [Header("Animator Control")] public Animator parentAnimatorToDisable; private Camera mainCamera; private Transform currentTarget; private float gazeTimer = 0f; private bool isInteracting = false; private bool hasPinched = false; private InputActionMap actionMap; private Dictionary<Transform, Vector3> originalPositions = new(); private Dictionary<Transform, Quaternion> originalRotations = new(); private Dictionary<Transform, Animator> partAnimators = new(); private void Start() { mainCamera = Camera.main; var ism = FindObjectOfType<InputActionManager>(); var mapAsset = ism.actionAssets[0]; actionMap = hand switch { PinchGesture.Hands.Left => mapAsset.FindActionMap("LeftHand"), PinchGesture.Hands.Right => mapAsset.FindActionMap("RightHand"), _ => throw new System.NotImplementedException() }; foreach (var part in droneParts) { originalPositions[part] = part.position; originalRotations[part] = part.rotation; Animator animator = part.GetComponent<Animator>(); if (animator != null) partAnimators[part] = animator; } } private void Update() { if (isInteracting) return; float pinchValue = actionMap .FindAction("PinchValue") .ReadValue<float>(); bool pinchReady = actionMap .FindAction("PinchReady") .ReadValue<float>() > 0f; if (pinchValue > 0.9f && pinchReady && !hasPinched) { hasPinched = true; if (currentTarget != null && gazeTimer >= fixationDuration) { StartCoroutine(InspectPart(currentTarget)); } } else if (pinchValue < 0.9f) { hasPinched = false; } Ray gazeRay = new Ray( mainCamera.transform.position, mainCamera.transform.forward ); if (Physics.Raycast(gazeRay, out RaycastHit hit)) { Transform hitTransform = hit.transform; if (droneParts.Contains(hitTransform)) { if (currentTarget == hitTransform) { gazeTimer += Time.deltaTime; } else { currentTarget = hitTransform; gazeTimer = 0f; } } else { currentTarget = null; gazeTimer = 0f; } } else { currentTarget = null; gazeTimer = 0f; } } private IEnumerator InspectPart(Transform part) { isInteracting = true; if (parentAnimatorToDisable != null) parentAnimatorToDisable.enabled = false; Vector3 originalPos = originalPositions[part]; Quaternion originalRot = originalRotations[part]; Vector3 targetPos = mainCamera.transform.position + mainCamera.transform.forward * focusDistance; if (partAnimators.TryGetValue(part, out Animator animator) && animator != null) { animator.enabled = false; } float t = 0f; while (t < 1f) { part.position = Vector3.Lerp(originalPos, targetPos, t); t += Time.deltaTime * moveSpeed; yield return null; } float rotateTime = 0f; while (rotateTime < rotationDuration) { part.Rotate( Vector3.up, rotateSpeed * Time.deltaTime, Space.Self ); rotateTime += Time.deltaTime; yield return null; } t = 0f; while (t < 1f) { part.position = Vector3.Lerp( part.position, originalPos, t ); part.rotation = Quaternion.Slerp( part.rotation, originalRot, t ); t += Time.deltaTime * moveSpeed; yield return null; } part.position = originalPos; part.rotation = originalRot; yield return new WaitForSeconds(1f); if (animator != null) animator.enabled = true; if (parentAnimatorToDisable != null) parentAnimatorToDisable.enabled = true; isInteracting = false; } } - Create a new C# script named
- Attach and Configure the Script:
- In your scene, create an empty GameObject named
GazeManager. - Attach the
GazeInput.csscript to this GameObject. - Got to the
Inspector. - Populate the
Drone Partslist by dragging each drone part (children ofDrone Assembly Inputs) into the array. - Assign the
Drone AssemblyGameObject (or any parent object with anAnimatorcomponent you want disabled during interaction). - Use the
Handdropdown to select which hand should trigger the interaction via pinch (LeftorRight). - Ensure each part has a
Collidercomponent (Box,Mesh, etc.) to enable gaze detection. - Adjust
Gaze & Gesture Settings. Fixation Durationspecifies how long the user must maintain gaze before the part becomes eligible for pinch interaction.Focus Distanceis the distance the part should move toward the camera.Rotation Durationspecifies how long the part should rotate before returning.Move SpeedandRotate Speedcontrol animation timing and responsiveness.
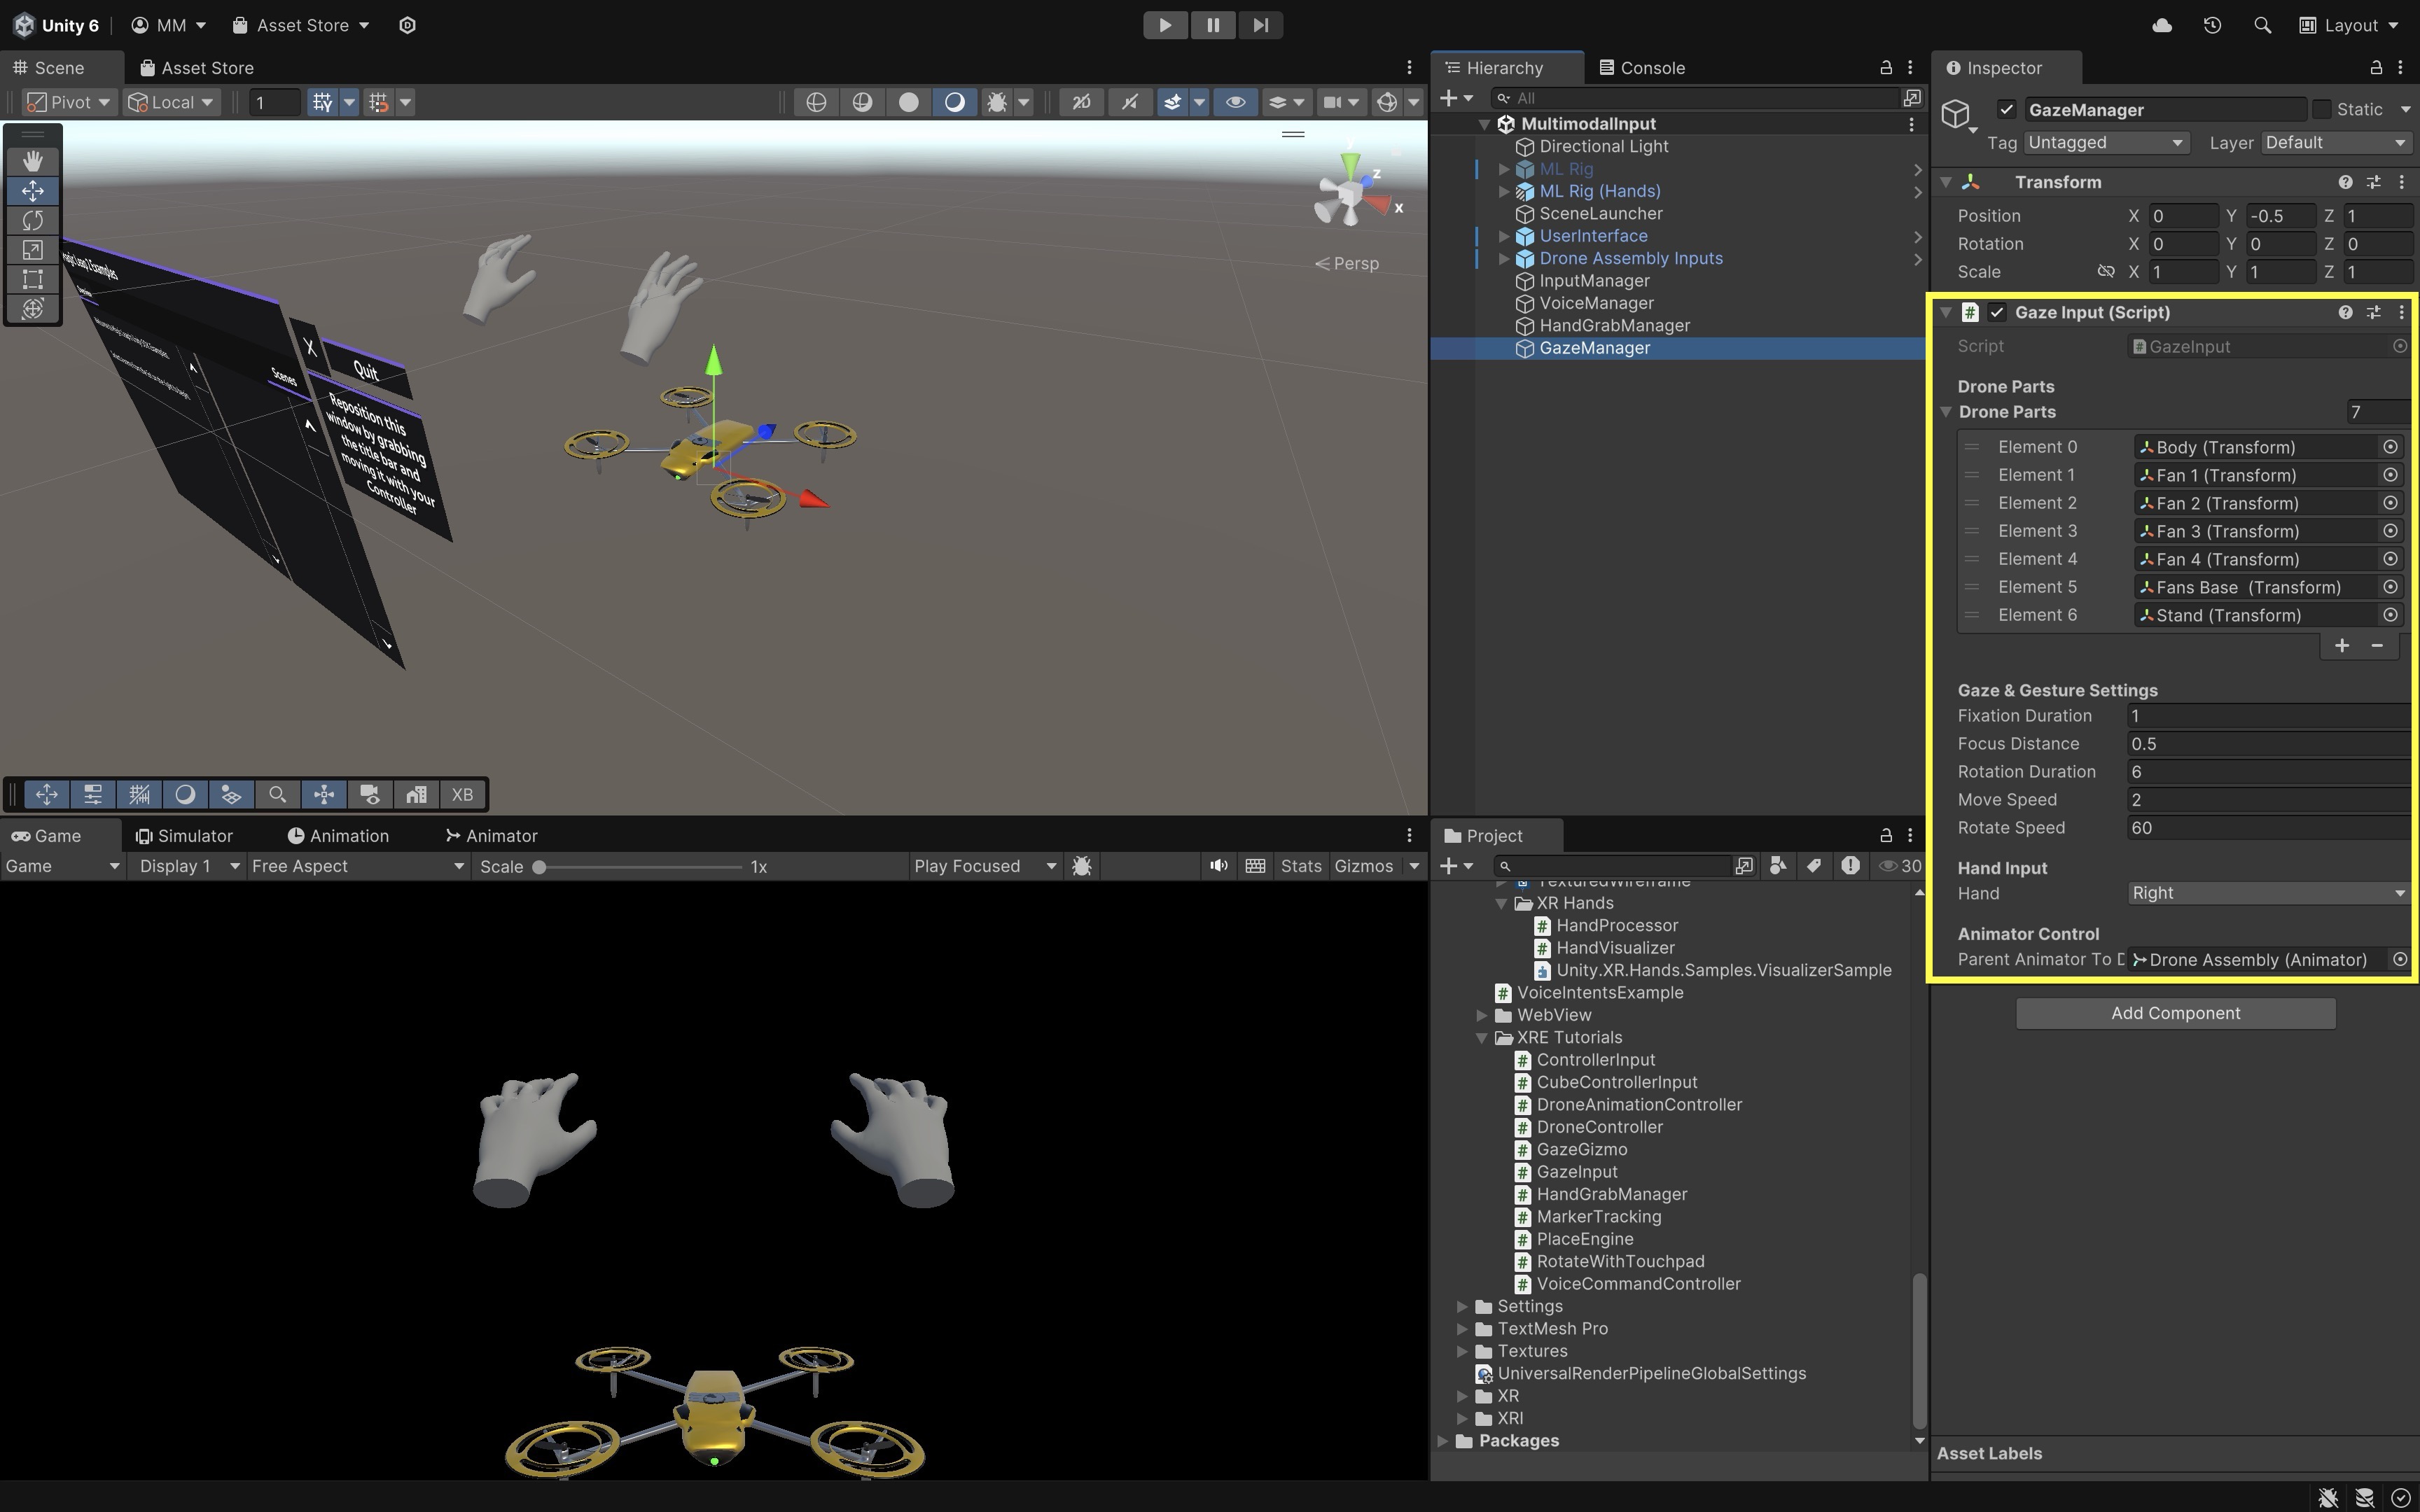
The
Animatoron the parent is temporarily disabled during interaction to prevent it from overriding scripted movement. It is automatically re-enabled when the part returns to its original pose. - In your scene, create an empty GameObject named
- Build and Test:
- Build and deploy the scene to the Magic Leap 2 headset.
- Launch the app.
- Fixate your gaze on any visible drone part (e.g.,
Body) for 1 second, then perform a pinch gesture with the selected hand. - The part will *move smoothly toward you** (~0.5 meters), rotate in place for the specified duration, and return to its original position and orientation.
This interaction design creates a deliberate and intuitive experience using gaze and hand gesture, ideal for inspection, simulation, and other control workflows.
Key Takeaways
Multimodal input in wearable AR—combining voice, gaze, gestures, and controllers—enables more natural, flexible, and context-aware interactions by letting users choose or blend input methods that best suit their environment and task. In Magic Leap 2 development, controllers offer precise, tactile control; voice commands provide hands-free convenience; hand gestures enable intuitive, direct manipulation; and gaze input adds subtle, attention-driven selection. Designing effective multimodal systems means aligning modalities with user context, ensuring responsiveness, supporting seamless switching, and providing redundancy for accessibility. By integrating these inputs thoughtfully, developers can create immersive AR experiences that feel fluid, adaptive, and user-centered.