E7. Wearable AR: Tracking & Anchors

Learning Outcomes
- Explain how image tracking anchors virtual content in spatial AR. Before class, review how fiducial markers like ArUco are configured, generated, and sized in Unity so you can explain how they align virtual objects with real-world positions.
- Configure marker tracking in Unity for spatial AR applications. Ahead of the session, practice setting marker types, generating markers, and—if possible—install required packages and add the
MarkerTrackingscript to a Unity project.- Describe the role of spatial anchors in persistent AR experiences. For your pre-class preparation, understand how location-bound digital content is created, stored, and restored in Magic Leap 2 environments.
- Set up spatial anchors in Unity with Magic Leap 2. In preparation, learn to scan spaces using the Spaces app, enable necessary permissions, configure the
AnchorExampleScript, and optionally preview anchor placement in the simulator.
Image Tracking
Image tracking is a core capability in wearable AR that allows digital content to be precisely anchored to real-world physical objects using visual markers. On the Magic Leap 2, this feature enables engineers, designers, and learners to experience spatially aligned 3D models, data overlays, and interactive animations by simply scanning specially designed markers—like ArUco tags or QR codes. Such experiences are invaluable for engineering education, industrial training, and technical maintenance, where understanding and interacting with sophisticated machinery benefits greatly from context-aware visual aids. Key applications include:
-
Anchoring Virtual Models to Real Objects: Markers help spatially align digital models with physical prototypes or machinery, ensuring that virtual overlays are contextually meaningful and precisely placed.
-
Triggering AR Interactions: By detecting a specific marker, the system can launch context-aware animations, data visualizations, or step-by-step instructions, making AR experiences dynamic and tailored to the user’s environment.
-
Spatial Awareness and Localization: Markers assist the AR system in understanding its surroundings, which can enhance tracking accuracy, reduce drift, and support experiences that require precise positioning, such as collaborative assembly tasks.

Picture entering a lab room while wearing a Magic Leap 2 headset, where a 3D printed replica of a V8 engine rests on a table. An ArUco marker is attached to the base of this replica. As soon as the headset detects the marker, a virtual twin of the V8 engine is overlaid precisely on top of the physical model. This spatial alignment creates an immersive AR experience, enabling users to explore interactive overlays, watch complex animations, or receive instructional guidance in real-time—directly on the actual equipment.
Fiducial Markers
Fiducial markers are special visual codes designed with distinct geometric patterns that are easily recognized by computer vision algorithms. They act as visual anchors in the physical environment, providing a bridge between the real and digital worlds. Common types of fiducial markers include:
-
QR Codes: These are familiar, grid-like matrix codes designed for rapid scanning and data retrieval. While commonly seen in consumer applications like links and payments, they can be repurposed in AR to trigger digital content quickly, such as launching an information panel or initiating a lightweight visualization in a prototype setting. QR codes are best for rapid prototyping, demonstrations, or simple data triggers in AR environments.
-
ArUco Markers: These are square binary markers known for their high reliability and robustness in detection, even under varying lighting and viewing angles. ArUco markers are particularly suited for industrial and engineering contexts, where precision and configurability are important. They allow the use of different dictionaries, enabling a vast number of unique markers with minimal confusion. They support customization via different dictionaries, making them scalable for complex systems with many unique markers.
-
Barcodes (UPC-A, EAN-13): Traditional linear barcodes used widely in retail and inventory systems. On Magic Leap 2, these are still experimental for AR purposes, but they hint at potential applications like inventory management or component tracking in logistics environments. Barcodes are currently experimental on Magic Leap 2, these could open up future opportunities in logistics, supply chain visualization, and inventory AR systems, although not yet commonly used for spatial anchoring.

Core Concepts and APIs
Understanding the main components and API elements involved in marker tracking on Magic Leap 2 is essential for developing robust AR applications:
-
MLMarkerTracker: This is the primary API provided by Magic Leap for detecting and tracking visual markers in real time. It handles the underlying computer vision processes and delivers marker detection results to your Unity application. -
TrackerSettings: A configuration structure that lets you specify how the tracker behaves. This includes setting the marker type (e.g., QR or ArUco), defining the physical size of the marker to ensure spatial scaling is accurate, and selecting the ArUco dictionary, which defines the set of markers the system should recognize. -
OnMLMarkerTrackerResultsFound: An event callback that gets triggered when a marker is detected within the headset’s field of view. It provides valuable data such as the marker’s unique ID for identification, the position and orientation (rotation) of the marker relative to the device, crucial for accurately positioning the virtual content, and additional tracking metrics that can be used to enhance the AR experience. -
MLMarkerTracker.StopScanningAsync(): An asynchronous method to stop the marker scanning process once a desired marker has been found. This is useful to prevent the system from continually processing markers unnecessarily. It optimizes performance by reducing computational load and avoids the unintended spawning of multiple instances of virtual content. -
Manifest Permission:
MARKER_TRACKING: To enable marker tracking in your Magic Leap 2 application, the Android manifest must declare theMARKER_TRACKINGpermission. Without this, marker tracking APIs won’t function, and your application may not pass necessary platform checks.
Implementation
To ground these concepts in a practical, engineering-focused application, we will implement an interactive drone disassembly sequence. This running example will spawn the virtual drone on top of a detected QR code marker, representing a real-world drone or its placeholder, and then trigger a step-by-step disassembly animation sequence, illustrating the internal components of the drone. The sequence will progress each time the Magic Leap 2 controller’s trigger button is pressed.
This example showcases how AR can transform engineering education and industrial workflows, such as technical training, where learners explore internal machinery safely, maintenance guidance, showing service technicians how to disassemble equipment, or design visualization, enabling teams to showcase assembly and function of complex products interactively.
- Scene Preparation:
- Open the
MarkerTracking.unityscene provided in the Magic Leap examples project. - Save it as a new scene in a different folder (e.g.,
Assets > Scenes > XRE Tutorials > MarkerTracking.unity) to keep the original for future use. - In the
Hierarchy, delete everything exceptML RigandDirectional Light. - Save the scene.
- Open the
- Import and Prepare the Drone Prefab:
- Import
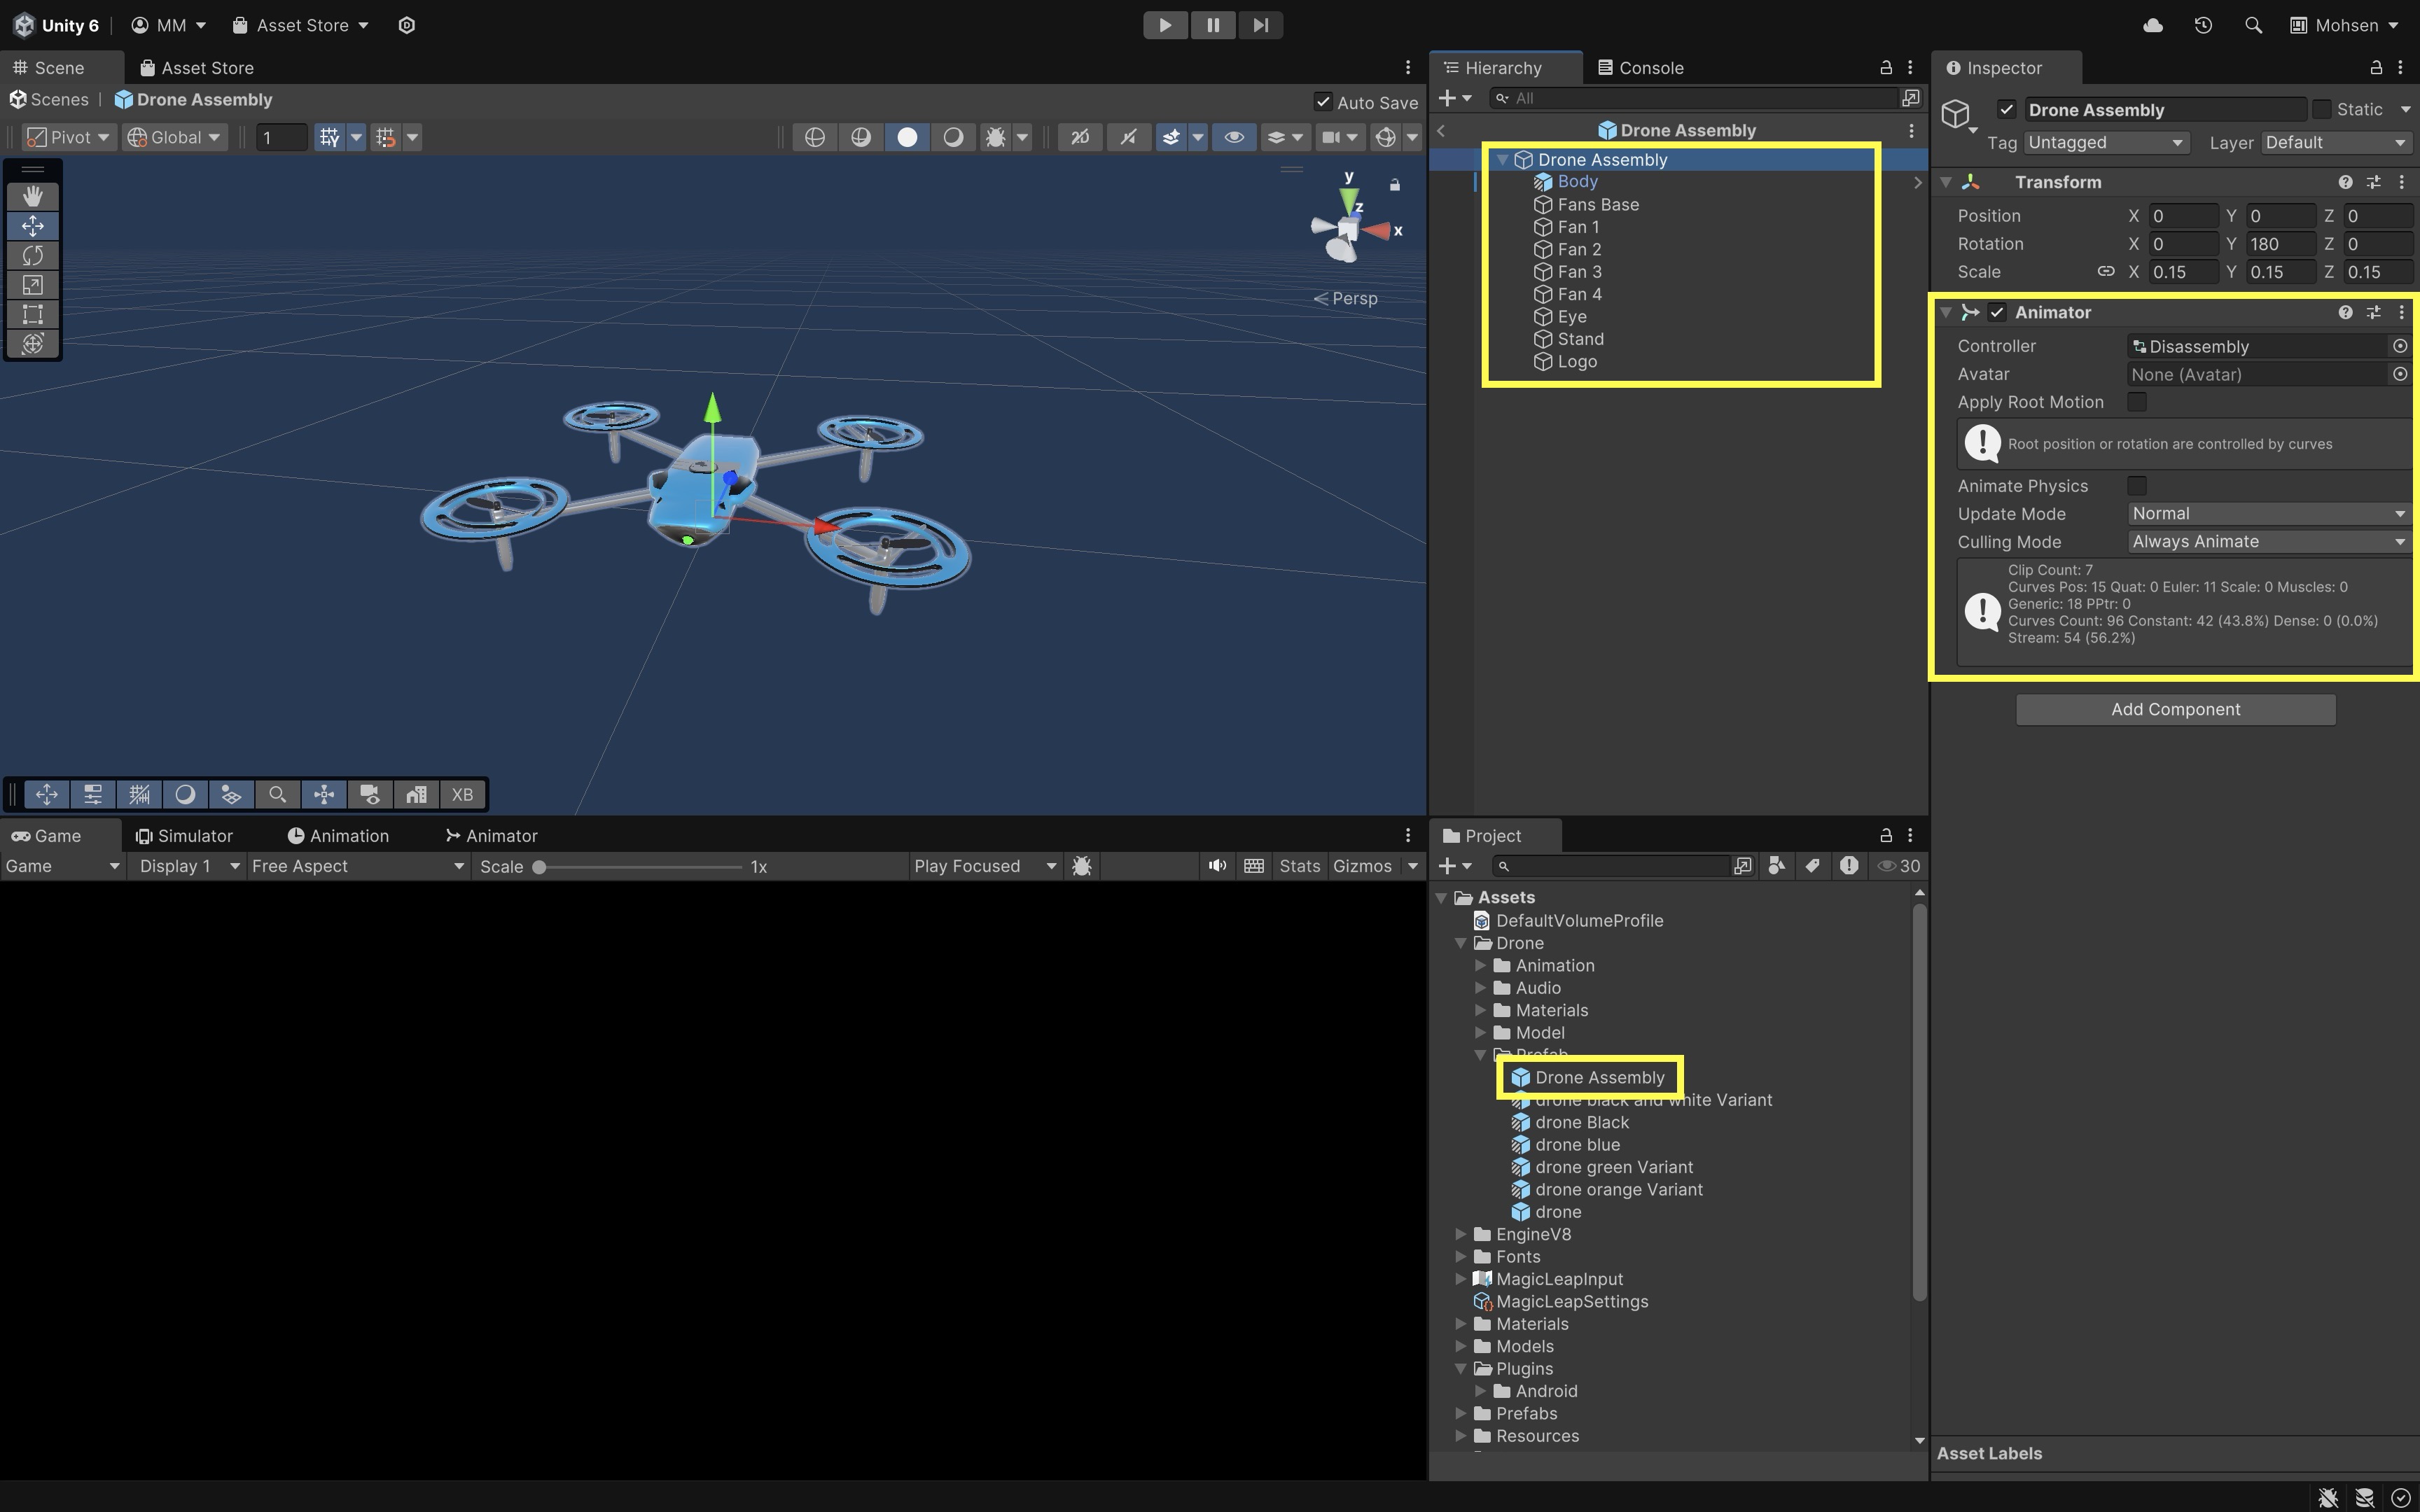
Drone.unitypackageif not already imported. - Locate the
Drone Assemblyprefab under thePrefabsfolder. - Open it in prefab mode and review its
Animatorcomponent as well as child GameObjects.
- Import
- Generate and Print a QR Code Marker:
- Generate a QR code using an online generator like Adobe Free QR Code Generator.
- The QR content can be anything; detection is based on the visual marker.
- Print the QR code at a measurable size (e.g., 15 cm = 0.15 meters).
- Ensure it is flat, high-contrast, and not reflective.

- Implement Marker Tracking:
- Create a new empty GameObject in the scene. Name it
MarkerTrackingManager. - Create
MarkerTracking.csinAssets > Scripts > XRE Tutorials(to keep yourProjectwindow organized):
using UnityEngine; using UnityEngine.XR.OpenXR; using MagicLeap.OpenXR.Features.MarkerUnderstanding; public class MarkerTracking : MonoBehaviour { public GameObject trackerObject; // Prefab to spawn public float qrMarkerSize = 0.15f; // QR marker size in meters private MagicLeapMarkerUnderstandingFeature markerFeature; private MarkerDetector markerDetector; private bool markerAlreadySpawned = false; void Start() { markerFeature = OpenXRSettings.Instance .GetFeature<MagicLeapMarkerUnderstandingFeature>(); if (markerFeature == null) { Debug.LogError( "MagicLeapMarkerUnderstandingFeature is not " + "enabled in OpenXR settings." ); return; } CreateQRDetector(); } private void CreateQRDetector() { MarkerDetectorSettings settings = new MarkerDetectorSettings { MarkerType = MarkerType.QR, QRSettings = new QRSettings { QRLength = qrMarkerSize, EstimateQRLength = false } }; markerDetector = markerFeature.CreateMarkerDetector(settings); Debug.Log("QR code marker detector created."); } void Update() { if (markerDetector == null || markerAlreadySpawned) return; markerFeature.UpdateMarkerDetectors(); foreach (var data in markerDetector.Data) { if (data.MarkerPose.HasValue) { var pose = data.MarkerPose.Value; Debug.Log( $"QR code detected. Data: {data.MarkerString}, " + $"Position: {pose.position}" ); InstantiateTrackerObject(pose.position, pose.rotation); markerAlreadySpawned = true; break; } } } private void InstantiateTrackerObject( Vector3 position, Quaternion rotation ) { if (trackerObject != null) { var obj = Instantiate(trackerObject, position, rotation); obj.transform.up = Vector3.up; Debug.Log( "Drone prefab instantiated at marker pose." ); } else { Debug.LogWarning( "No tracker object assigned to spawn." ); } } private void OnDestroy() { if (markerDetector != null) { markerFeature.DestroyMarkerDetector(markerDetector); markerDetector = null; Debug.Log( "Marker detector destroyed on cleanup." ); } } } - Create a new empty GameObject in the scene. Name it
- Configure the Script:
- Attach the script to
MarkerTrackingManager. - Assign the
Drone Assemblyprefab to theTracker Objectfield. - Set
QR Marker Sizeto your printed marker size (e.g., 0.15 meters).
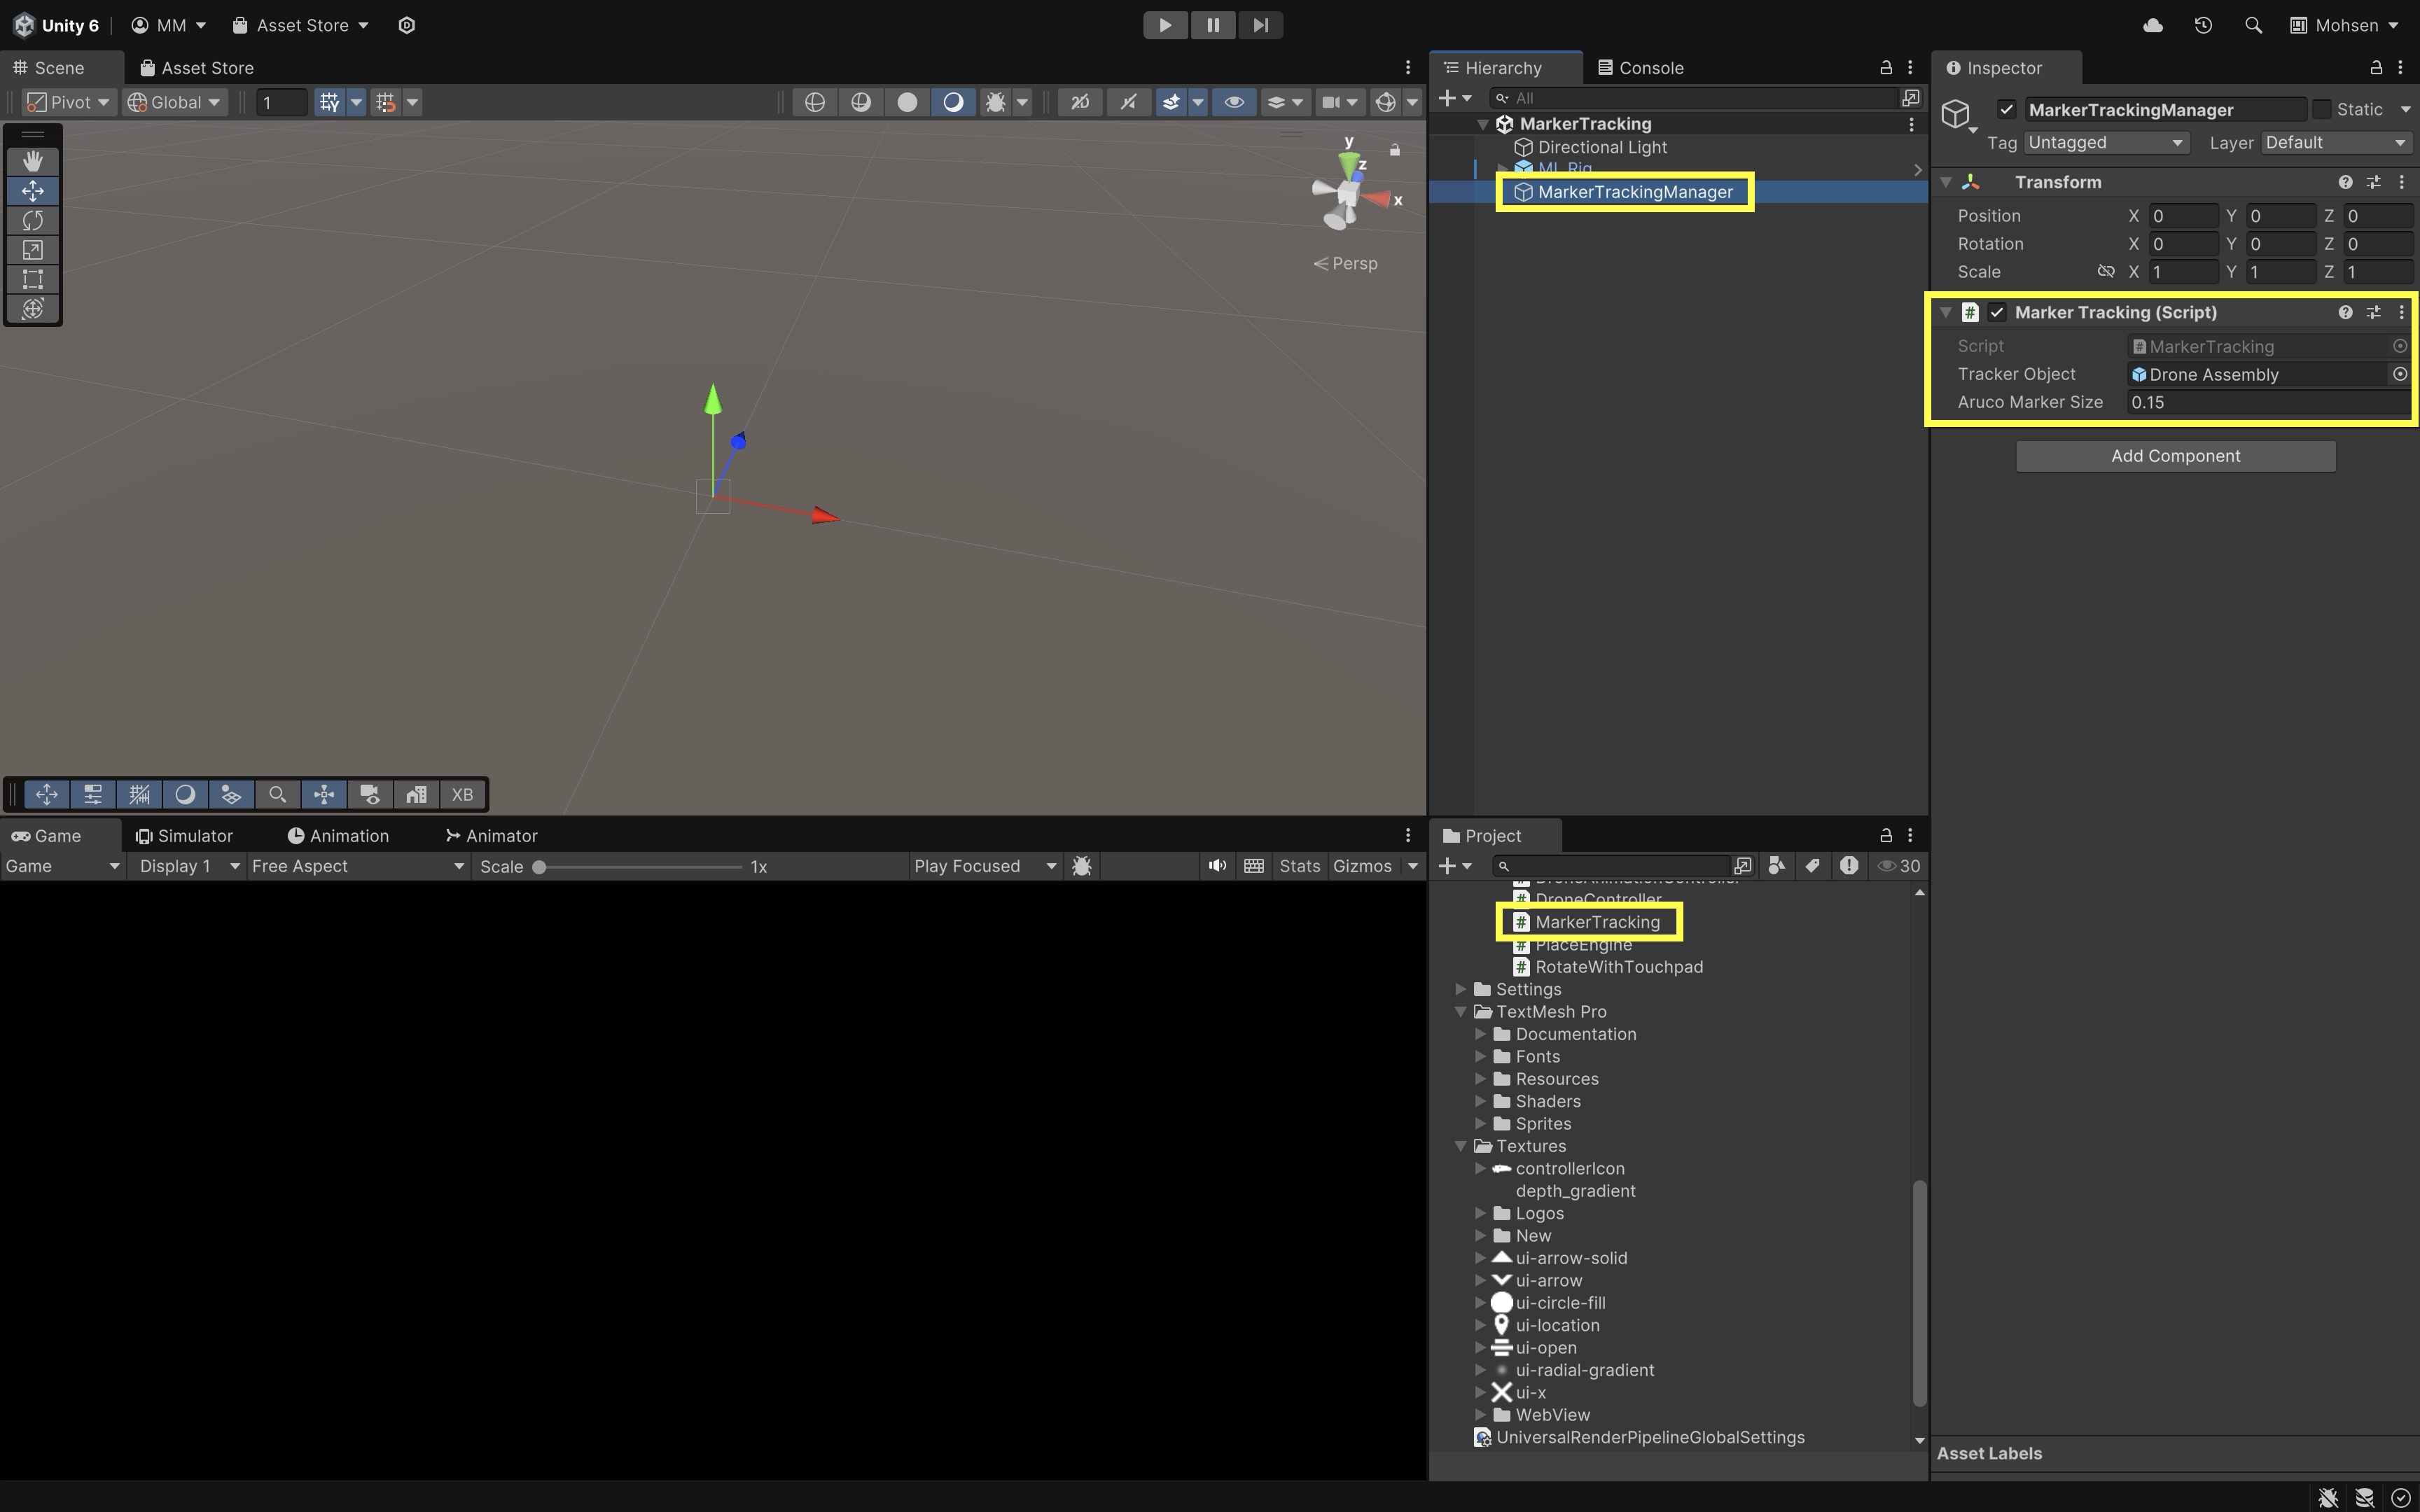
The
MarkerTracking.csscript enables real-time detection of QR codes in the environment using the Magic Leap Marker Understanding feature. When a QR marker is detected, it spawns theDrone Assemblyprefab at the marker’s position and orientation, anchoring the virtual model to a physical reference point. This script is essential for creating spatially registered AR experiences, ensuring that virtual content aligns accurately with the real world. - Attach the script to
- Implement Drone Disassembly Controller:
- Create
DroneAnimationController.csand paste:
using UnityEngine; public class DroneAnimationController : MonoBehaviour { private Animator animator; private string[] disassemblyTriggers = { "Fan 1", "Fan 2", "Fan 3", "Fan 4", "Fans Base", "Body", "Assembly" }; private int currentStep = 0; void Awake() { animator = GetComponent<Animator>(); if (animator == null) { Debug.LogError("No Animator found on Drone GameObject."); } else { animator.cullingMode = AnimatorCullingMode.AlwaysAnimate; Debug.Log("Animator assigned and culling mode set."); } } // Public method for UI button to trigger public void TriggerNextStep() { if (animator == null) return; string trigger = disassemblyTriggers[currentStep]; Debug.Log($"Triggering animation: {trigger}"); animator.SetTrigger(trigger); currentStep = (currentStep + 1) % disassemblyTriggers.Length; // loop back } } - Create
- Configure the Script:
- Select the
Drone Assemblyprefab in theProjectwindow. - Attach the
DroneAnimationController.csscript to the prefab’s root GameObject. - Ensure the
Animatorcomponent is present on the same GameObject and has the correct animation controller assigned. - Confirm that the
Animator Controller(Disassembly) contains the followingTriggerparameters:Fan 1,Fan 2,Fan 3,Fan 4,Fans Base,Body, andAssembly. - Each parameter should have a corresponding transition in the
Animatorfor the disassembly sequence.
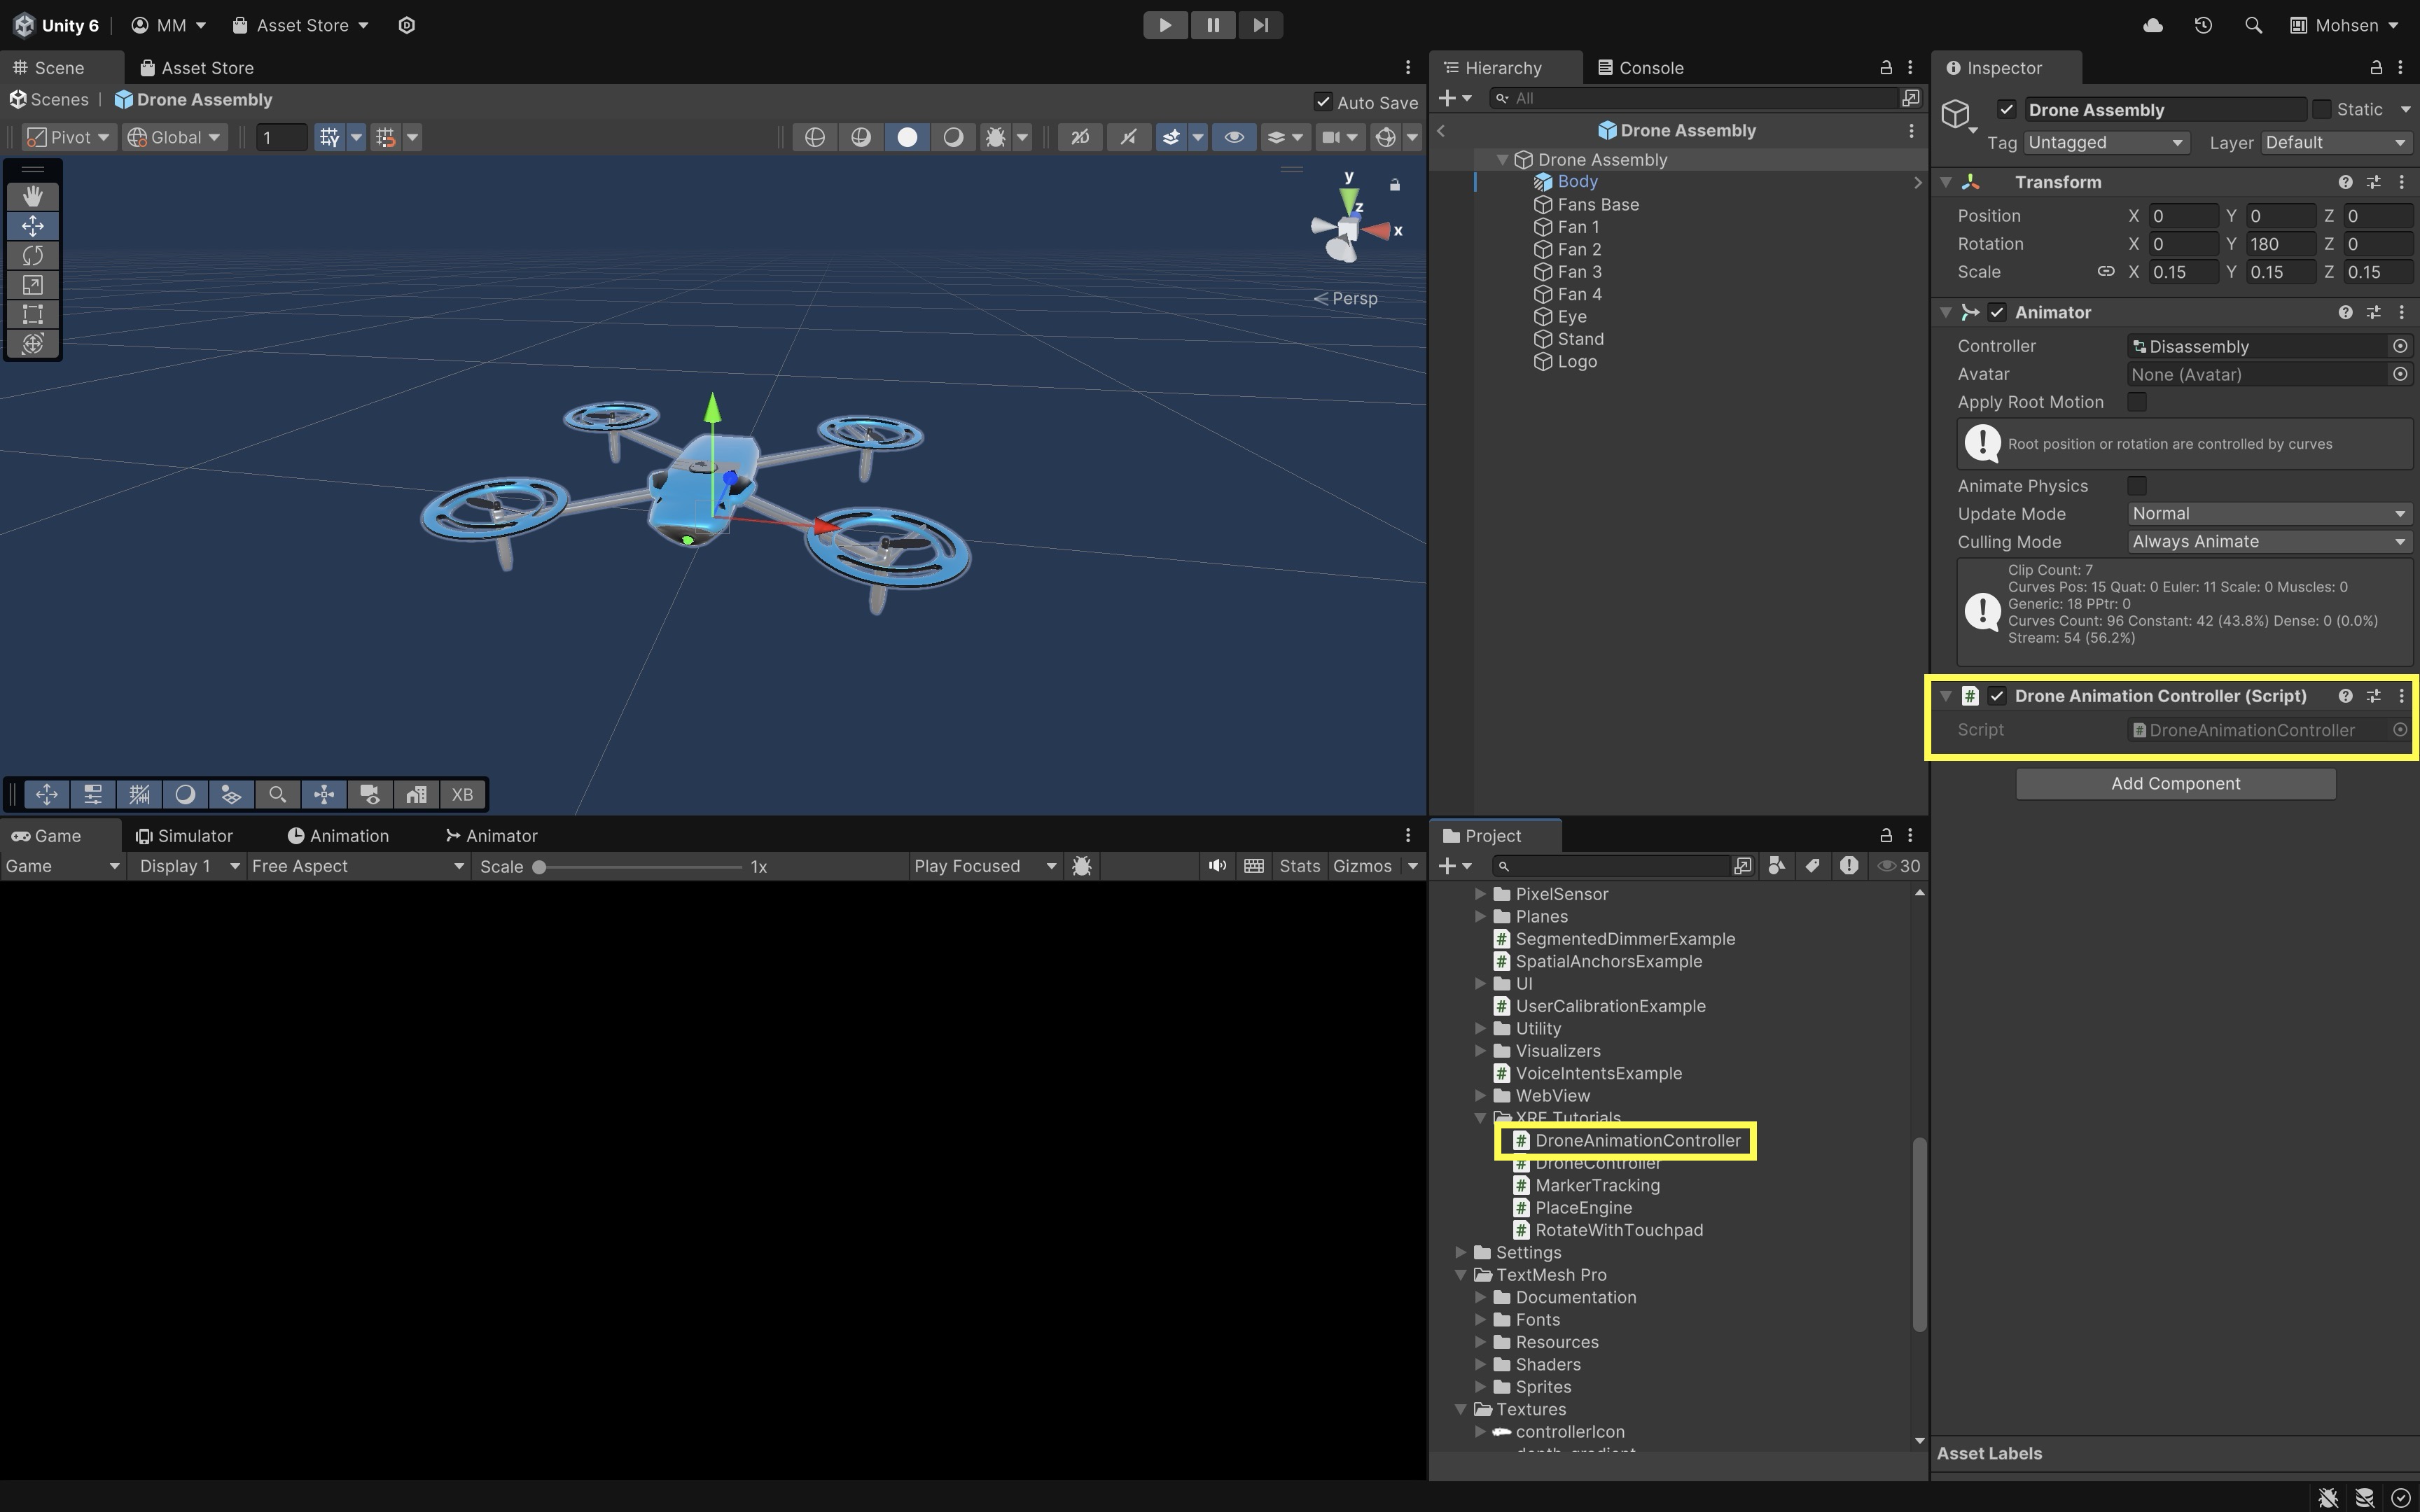
The
DroneAnimationController.csscript controls the drone’s disassembly animation by triggering predefined animation steps in sequence. It exposes a public method that can be called (e.g., via a UI button) to advance through the animation loop step by step. - Select the
- Add a World Space UI Button for Drone Animation Interaction:
- Open the
Drone Assemblyprefab for editing. - Right-click and select
XR > UI Canvas. - Right-click the
CanvasGameObject and selectUI > Button - TextMeshPro. - Adjust the RectTransform size, position, and scale to ensure visibility in AR.
- Rename the button to
Next Step Button. - Update the
Text (TMP)text to displayNext Step.

- Open the
- Wire Up the Button to Trigger the Animation:
- Locate the button’s
OnClick ()event in theInspector. - Click the
+to add a new event listener. - Drag the
Drone Assemblyprefab’s root GameObject into the target field. - From the dropdown, select:
DroneAnimationController -> TriggerNextStep. - Apply the prefab changes to save.

- Locate the button’s
- Deploy and Test the Behavior:
- Build the app onto your Magic Leap 2 headset following the standard process.
- Place your printed QR code on a flat, well-lit surface.
- Launch your app on Magic Leap 2.
- When the QR code is detected, the drone prefab spawns, registered to the marker position.
- Use the Next Step button (visible in AR near the drone) to progress through the disassembly animation sequence. The sequence will loop continuously as you press.
Optionally, consider adding controller input mapping to also trigger steps via ML2 controller buttons, adding visual feedback or labels indicating the current animation step, or implementing marker re-tracking or multiple marker support.
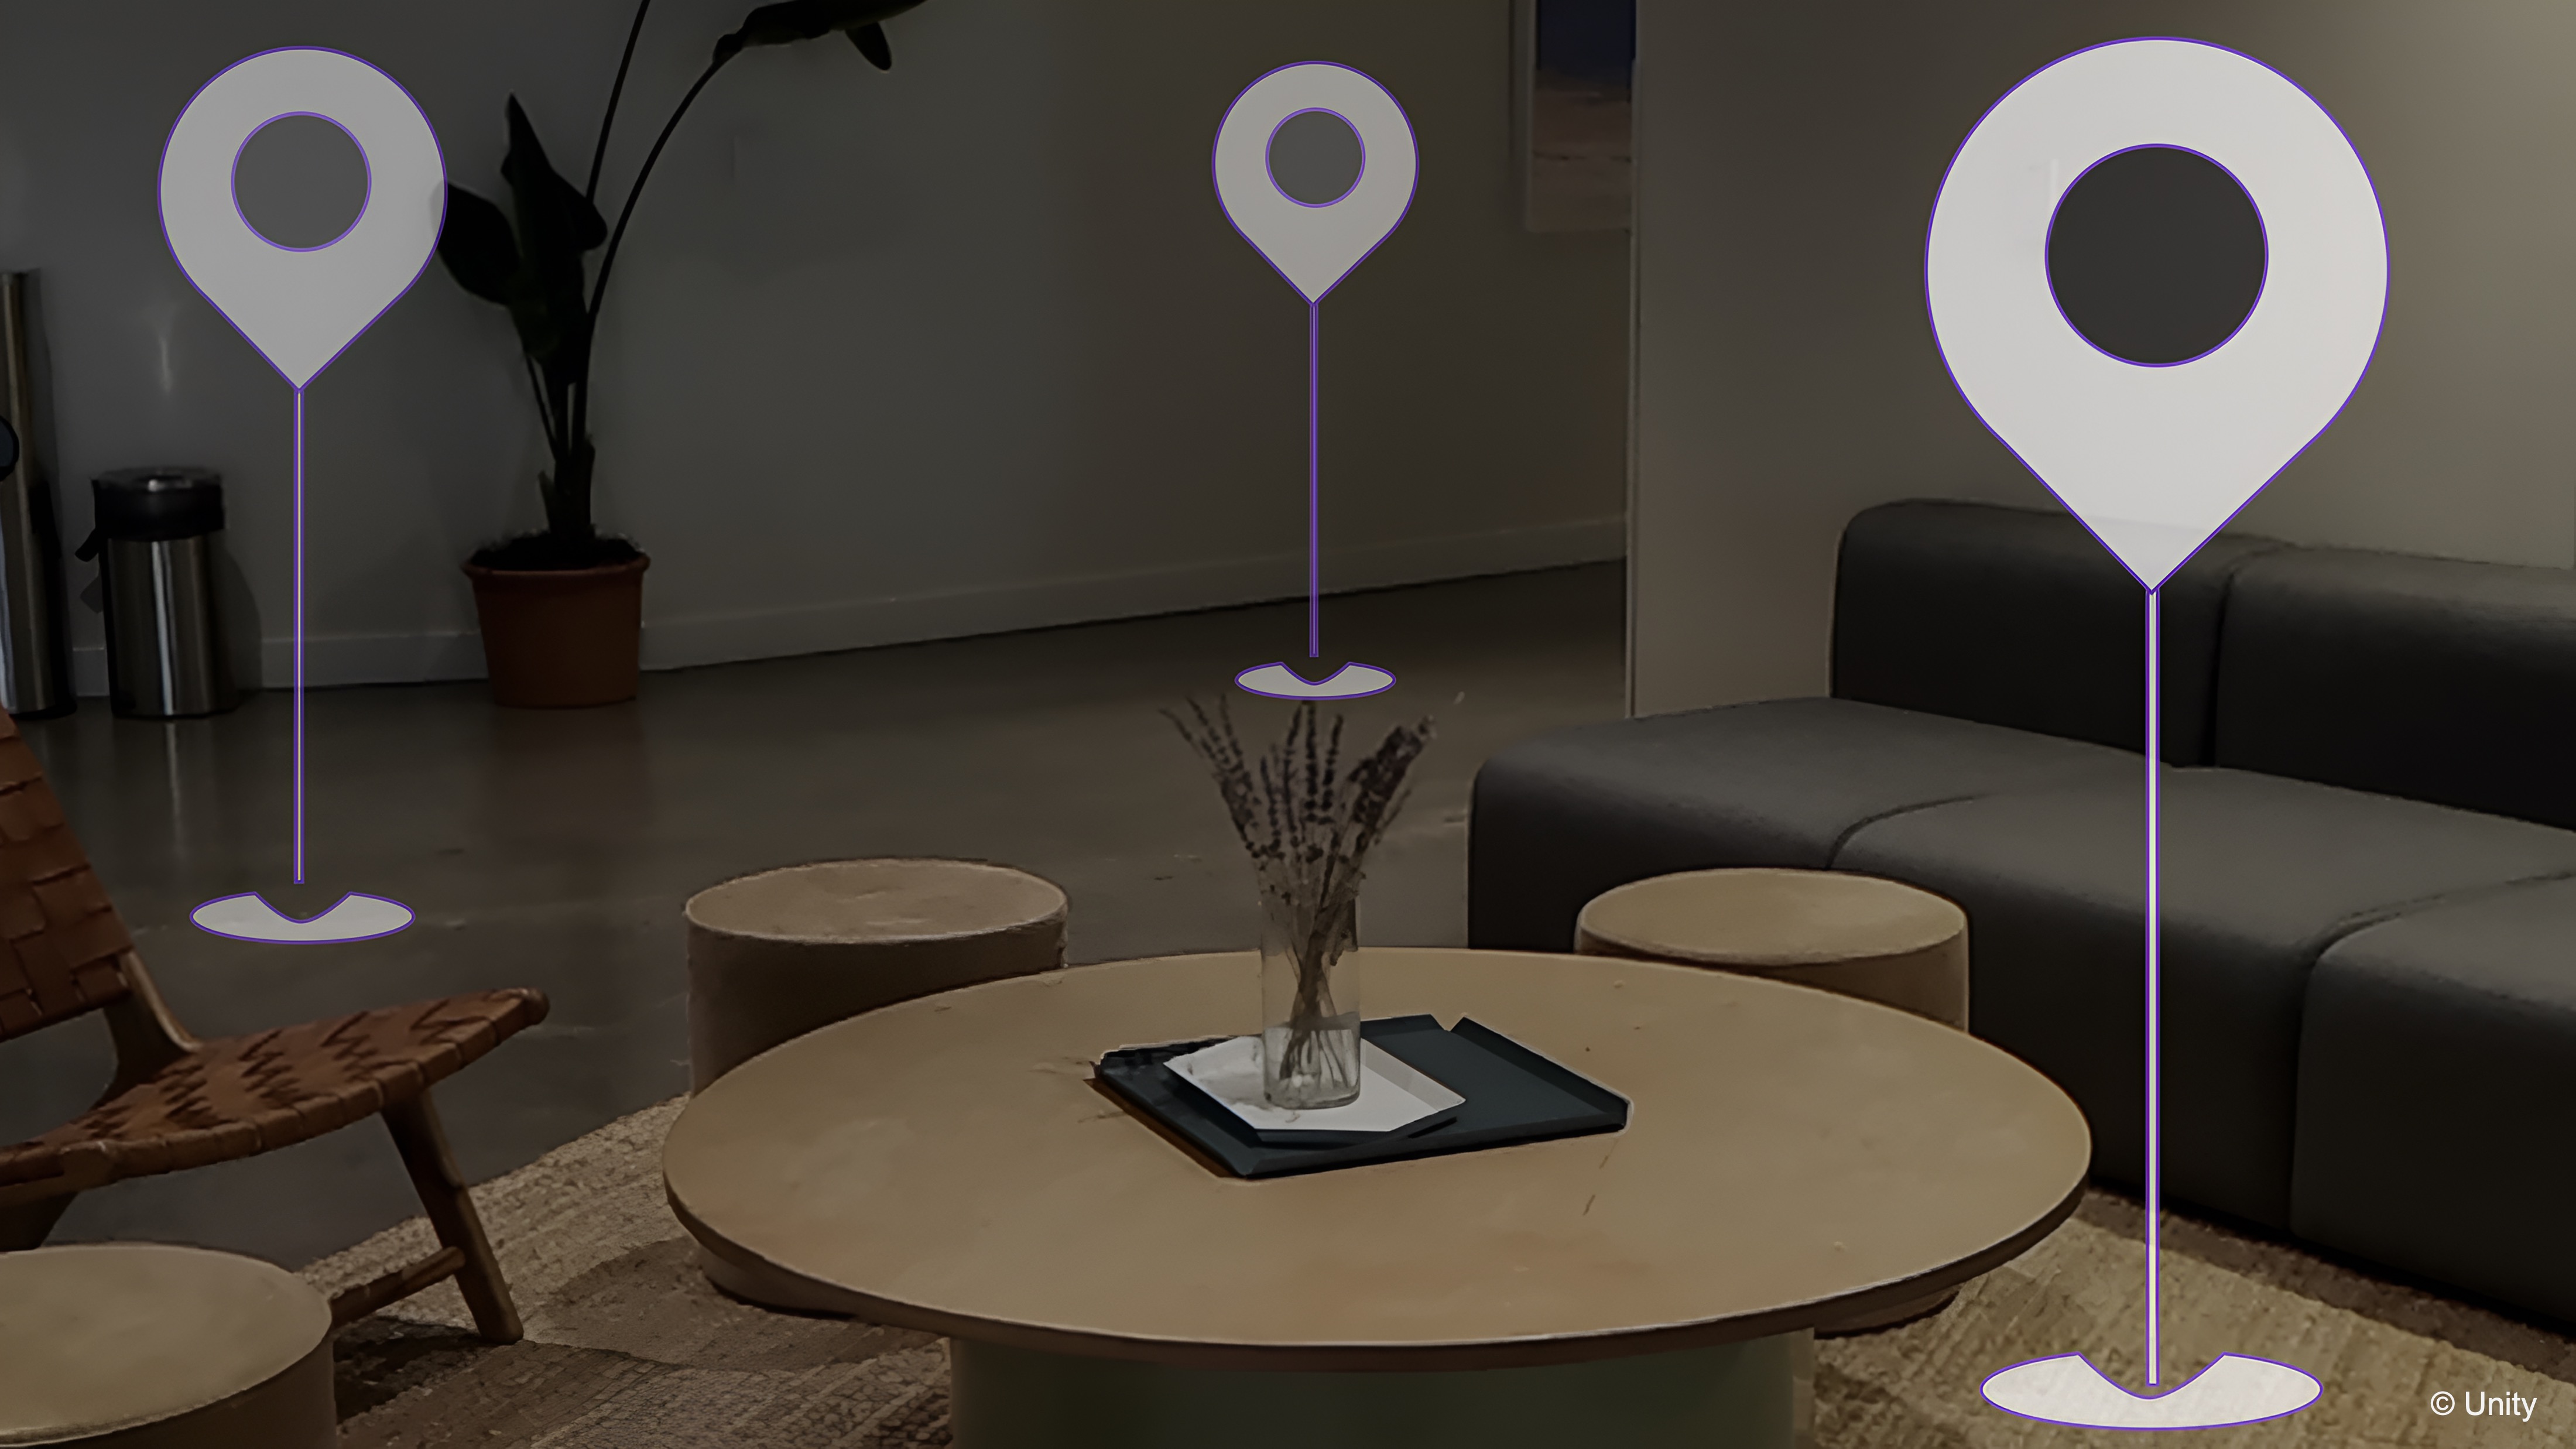
Spatial Anchors
Spatial anchors are key to enabling persistent, location-locked digital content in spatial AR. With the Magic Leap 2, you can place anchors in your physical environment using a scanned map, allowing virtual content to reappear in the exact same place every time you enter the space. This is crucial for industrial and training use cases where alignment with the real world matters.
Imagine a user walks into a physical lab space with a 3D printed V8 engine replica on a table. Using the Magic Leap 2 headset, they are automatically localized within a previously scanned space. A spatial anchor, saved earlier and attached to the table location, allows the virtual model of the V8 engine to appear directly on top of the 3D printed replica—precisely aligned in both position and orientation. Even after restarting the app or moving to another room and back, the engine reappears exactly where it was placed.
Why Use Anchors?
-
Persistent Content: Keep virtual content anchored in fixed real-world positions across sessions. Ideal for factory layouts, digital twins, or equipment overlays.
Anchors ensure that spatially dependent data, like maintenance steps or machine states, are always presented in the correct physical context. -
Multi‑User Sync: Multiple users wearing Magic Leap 2 can view and interact with the same anchored content in the same space. Enables collaborative AR workflows.
This supports use cases like team training, guided assembly, or inspections, where a shared spatial understanding is critical. -
Context Awareness: Anchors enable content to remain accurately placed relative to real-world features. This helps in creating context-aware interfaces that adapt to specific locations, such as showing relevant data next to a machine or workstation.
-
Task Continuity: Users can leave a task in progress and resume it later at the exact same physical location with all spatial data intact. This is essential for complex manufacturing steps, inspections, or maintenance routines that span multiple sessions.
-
Improved User Experience: Anchors prevent virtual objects from drifting or misaligning, a common problem in AR experiences. This results in greater precision and reliability, which is critical in engineering and industrial settings.
-
Integration with Localization Maps: When combined with Magic Leap’s Localization Maps, anchors allow content to be tied to different rooms, factory zones, or buildings, enabling location-specific experiences that scale across larger environments.
Anchors are not just points in space — they are the backbone of building spatially consistent, collaborative, and enduring XR experiences. Compared to mobile AR, which typically uses plane detection and temporary anchors, Magic Leap 2’s spatial anchors are tied to persistent scanned spaces, enabling content to survive reboots and maintain physical alignment long-term.
Core Concepts
-
Spatial Anchors: Saved points within a Space where virtual content can be tethered permanently, enabling objects to remain anchored to fixed locations in the physical world. These anchors store unique identifiers that persist across sessions, ensuring that the content maintains consistency even after the device is powered off or the app is restarted. The persistence of spatial anchors is critical for applications requiring reliable tracking and accurate placement of virtual content over time.
SPATIAL_ANCHORSis the required Android permission flag to enable anchor creation and localization. Without this permission, your app cannot persistently place or retrieve spatial anchors. -
MLAnchors: Magic Leap’s API for managing spatial anchors, offering functionality to create, query, delete, and update anchors programmatically. This API provides low-level control over anchors for custom app needs, such as dynamically adjusting their position or retrieving anchor information for interaction. By usingMLAnchors, developers can implement precise spatial mapping that allows virtual objects to interact with the environment in a natural, seamless manner, tailored to specific use cases in AR applications. -
AnchorExampleScript: A sample Unity script provided in the SDK that demonstrates how to place and manage anchors using a controller. This script is particularly useful as a reference for integrating anchoring logic into custom XR applications, providing a clear example of how to create and manipulate anchors through user interaction. It serves as a practical guide to understanding the integration of spatial anchors into your AR project, helping developers quickly implement anchor management features. -
Spaces App: Magic Leap’s app for scanning and saving real-world environments, helping to create digital representations of physical spaces. It generates a “Space” map that forms the spatial reference frame for localization and anchoring, allowing virtual objects to maintain consistent positions in relation to the environment. The Spaces app also supports the adjustment of spatial boundaries and environmental scans to ensure accurate real-world modeling for AR applications. Review this Magic Leap documentation to learn more about how to use the Spaces app to scan and map your environment.
Implementation
Now, let’s explore how to anchor a custom GameObject (e.g., a Drone prefab) to a physical space using Magic Leap 2’s Spatial Anchors and the XR Interaction Toolkit with OpenXR.
- Setup Project with Magic Leap Examples:
- Open the Magic Leap examples project.
- Locate the
SpatialAnchors.unityscene inside the examples package. - Duplicate and save it as
Anchors.unityinAssets > Scenes > XRE Tutorials. This keeps the original intact while allowing you to customize your version.
This keeps the original intact while allowing you to customize your version.
- Review the Preconfigured Scene:
- The
Anchors.unityscene is configured withML Rigsimilar to previous tutorial examples. - Locate and review the
SpatialAnchorsExamplescript component of theExampleGameObject. - It manages creating anchors at the controller’s position, storing and publishing anchors, managing localization maps, and querying and deleting anchors.
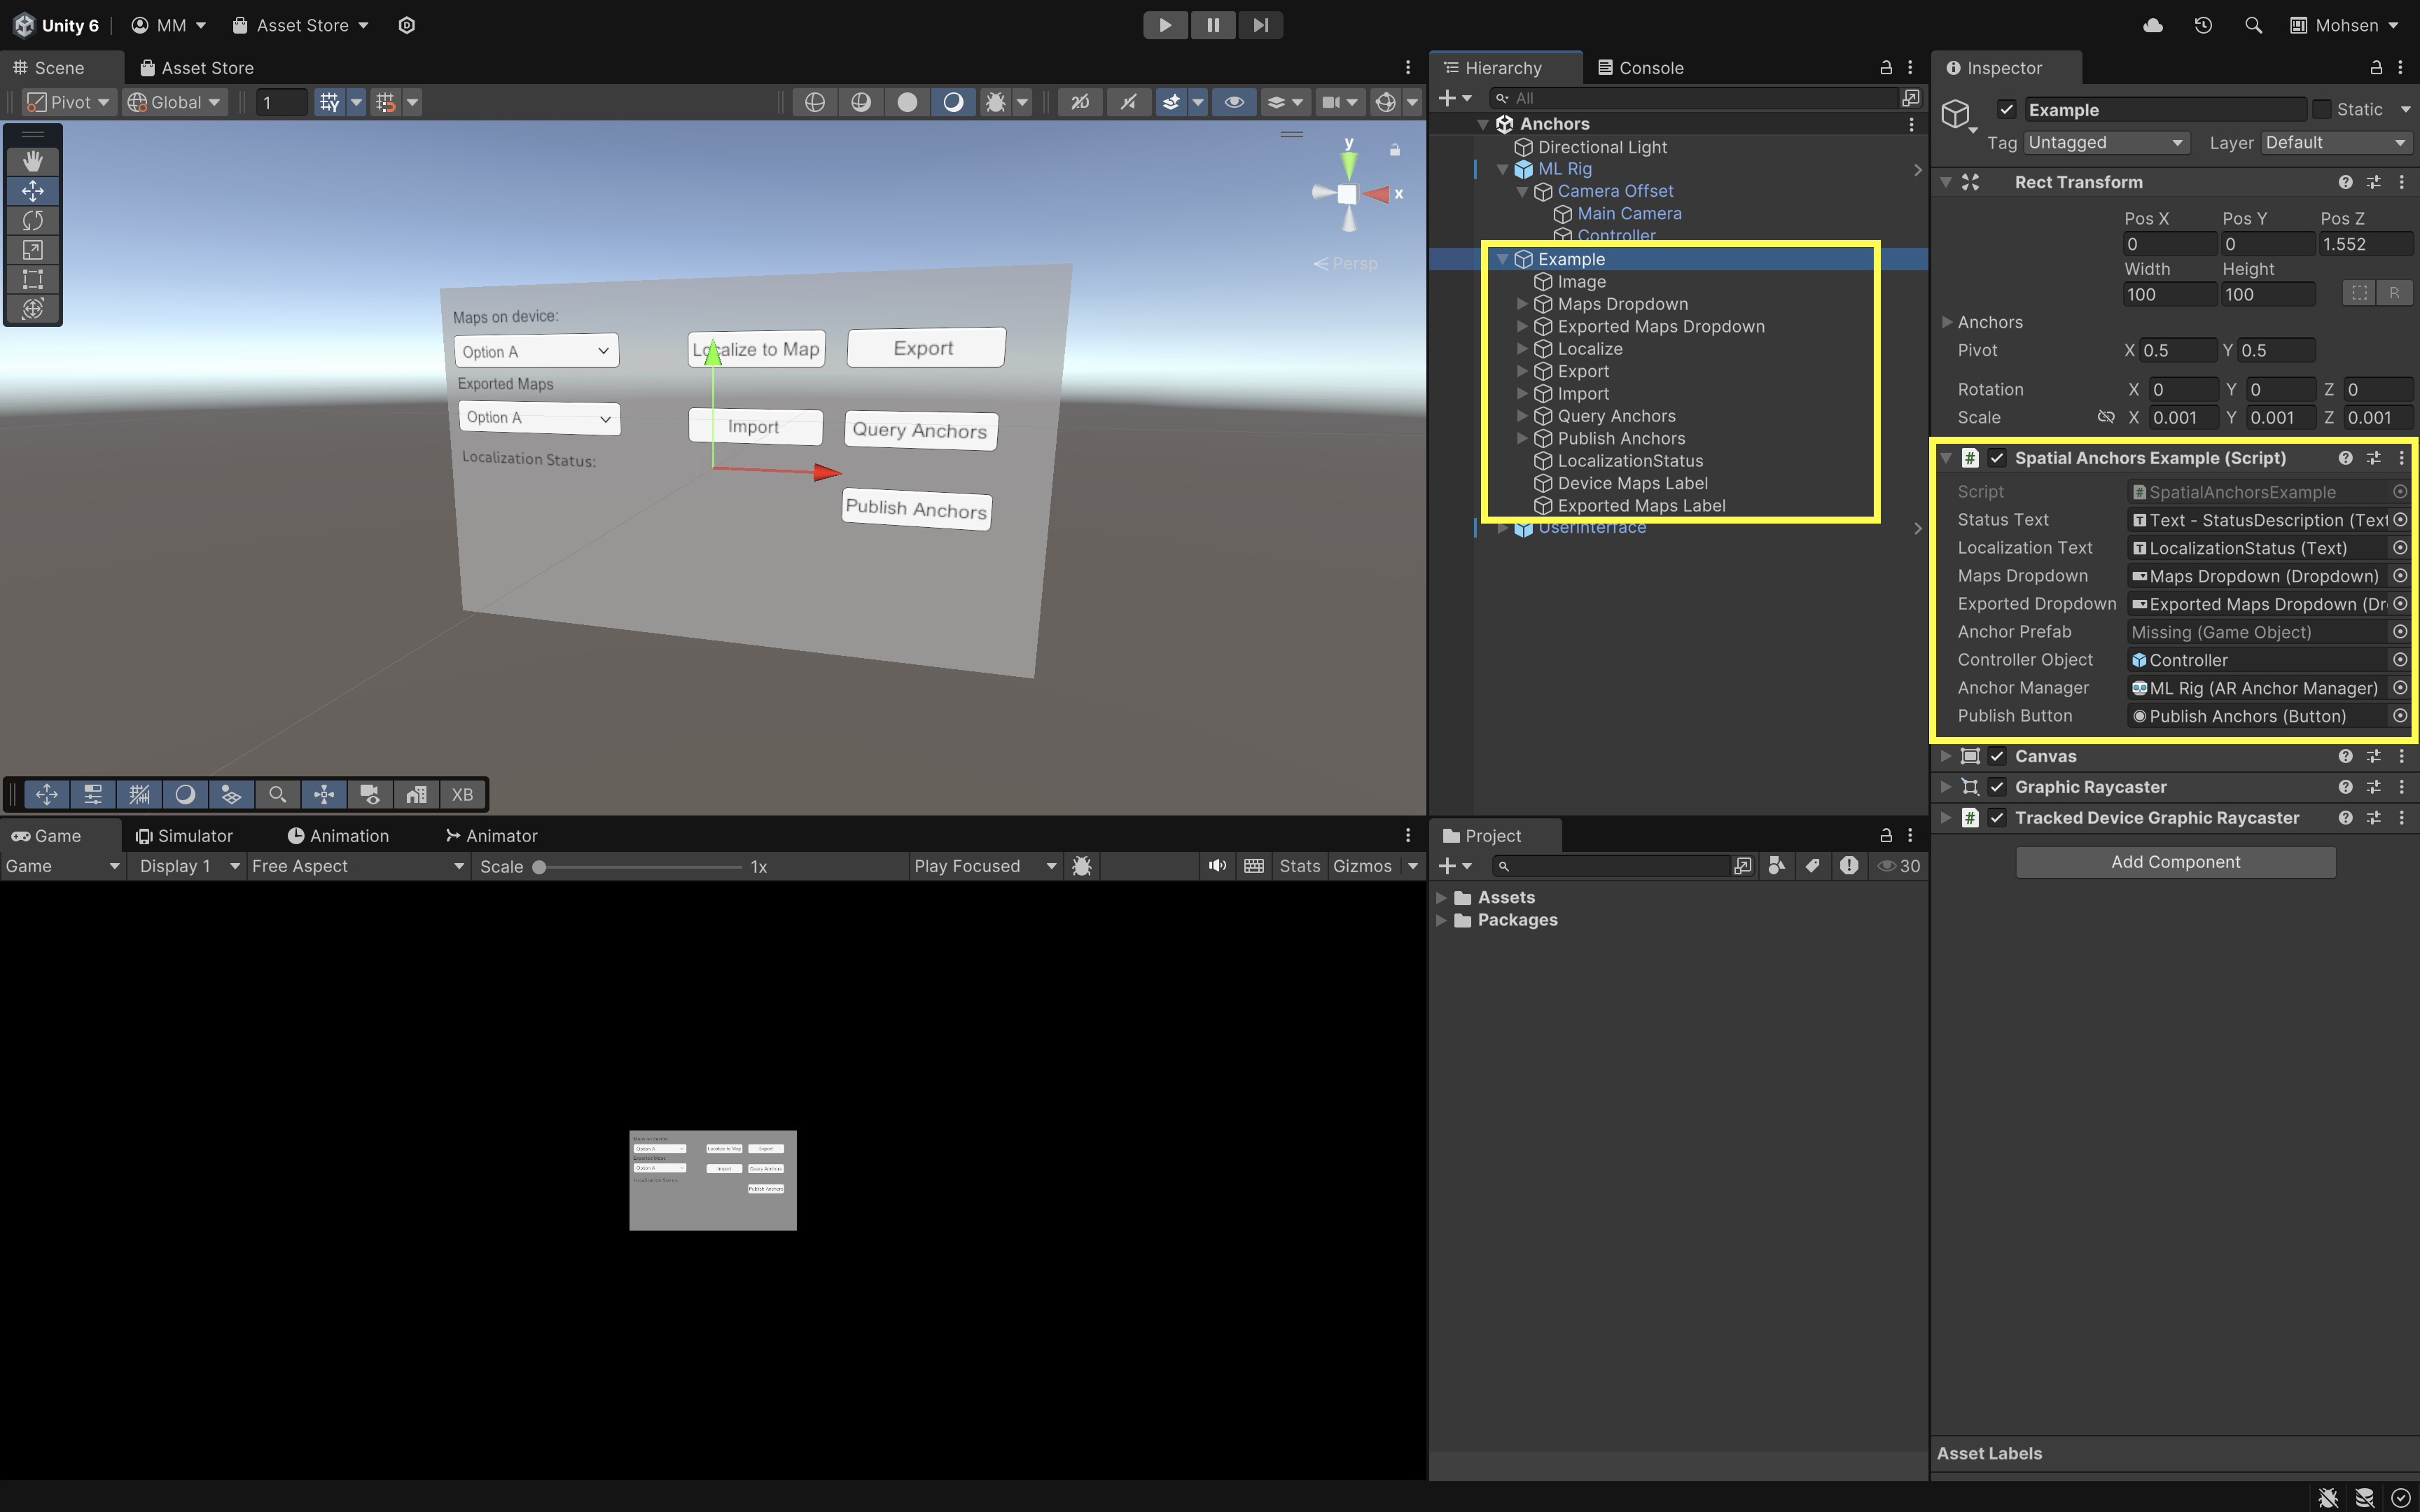
The
SpatialAnchorsExamplescript provided by Magic Leap serves as a complete reference implementation for managing spatial anchors on Magic Leap 2. It includes functionality to create, publish, query, localize, export, and import anchors, as well as track their persistence across sessions using the Magic Leap Spatial Anchors Storage and Localization Maps features. Additionally, the script integrates controller input to interactively place and remove anchors in real-time, making it a solid foundation for building spatially-aware applications. - The
- Replace the Anchor Prefab with a Custom Model:
- In the
Hierarchy, find theSpatialAnchorsExampleGameObject. - In the
Inspector, locate the fieldAnchor Prefab. - Replace this with your custom prefab, e.g.,
Assets > Drone > Prefab > Drone Assembly Anchor.prefab.
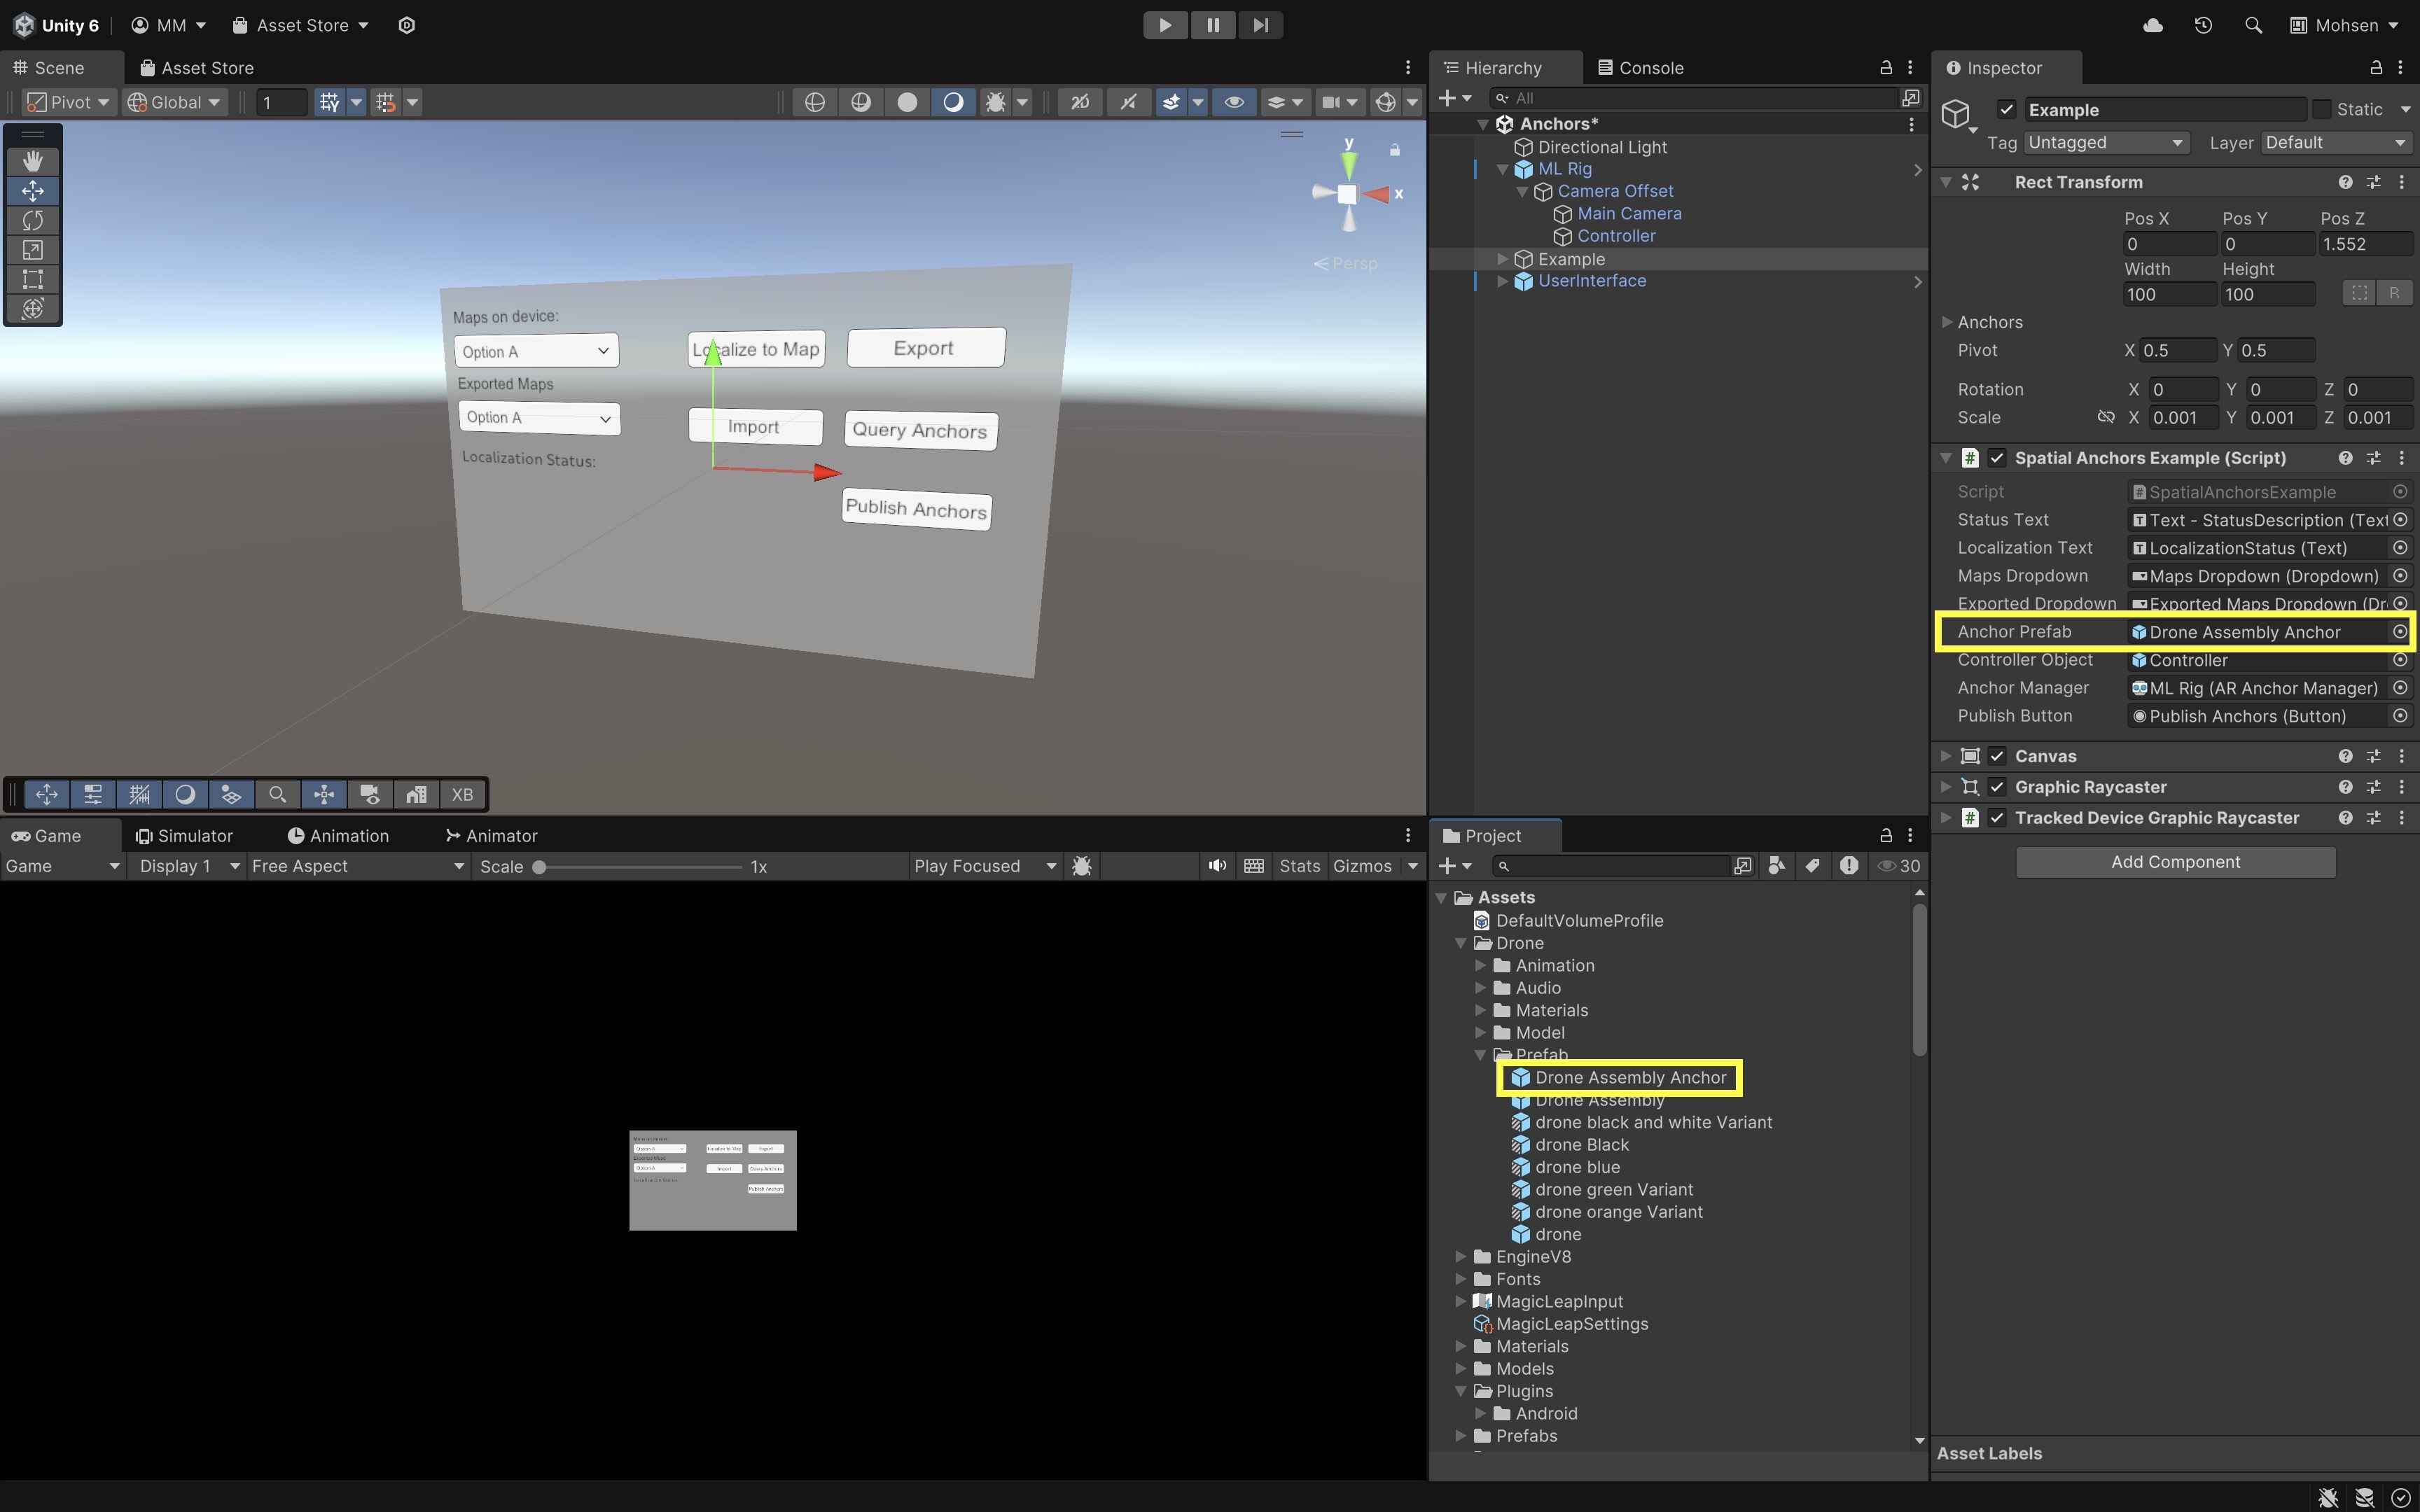
Ensure your custom anchor prefab includes a
MeshRendereron the root GameObject. This is necessary for the anchoring script to visually indicate the anchor state by changing the material color during placement and publishing. - In the
- Modify the SpatialAnchorsExample Script:
- Locate the
OnBumpermethod inSpatialAnchorsExample.cs. - Ensure the Drone always spawns with Y axis facing up:
 private void OnBumper(InputAction.CallbackContext _)
 {
     Pose currentPose = new Pose(
         controllerObject.transform.position,
         Quaternion.identity
     );

     GameObject newAnchor = Instantiate(
         anchorPrefab,
         currentPose.position,
         Quaternion.identity
     );

     ARAnchor newAnchorComponent =
         newAnchor.AddComponent<ARAnchor>();

     newAnchorComponent.GetComponent<MeshRenderer>()
         .material.color = Color.grey;

     localAnchors.Add(newAnchorComponent);
 }
This forces the prefab to instantiate with world-aligned rotation (Y up), ensuring that objects like the Drone are always upright regardless of the controller’s orientation. Note that this adjustment is specific to our example for better spatial consistency, but it can be modified or disregarded depending on the intended interaction design or if object orientation should follow the controller’s pose.
- Locate the
- Removing Anchors:
- To remove the most recent local (unpublished) anchor, press the Menu button on the controller.
- This deletes the last placed anchor that has not yet been published to storage.
- If there are no local anchors remaining, pressing Menu again will remove the last stored anchor.
- This is done via the
DeleteStoredSpatialAnchorsmethod inSpatialAnchorsExample.cs:
storageFeature.DeleteStoredSpatialAnchors(new List<ARAnchor> { storedAnchors[^1] });For more advanced scenarios, you can extend this with a UI panel listing anchors with identifiers, a confirmation dialog before deletion, and tagging or labeling anchors for easier tracking in engineering apps.
- Deploy and Test the Behavior:
- Build the project to your Magic Leap 2 device.
- Launch the app.
- Press Bumper to place and anchor your Drone with Y-axis up.
- Press Menu to remove anchors (local or published).
- Use the Publish button to persist anchors across sessions.
Anchors can be persisted with localization maps, making them available across sessions and users. You can also integrate additional interactivity, including information overlays, process guidance, or maintenance instructions attached to spatial anchors.
Expanding Capabilities
Spatial anchors are not just about placing content — they open the door to creating robust, spatially intelligent applications that are reliable, interactive, and persistent across time and users. After setting up basic anchoring, here are ways to expand your XR applications:
-
Localization Status UI: Display the current localization status using
MLAnchors.GetLocalizationState(). If the user is not localized, prompt them to open the Spaces app and select the correct environment before anchor-based content can load (e.g., “Please localize to continue”). Providing localization feedback helps prevent errors and ensures users engage with content in the correct physical context. -
Anchor Persistence & Sharing: Extend the anchor system by saving anchor IDs and metadata (e.g., content type, timestamps) to local storage, a cloud backend, or an enterprise database. This enables session persistence, multi-user synchronization, and the ability to restore an environment’s digital state across devices or sessions.
-
Anchor Lifecycle Events: Use event callbacks to handle anchor creation, tracking loss, or environmental changes. For example, fade the V8 engine in/out, show tooltips when anchors are found or lost, or prompt re-localization if tracking degrades.
This improves reliability and user trust in long-running or complex applications. -
Prefab Replacement & Customization: Replace the default cube with your engine prefab, Drone model, or any other asset, and enrich it with animations, spatial audio narration, visual effects, or interactive UI panels attached to the anchored model. This makes experiences more engaging and informative.
-
Multi-Anchor Layouts: For complex scenes like assembly lines, factory floors, or training simulators, use multiple spatial anchors to position different machine parts, tools, or instruction panels accurately within a space.
This allows you to recreate entire workflows or operational environments in mixed reality. -
Version Control & Updates: Implement versioning for your anchored content by tagging anchors with metadata. This is useful in industrial applications where machine layouts or instructions may change, ensuring users always see the most current configuration.
-
Anchor Management Tools: Consider building an in-app anchor management system that allows users to place, name, edit, or delete anchors dynamically within the app. This is particularly useful in field service or training where environments may need to adapt on the fly.
By extending the functionality of spatial anchors, you transform your applications from static experiences into context-aware, collaborative, and persistent spatial platforms. This is foundational for engineering applications, smart manufacturing, field maintenance, and advanced training solutions.
Key Takeaways
In wearable AR with Magic Leap 2, image tracking and spatial anchors work hand-in-hand to create precise, persistent, and context-aware experiences. Fiducial markers like ArUco and QR codes enable exact alignment of virtual content with physical objects, supporting interactive training, visualization, and guided tasks. Through Unity’s marker tracking APIs and carefully configured scripts, virtual models can be anchored to real-world markers for immediate, responsive interaction. Spatial anchors extend this capability by preserving content placement across sessions and even between users, ensuring that digital objects reliably reappear in the same physical location. Together, these technologies empower developers to build robust, location-aware AR applications that enhance education, industrial workflows, and collaborative environments with accurate, enduring spatial alignment.