E5. Mobile AR: Anchors

Learning Outcomes
- Explain the role of anchors in AR for maintaining spatial stability. Before class, review when and why to use anchors, and identify one XFactory scenario where anchoring would be essential for keeping virtual elements aligned with the real world.
- Describe how to implement tap-based anchor placement in AR. In preparation, read how to use
ARPlaneManager,ARRaycastManager, andARAnchorManagerso users can dynamically pin virtual objects to detected planes.- Explain how anchoring enhances tracked image stability. Ahead of the session, study how combining anchors with image tracking maintains alignment when markers are out of view, and think through possible applications in XFactory stations.
- Attach AR anchors to existing GameObjects. Prior to class, understand the scenarios for manually adding an
ARAnchorcomponent to stabilize pre-placed content, and review scripting examples for adding anchors at runtime.- Remove anchors to manage AR application resources. For your pre-class task, learn the process of removing anchors using
ARAnchorManageror by destroying theARAnchorcomponent to maintain performance in interactive or session-based AR experiences.
Anchoring GameObjects
In AR applications, reliably tracking objects and anchoring virtual content to real‐world features is foundational to delivering immersive, stable, and contextually aware experiences. Without robust object tracking and anchoring, virtual overlays can appear to drift, jitter, or detach from their intended targets, breaking user immersion and eroding trust in the application’s spatial understanding. By leveraging object tracking, anchors, and bounding‐box detection together, your AR applications can deliver:
-
Interactive Scenes: Let users manipulate or decorate real objects with virtual augmentations (e.g., furniture placement, educational overlays). Anchors ensure that virtual content remains consistently placed on physical objects, providing a seamless experience as users interact with and modify their surroundings in real-time.
-
Context‑Aware Behavior: Keep labels, animations, UI, and other effects correctly aligned with moving objects in real-time. This ensures that content appears to follow the object’s movement, avoiding disorientation and enhancing the natural interaction between the physical and virtual worlds.
-
Stable Placement: Pin virtual content to fixed points in space so it stays put even under rapid device movement or poor lighting. Anchors help maintain stability and prevent content from shifting or becoming misaligned, ensuring that virtual elements stay anchored to real-world surfaces despite environmental challenges.
-
Seamless Recovery: Compensate for temporary tracking loss or coordinate drift to prevent content “jumps” or misalignments. When tracking is restored, anchors ensure smooth transitions, reducing interruptions and improving user confidence in the AR system’s reliability.
-
Precise Spatial Limits: Define the exact extents within which content can be placed or constrained, ensuring accurate alignment with real-world objects. Anchors can enforce spatial boundaries, guiding users to position virtual content only in areas that make sense for the real-world context.
-
Rich Interaction Logic: Enable physics, occlusion, and gesture interactions that respect the true geometry of tracked objects. Anchors ensure that the virtual content interacts naturally with real-world features, providing a realistic experience where virtual objects behave as expected in relation to physical ones.
-
Visual Feedback: Display outlines or guides around tracked objects to communicate tracking quality and interaction zones. By anchoring visual cues, users can better understand where interaction is possible and how reliable the tracking is, improving usability and reducing frustration.
-
High Stability and Accuracy: Maintain a consistent, immersive experience by tightly integrating virtual content with the physical environment. Anchors ensure that virtual content remains accurately aligned, delivering a smooth, persistent AR experience, even when users move or adjust their viewpoint.

AR Anchor Manager
An anchor in AR Foundation is a special type of trackable that represents a fixed Pose (position and rotation) in the real world, to which virtual content can be “pinned.” This helps ensure that the virtual content maintains its alignment with the physical environment over time, even if the AR session temporarily loses tracking or the underlying world mapping shifts. In simple terms, anchors help stabilize and persist the position of your AR content relative to the real world. Anchors provide a mechanism to combat drift, instability, or repositioning of virtual content that can occur when the AR session loses and regains tracking, the device reinitializes the world coordinate system, or the user moves extensively around the scene. Without anchors, AR content is more susceptible to these issues because it’s only tied to Unity’s local world space, which is itself mapped onto the AR session space that may shift during runtime. Common use cases for anchors include:
-
Placing large or critical virtual objects on detected planes: Large objects are sensitive to drift because users move around them and expect consistent alignment from every angle. Anchors help maintain the spatial fidelity, ensuring that objects stay in the correct position and appear realistic in applications like virtual furniture placement.
-
Stabilizing content after image-based tracking: When an image marker is detected, an anchor ensures that the virtual object stays in place even after the marker is no longer visible. This prevents the content from repositioning incorrectly, improving the reliability of the AR experience and enhancing user trust.
-
Pinning spatial UI elements or holograms in AR: Anchors lock UI elements, such as menus or guidance markers, in place within the physical space, ensuring they remain in the correct position regardless of user movement. This is especially useful for navigation or informational overlays that need to stay contextually accurate.
-
Improving content stability in augmented navigation or games: Anchors help virtual objects like waypoints or collectibles stay fixed in the real world, preventing them from drifting as the user moves. This creates a more immersive and intuitive experience, such as keeping clues or markers tied to specific locations in a game or app.
-
Enhancing interactive learning and educational tools: Anchors place interactive 3D models in physical space for users to explore. This ensures that virtual models, like those used in anatomy teaching or scientific simulations, remain stable and correctly positioned, offering a reliable learning experience.
-
Supporting persistent virtual markers or assets in the environment: Anchors enable virtual markers or assets to persist in physical locations. In tourism apps, for example, anchors restore content like 3D models or historical information when users revisit a location, maintaining the spatial context over time.
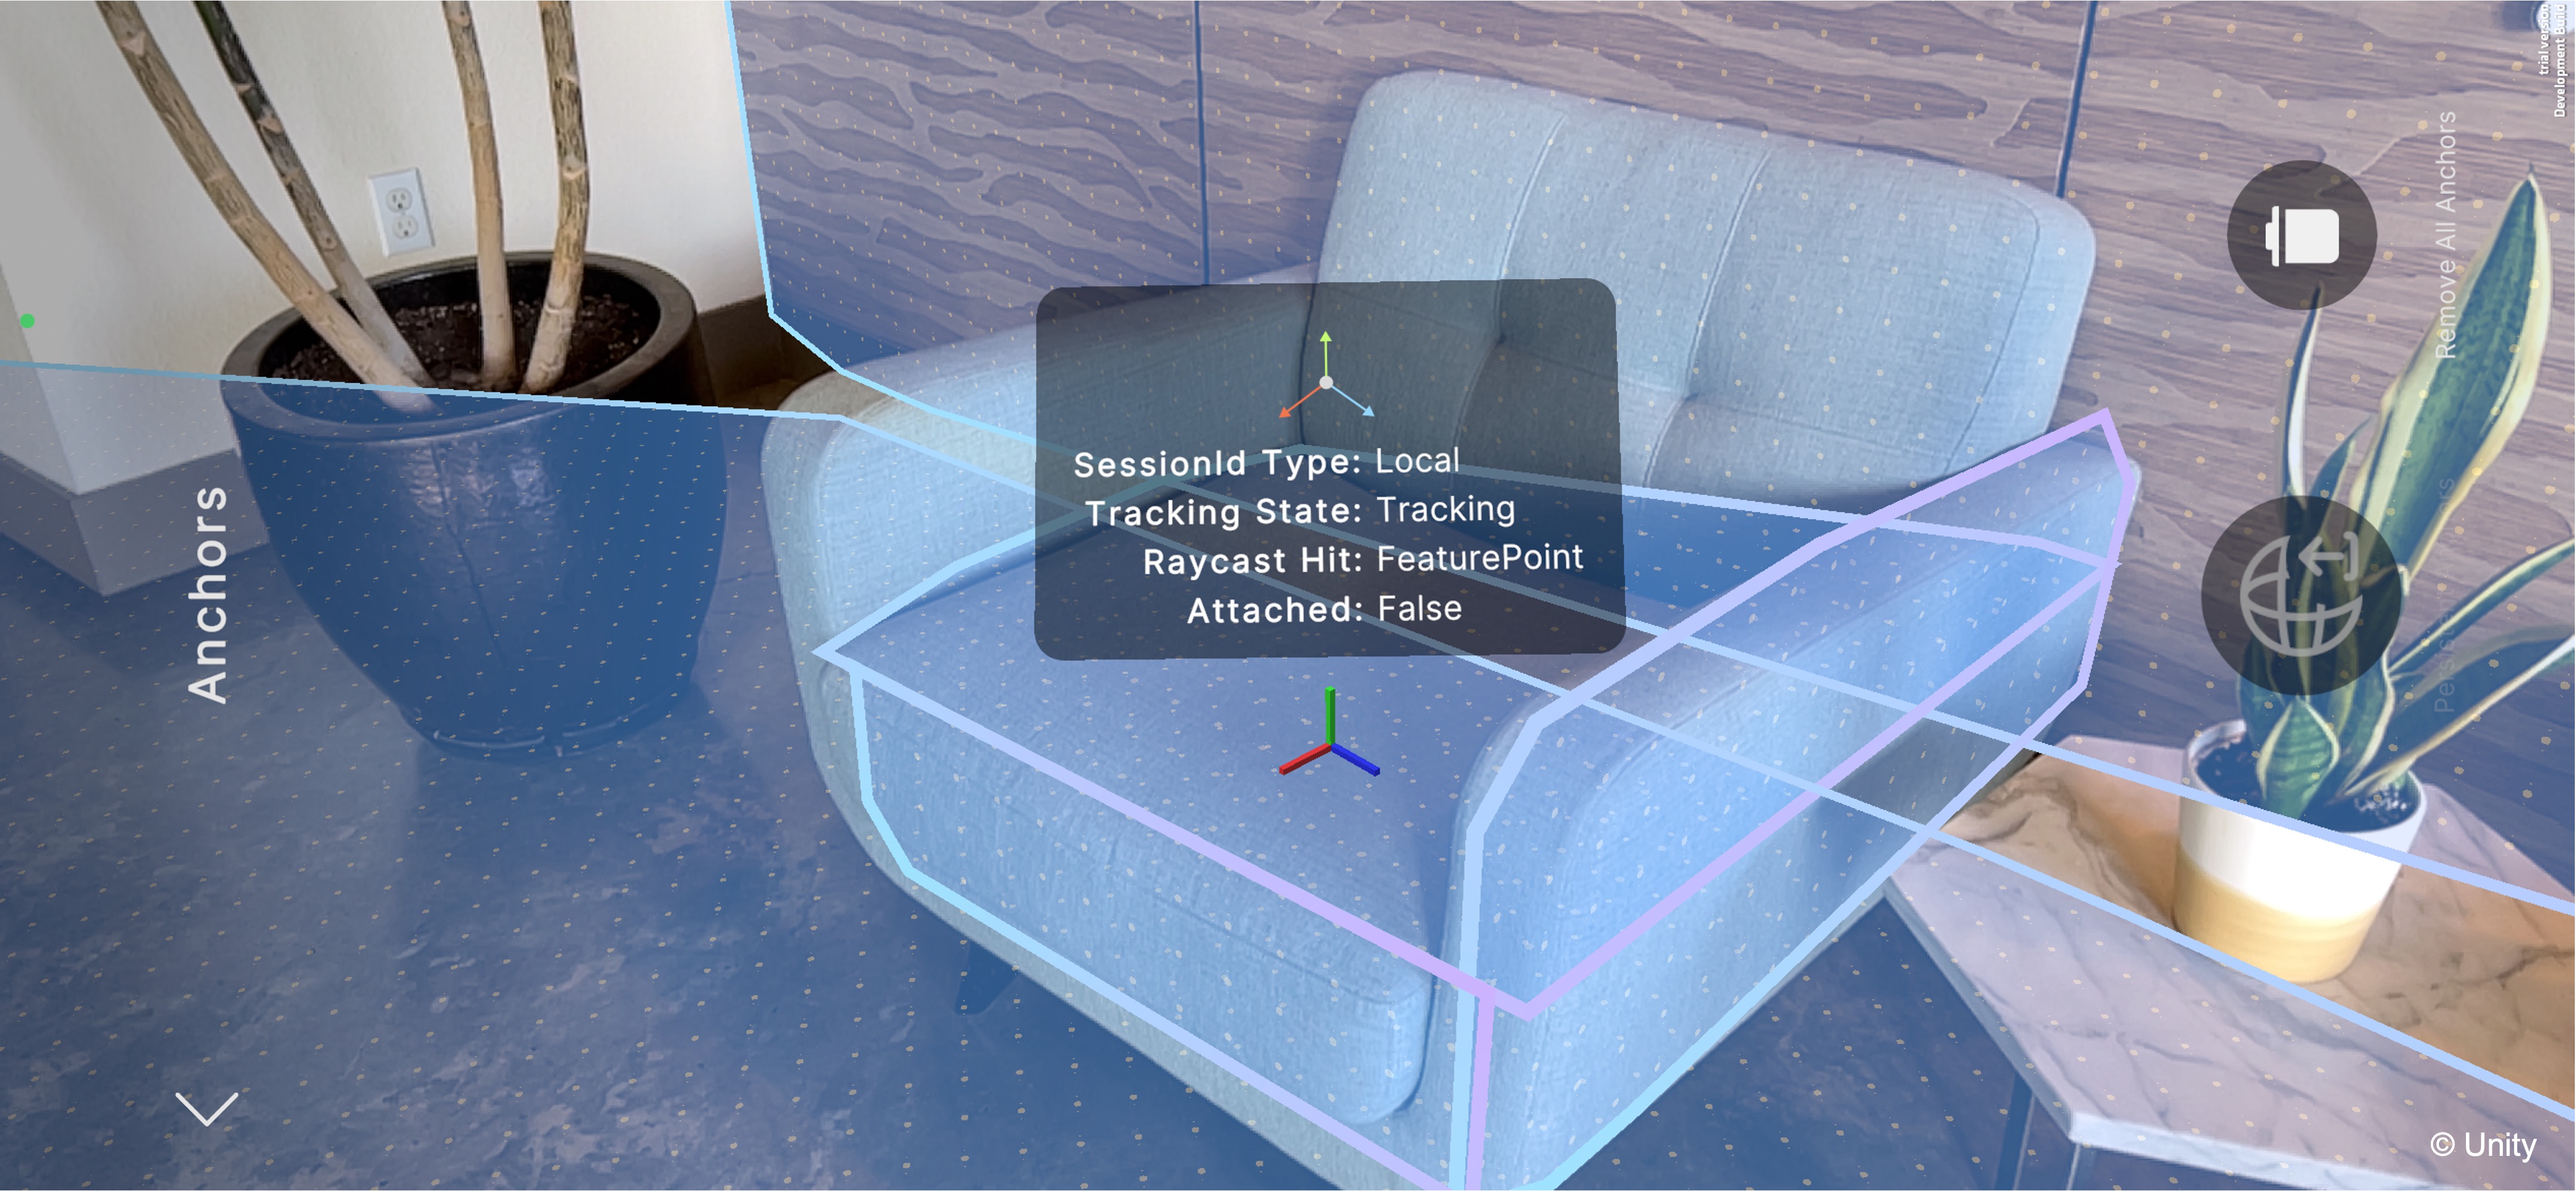
Imagine placing XFactory’s virtual V8 engine model on a detected AR plane, such as a workshop floor or an assembly bench. Without an anchor, if the device briefly loses tracking (e.g., due to occlusion or lighting changes), the engine model might shift or drift from its intended position when tracking resumes. By creating an anchor at the plane pose where the engine is placed, we ensure that the engine remains securely “pinned” to that spot, maintaining spatial consistency even as the user walks around or tracking fluctuates.
Best Practices
While anchors enhance stability, they come with some computational overhead:
-
Avoid creating excessive anchors in a small area. This can impact performance and tracking stability. Each anchor requires the AR system to maintain and update its spatial mapping, which can become computationally expensive if overused. In densely populated scenes, too many anchors can degrade tracking accuracy or even cause some anchors to lose their reliability.
-
Remove anchors when no longer needed. Use
ARAnchorManager.TryRemoveAnchoror destroy the associatedARAnchorcomponent to free resources. Persisting unnecessary anchors increases memory usage and can lead to inefficient tracking updates, especially in long-running AR sessions where environmental changes may make some anchors obsolete. -
Parenting directly to detected planes. If plane detection is stable and ongoing tracking is not needed, you may simply parent virtual content to the plane’s transform instead of creating a separate anchor. This approach reduces overhead because planes are already being tracked and updated by the system, eliminating the need for additional anchor maintenance while still providing positional stability.
Platform Support
AR Foundation’s anchor subsystem is widely supported across major platforms:
- Apple ARKit (iOS and iPadOS): Provides robust anchor support on iPhones and iPads, ensuring spatial consistency across Apple devices.
- Google ARCore (Android): Enables reliable pinning of virtual objects on Android devices with AR capabilities.
- Apple visionOS: Supports anchors in mixed reality experiences designed for the Vision Pro and future Apple headsets.
- Microsoft HoloLens (via OpenXR): Anchors are crucial for maintaining spatial alignment in persistent holographic experiences on HoloLens devices.
- Meta devices (Quest) via OpenXR: Allows developers to create stable VR/AR hybrid applications where anchored content remains fixed in physical space.
- Magic Leap (MLSDK or OpenXR): Supports precision spatial anchoring essential for industrial and enterprise applications.
- XR Simulation (Unity Editor): Facilitates testing of anchor logic within the Unity Editor without needing a physical device.
Anchoring On Tap
To manage anchors in your scene, the ARAnchorManager component handles creating, tracking, and removing anchors via the underlying XRAnchorSubsystem, and raises events when anchors change. It is a trackable manager that listens to the underlying XRAnchorSubsystem, creates an ARAnchor GameObject for each tracked anchor, and fires a trackablesChanged event when anchors are added, updated, or removed.
Use Cases
Tapping to place anchors on detected planes offers a flexible way to interact with the physical environment in AR. While plane detection and hit testing can position virtual content, without anchoring, these objects may drift, disappear, or misalign when tracking data changes or environmental conditions vary. Here are scenarios where anchoring on tap significantly improves interaction and spatial stability:
- Mobile User Interaction: In dynamic environments where users walk around or reposition frequently, anchors ensure that tapped objects stay fixed to the intended surface.
- Session Continuity: When environmental tracking temporarily degrades (e.g., due to lighting changes), anchored objects retain their positions, preventing re-placement.
- Collaborative Placement: Multiple users in a shared AR session can see anchored objects in the same real-world locations, critical for collaborative tasks or demonstrations.
- Precision Placement: When users need to position objects with spatial accuracy (e.g., machinery layouts, furniture placement), anchoring ensures that the placement persists reliably.
- Environmental Changes: In settings where surfaces might move slightly (e.g., mobile platforms, moving tables), anchors maintain relative positioning even as environmental meshes update.
- Long-Term Installations: For installations that remain over multiple AR sessions or days (e.g., museums, factories), anchors ensure that content remains consistent without re-placement.
Implementation
Let’s use the V8 engine model from XFactory to showcase how ARAnchorManager can pin an object that’s spawned on tap on a plane.
- Scene Setup:
- Start from your existing
World Understanding.unityscene that is already configured withAR Session,ARPlaneManager,ARRaycastManager, andXR Origin. Save it asAnchors.unityin your Scenes folder. - Remove the
Robot ManagerGameObject from theHierarchy. - Add an empty GameObject to your scene and name it
Anchor Manager. - Attach the following components to
Anchor Manager:ARRaycastManagerandARAnchorManager. - Assign the
XR Originto both managers via theInspectorif not auto-assigned.
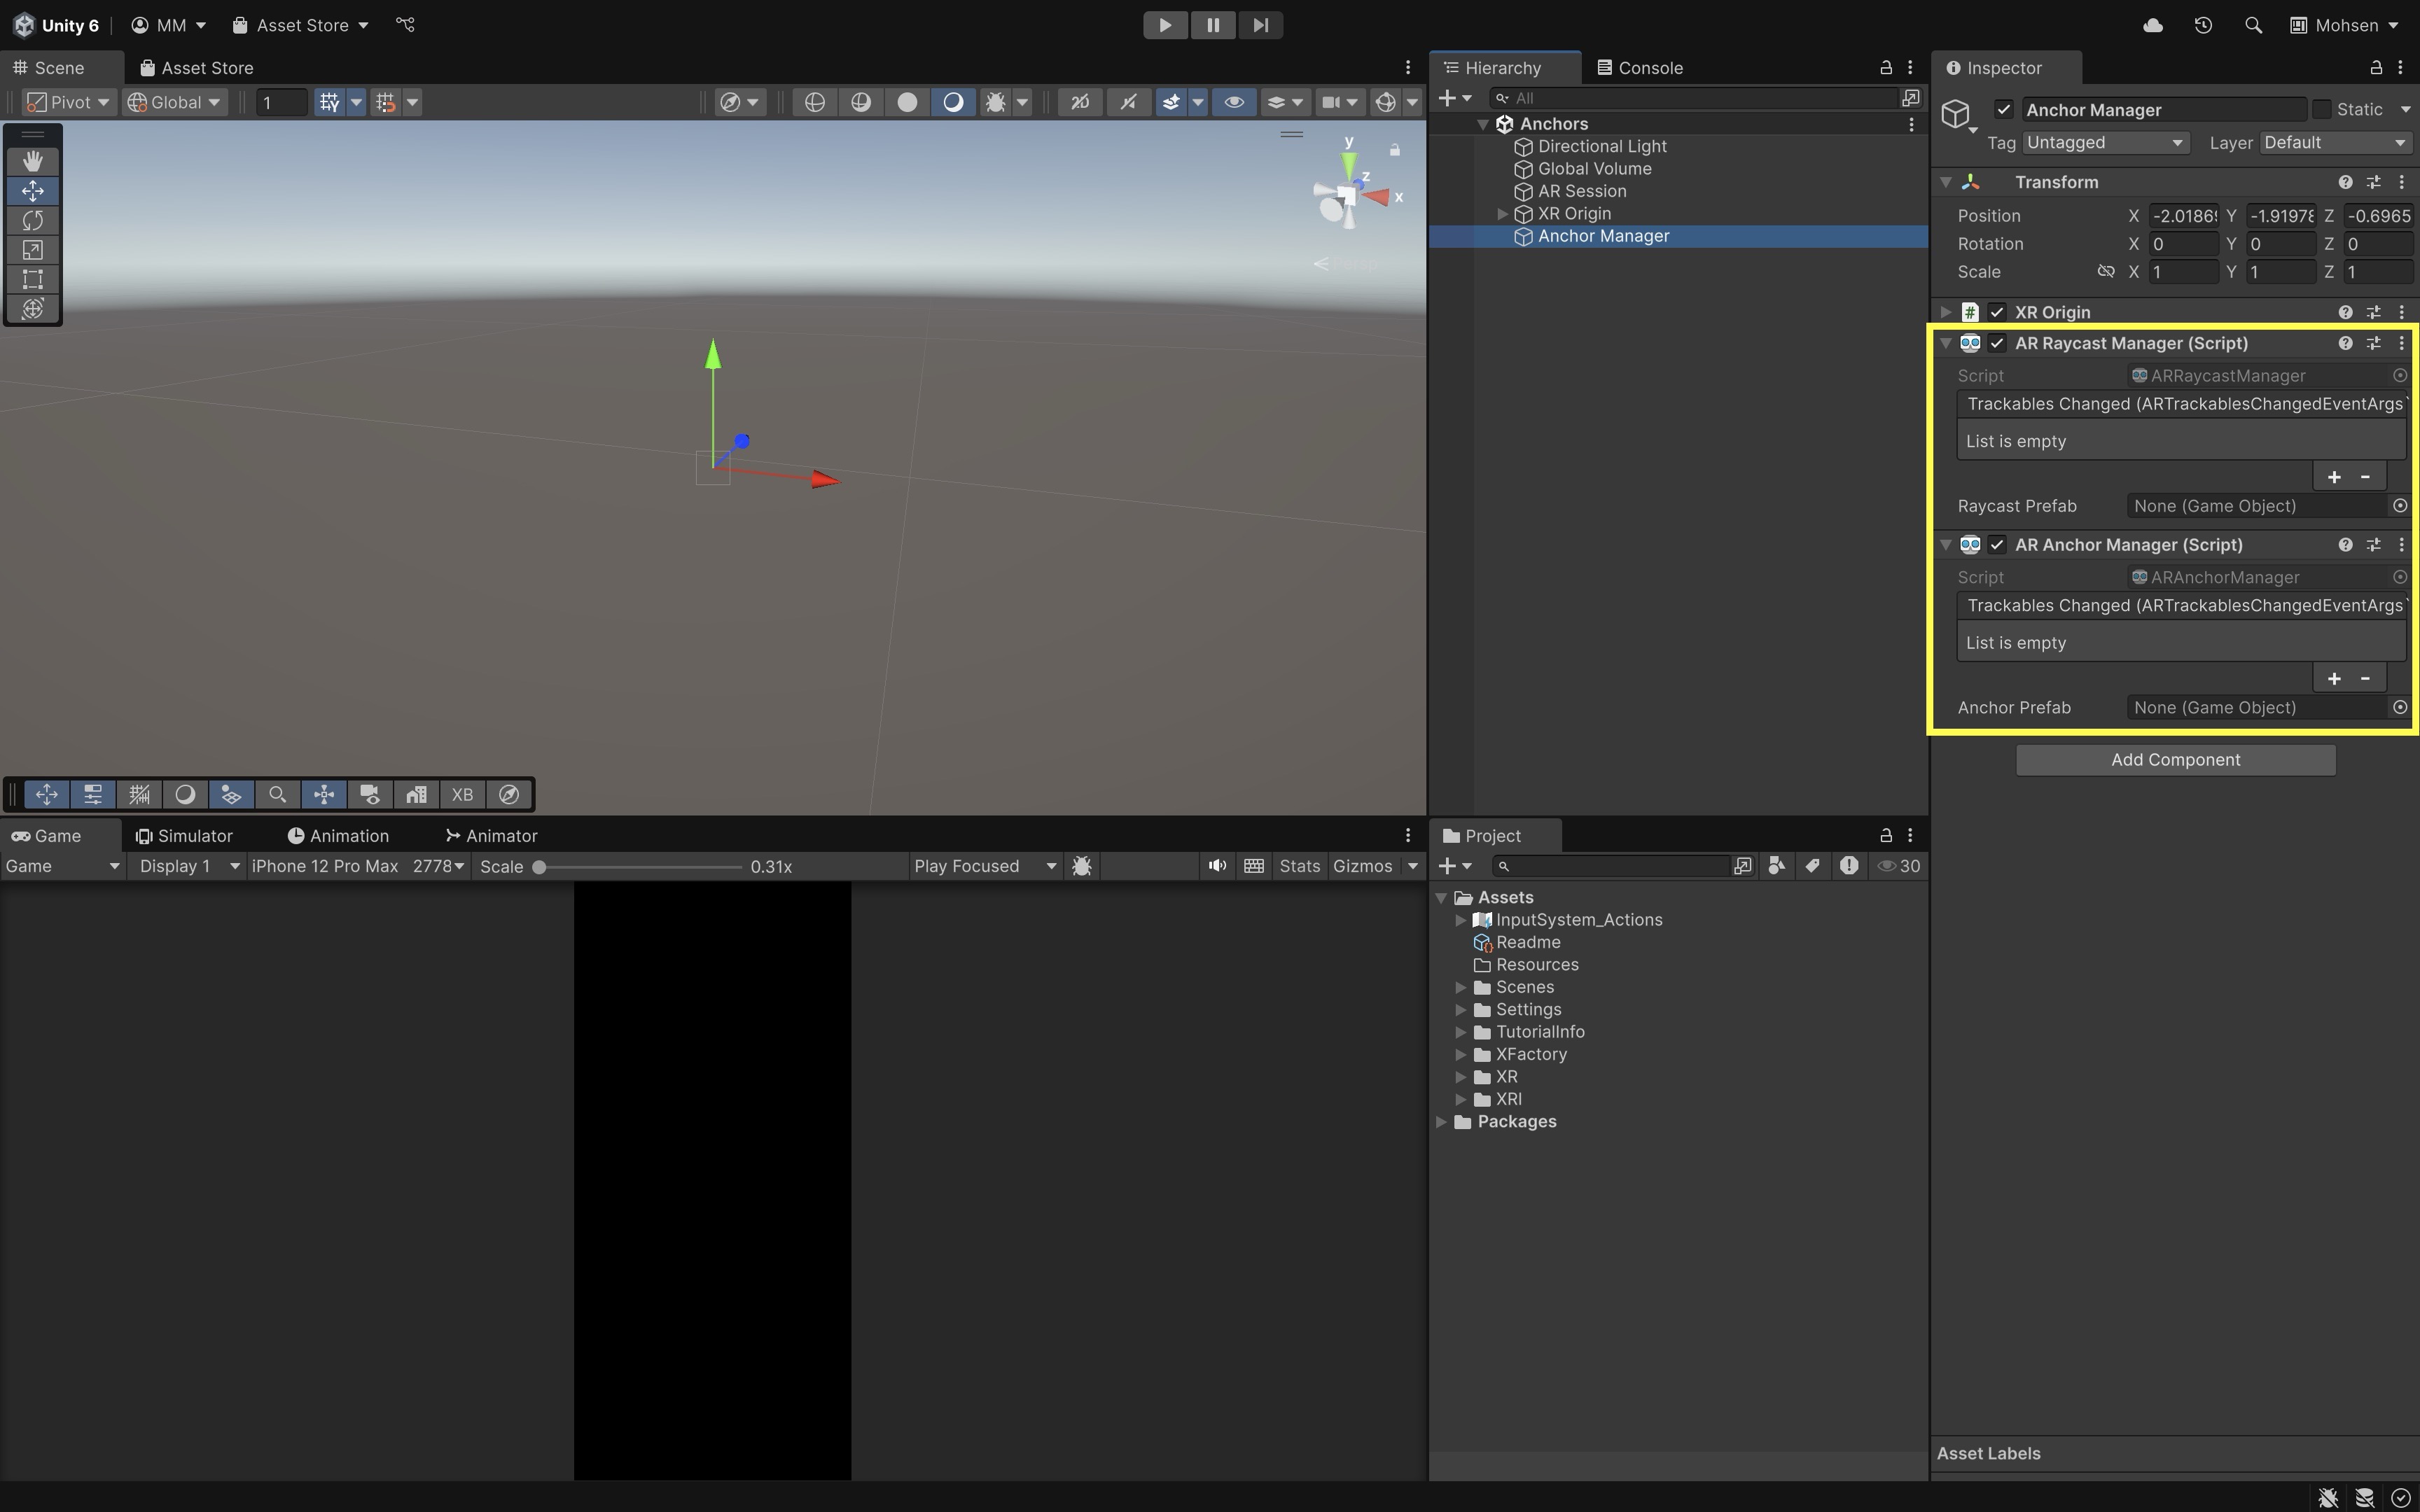
The
ARRaycastManagerdetects where on real-world surfaces the user is tapping, while theARAnchorManagercreates and manages anchors to pin virtual content to those surfaces. TheRaycast PrefabandAnchor Prefabfields can remain empty because we are instantiating the Engine V8 prefab directly through our custom script, giving us full control over what gets placed and how. - Start from your existing
- Add and Configure an Anchor Placer Script:
- Create a new script named
AnchorPlacer.cs. - Attach the script to the
Anchor ManagerGameObject.
using UnityEngine; using UnityEngine.XR.ARFoundation; using UnityEngine.XR.ARSubsystems; using System.Collections.Generic; using System.Threading.Tasks; [RequireComponent(typeof(ARRaycastManager))] [RequireComponent(typeof(ARAnchorManager))] public class AnchorPlacer : MonoBehaviour { public GameObject engineV8Prefab; ARRaycastManager _raycastMgr; ARAnchorManager _anchorMgr; List<ARRaycastHit> _hits = new(); void Awake() { _raycastMgr = GetComponent<ARRaycastManager>(); _anchorMgr = GetComponent<ARAnchorManager>(); } void Update() { if (Input.touchCount == 0) return; Touch touch = Input.GetTouch(0); if (touch.phase != TouchPhase.Began) return; if (_raycastMgr.Raycast(touch.position, _hits, TrackableType.Planes)) { Pose hitPose = _hits[0].pose; PlaceAnchorAndEngine(hitPose); } } async void PlaceAnchorAndEngine(Pose pose) { var anchorResult = await _anchorMgr.TryAddAnchorAsync(pose); if (anchorResult.status.IsSuccess()) { var anchor = anchorResult.value; Instantiate(engineV8Prefab, anchor.transform); Debug.Log("Anchor and V8 engine placed successfully."); } else { Debug.LogWarning("Failed to create anchor at pose."); } } } - Create a new script named
- Configure the Script:
- Select the
Anchor ManagerGameObject in your scene. - In the
Inspector, locate theAnchor Placercomponent. - Drag and drop the
Engine V8prefab from yourAssetsinto this field. - Ensure the
Engine V8prefab has appropriate scale and a pivot point at its base, so it rests correctly on detected planes.

The
AnchorPlacer.csscript needs access to theEngine V8prefab so it can instantiate the model as a child of the newly created anchor, ensuring the engine stays reliably pinned to the physical environment. - Select the
- Test the Behavior:
- Build and deploy the scene to an AR-capable mobile device.
- Move your device to scan the environment so planes are detected.
- Tap on a detected plane. The engine model should spawn at the tapped location.
- The object is now parented to an anchor.
- It remains in place even if tracking is temporarily lost.
- It doesn’t drift or shift if the environment’s coordinate system updates.
- Move around, occlude the view briefly, or re-enter the area to observe the stability of the anchored engine model.
If you are not seeing the expected stability, ensure that plane detection is working properly, and that the
ARAnchorManageris active and correctly configured.
Potential Extensions
Once you have a basic implementation of image anchoring, you can extend its functionality to create richer and more interactive AR experiences. Below are several ideas for enhancing and expanding the anchoring system:
-
Dynamic Content Loading: Load different prefabs or models dynamically based on the specific image tracked, enabling a broader range of content without hardcoding each one.
-
Anchor Persistence Across Sessions: Implement cloud anchors or a local persistence mechanism so that anchors remain in place even after closing and reopening the app.
-
Multi-Image Anchoring: Extend the system to support multiple tracked images, each anchoring different objects in a shared scene for complex multi-object AR experiences.
-
User Interaction and Customization: Allow users to reposition or replace anchored content via gestures, enabling personalized AR layouts.
-
Anchor Visualization: Develop a debug mode that visualizes anchor points or bounding boxes around anchored content to assist in troubleshooting and optimization.
-
Cross-Platform Support: Adapt the anchoring system to ensure consistent behavior across ARCore, ARKit, and HoloLens platforms using AR Foundation’s cross-platform capabilities.
Anchoring to Tracked Images
When using image tracking in AR Foundation, virtual content is typically positioned relative to the detected image’s pose. However, if the image goes out of view or tracking is temporarily lost, the content may drift or disappear. To enhance stability and persistence, you can create an anchor at the tracked image’s position.
Use Cases
Anchoring virtual content to tracked images has practical applications across various industries and interaction scenarios in AR. While image tracking provides a convenient way to detect and position virtual content, it has limitations. Image tracking alone depends on the continuous visibility of the reference image. If the image is obscured, moves out of the camera’s field of view, or if lighting conditions degrade, tracking can be lost — causing the virtual content to disappear, jitter, or drift. Anchoring addresses this by creating a fixed reference point in the physical environment, ensuring that the digital overlay remains stable and persistent even when the original image is no longer detected. Here are common scenarios where relying on image tracking alone is insufficient, and where using anchors can significantly improve performance and user experience:
-
Temporary Occlusion: When the tracked image is partially or fully occluded by hands, tools, or other objects during interaction, anchoring ensures that virtual content remains visible and stable.
-
User Movement: As users move around the environment, they may unintentionally lose sight of the image marker. Anchors prevent the virtual content from disappearing when the marker is out of view.
-
Changing Lighting Conditions: Poor or dynamic lighting can affect the image tracking quality. Anchors help maintain content placement even if the system struggles to recognize the image.
-
Large Physical Spaces: In spacious environments, users may move far from the marker, making image tracking impractical. Anchors allow the content to stay pinned without constant visibility of the marker.
-
Interactive Tasks: Scenarios like maintenance or assembly often require users to focus on tasks rather than keeping the image in view. Anchoring supports persistent guidance without the need to constantly re-track the image.
-
Environmental Dynamics: Vibrations, moving equipment, or shifting perspectives in industrial settings can disrupt image tracking. Anchors stabilize content in such dynamic environments.
-
Multi-User Collaboration: For collaborative AR experiences, anchors ensure that all users see the content in the same fixed position, even if the reference image is not in view for everyone.
Example
To showcase this capability, we will build on the existing Image Tracking.unity scene to instantiate the Engine V8 prefab when a specific tracked image is detected, and then attach the prefab to an anchor created at the image’s pose. This will ensure the virtual engine remains pinned even if the image is briefly lost from view.
- Scene Prerequisites:
- Open your existing
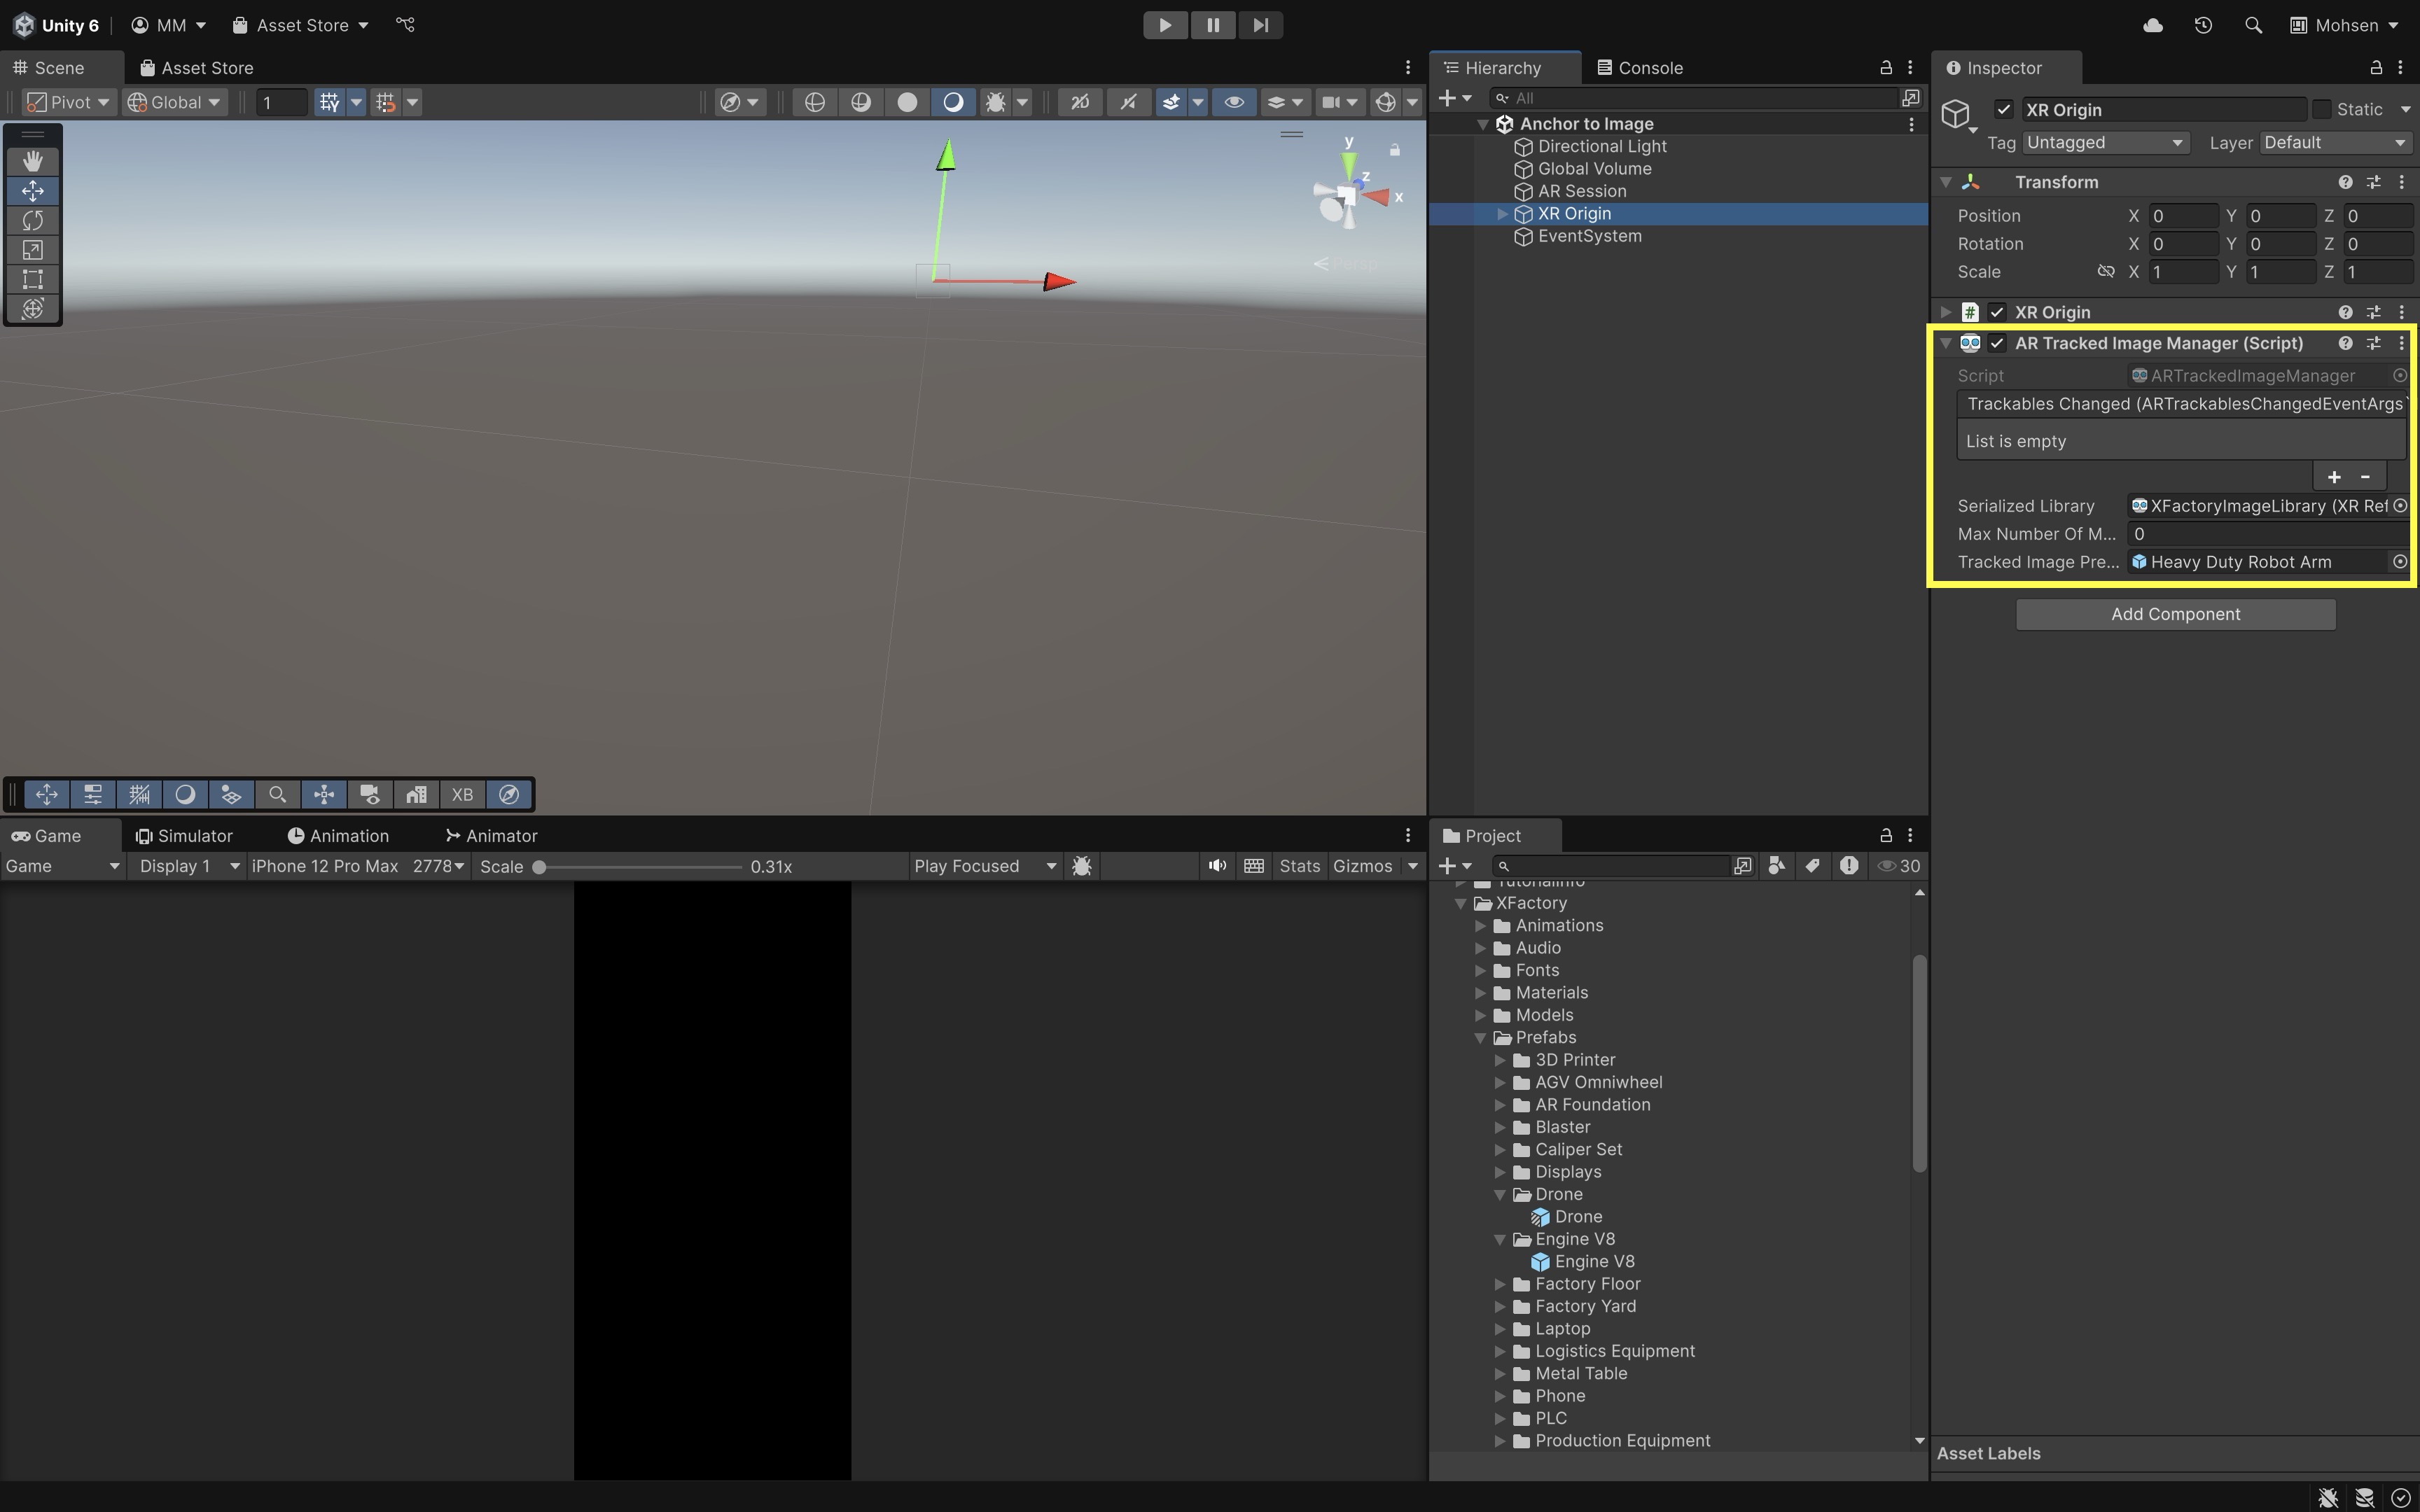
Image Tracking.unityscene, which should already hasAR Tracked Image Manager,XR Origin, andAR Session. - Ensure your
Reference Image Libraryis configured with the target images you want to track. - Save the scene as
Anchor to Image.unityor something similar. - Drag and drop the
Engine V8prefab into theTracked Image Prefabof theAR Tracked Managercomponent underXR Origin.
- Open your existing
- Add and Configure a Tracked Image Anchor Script:
- Create a new script called
TrackedImageAnchor.cs. - Attach it to
XR Originor any dedicated GameObject in the scene. It will automatically add anAR Anchor Managercomponent.
using UnityEngine; using UnityEngine.XR.ARFoundation; using UnityEngine.XR.ARSubsystems; using System.Threading.Tasks; [RequireComponent(typeof(ARTrackedImageManager))] [RequireComponent(typeof(ARAnchorManager))] public class TrackedImageAnchor : MonoBehaviour { public GameObject engineV8Prefab; ARTrackedImageManager _trackedImageMgr; ARAnchorManager _anchorMgr; void Awake() { _trackedImageMgr = GetComponent<ARTrackedImageManager>(); _anchorMgr = GetComponent<ARAnchorManager>(); } void OnEnable() { _trackedImageMgr.trackedImagesChanged += OnTrackedImagesChanged; } void OnDisable() { _trackedImageMgr.trackedImagesChanged -= OnTrackedImagesChanged; } void OnTrackedImagesChanged(ARTrackedImagesChangedEventArgs eventArgs) { foreach (var trackedImage in eventArgs.added) { AnchorToTrackedImage(trackedImage); } foreach (var trackedImage in eventArgs.updated) { if (trackedImage.trackingState == TrackingState.Tracking && trackedImage.transform.childCount == 0) { AnchorToTrackedImage(trackedImage); } } } async void AnchorToTrackedImage(ARTrackedImage trackedImage) { var pose = new Pose( trackedImage.transform.position, trackedImage.transform.rotation ); var anchorResult = await _anchorMgr.TryAddAnchorAsync(pose); if (anchorResult.status.IsSuccess()) { var anchor = anchorResult.value; Instantiate(engineV8Prefab, anchor.transform); Debug.Log( $"Anchor created and V8 engine instantiated " + $"for tracked image: {trackedImage.referenceImage.name}" ); } else { Debug.LogWarning( $"Failed to create anchor for tracked image: " + $"{trackedImage.referenceImage.name}" ); } } } - Create a new script called
- Configure the Script:
- Select the GameObject where you attached the
TrackedImageAnchor.csscript (e.g.,XR Origin). - In the
Inspector, find theEngine V8 Prefabfield. - Drag and drop your
Engine V8prefab from theAssetsinto this field.
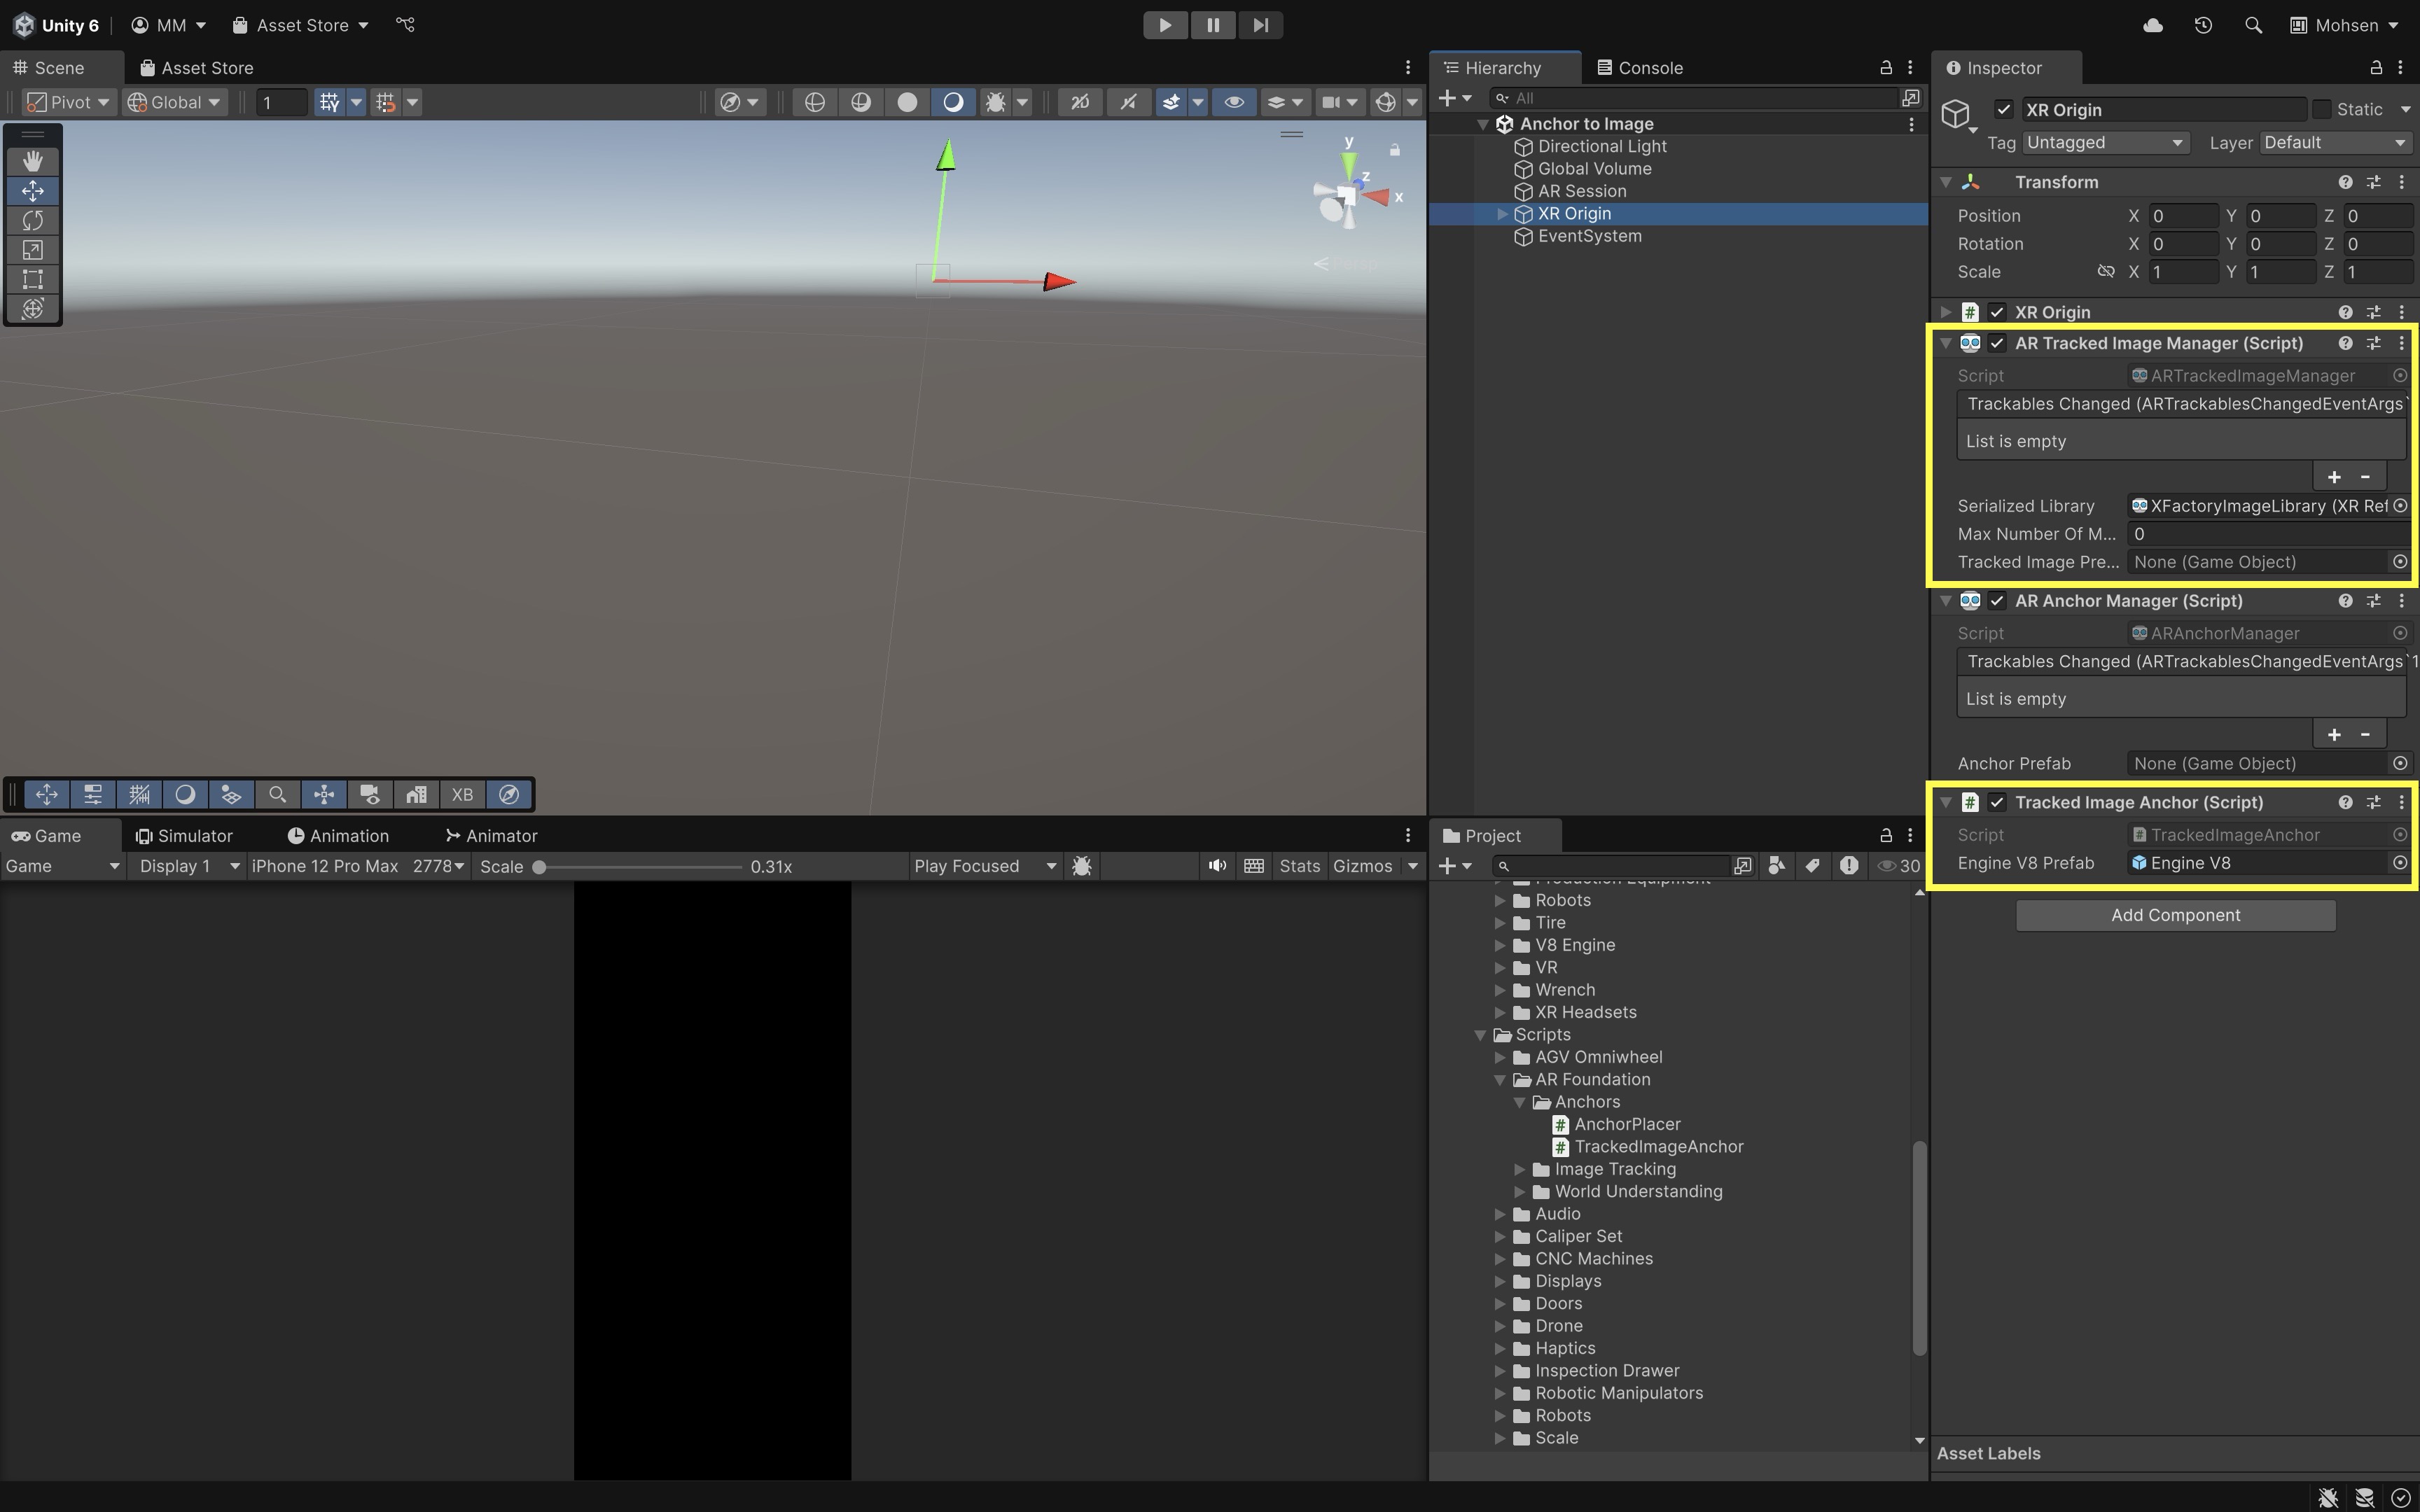
To avoid duplicate instances of the prefab, ensure that the
AR Tracked Image Managercomponent’sTracked Image Prefabfield is set toNonein theInspector. This ensures that only theTrackedImageAnchorscript handles instantiating and anchoring the prefab when an image is detected. TheAR Tracked Image Manageris still required because it detects and tracks images in the environment, enabling your custom script to respond by placing and anchoring content. - Select the GameObject where you attached the
- Test the Behavior:
- Build and deploy the scene to an AR-enabled device.
- Present one of the reference images to the camera.
- When the image is recognized, the engine model will appear anchored at the image’s position and orientation.
- The engine should remain pinned in place, even if the image is briefly out of view or tracking state changes.
- Move around the tracked image to verify that the engine remains stable and properly oriented relative to the image.
If the engine doesn’t appear, ensure your
Reference Image Libraryis correctly configured and that the image is detectable under current lighting conditions.
Potential Extensions
Once you have a basic implementation of image anchoring, you can extend its functionality to create richer and more interactive AR experiences. Below are several ideas for enhancing and expanding the anchoring system:
-
Dynamic Content Loading: Load different prefabs or models dynamically based on the specific image tracked, enabling a broader range of content without hardcoding each one.
-
Anchor Persistence Across Sessions: Implement cloud anchors or a local persistence mechanism so that anchors remain in place even after closing and reopening the app.
-
Multi-Image Anchoring: Extend the system to support multiple tracked images, each anchoring different objects in a shared scene for complex multi-object AR experiences.
-
User Interaction and Customization: Allow users to reposition or replace anchored content via gestures, enabling personalized AR layouts.
-
Anchor Visualization: Develop a debug mode that visualizes anchor points or bounding boxes around anchored content to assist in troubleshooting and optimization.
-
Cross-Platform Support: Adapt the anchoring system to ensure consistent behavior across ARCore, ARKit, and HoloLens platforms using AR Foundation’s cross-platform capabilities.
ARAnchor Component
The AR Anchor component represents a single tracked anchor in the AR session. You can add this component to any GameObject to lock its position and orientation in the physical environment, helping to stabilize content against tracking loss or world mapping drift. The ARAnchor exposes key properties:
trackingState: Indicates if the anchor is currently tracked, limited, or not tracked.pending: Returnstrueif the anchor is still being registered with the AR system.destroyOnRemoval: If set totrue, the anchor’s GameObject is automatically destroyed when the anchor is removed from the AR session.
Use Cases
In some AR experiences, virtual objects are already present in the scene due to prior interactions, procedural generation, or pre-loaded content. Simply relying on their initial position in world space may not provide enough stability against tracking loss, environmental drift, or world map changes. Manually attaching an ARAnchor to these objects ensures their positions remain stable and consistent relative to the real world. Scenarios where manually attaching anchors is particularly useful include:
- Post-Placement Stabilization: After objects are dynamically spawned (e.g., drones, tools), anchoring them locks their position to the environment, ensuring they don’t drift.
- Interactive Content Repositioning: When users move or manipulate objects, attaching an anchor afterward ensures the new position is stabilized.
- Session Persistence: For AR applications that reload or restore content after session interruptions, manually anchored objects maintain their spatial context.
- Dynamic Scene Updates: In environments where objects need to adapt or respond to real-world changes (like moving robots or tools), anchoring helps maintain accurate alignment.
- Content Authoring Tools: For AR scene editors or design tools, developers can allow users to place and then stabilize content explicitly with anchors.
- Precision Training and Simulation: In engineering or industrial simulations, manually anchored models like machinery or parts remain precisely positioned for consistent training outcomes.
Example
Let’s see how we can manually attach an anchor to any GameObject in your scene. This is useful when content is dynamically placed and you want to stabilize it after placement.
- Add and Configure an Anchor on GameObject Script:
- Create an
AnchorOnGameObject.csscript.
using UnityEngine; using UnityEngine.XR.ARFoundation; public class AnchorOnGameObject : MonoBehaviour { private ARAnchorManager _anchorMgr; void Start() { _anchorMgr = FindObjectOfType<ARAnchorManager>(); if (_anchorMgr == null) { Debug.LogError("ARAnchorManager not found in the scene."); return; } var anchor = gameObject.AddComponent<ARAnchor>(); _anchorMgr.trackablesChanged += args => { if (args.added.Contains(anchor)) { Debug.Log("GameObject anchored successfully!"); } }; } } - Create an
- Configure the Script:
- Select the GameObject in your scene that you want to stabilize with an anchor (e.g., add the
Droneprefab to the scene). - Add the
AnchorOnGameObject.csscript to this GameObject via theInspector. - Ensure that your
XR OriginGameObject has anARAnchorManagercomponent attached. This is required for anchor tracking to function properly.
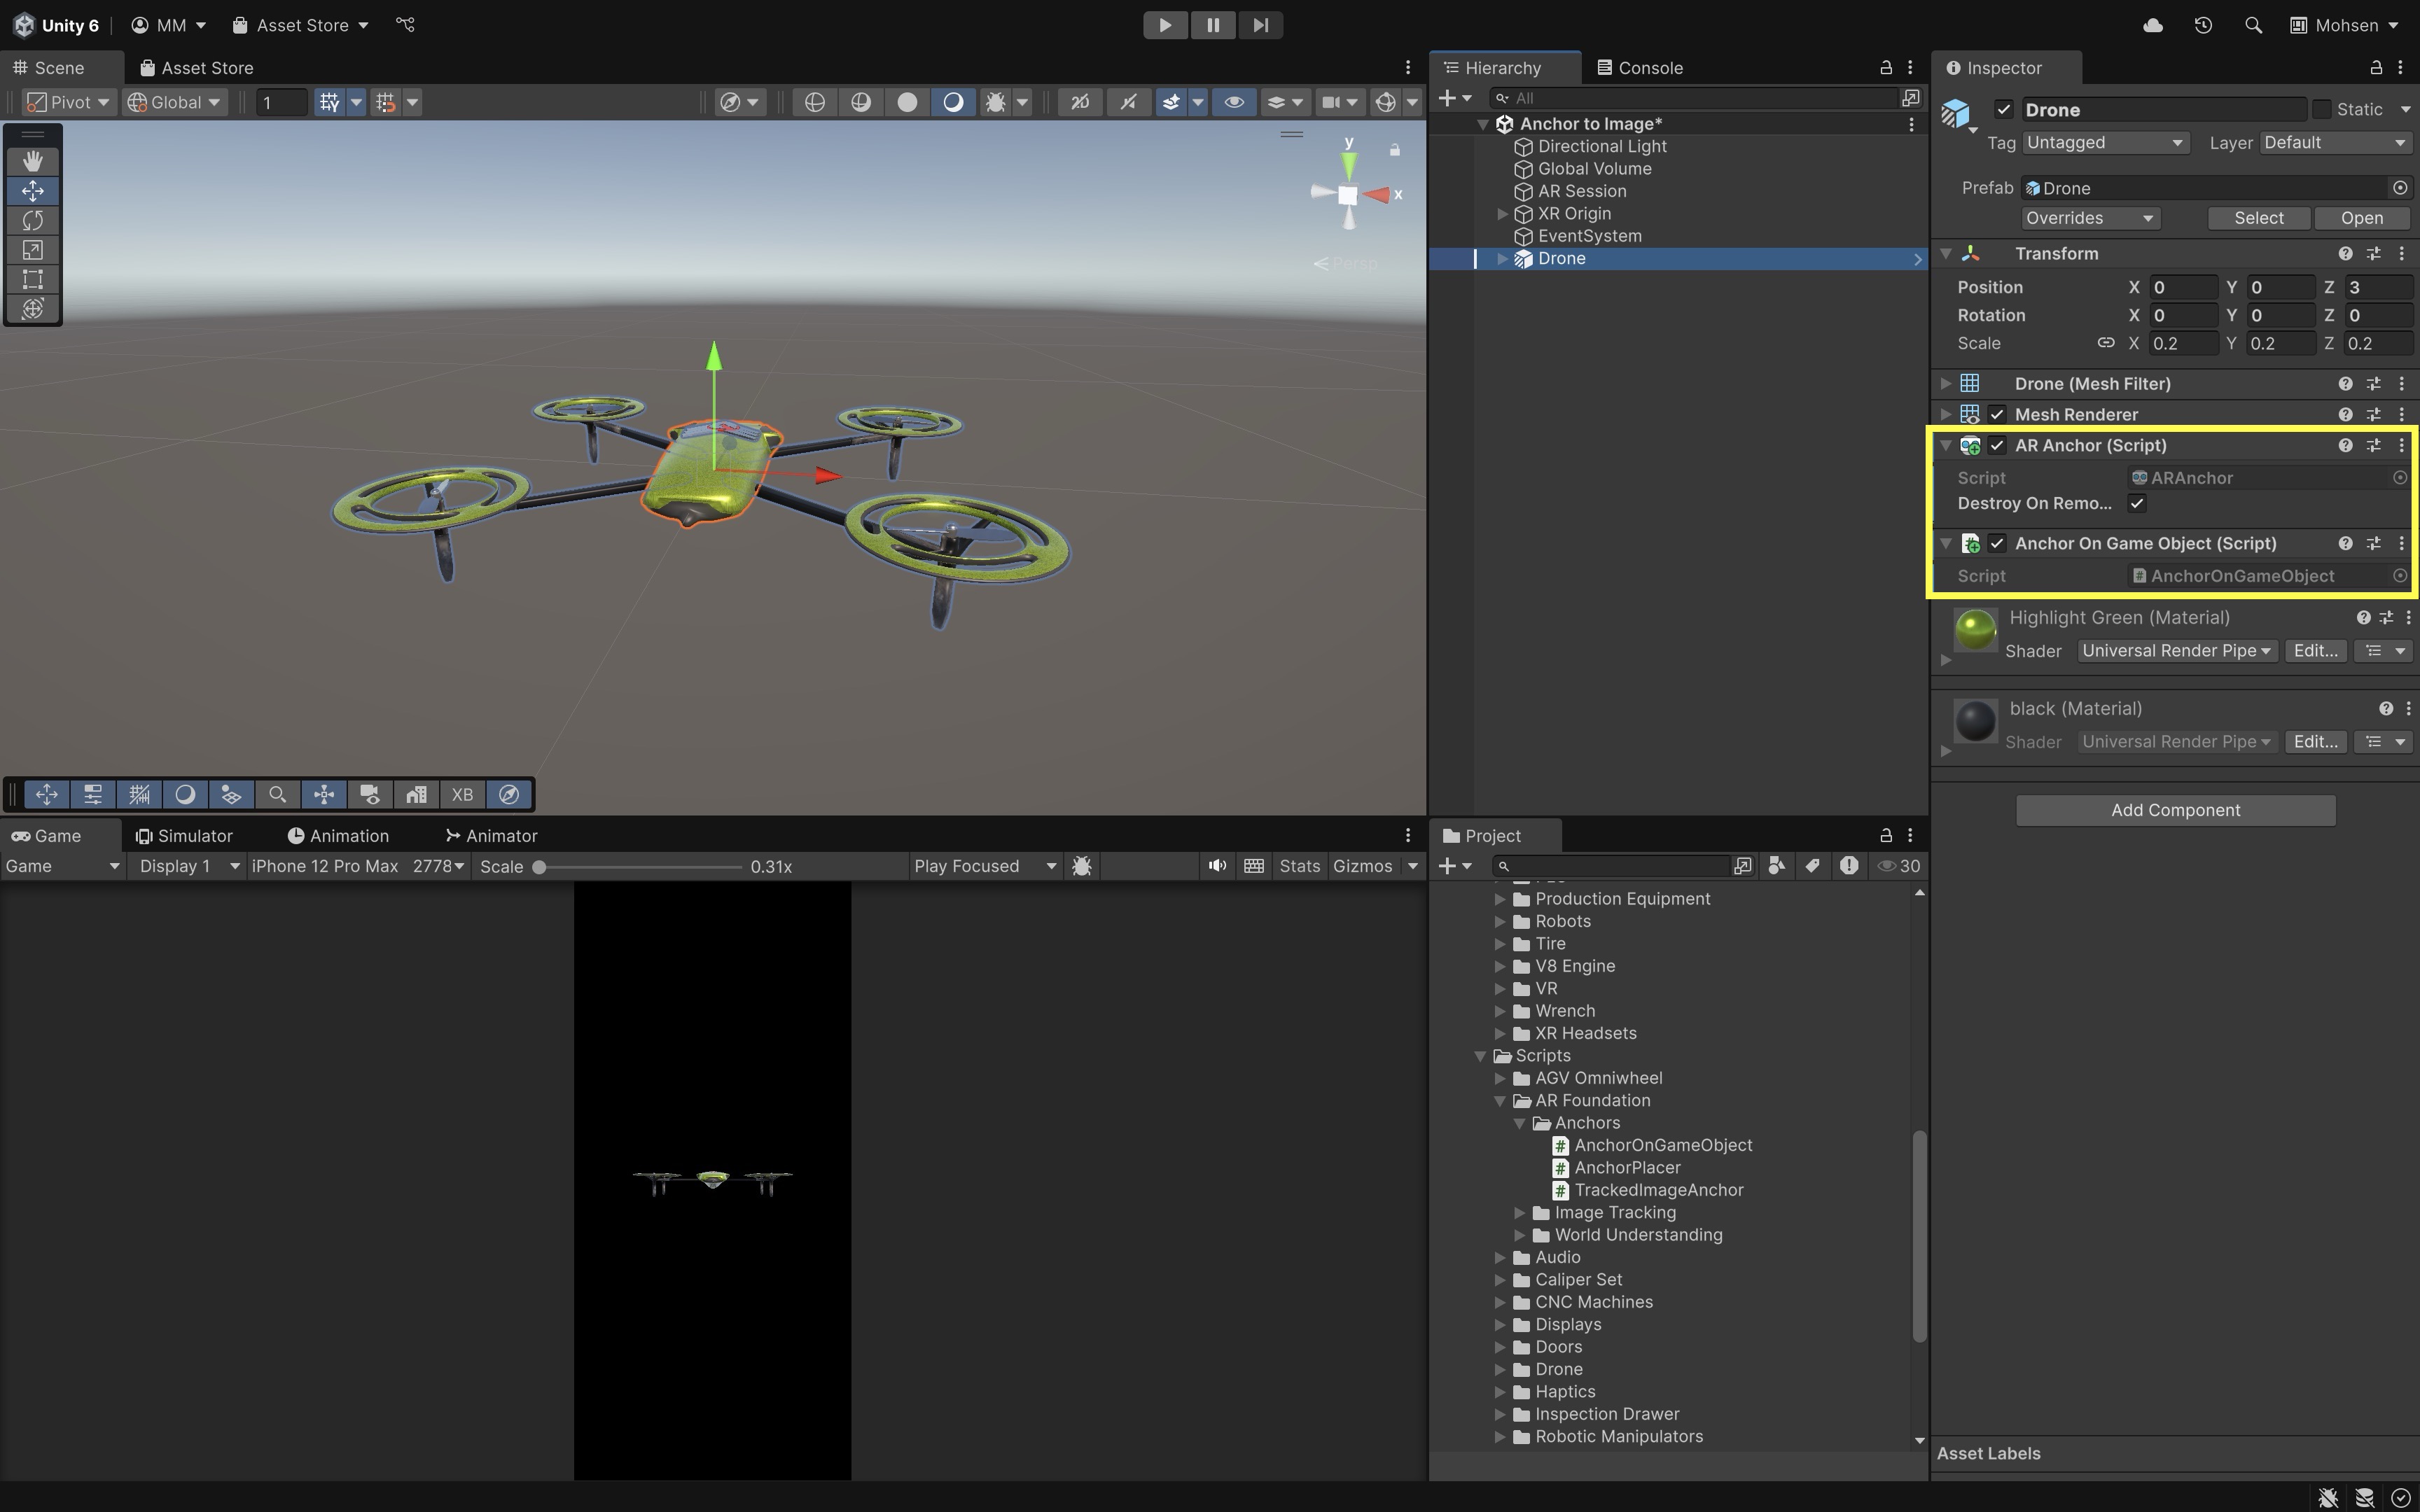
- Select the GameObject in your scene that you want to stabilize with an anchor (e.g., add the
- Test the Behavior:
- When the app starts, the script will automatically add an
ARAnchorcomponent to the GameObject (e.g., drone). - It will also listen for the
trackablesChangedevent to confirm that the anchor is successfully tracked.
- When the app starts, the script will automatically add an
Use this configuration approach when you need to lock virtual content in space after placement or interaction.
Potential Extensions
Once you have a basic implementation of image anchoring, you can extend its functionality to create richer and more interactive AR experiences. Below are several ideas for enhancing and expanding the anchoring system:
- Dynamic Content Loading: Load different prefabs or models dynamically based on the specific image tracked, enabling a broader range of content without hardcoding each one.
- Anchor Persistence Across Sessions: Implement cloud anchors or a local persistence mechanism so that anchors remain in place even after closing and reopening the app.
- Multi-Image Anchoring: Extend the system to support multiple tracked images, each anchoring different objects in a shared scene for complex multi-object AR experiences.
- User Interaction and Customization: Allow users to reposition or replace anchored content via gestures, enabling personalized AR layouts.
- Anchor Visualization: Develop a debug mode that visualizes anchor points or bounding boxes around anchored content to assist in troubleshooting and optimization.
- Cross-Platform Support: Adapt the anchoring system to ensure consistent behavior across ARCore, ARKit, and HoloLens platforms using AR Foundation’s cross-platform capabilities.
Removing Anchors
Removing anchors is important for resource management and scene cleanliness in AR applications. Unused anchors can continue consuming system resources and clutter the AR session, potentially affecting tracking performance and stability. The script below provides two options to remove an anchor, via ARAnchorManager.TryRemoveAnchor, which unregisters the anchor from the AR session, and by destroying the ARAnchor component or its GameObject, which also unregisters it.
- Attach this script to a GameObject that acts as a controller or manager for anchors (e.g., an empty
Anchor ManagerGameObject). - At runtime, you can call
RemoveAnchor(anchor)and pass the anchor you wish to remove.
using UnityEngine;
using UnityEngine.XR.ARFoundation;

public class AnchorRemover : MonoBehaviour
{
    private ARAnchorManager _anchorMgr;

    void Start()
    {
        _anchorMgr = FindObjectOfType<ARAnchorManager>();

        if (_anchorMgr == null)
        {
            Debug.LogError(
                "ARAnchorManager not found in the scene."
            );
        }
    }

    public void RemoveAnchor(ARAnchor anchor)
    {
        if (anchor == null)
        {
            Debug.LogWarning("No anchor provided to remove.");
            return;
        }

        // Option 1: Try to remove via Anchor Manager
        if (_anchorMgr.TryRemoveAnchor(anchor))
        {
            Debug.Log("Anchor removed via ARAnchorManager.");
        }
        else
        {
            Debug.LogWarning(
                "Failed to remove anchor via ARAnchorManager. " +
                "Destroying manually."
            );

            // Option 2: Simply destroy the anchor component
            Destroy(anchor);
        }
    }
}
You might trigger
RemoveAnchor(anchor)when a “reset” button is pressed, the user completes or cancels an assembly step in XR training, or dynamically, when the user moves to a new location or station.
Key Takeaways
Anchors are essential in AR development for keeping virtual content precisely aligned with the physical world, ensuring stability, persistence, and user trust even when tracking conditions fluctuate. They allow developers to pin objects to real-world surfaces, maintain placement after image markers leave view, and support collaborative or long-term experiences. Whether placed dynamically through taps, attached to tracked images, or added to existing GameObjects, anchors combat drift, enable smooth recovery after tracking loss, and preserve spatial context across sessions. Effective anchor use involves mindful resource management—creating them only when needed and removing them when no longer useful—while leveraging platform support across ARKit, ARCore, and other XR systems. Mastering anchors means delivering AR experiences that feel consistent, responsive, and truly integrated into the user’s environment.