E4 Mobile AR: Tracking

Learning Outcomes
- Explain how AR Foundation performs image tracking. Before class, review how 2D reference images are detected and tracked in real space, and think through possible AR responses when an image is recognized or when tracking is lost.
- Create and configure a Reference Image Library in Unity. In preparation, import a sample image, set its physical size, verify it has strong visual features, and—if possible—compare feature richness across multiple images.
- Set up an AR Tracked Image Manager for prefab spawning. Ahead of the session, add the
ARTrackedImageManagerto your scene, assign your reference image library, set a placeholder prefab, and preview its appearance when the image is detected.- Interpret AR tracked image states and respond accordingly. Prior to class, study the
None,Limited, andTrackingstates, and explore howARTrackedImage.trackingStatecan trigger visual or UI feedback when tracking changes.
What Is Image Tracking?
Image tracking is a core feature in Unity’s AR Foundation framework that enables applications to recognize, locate, and continuously track 2D images (called reference images) in the user’s environment. This functionality is built on top of platform-specific capabilities (like ARKit and ARCore) via the XRImageTrackingSubsystem. Image tracking allows virtual content to interact with real-world objects in a highly immersive and interactive manner. The system effectively bridges the gap between the physical and digital worlds, enhancing user experiences in augmented reality applications. The image tracking process consists of three key functions that work together to ensure smooth and accurate tracking:
-
Detect: In this initial phase, the AR system scans the environment to find an image that matches one from a predefined library of known images. The reference image is typically added to the app as part of an asset bundle or a separate resource file, and it serves as a “trigger” to begin the augmented experience. Detection is highly dependent on factors like image quality, lighting conditions, and distance from the camera.
-
Track: Once the image is detected, the system continuously estimates its position and orientation (pose) in 3D space. This tracking process occurs in real-time as the user moves around or the image changes its position relative to the camera. The tracking not only includes translation (position) but also rotation, ensuring that virtual content remains correctly aligned and attached to the physical object, even with changes in perspective. It ensures the persistent interaction with the physical image, as well as updates the pose continuously as the user navigates the environment.
-
Notify: Throughout the tracking process, the AR system notifies the app via lifecycle events, which allow the app to respond dynamically to the state of the image (whether it has been detected, lost, or updated). These events enable the app to perform actions such as spawning virtual objects, triggering animations, or removing content when the image is no longer in view. Events also allow for interaction with the tracked image, enabling the user to trigger virtual actions, such as tapping on a part of the image to display more information, move objects, or start specific AR-based features.
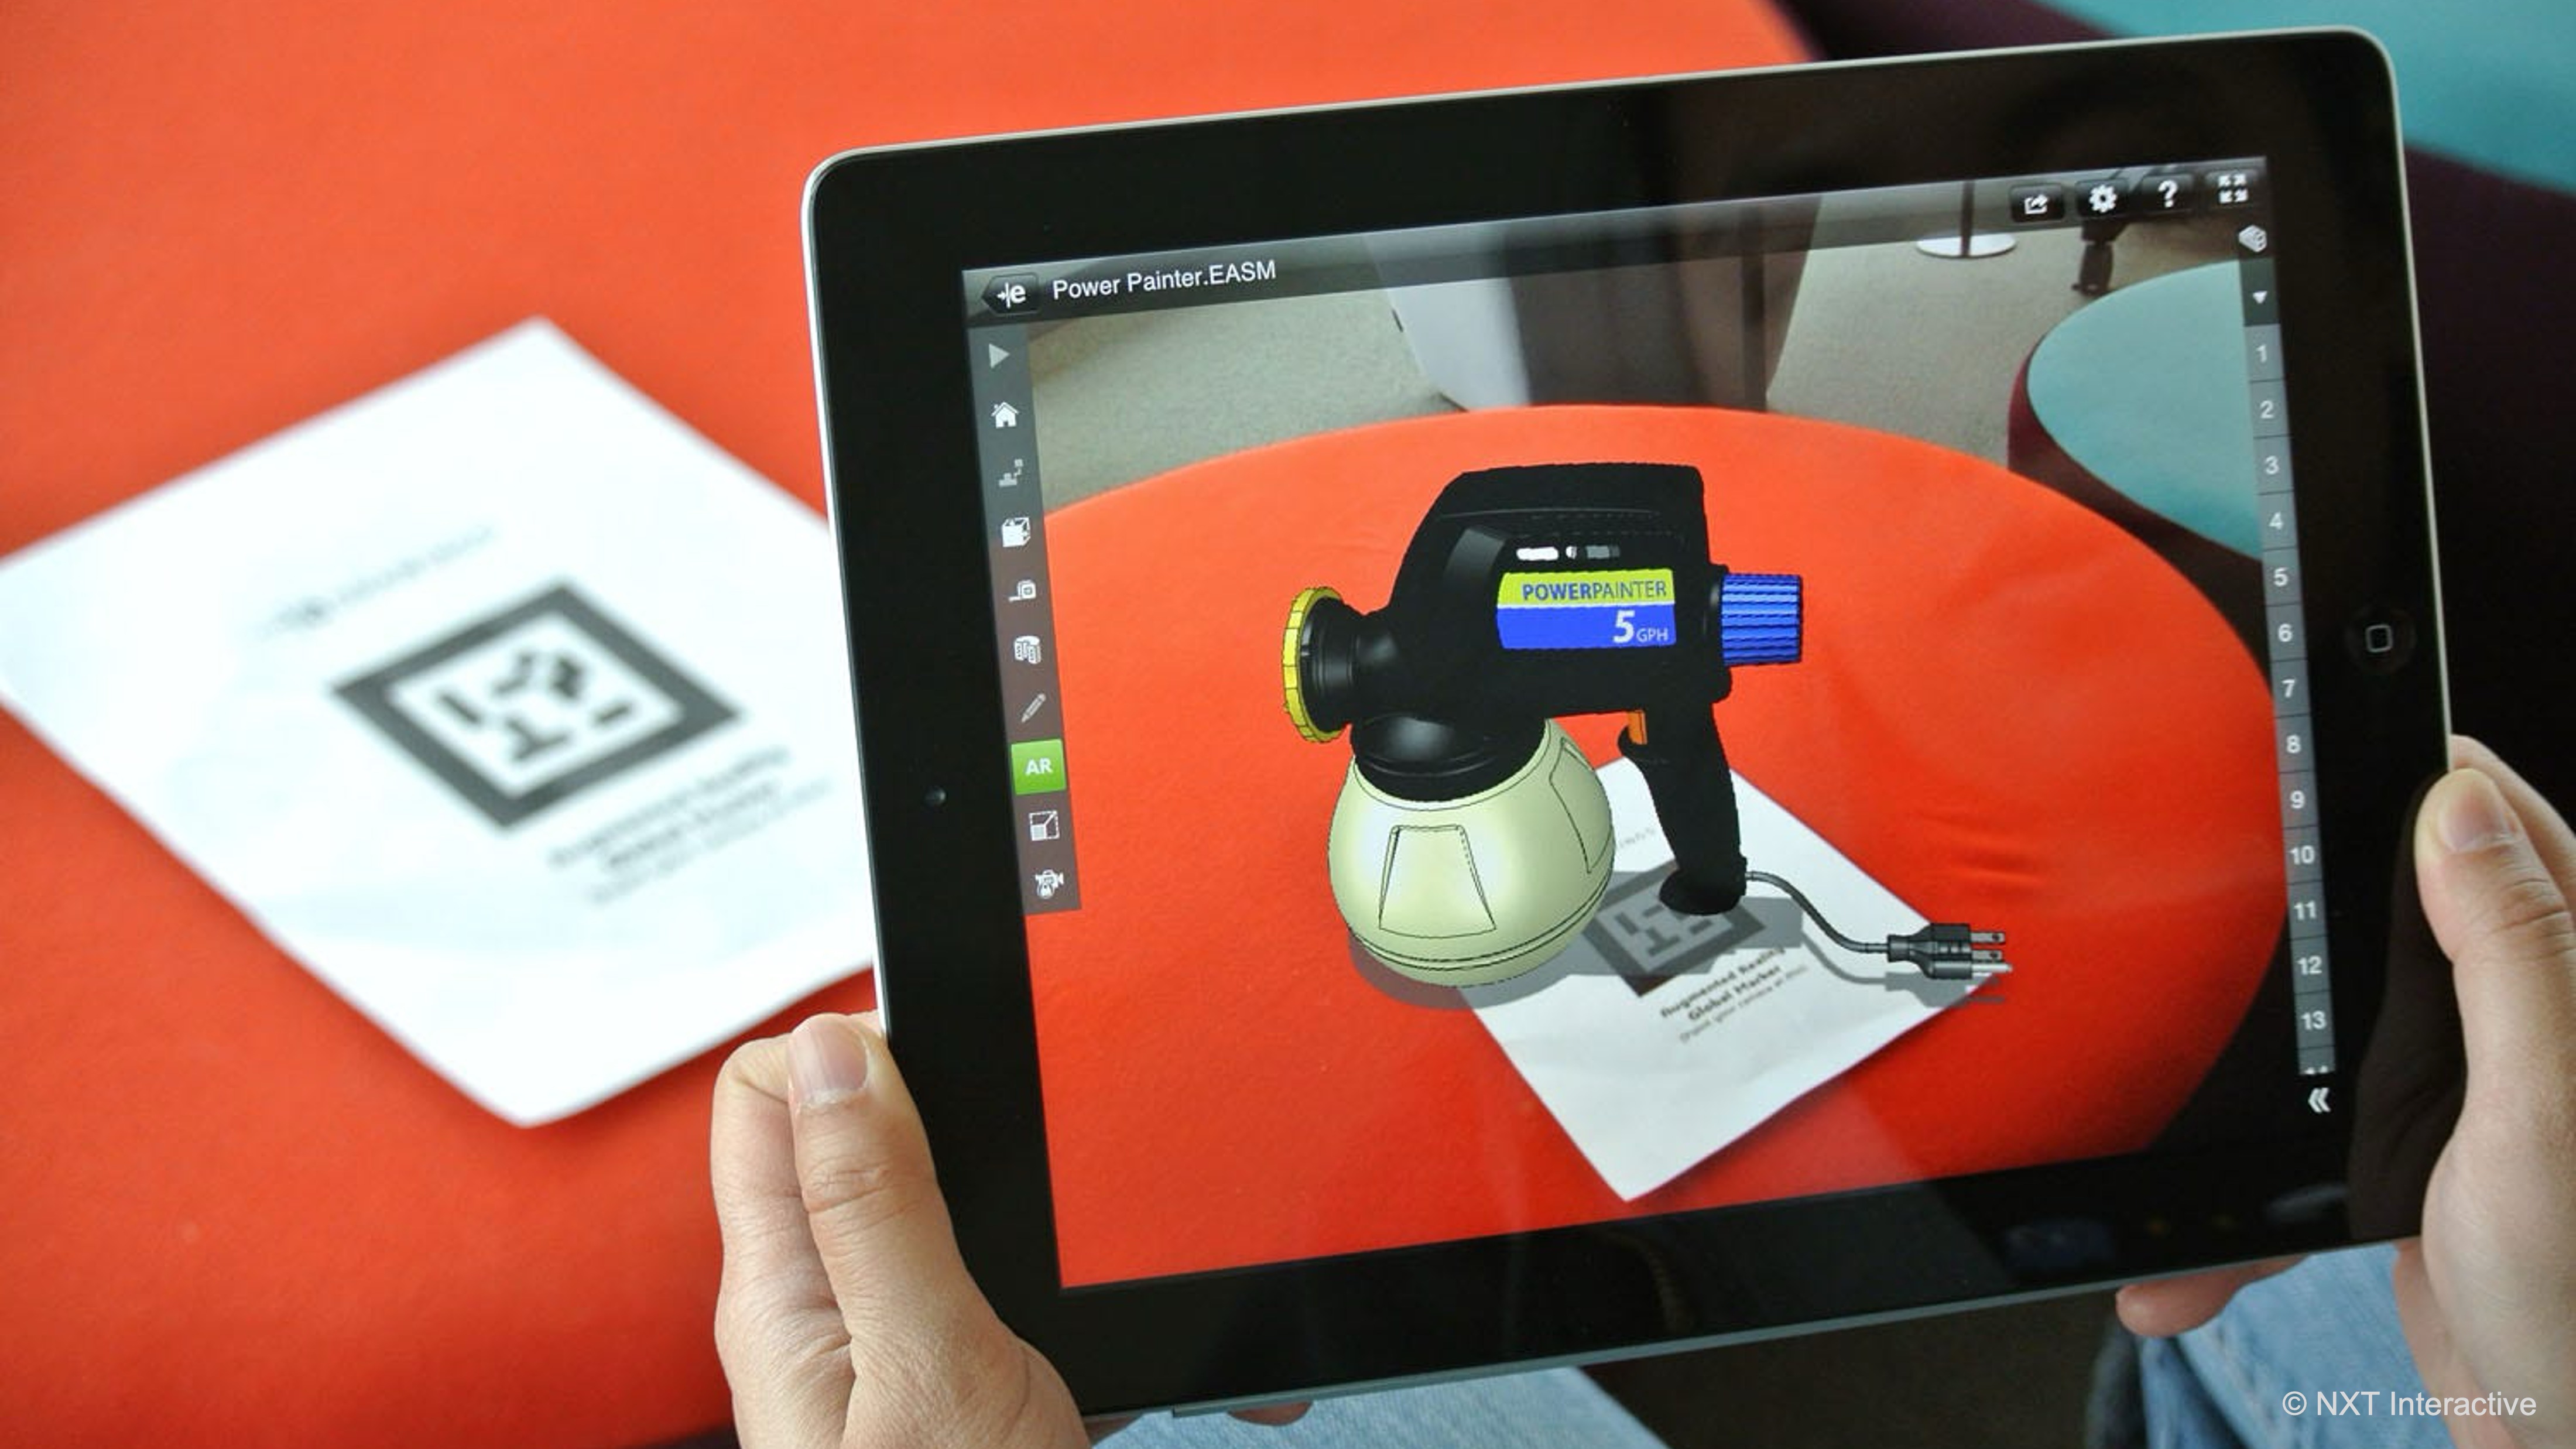
Consider an AR application that allows you to simulate and control a virtual robot model superimposed on its exact physical replica. A printed image placed near the robot’s real-world counterpart serves as the reference image. When the AR app detects this image, it overlays a virtual interface, allowing the user to trigger animations (e.g., pickup, placement, returning home). This interaction occurs seamlessly in the app, creating an intuitive and engaging experience where the virtual and physical worlds blend together through image tracking.
Principles of Image Tracking
To understand how image tracking works and how to apply it effectively, it is helpful to grasp the underlying principles. These principles ensure the smooth operation of AR systems and improve the user experience by providing high-quality, reliable tracking:
-
Image Recognition: A reference image must have high contrast, distinct visual features, and clarity for optimal detection and recognition. The AR system uses computer vision algorithms to extract feature points from the image, such as edges, corners, and distinct patterns, which act as “landmarks” for the tracking process. These extracted features are then compared to the live camera feed to identify the image. The better the quality and clarity of the image, the more accurate the detection will be, especially in dynamic or low-light environments. Images with repetitive patterns or low contrast can lead to detection failures or unreliable tracking.
-
Pose Estimation: Once the reference image is recognized, the system computes its 6 degrees of freedom (6DoF) pose, which includes both its position and orientation in 3D space relative to the camera. The pose allows the system to place digital content (such as holograms) precisely on top of or next to the physical reference image, ensuring that the virtual objects remain anchored to the real-world image, regardless of the viewer’s perspective or movement. The accuracy of pose estimation directly impacts how well virtual content aligns with the reference image, making it crucial for a seamless AR experience.
- Tracking Lifecycle: Images are continuously evaluated during the tracking process, which can be divided into three main stages. The system’s ability to effectively handle all stages of the lifecycle ensures smooth transitions and actions within the app:
- Added: This stage occurs when the image is first detected, and tracking begins. The system acknowledges the image as a valid reference and starts tracking its position and orientation.
- Updated: Once the image is tracked, any changes in its pose (position or orientation) are updated in real-time. This allows virtual content to follow the image accurately as the user moves.
- Removed: The image is removed from tracking when it is no longer visible to the camera or if tracking quality is compromised (e.g., due to occlusion or poor visibility). At this stage, the AR system typically triggers lifecycle events to notify the app that the image is no longer in view.
-
Size and Scale: Providing a physical width (in meters) for each reference image helps improve both accuracy and scale estimation in AR applications. The physical width allows the system to better estimate the image’s actual size in the real world, improving the alignment and scaling of virtual objects relative to the image. Without a physical width, the system may have to guess the image’s size, which can result in misaligned or incorrectly scaled virtual content, especially if the camera is positioned too close or too far from the image.
- Environmental Factors:Lighting, angle, occlusion, and image quality all play a significant role in the reliability of image tracking.
- Lighting: Consistent and well-distributed lighting is essential for the system to detect the image clearly and track it reliably. Too much backlighting or low-light conditions can confuse the system.
- Angle: The image should be positioned in a way that ensures the camera can view its features clearly. Extreme angles or distorted perspectives can hinder recognition and pose estimation.
- Occlusion: Any obstruction between the camera and the image (such as objects blocking parts of the image) can disrupt tracking, leading to interruptions in virtual content rendering.
- Image Quality: The image itself must be printed clearly and without distortion. Poor quality prints, such as blurry or pixelated images, can cause detection failures or poor tracking accuracy.
Why Image Tracking Matters
Image tracking unlocks powerful and intuitive AR experiences by tying virtual content to specific real-world images. Not only does it enhance learning and interactivity, but it also bridges the gap between virtual simulations and physical industrial environments, supporting productivity, safety, and innovation across sectors. Common applications include:
-
Contextual Experiences: Enhance content based on what the user is looking at. Pointing a tablet or AR device at a marker placed near a physical robot can bring up an interactive control panel. Users can trigger specific animations to visualize the robot’s operational cycle virtually overlaid on its physical twin.
-
Persistent Anchors: Use reference images as durable AR anchors for placing and maintaining virtual content in the same spot. The robot marker acts as a stable anchor, ensuring the control UI and animation overlays stay aligned with the robot’s position even as users change their viewing angles or restart the AR session.
-
Interactive Games & Navigation: Reference images can serve as checkpoints or directional cues in interactive AR experiences. In an industrial environment, printed markers placed in various stations can trigger contextual information or tutorials. For the robot arm, this could include maintenance instructions or safety guidelines appearing automatically when the robot’s marker is scanned.
-
Training and Skill Development: Image tracking supports guided training modules where each marker represents a specific task or process step. Scanning a marker next to the equipment could launch AR instructions on proper equipment operation, troubleshooting, safety protocols, or common fault diagnosis.
-
Maintenance and Inspection: Maintenance staff can scan reference images affixed to machines to reveal real-time data, part specifications, or last maintenance records. A marker on a CNC machine could show AR overlays indicating lubrication points, wear-prone components, or interactive checklists for preventive maintenance.
-
Digital Twins Integration: Image tracking can help align virtual digital twins with their physical counterparts on the shop floor. A marker on an industrial 3D printer enables operators to overlay real-time process data like temperature, build progress, or upcoming tasks directly onto the printer in AR.
-
Marketing and Exhibits: In showrooms or industrial exhibitions, image tracking can bring static displays to life with animations, data visualizations, or exploded views. Scanning a printed schematic of an engine can present an animated breakdown of each subsystem—pistons, valves, crankshaft—enhancing understanding for both technical and non-technical audiences.
Platform Support
Not all AR Foundation providers support image tracking. Here is the current support status:
| Provider Plugin | Image Tracking Supported |
|---|---|
| Google ARCore XR Plug-in | ✅ |
| Apple ARKit XR Plug-in | ✅ |
| Apple visionOS XR Plug-in | ✅ |
| Microsoft HoloLens via OpenXR | ❌ |
| Unity OpenXR: Meta Quest | ❌ |
| Unity OpenXR: Android XR | ❌ |
| XR Simulation | ✅ |
AR platform support is constantly evolving, so it’s a good idea to stay updated on new plugin releases and feature enhancements. Understanding the
ARTrackedImagecomponent and its lifecycle is key to creating stable, responsive AR experiences. Next, explore how to combine these tracking events with UI interactions to create fully interactive AR workflows.
Reference Image Library
A Reference Image Library in Unity is a ScriptableObject that contains a collection of 2D images your AR app can recognize and track. You build and package this library with your Unity project to enable image tracking functionality.
What Is a Reference Image?
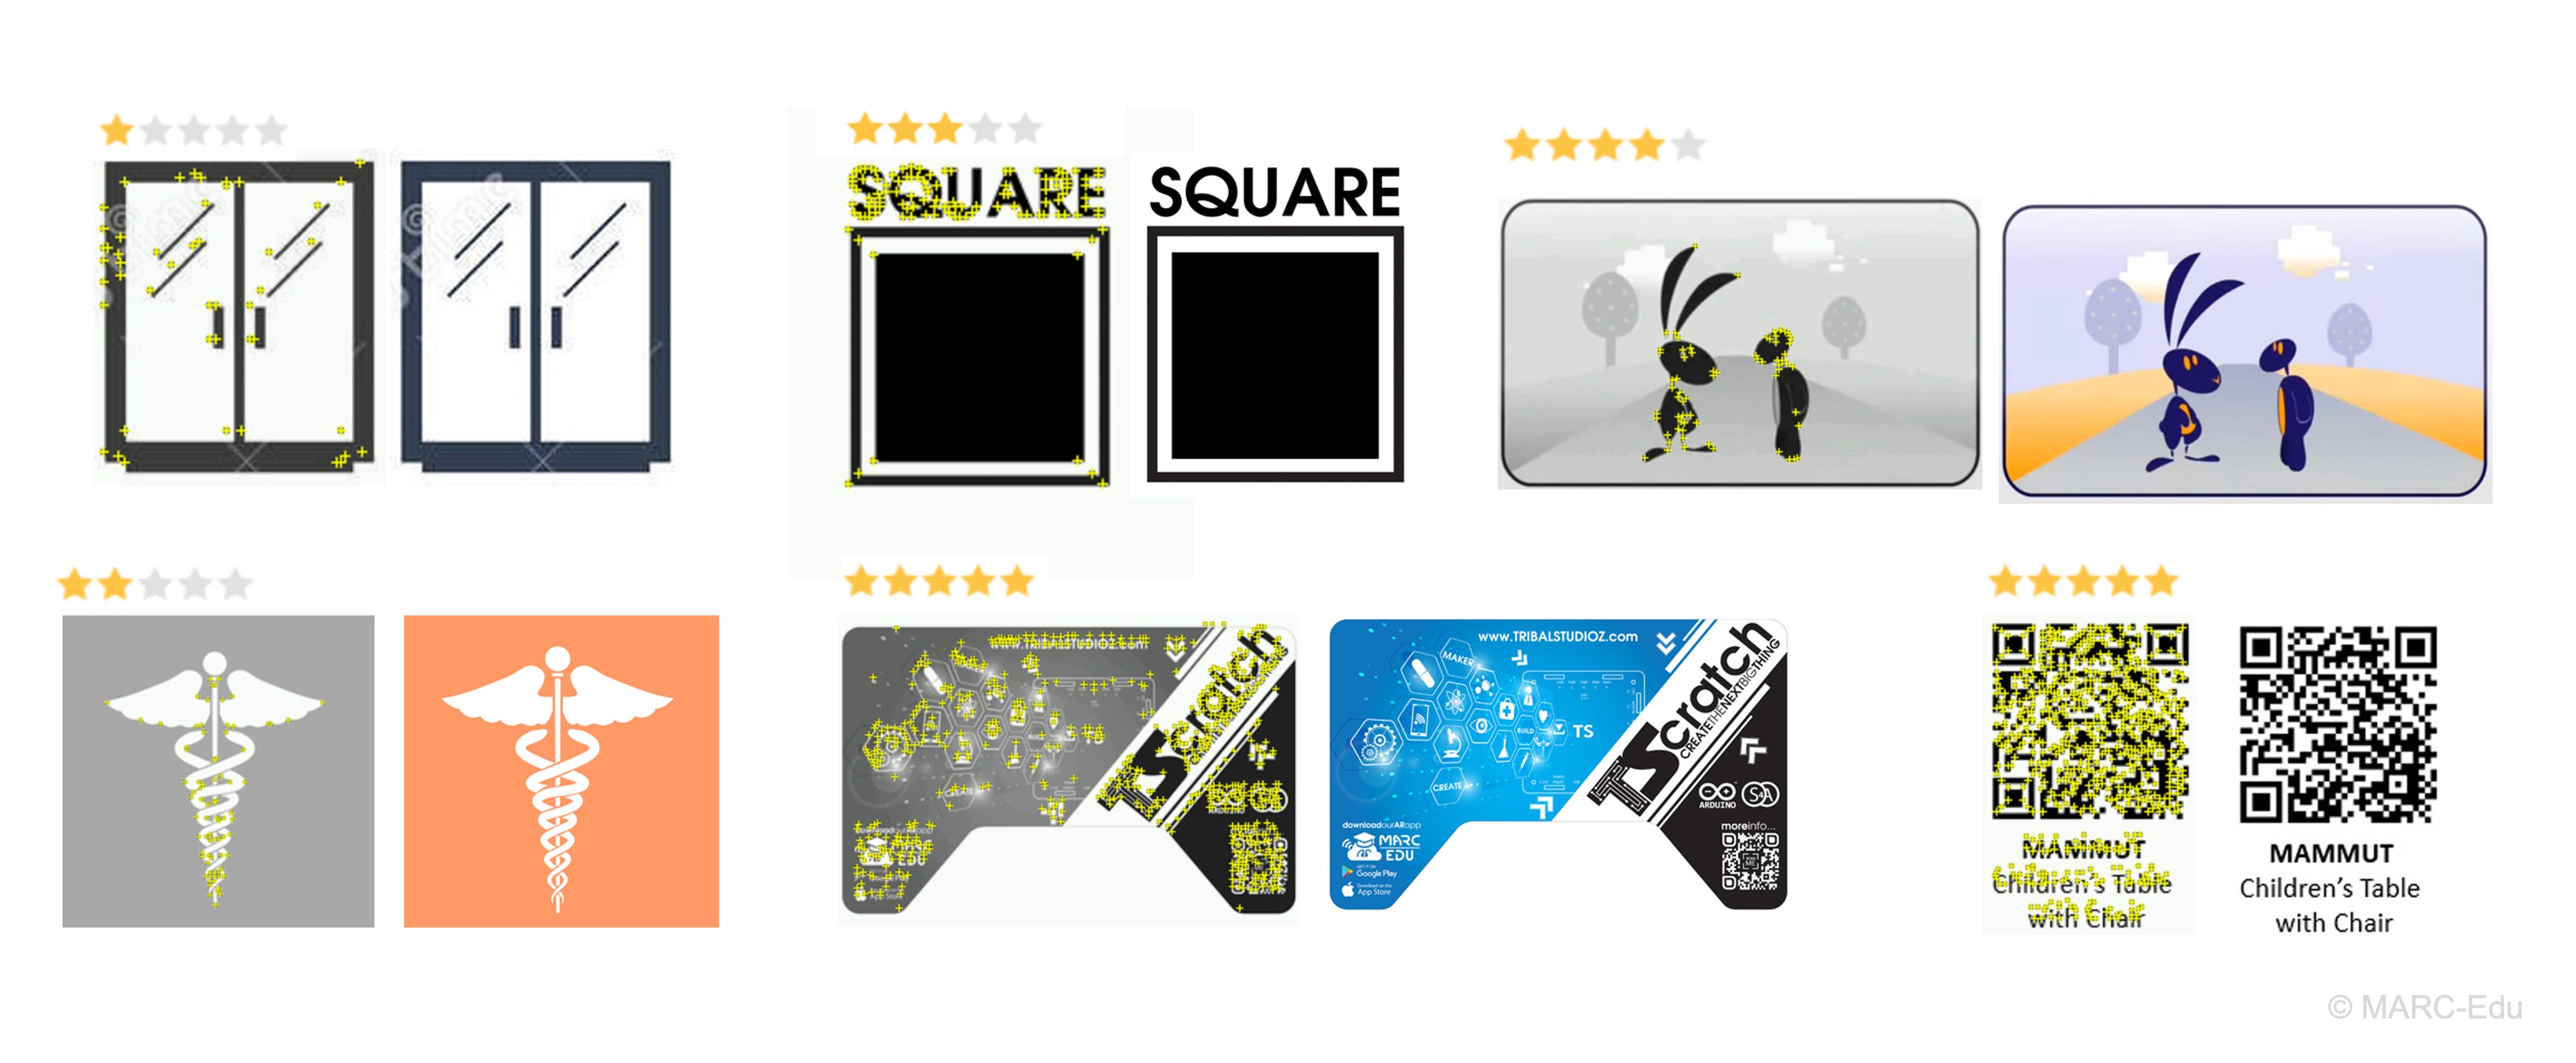
A reference image is a pre-defined 2D visual asset (such as a poster, sign, or schematic) that the AR system is trained to recognize. Each image can include an optional physical width (in meters), improving tracking accuracy and scale fidelity. For basic AR apps, start by choosing images that already have distinct, recognizable features—such as company logos, equipment schematics, or instructional diagrams. Avoid images with repetitive textures or overly simplistic designs. Use Unity’s AR Foundation feature point visualization tools during development to verify that your selected image offers enough detectable features for reliable tracking. An effective reference image should be:
-
High-Resolution: The image should contain ample pixel data for the AR system to extract and compare visual features. Low-resolution images may blur or pixelate, reducing detection reliability and precision.
-
Feature-Rich: Rich details like unique shapes, corners, and contrasting areas enable the computer vision algorithms to differentiate the image from others in the environment. Repetitive patterns (like grids or textures) can confuse tracking algorithms, leading to false detections or unstable tracking.
-
High-Contrast: Sharp differences between light and dark regions enhance the system’s ability to identify and anchor feature points under varying lighting conditions. Low-contrast images may blend into the background or become difficult to detect in dim or bright environments.
-
Displayed on a Flat, Matte Surface: Glossy or curved surfaces can cause reflections or distortions, which impede consistent tracking. A matte finish avoids glare from lighting, ensuring that the image is reliably visible to the device camera from different angles.
-
Real-World Dimensions: Specifying the actual physical width of the image allows the AR system to scale virtual objects proportionally. Without accurate size data, the holographic overlays might appear misaligned, improperly scaled, or spatially disconnected from the physical reference.
The example reference image library above can be downloaded from the course GitHub repository.
Static and Mutable Libraries
-
Static Library: A static library is created in Unity’s editor and packaged directly into the application build. The set of images cannot change at runtime. This is the most widely supported method across AR platforms (ARKit, ARCore, etc.) and is recommended when your set of target images is predefined. For most AR applications where the target environment and markers are known ahead of time, a static image library is sufficient. Always ensure that the reference images are high-resolution and correctly sized (e.g., specifying a real-world width like
0.2m) to maintain accurate detection and proper alignment of virtual content with the physical world. -
Mutable Library: This allows adding new images dynamically at runtime, but requires platform support (checked via
subsystem.subsystemDescriptor.supportsMutableLibrary). In Unity, you can add new images usingScheduleAddImageJob. This is useful when the application needs to learn or update its targets post-deployment. Mutable libraries are ideal for dynamic applications where users might introduce new materials, signage, or schematics that need to be recognized on the fly. This is common in scenarios like field maintenance, customizable product showcases, or educational tools that evolve with new reference materials—without requiring an app rebuild.
Creating an Image Library
To enable image tracking in your AR project, start by creating a dedicated AR scene and then set up a Reference Image Library to store the images the app will recognize.
- Create the Image Tracking Scene:
- Open your
XFactoryARproject. - In the Unity Editor, go to
File > New Scene > Basic (URP). - Right-click in the
Hierarchyand selectXR > AR Session. - Right-click in the
Hierarchyand selectXR > XR Origin (AR). - Save the scene via
File > Save As, naming itImage Tracking.unity. If you already have an AR scene set up, duplicate it and rename it to Image Tracking for reuse.
- Open your
- Create the Reference Image Library:
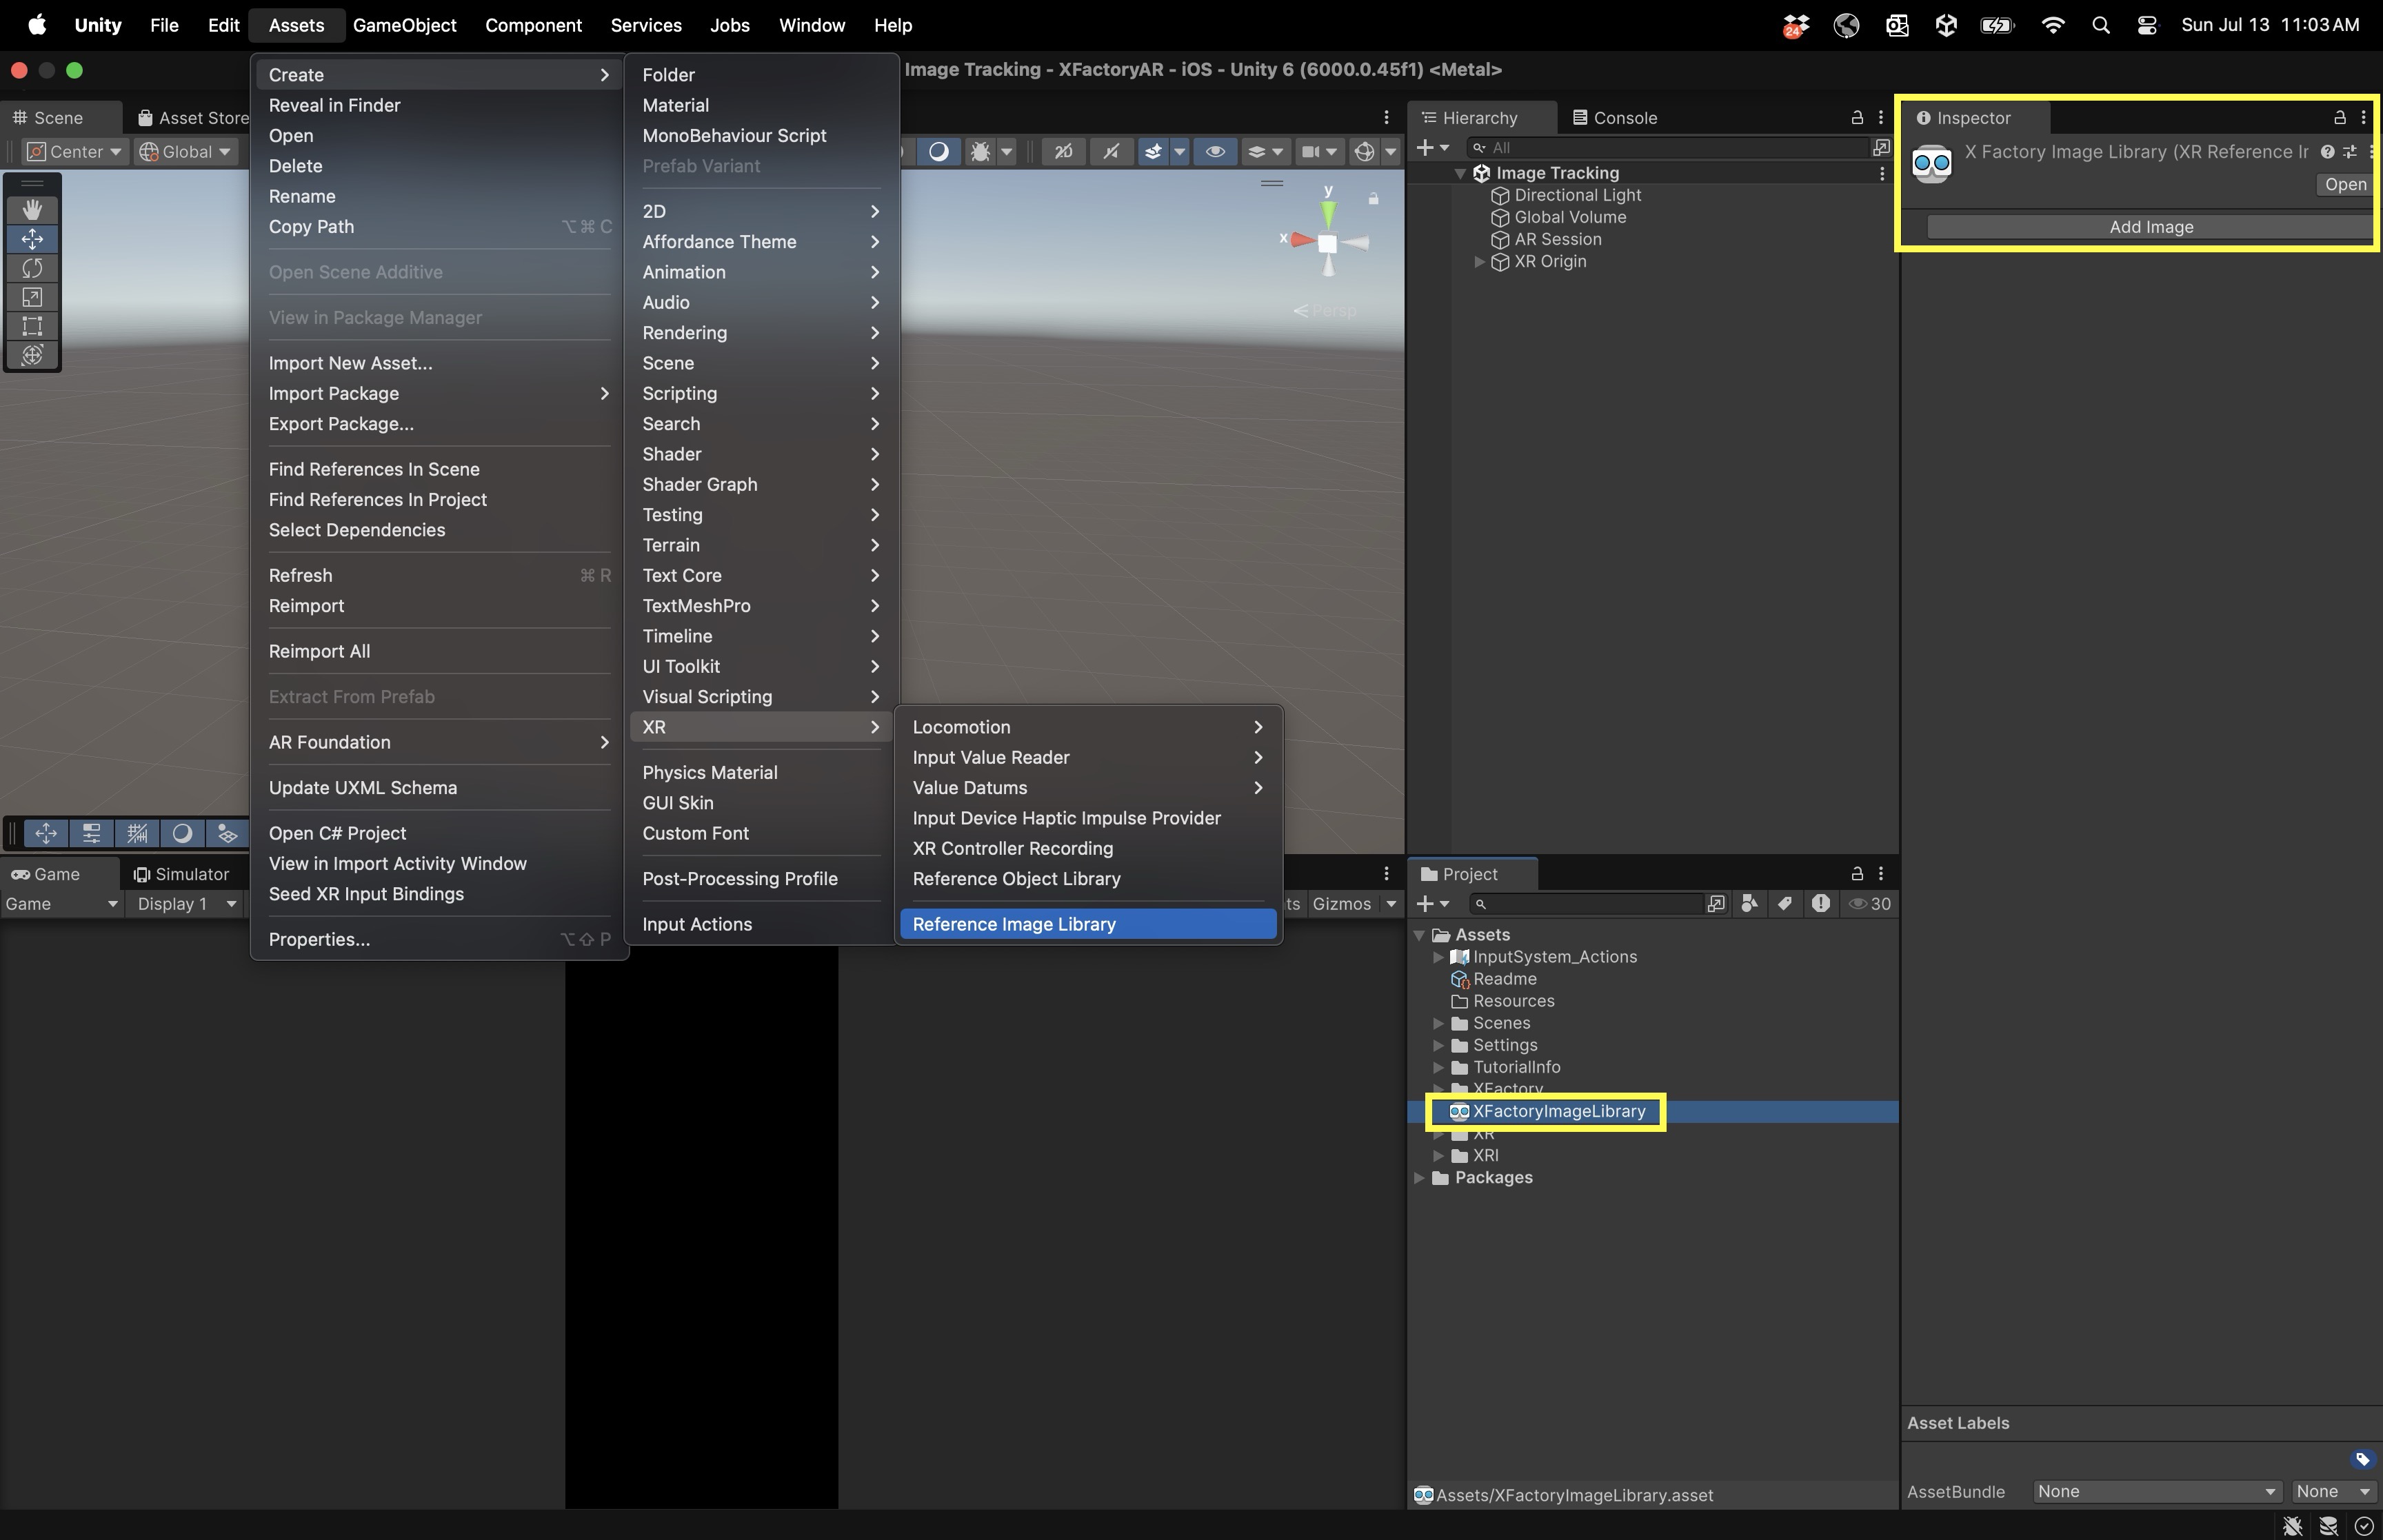
- In the top menu, navigate to
Assets > Create > XR > Reference Image Library. - A new asset will appear in the
Projectwindow (default name:ReferenceImageLibrary.asset). - Rename the asset to something descriptive, such as
XFactoryImageLibrary. A specific name likeXFactoryImageLibrarykeeps your project organized, especially when handling multiple image tracking libraries. - Optionally, move it to an appropriate folder to keep your
Assetsfolder organized.
- In the top menu, navigate to
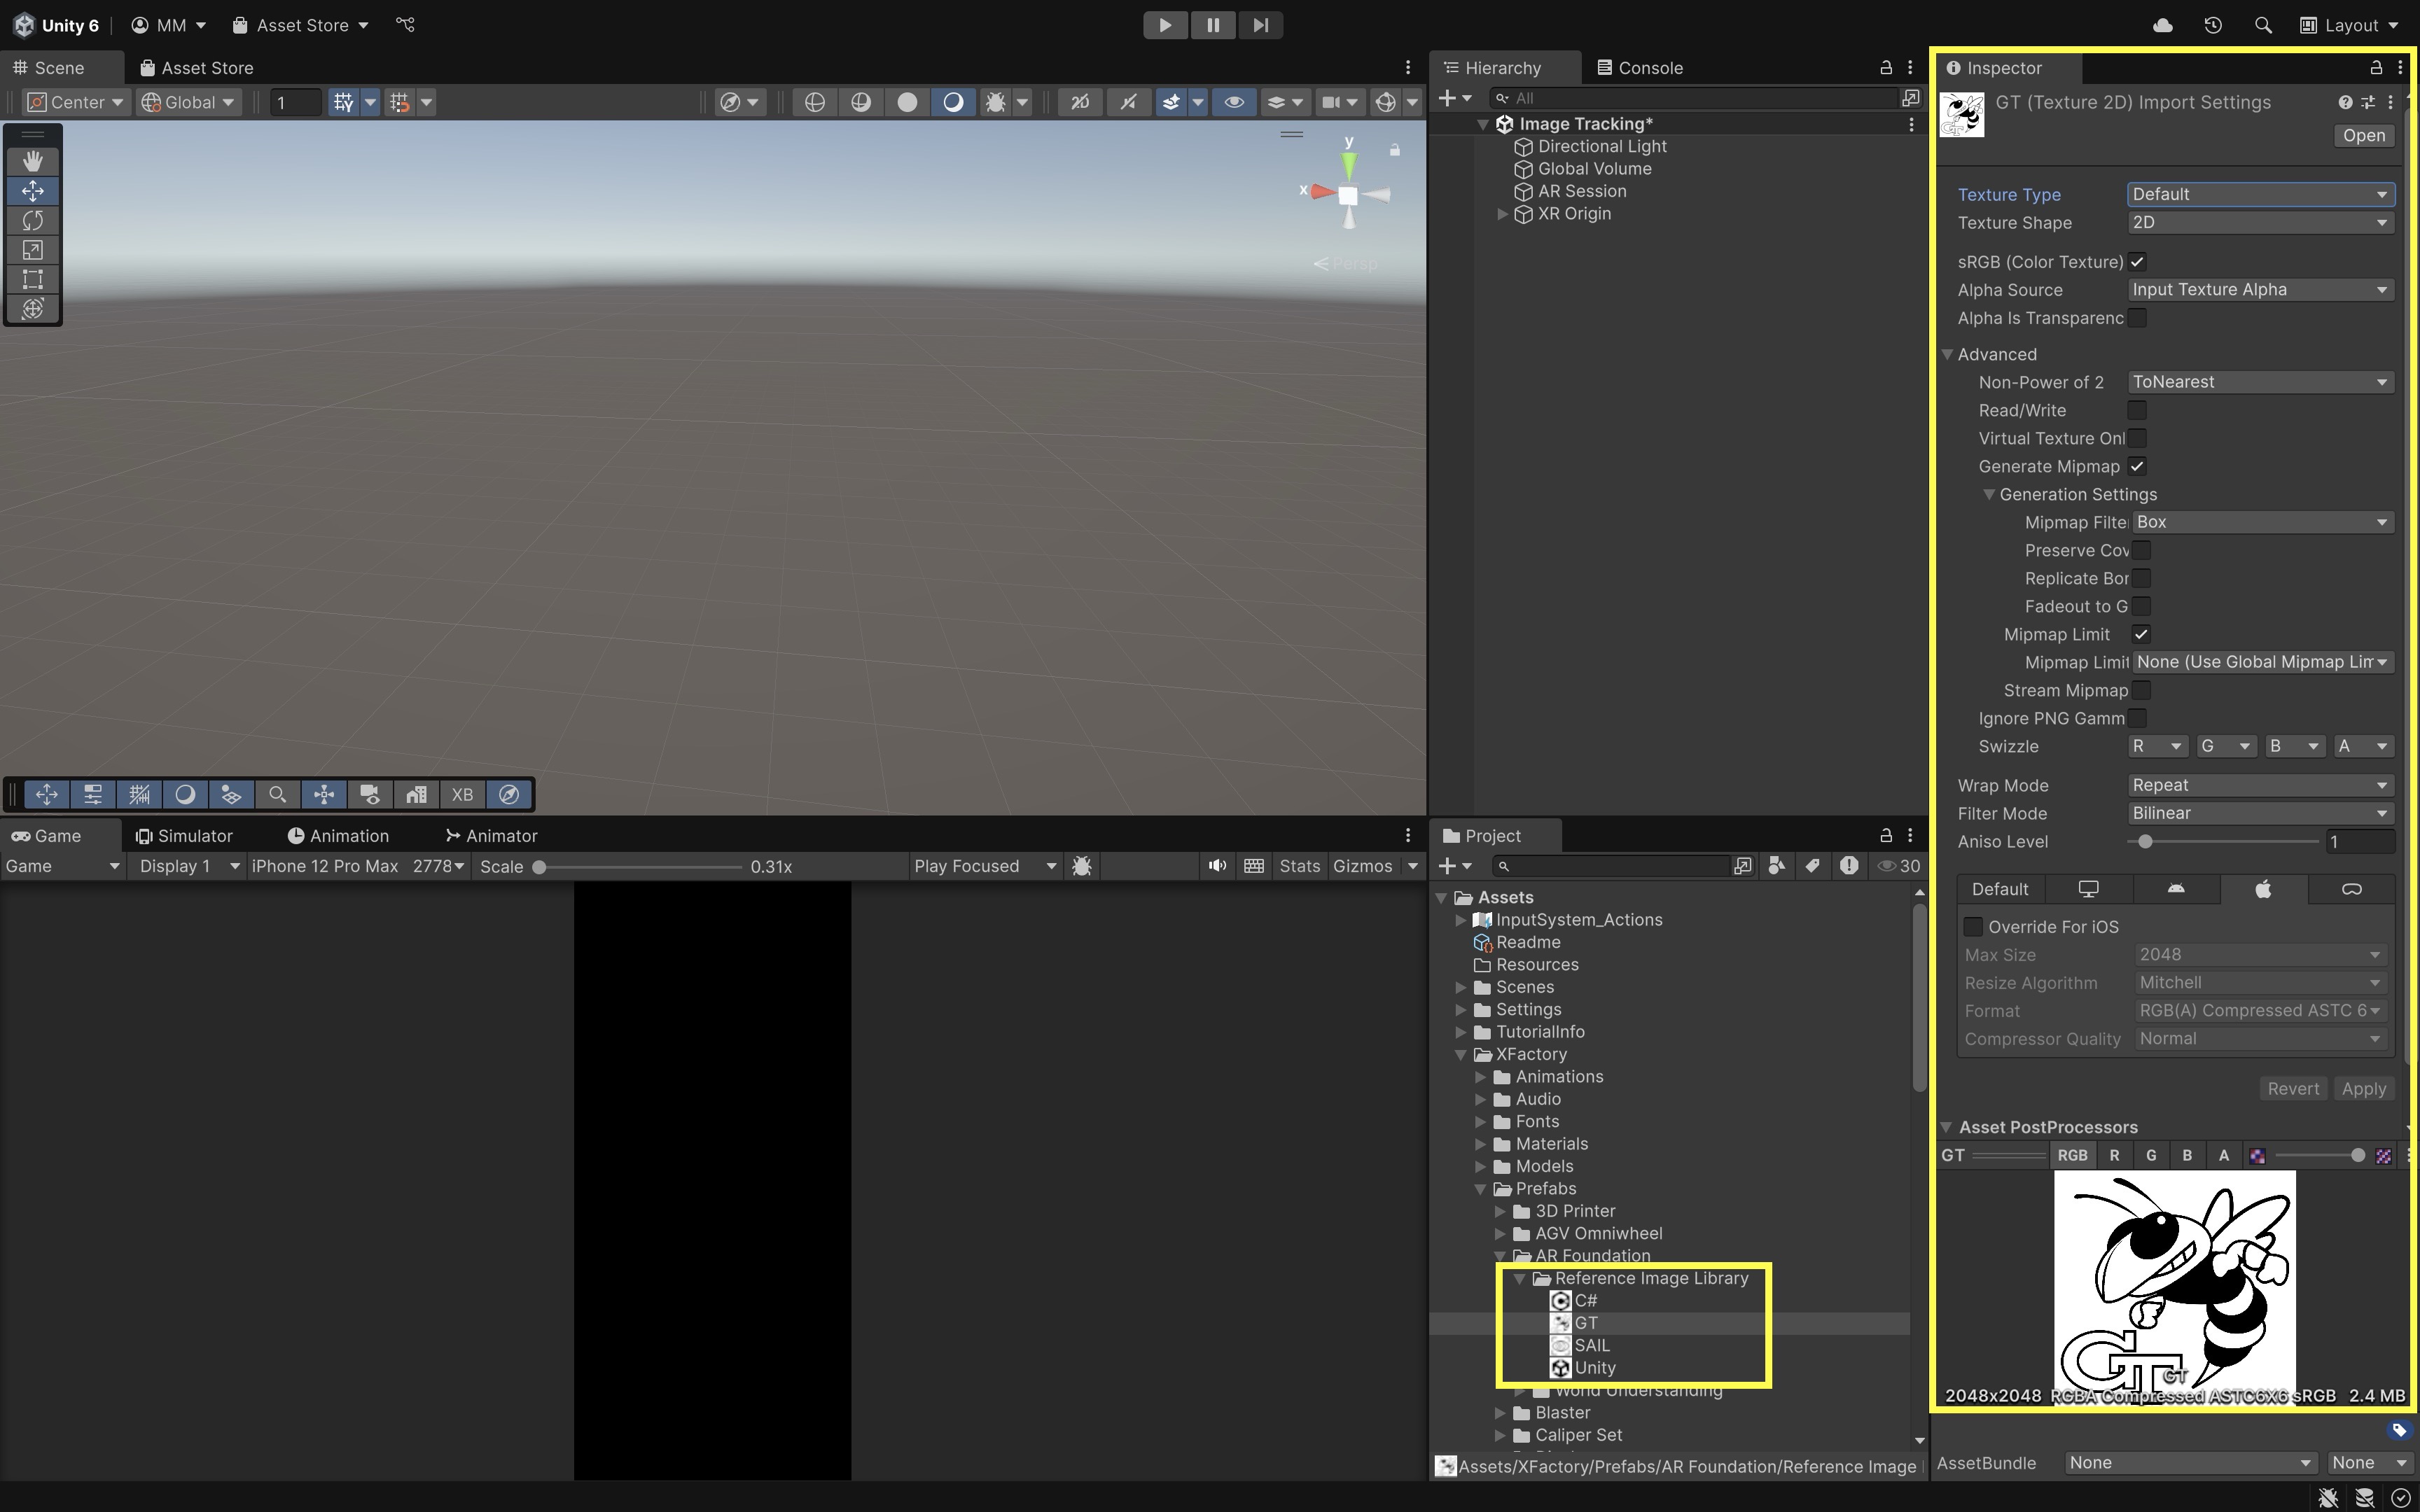
- Import the Marker Image:
- Navigate to
Assets > Import New Asset…. - Select the image file(s) you want to use as reference markers (e.g., PNG, JPG).
- After importing, select each image and check its
Inspector. - Confirm
Texture Typeis set toDefault. - Ensure the image is high-resolution, has sharp contrast, and distinct features.
- Navigate to
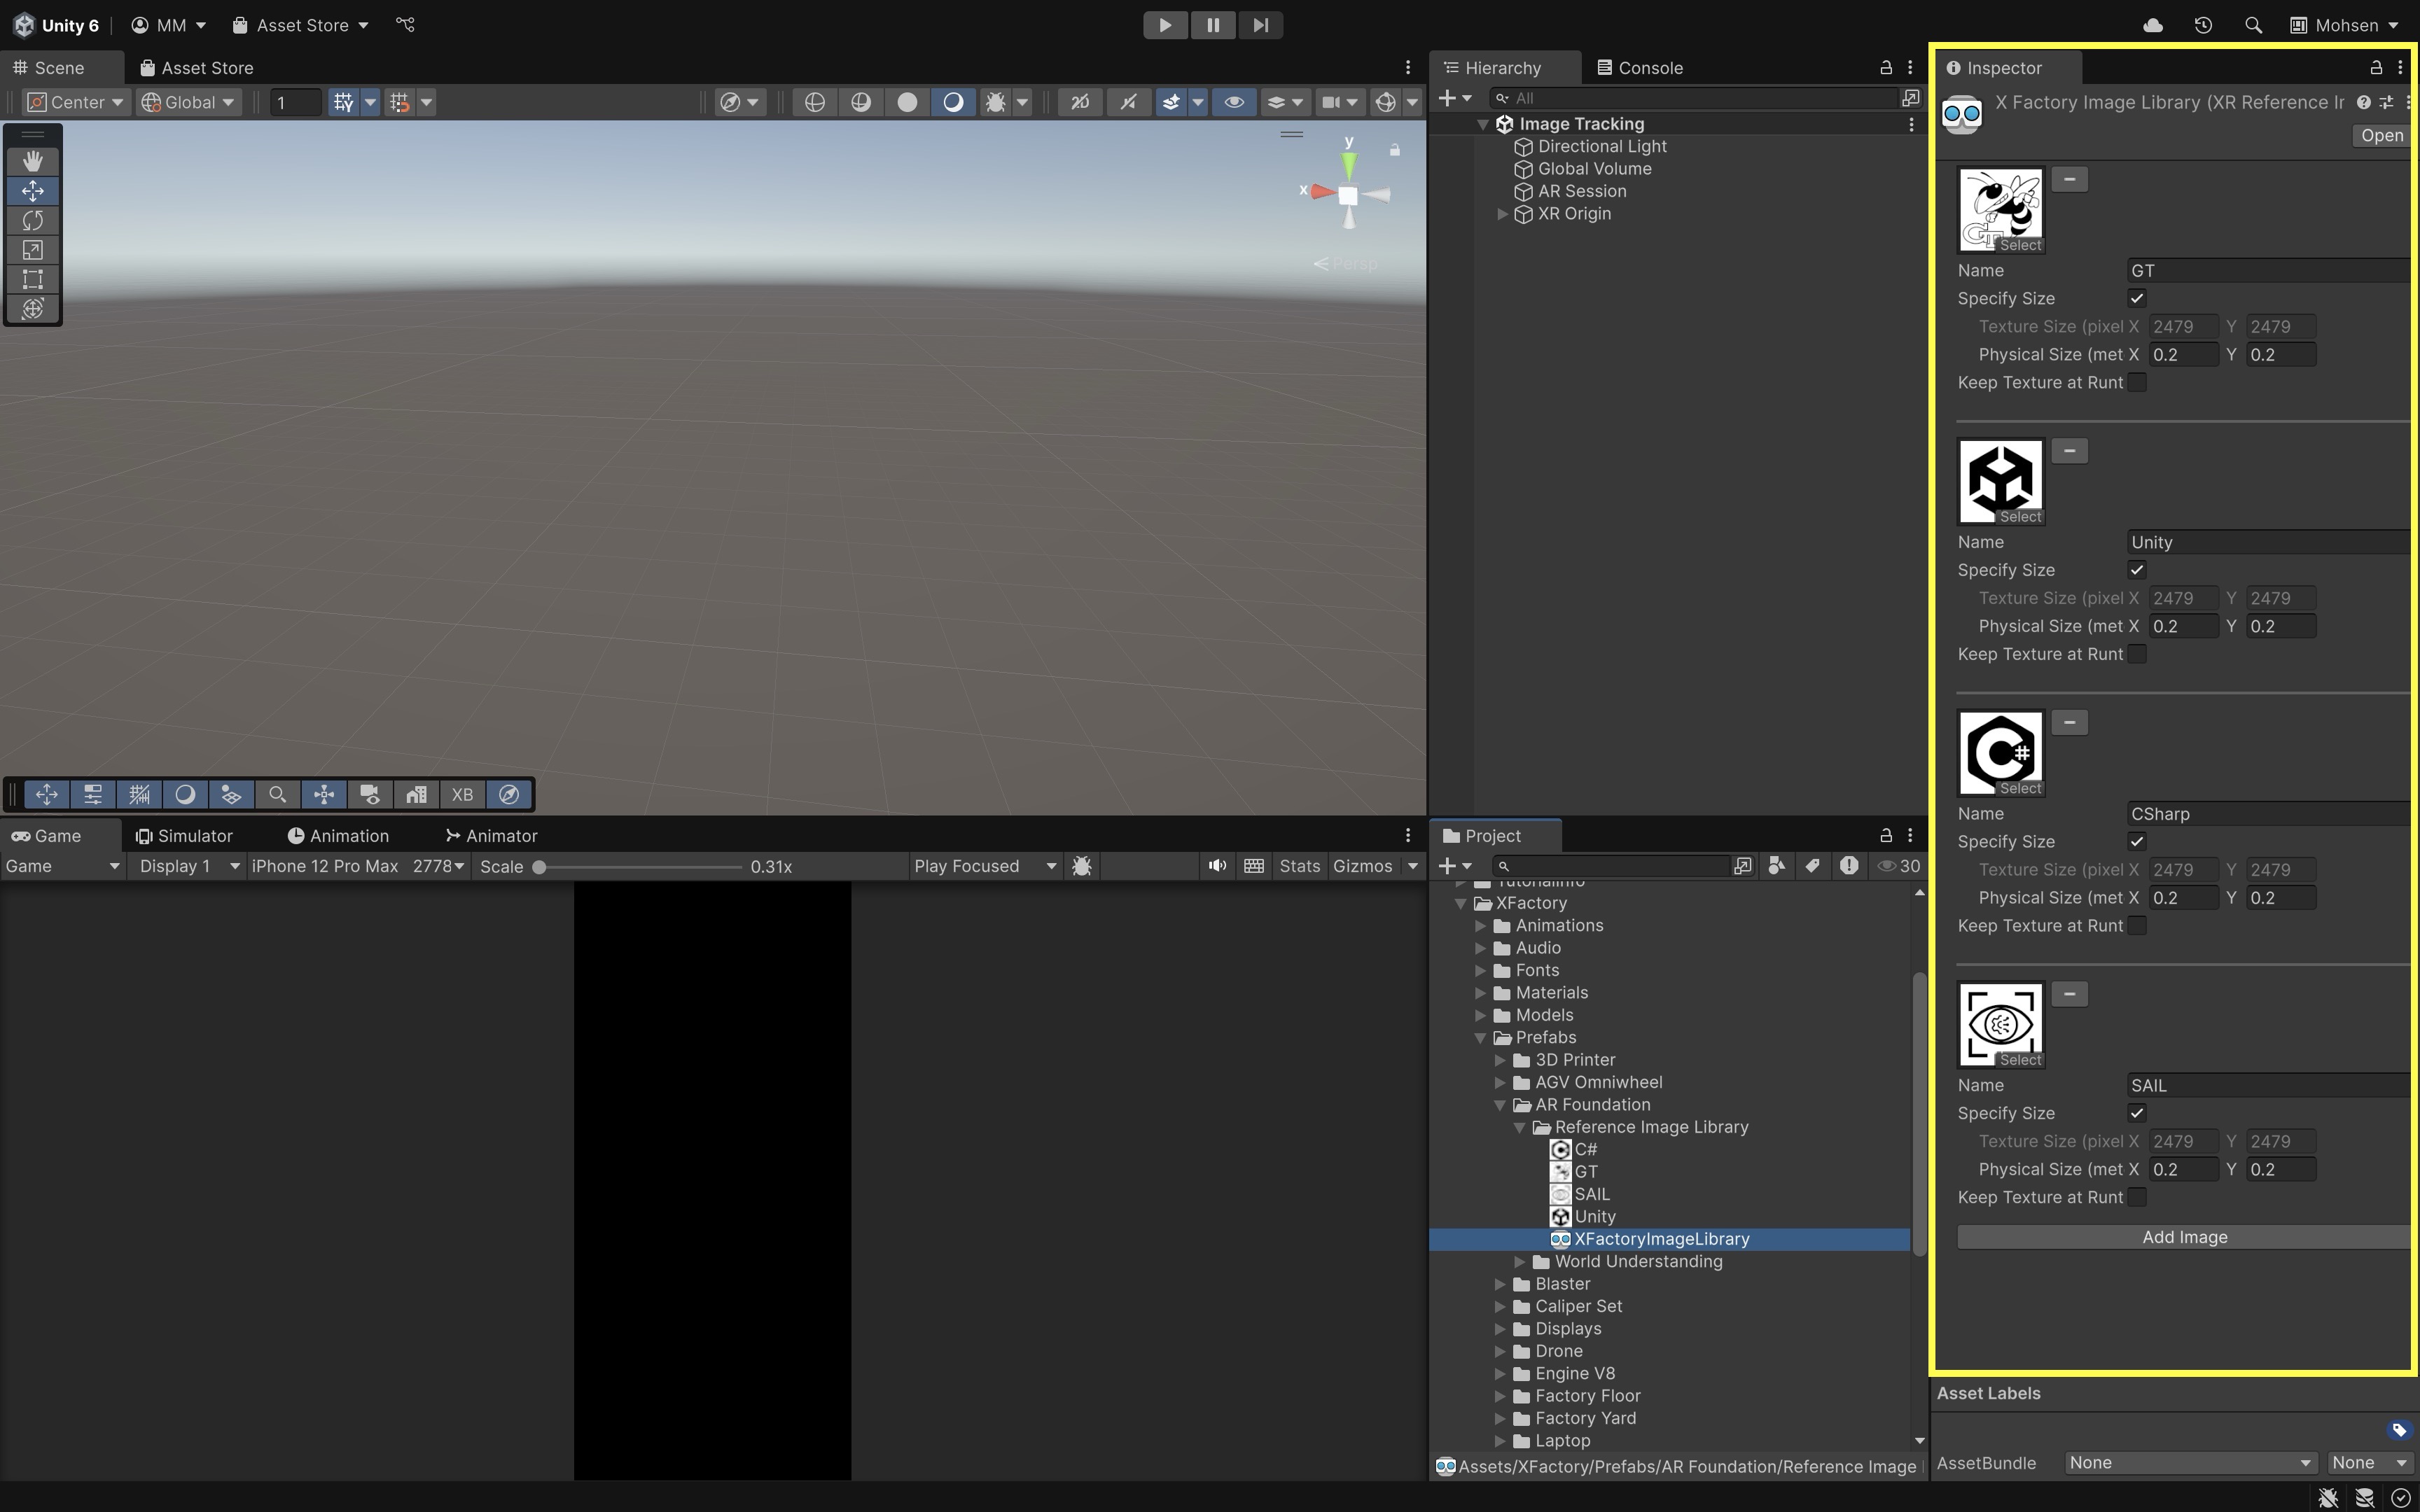
- Add Images to the Reference Image Library:
- Select the
XFactoryImageLibraryasset in theProjectwindow. - In the
Inspector, clickAdd Imageto create a new entry for each image. - Click
SelectunderTexture2D Assetto assign the imported marker image. - Enter a
Namefor easy identification in scripts. - Enable
Specify Sizeand input thePhysical Size (meters)of the printed marker, e.g.,0.2for 20 cm. - Leave
Keep Texture at Runtimeunchecked unless you need runtime access to the texture.
- Select the
Properly configuring these settings ensures reliable detection, accurate scaling of virtual content, and stable tracking performance, all of which are essential for a smooth and precise AR experience. With the scene and
Reference Image Libraryconfigured, you are ready to integrate theAR Tracked Image Managerto recognize the marker and trigger the corresponding robot control interfaces in AR.
AR Tracked Image Manager
In AR Foundation, the AR Tracked Image Manager component detects 2D images in the real world and spawns an ARTrackedImage GameObject when a match is found from your Reference Image Library. The ARTrackedImage acts as the anchor that keeps the spawned model aligned with the physical marker. This allows for the creation of interactive augmented reality experiences where virtual content is anchored to physical objects based on image tracking.
Core Concepts
-
Reference Image Library: The
ARTrackedImageManageruses this library to detect markers in the real world. AReference Image Libraryis essentially a collection of images that the AR system can recognize and track. Each image in the library must be unique and provides vital information to the system. This includes a unique name for the image, the physical size (usually in meters) of the image, and the image data itself. The library can be manually created and managed within Unity, enabling the addition of various reference images for dynamic tracking within the AR app. -
Image Detection and Recognition: The
ARTrackedImageManagercontinuously scans the camera feed for images that match the ones in theReference Image Library. It uses computer vision algorithms to analyze the camera feed and identify markers from the library. When a match is found, the system triggers the creation of anARTrackedImageGameObject that is anchored to the real-world position of the detected image. This allows virtual content to remain accurately aligned with the image, even as the user or the camera moves around the scene. -
ARTrackedImage GameObject: The
ARTrackedImageGameObject represents the detected image and serves as an anchor for placing virtual content. TheARTrackedImagecontains essential information such as the image’s position, rotation, and tracking state. Any virtual objects, like 3D models, UI panels, or holographic elements, should be parented to theARTrackedImageto ensure they remain properly aligned with the physical marker. This anchoring ensures that virtual content behaves naturally and remains stable as users interact with it. -
Tracked Image Prefab: A predefined prefab is assigned in the
ARTrackedImageManagerand acts as the default object to spawn when an image is detected. The prefab can contain virtual content like 3D models, animations, or interactive elements. When an image is detected, the prefab is instantiated as a child of theARTrackedImage, positioned directly over the physical marker. This simplifies attaching complex objects or interactions to tracked images, as everything is predefined and easily instantiated upon detection. -
Pose Tracking: sThe
ARTrackedImageManagercontinuously updates the position and rotation of theARTrackedImagein real time based on the camera’s view of the marker. As the user moves around, the camera captures the image from different angles, and the system recalculates the virtual content’s position and orientation to ensure it stays correctly aligned with the physical image. This ensures that virtual content appears anchored and stable, maintaining a smooth and realistic AR experience for users. - Tracking States: Each
ARTrackedImagehas a tracking state that indicates the quality of tracking. These tracking states can be used to control the visibility and interaction of virtual content. For example, you can hide or disable content when the image is no longer being tracked, or pause animations when tracking quality is low. The three possible states are:- Tracking: The image is being tracked successfully, and its position and orientation are accurate.
- Limited: The image is partially tracked, meaning the system is having trouble maintaining a stable connection to it, possibly due to poor lighting or occlusion.
- None: The image is no longer being tracked, either because it is out of view or the system cannot recognize it.
- Lifecycle Events: The manager exposes the
trackablesChangedevent, which notifies your app when tracked images are added, updated, or removed from the scene. This event is valuable for triggering specific actions in response to changes in the tracking state of images. For example, you can trigger animations or spawn effects when a new image is detected or clean up virtual content when an image is no longer visible. By responding to these lifecycle events, you can create more dynamic and responsive AR experiences that adapt to the user’s environment and interaction.
Implementation
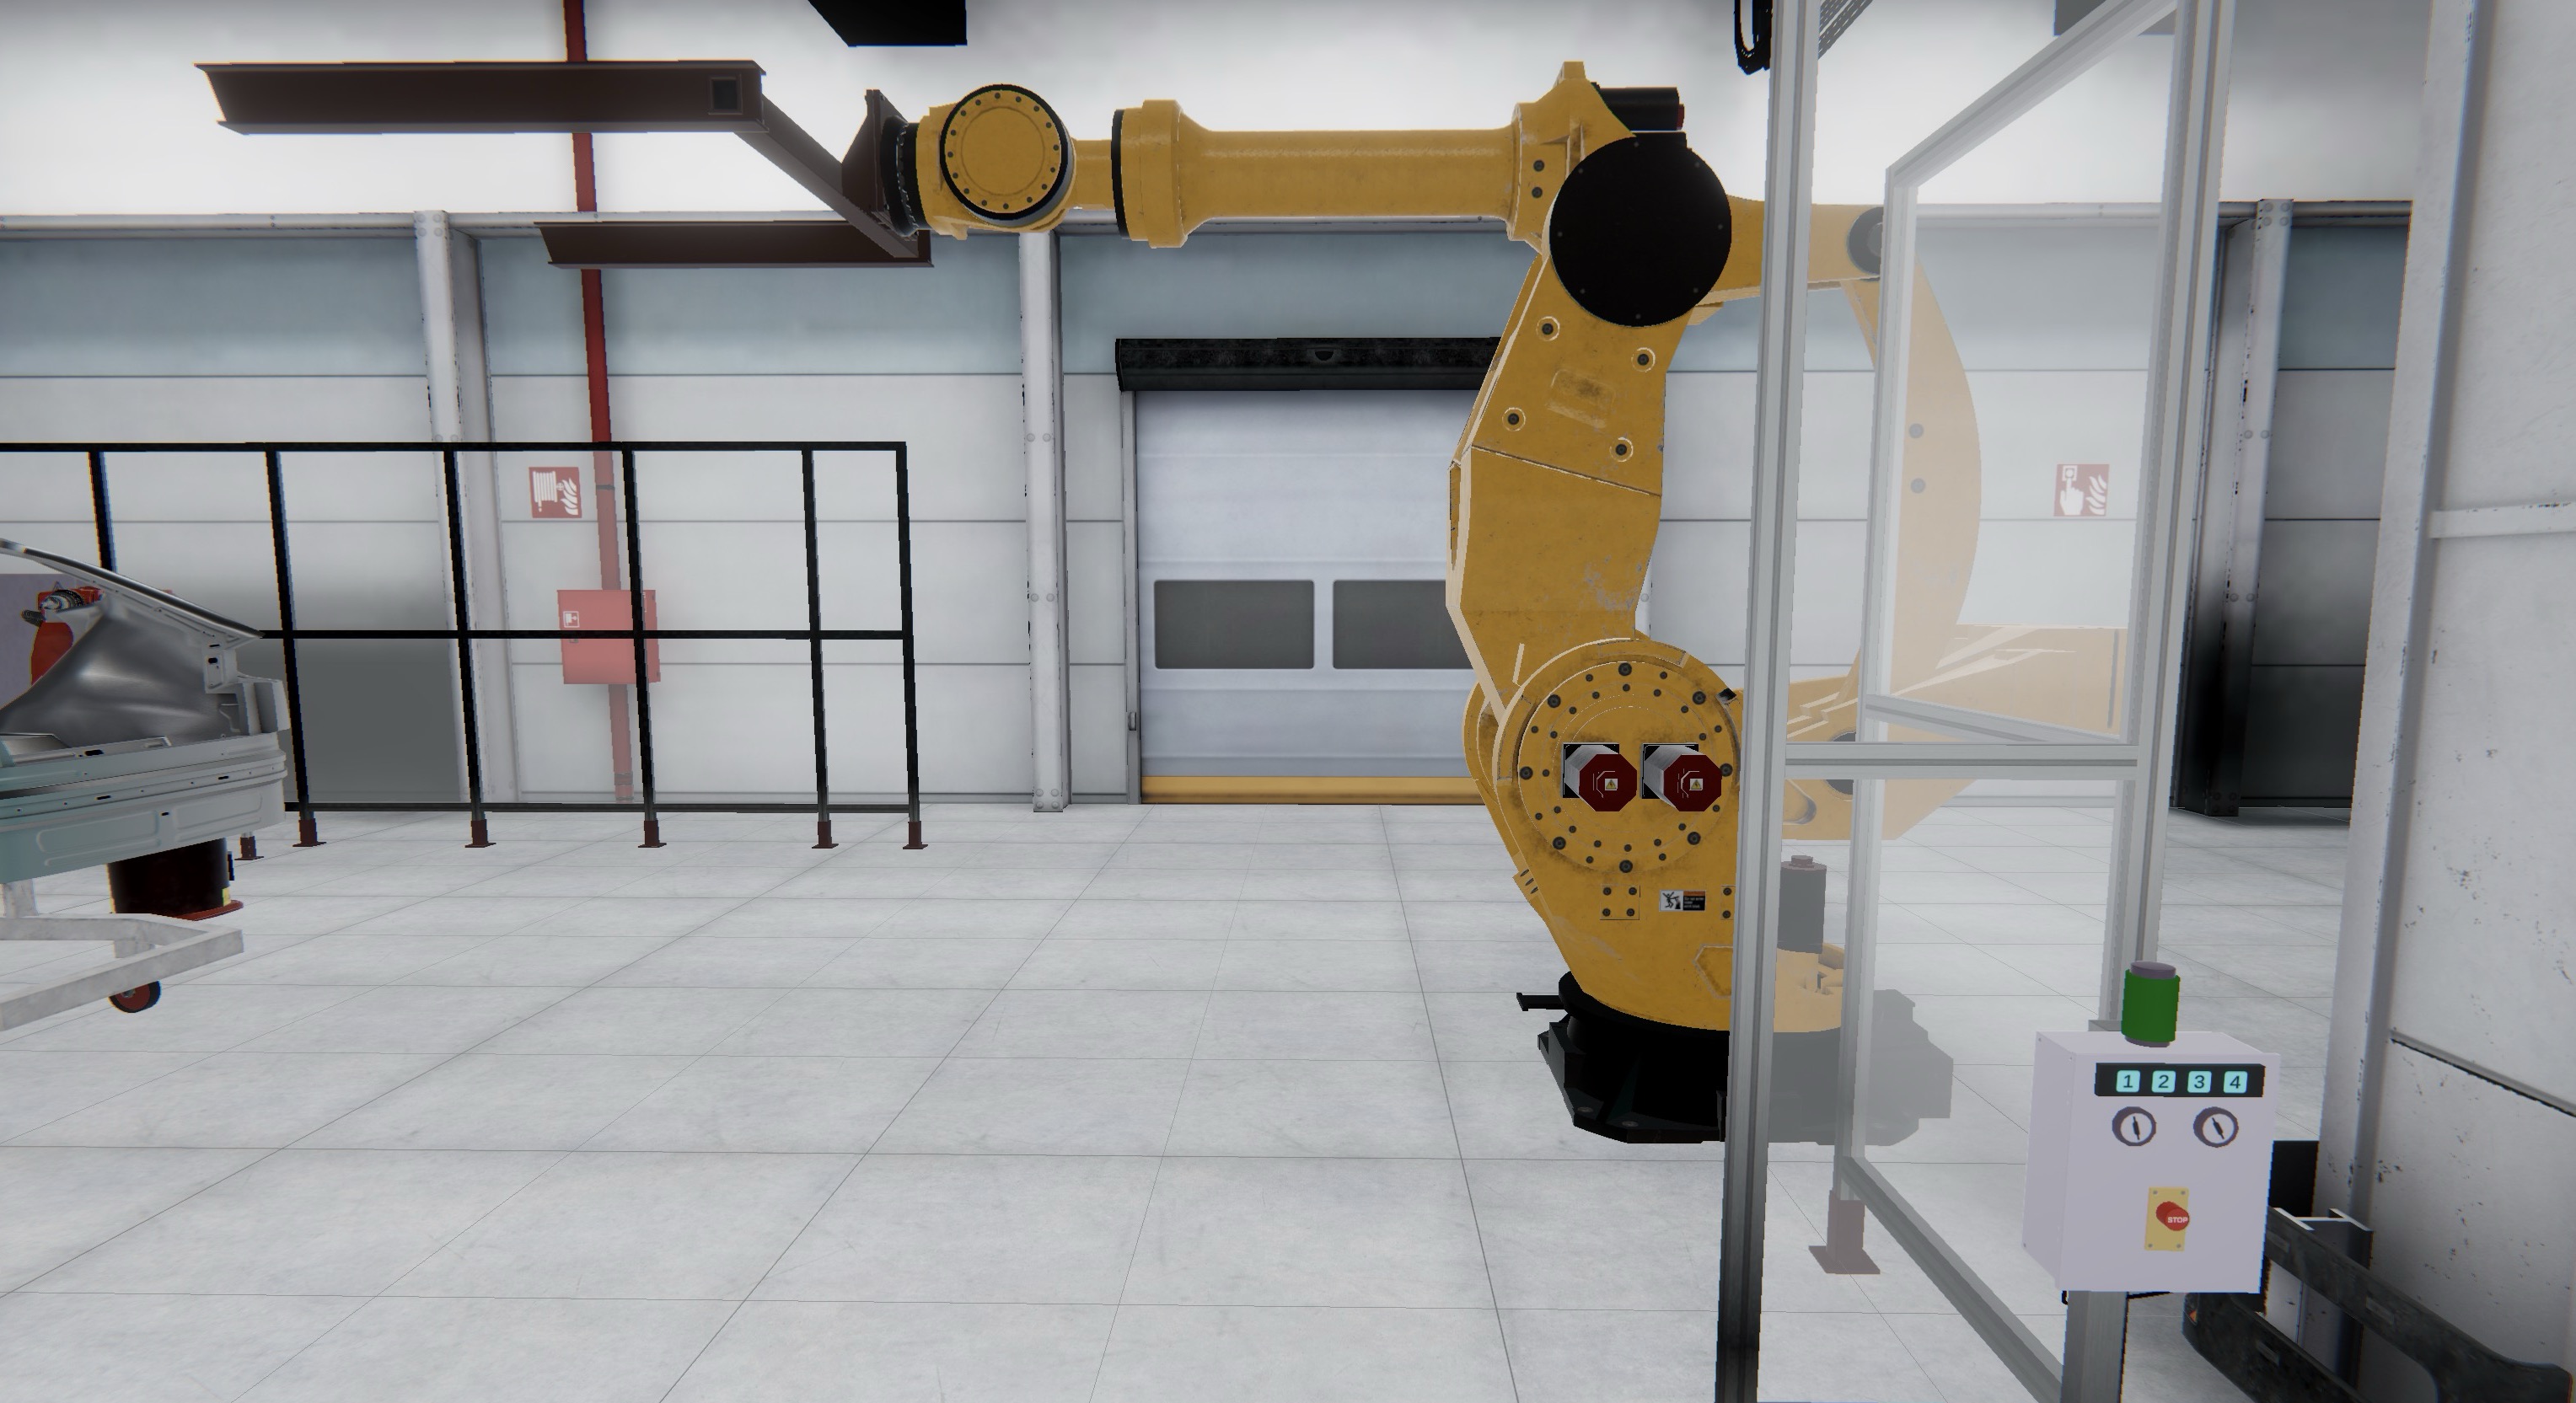
Let’s use XFactory’s Heavy Duty Robot Arm prefab as an example to showcase image tracking with AR Foundation. When a specific marker is detected, the robot appears in AR, anchored to the marker, with a screen-space UI for triggering its pick-and-place animations: Pick, Turn, Place, and Home. The robot’s behavior reuses the same Animator setup and activation logic from the VR module, now adapted for AR interaction.
- Add and Configure
ARTrackedImageManager:- Select
XR Originand go to itsInspector. - Click
Add Component > AR Tracked Image Manager. This component listens for images from your reference library and manages the associated tracked image objects. Serialized Library: Assign theXFactoryImageLibrary. This tells the manager which images to recognize.Max Number Of Moving Images: Optionally, define how many moving images to track simultaneously if hardware or use case requires a limit.Tracked Image Prefab: Assign theHeavy Duty Robot Armprefab fromAssets > XFactory > Prefabs > Robots. This prefab appears anchored to the detected marker.
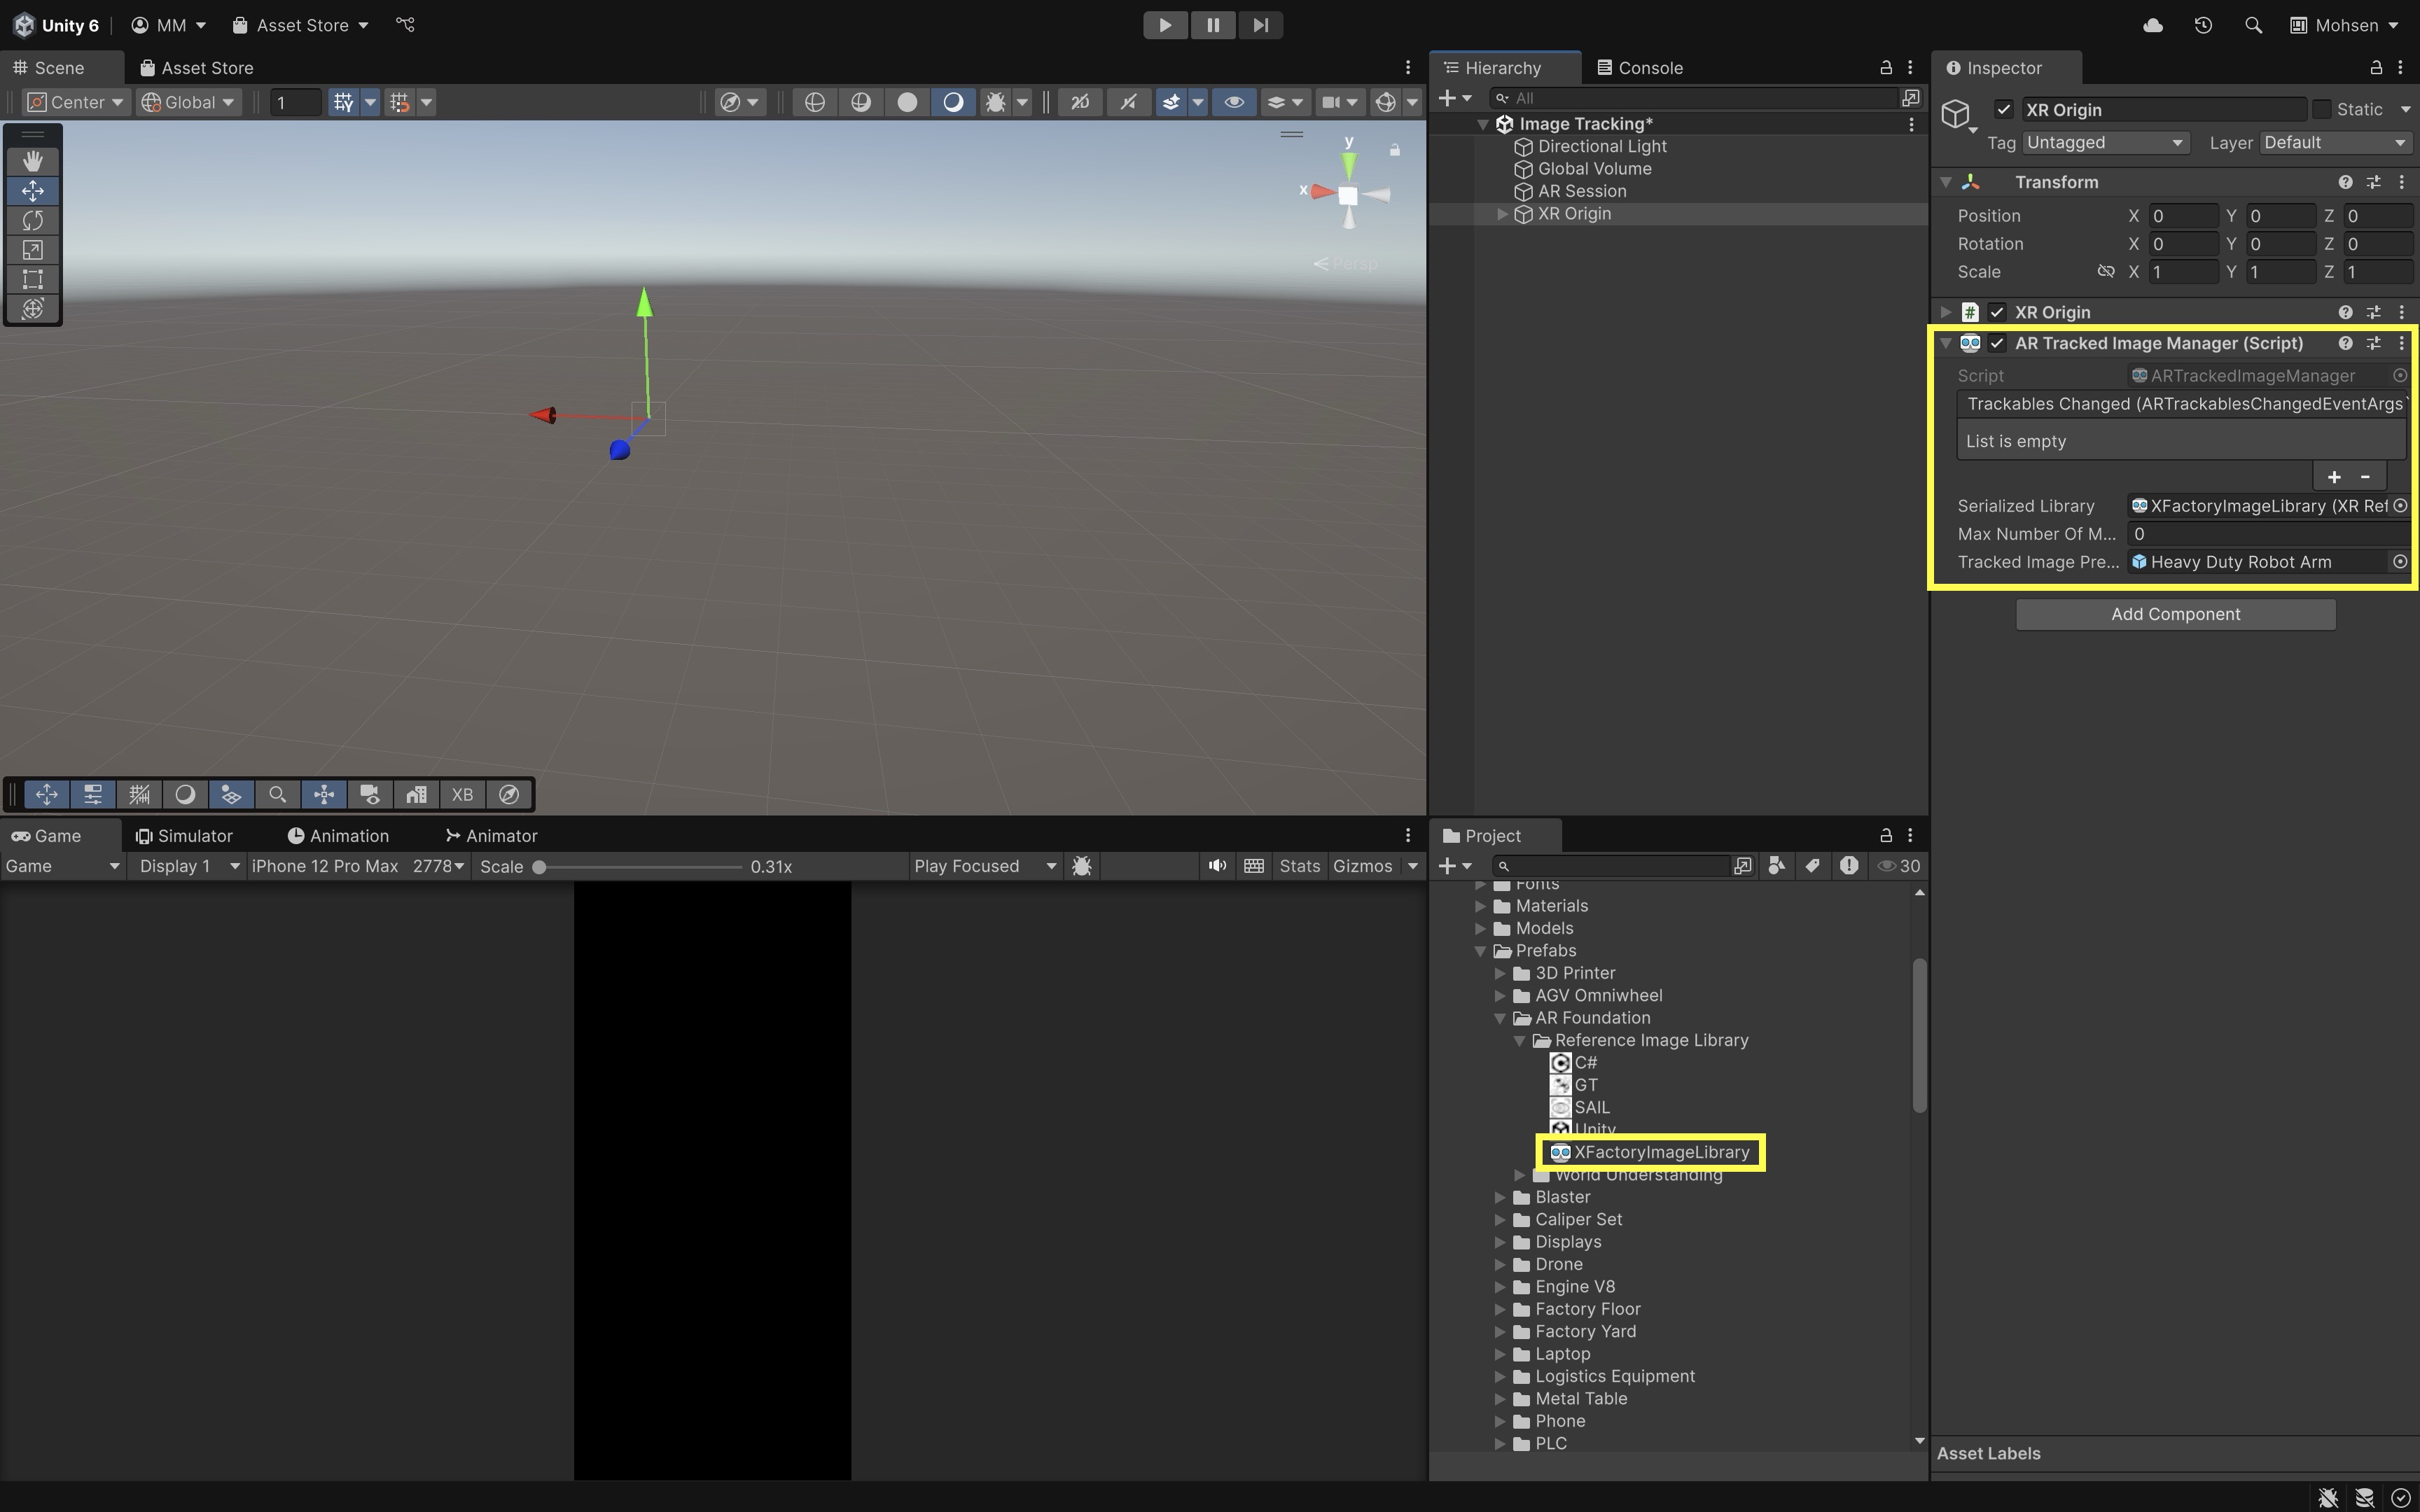
The
Trackables Changedfield in theARTrackedImageManageris a UnityEvent that triggers whenever tracked images are added, updated, or removed in the AR session. This event is optional and can be skipped for this example. - Select
- Create a UI Canvas for Robot Control:
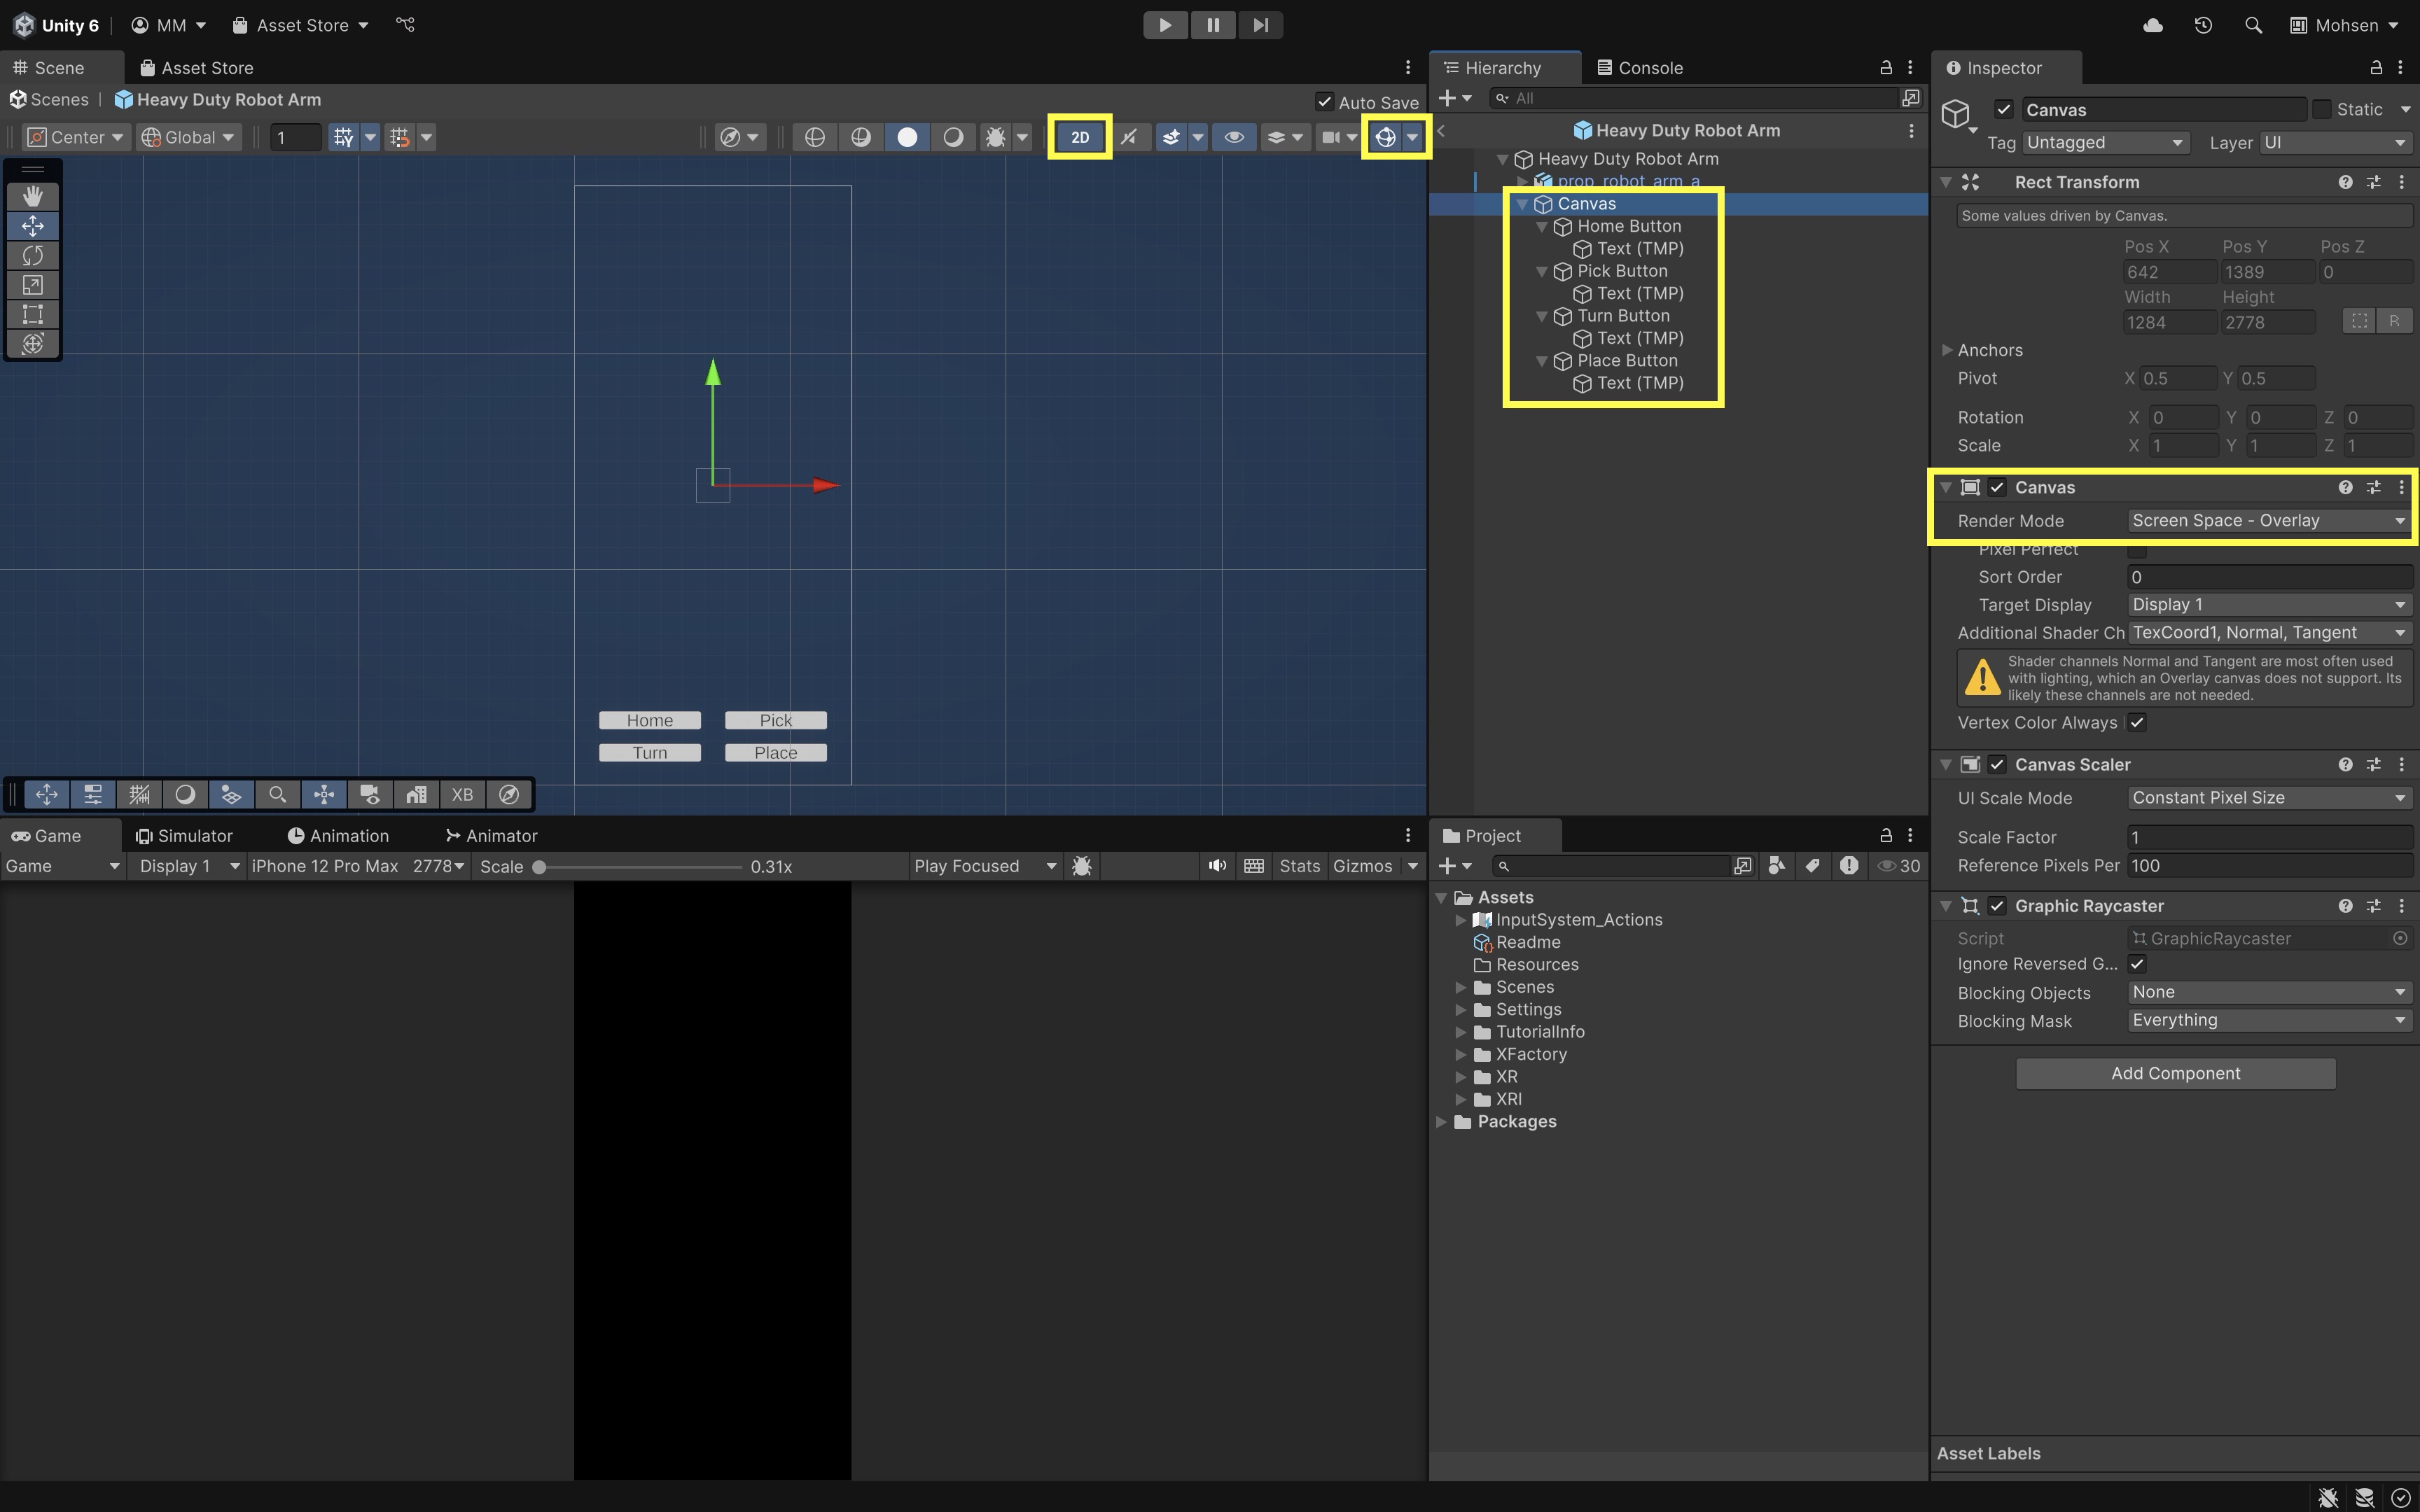
- Open the
Heavy Duty Robot Armprefab in prefab mode. - Right-click on the prefab root in the
Hierarchyand selectUI > Canvas. - Set the
Render ModetoScreen Space - Overlay. - Right-click the
Canvasand selectUI > Button - TextMeshPro. Rename toHomeButton, change text toHome. Adjust its size as needed. - Duplicate the button three times, renaming and relabeling them as
PickButton,TurnButton, andPlaceButton. - Use
RectTransformto position the buttons neatly in the canvas.
Since the
Heavy Duty Robot Armprefab is instantiated dynamically when the marker is detected, we will make sure the prefab itself contains the UI canvas with buttons, already set up to control the robot’sAnimator. - Open the
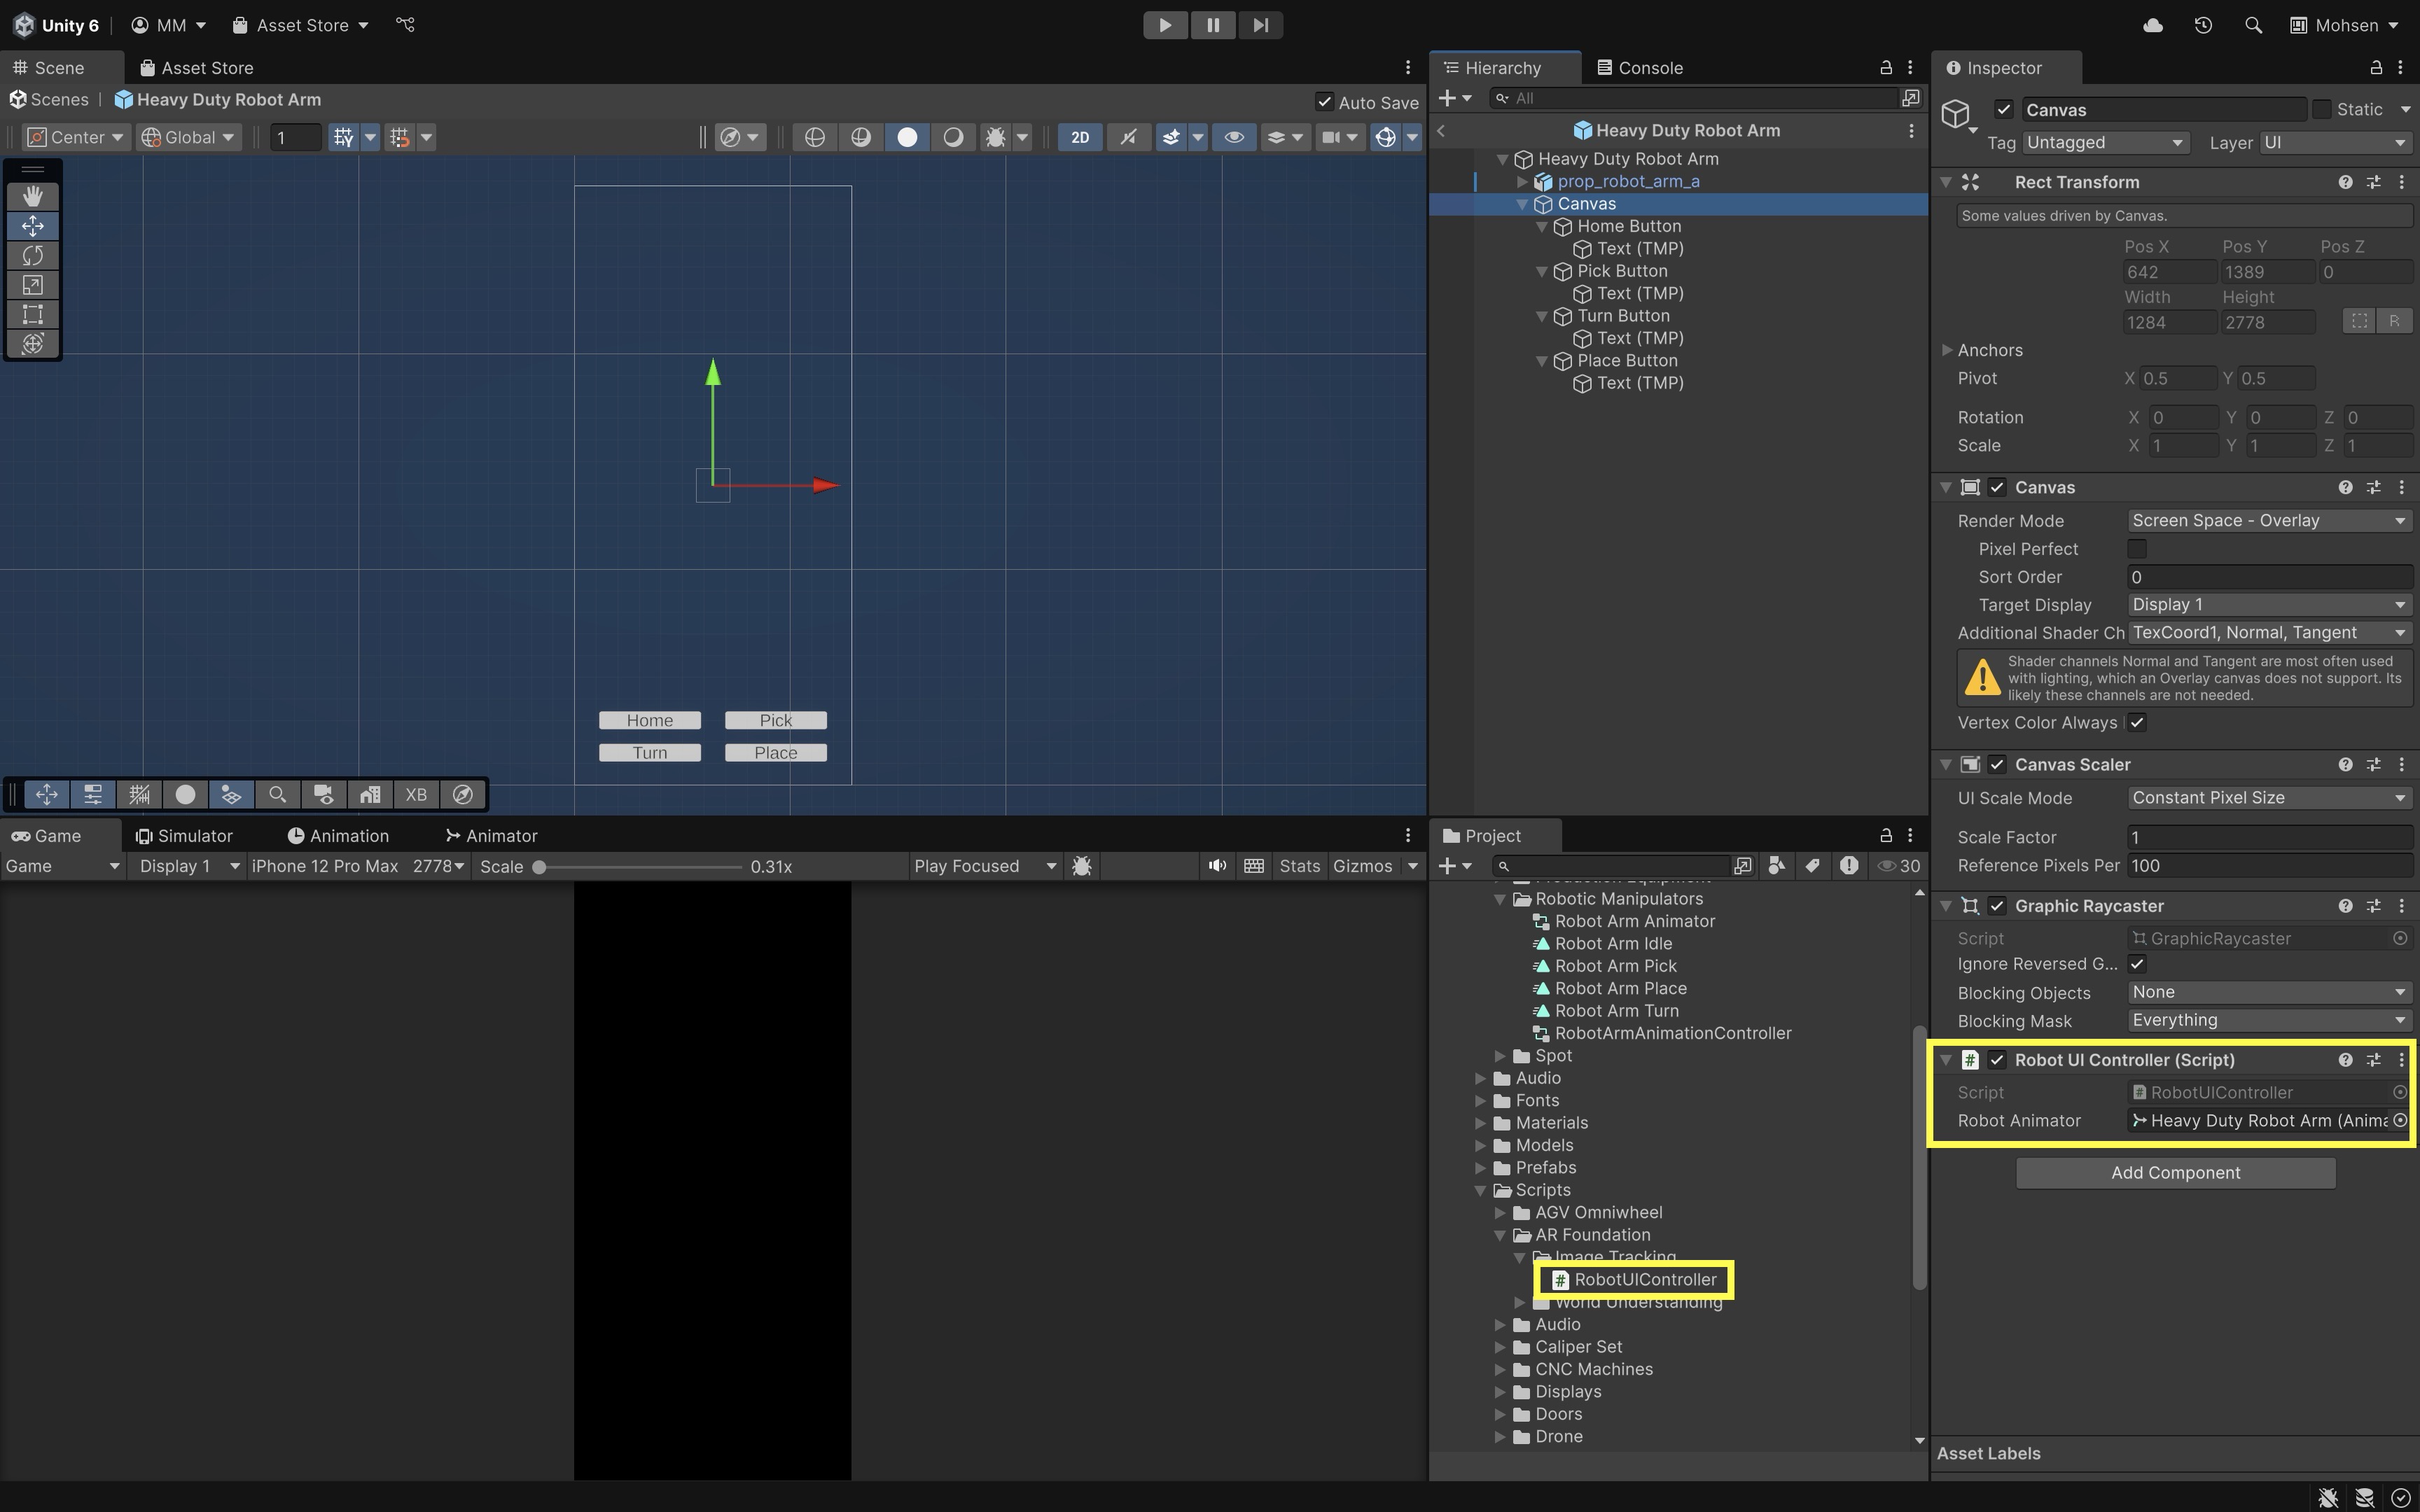
- Create a UI Controller Script:
- Create a new C# script called
RobotUIController, attach it to theCanvasin the prefab. This code connects the UI to the robot’sAnimator:
using UnityEngine; public class RobotUIController : MonoBehaviour { public Animator robotAnimator; public void TriggerAnimation(string triggerName) { if (robotAnimator != null) { robotAnimator.SetTrigger(triggerName); } } } - Create a new C# script called
- Configure the Script:
- In prefab mode, select the
Canvasinside theHeavy Duty Robot Armprefab. - In the
Robot UI Controllercomponent, drag theHeavy Duty Robot ArmGameObject into theRobot Animatorfield, which will automatically detect itsAnimatorcomponent.
- In prefab mode, select the
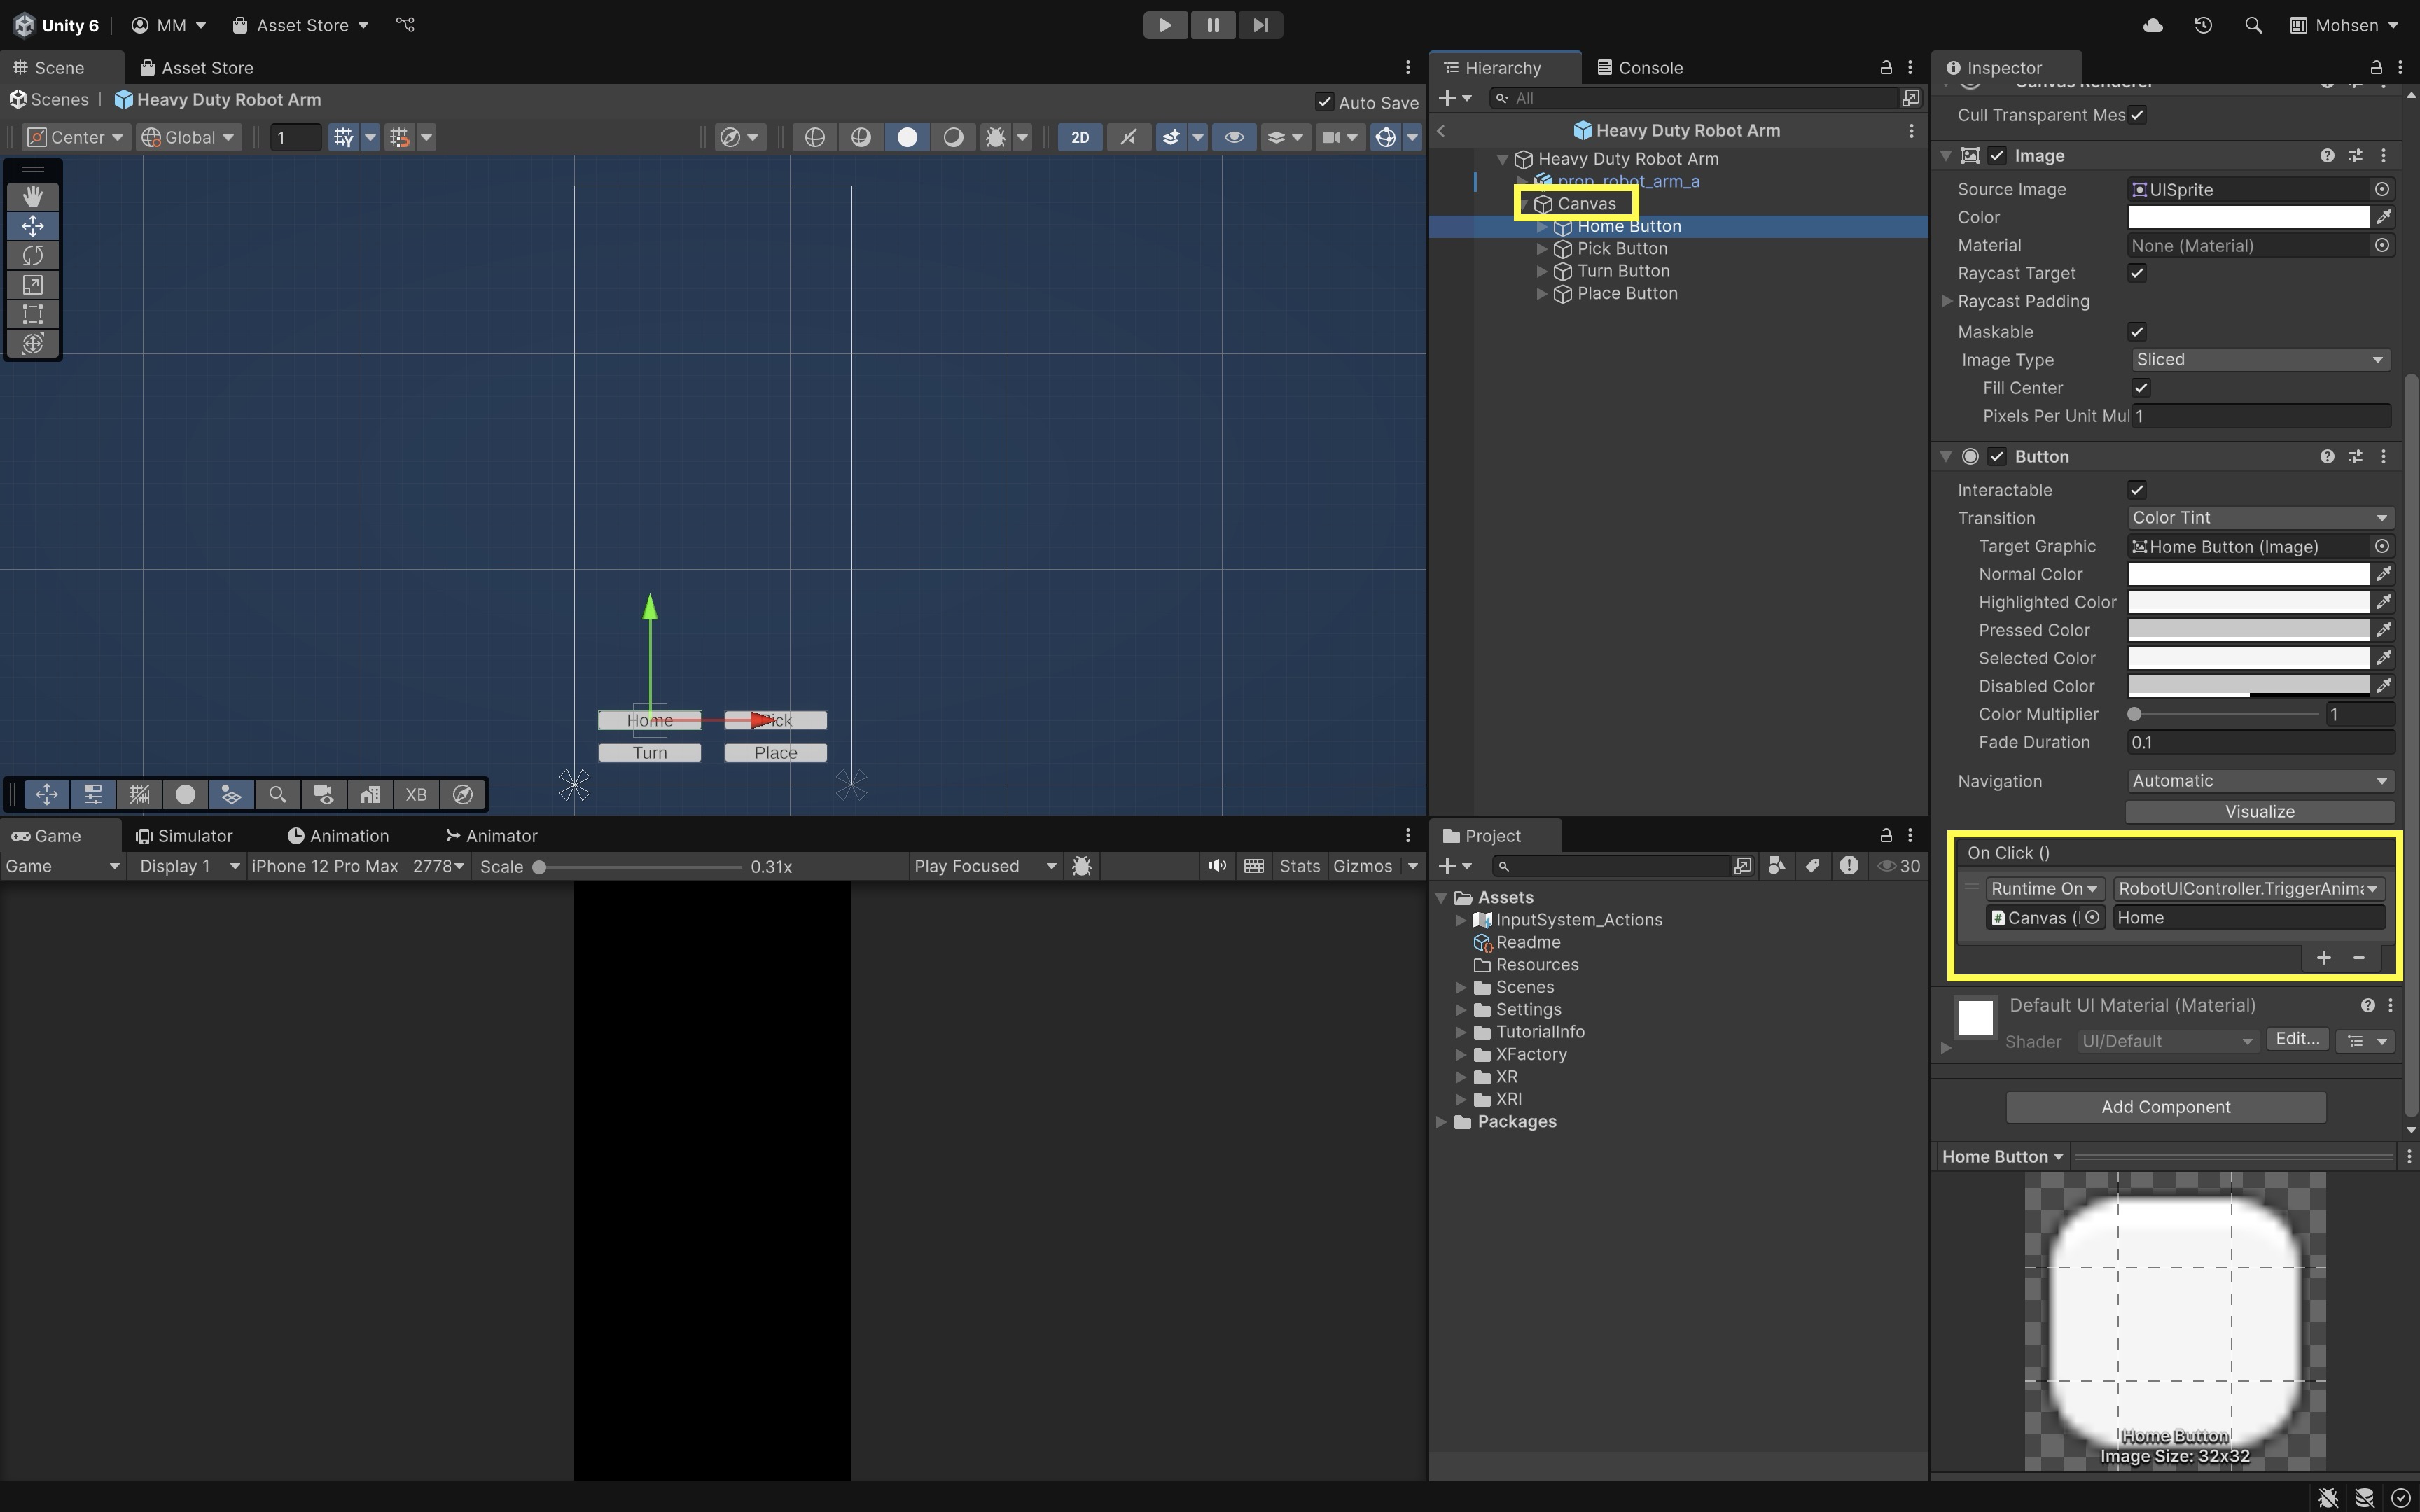
- Connect Each Button to Trigger the Animator:
- Select the button in the prefab hierarchy.
- In the
Button (Script)component, find theOn Click ()event list. - Click the
+to add a new event. - Drag the
Canvas(whereRobotUIController.csis attached) into the event field. - From the dropdown, select
RobotUIController → TriggerAnimation(string). - In the string parameter field, type the corresponding trigger:
Home(forHome Button),Pick(forPick Button),Turn(forTurn Button), andPlace(forPlace Button) - After wiring all buttons, click Save in the Prefab Mode toolbar to apply the changes.
- Test the Behavior:
- Build and deploy the AR app to your mobile device.
- Point the device’s camera at the robot marker image.
- The
Heavy Duty Robot Armprefab, along with the robot control panel UI, should appear anchored to the marker. - Tapping each button triggers the associated animation on the robot via its
Animator:
- Home: Home pose
- Pick: Pick animation
- Turn: Turn motion
- Place: Place animation
This creates a cohesive AR experience where marker-based tracking and interaction with virtual machinery are seamlessly integrated through a simple UI.
ARTrackedImage
When a marker image is detected in AR Foundation, Unity spawns ARTrackedImage. The AR Tracked Image component contains essential information about the detected image and its tracking status, allowing your AR content (like the Heavy Duty Robot Arm) to stay properly anchored and responsive to tracking conditions. Its key properties include:
-
destroyOnRemoval: Iftrue, the GameObject is destroyed when the image is no longer tracked. This property is particularly useful for cleanup and to avoid clutter in the scene when an image disappears. For the robot, keep thisfalseto prevent the model from disappearing during brief tracking interruptions, ensuring a smoother user experience. -
referenceImage: Contains metadata (name, size, GUID) about the detected image from the Reference Image Library. This property is valuable when your app tracks multiple images, as it allows you to easily identify which image was recognized and respond accordingly. By using this data, you can perform specific actions or trigger unique behaviors for different images. -
trackingState: Indicates tracking reliability:None,Limited, orTracking. This state is crucial for adjusting the AR content in real time, such as modifying visuals or animations based on the tracking quality. For example, you might useLimitedtracking to reduce the visibility of virtual objects or pause animations when tracking accuracy is compromised. -
sessionRelativePose: Provides the current pose of the tracked image relative to the AR session space. This ensures precise alignment of the virtual content with the physical marker and allows for stable placement of AR objects even as the camera moves or the marker shifts slightly. It plays a critical role in maintaining the illusion of seamless integration between the physical and digital worlds. -
updated(event): An event you can subscribe to in code to respond when the tracked image’s pose or tracking state changes. This event is vital for real-time adjustments, such as re-aligning virtual content, triggering actions, or responding to changes in tracking reliability. By subscribing to this event, you can ensure that the app always reacts appropriately to tracking fluctuations.
Tracked Image Lifecycle
Tracked images managed by ARTrackedImageManager pass through three main lifecycle phases:
-
Added: The first time an image is detected. The robot arm prefab is instantiated and aligned to the marker. This is the point where virtual content becomes anchored to the physical marker. For example, you could display the robot in the Home pose when the image is first found, giving users a clear, intuitive starting point for interaction.
-
Updated: Triggered each frame if the image’s pose or tracking quality changes. It’s important to always check the trackingState before updating content, as changes in tracking quality may require adjustments. For instance, if tracking is
Limited, reducing the robot’s opacity or pausing its actions can help avoid confusion or visual errors until the tracking quality improves. -
Removed: Called when the image is no longer tracked. If
destroyOnRemovalistrue, theARTrackedImageGameObject is destroyed, cleaning up any virtual content associated with the marker. In case of tracking loss, for example, you might pause interactions with the robot and fade out the model smoothly, ensuring that the transition is as seamless as possible.
Managing these phases ensures that your AR content behaves predictably as tracking conditions fluctuate. By carefully handling each stage, you can provide a more stable, intuitive experience for users interacting with AR content.
Best Practices
-
Always parent your AR content under the
ARTrackedImageGameObject. This ensures virtual content moves, rotates, and scales with the physical marker, maintaining correct alignment and a stable user experience. -
Avoid manually destroying tracked image GameObjects. Let the
ARTrackedImageManagerhandle removal with thedestroyOnRemovalsetting to prevent errors and ensure proper cleanup of tracked images. -
Check the
trackingStatebefore updating visuals or interactions. Only make changes when tracking is stable (Trackingstate), avoiding jittery or incorrect behavior when tracking isLimitedorNone. -
Cache references to spawned content or controllers. Storing references to content, such as control panels, improves performance and allows quick updates without recreating elements.
-
Optimize the Reference Image Library. Keep the library lean by only including essential images to improve detection speed and tracking performance.
-
Provide fallback behavior when tracking is lost. Use visual cues like fading effects or animations to inform users when tracking is lost, maintaining a smooth experience.
-
Test in various environments. Test AR content in different lighting, distances, and angles to ensure consistent tracking performance in diverse real-world scenarios.
-
Adjust virtual content dynamically with
ARTrackedImageproperties. Use properties likesessionRelativePoseandtrackingStateto update content behavior, such as switching to fallback animations when tracking is lost.
Key Takeaways
Image tracking in AR Foundation enables rich, interactive experiences by recognizing and anchoring virtual content to real-world reference images. Achieving reliable tracking depends on using high-quality, feature-rich images with defined physical dimensions, stored in a well-configured Reference Image Library. The AR Tracked Image Manager detects these images, spawns anchored prefabs, and updates their position and orientation in real time based on tracking states. By responding to lifecycle events—Added, Updated, and Removed—you can adapt content dynamically, ensuring smooth interactions even when tracking conditions fluctuate. Whether for training, maintenance, or interactive demonstrations, combining robust image design, careful library setup, and thoughtful event handling creates stable, immersive AR applications that seamlessly bridge the physical and digital worlds.