D3. Grabbing Objects in VR
Learning Outcomes
- Explain the function and configuration of the
XR Grab Interactablecomponent in Unity. Before class, review its purpose in enabling object grabbing, explore the different movement types, and note how it supports realistic physics and throwing in VR.- Set up ray grab interaction for objects in VR. As preparation, make an object ray-grabbable by adding a
RigidbodyandXR Grab Interactable, settingMovement TypetoVelocity Tracking, enablingSmooth Position, and testing with a ray interactor.- Describe near grab interaction and its setup in Unity. Ahead of the session, study how near-only grabbing works by replacing a ray interactor with a direct interactor on one controller.
- Understand the role of custom attach points in VR interactions. For your pre-class work, learn how custom attach points improve hand alignment when grabbing, and optionally add a simple
GripHandleto test the concept.- Describe natural interaction behavior in VR grabbing. Review how leaving
Attach Transformempty allows objects to maintain their natural rotation when grabbed via ray.- Apply best practices for VR object interaction. Come prepared with one UX improvement and one performance optimization (e.g., simplifying colliders, enabling haptics, cleaning hierarchy) you could apply to your own project.
Grab Interaction
Immersive VR experiences rely on intuitive interactions. One of the most fundamental is grabbing objects. In virtual environments, being able to reach out, pick up, and manipulate items is key to making the experience feel natural and believable. Grabbable objects allow players to interact with the world beyond simple observation. When an object is grabbed, it typically attaches to the user’s virtual hand or controller, moving with it in real time. Upon release, objects often respond with realistic physics-based motion—such as inheriting the hand’s velocity—enabling interactions like throwing or dropping items convincingly. These mechanics form the foundation of interactive VR. By supporting natural object handling, developers can create experiences where users feel present and engaged across various use cases:
-
Tool Use and Task Simulation: Users can pick up and manipulate tools or equipment, whether for industrial training, repair tasks, or role-specific simulations. This includes scenarios like using wrenches, welders, or surgical instruments, often with constraints or snapping to simulate real-world behavior.
-
Inspection and Exploration: Objects can be grabbed, rotated, and examined closely to understand their details. This is valuable in training, education, product design, or even entertainment, such as inspecting mechanical parts, artifacts, or models.
-
Assembly and Construction: Grabbable parts can be combined to simulate assembly tasks, from mechanical systems to medical devices. These interactions help users practice coordination, precision, and procedural knowledge.
-
Interactive Interfaces and Controls: Virtual UI elements can be designed to be grabbed, moved, or manipulated. This can include repositioning panels, dragging sliders, or picking up virtual displays, blending physical interaction with digital controls.
-
Physics and Realism: Grabbed objects often inherit forces and constraints, enabling realistic throwing, weight simulation, or balance challenges. This adds immersion for gaming, training, and physics-based learning experiences.
-
Safety, Role-Play, and Specialized Training: Grab interactions simulate critical tools and equipment in high-stakes environments. Examples include handling fire extinguishers, medical instruments, or tactical gear — allowing users to safely practice in scenarios that mirror real-world challenges.
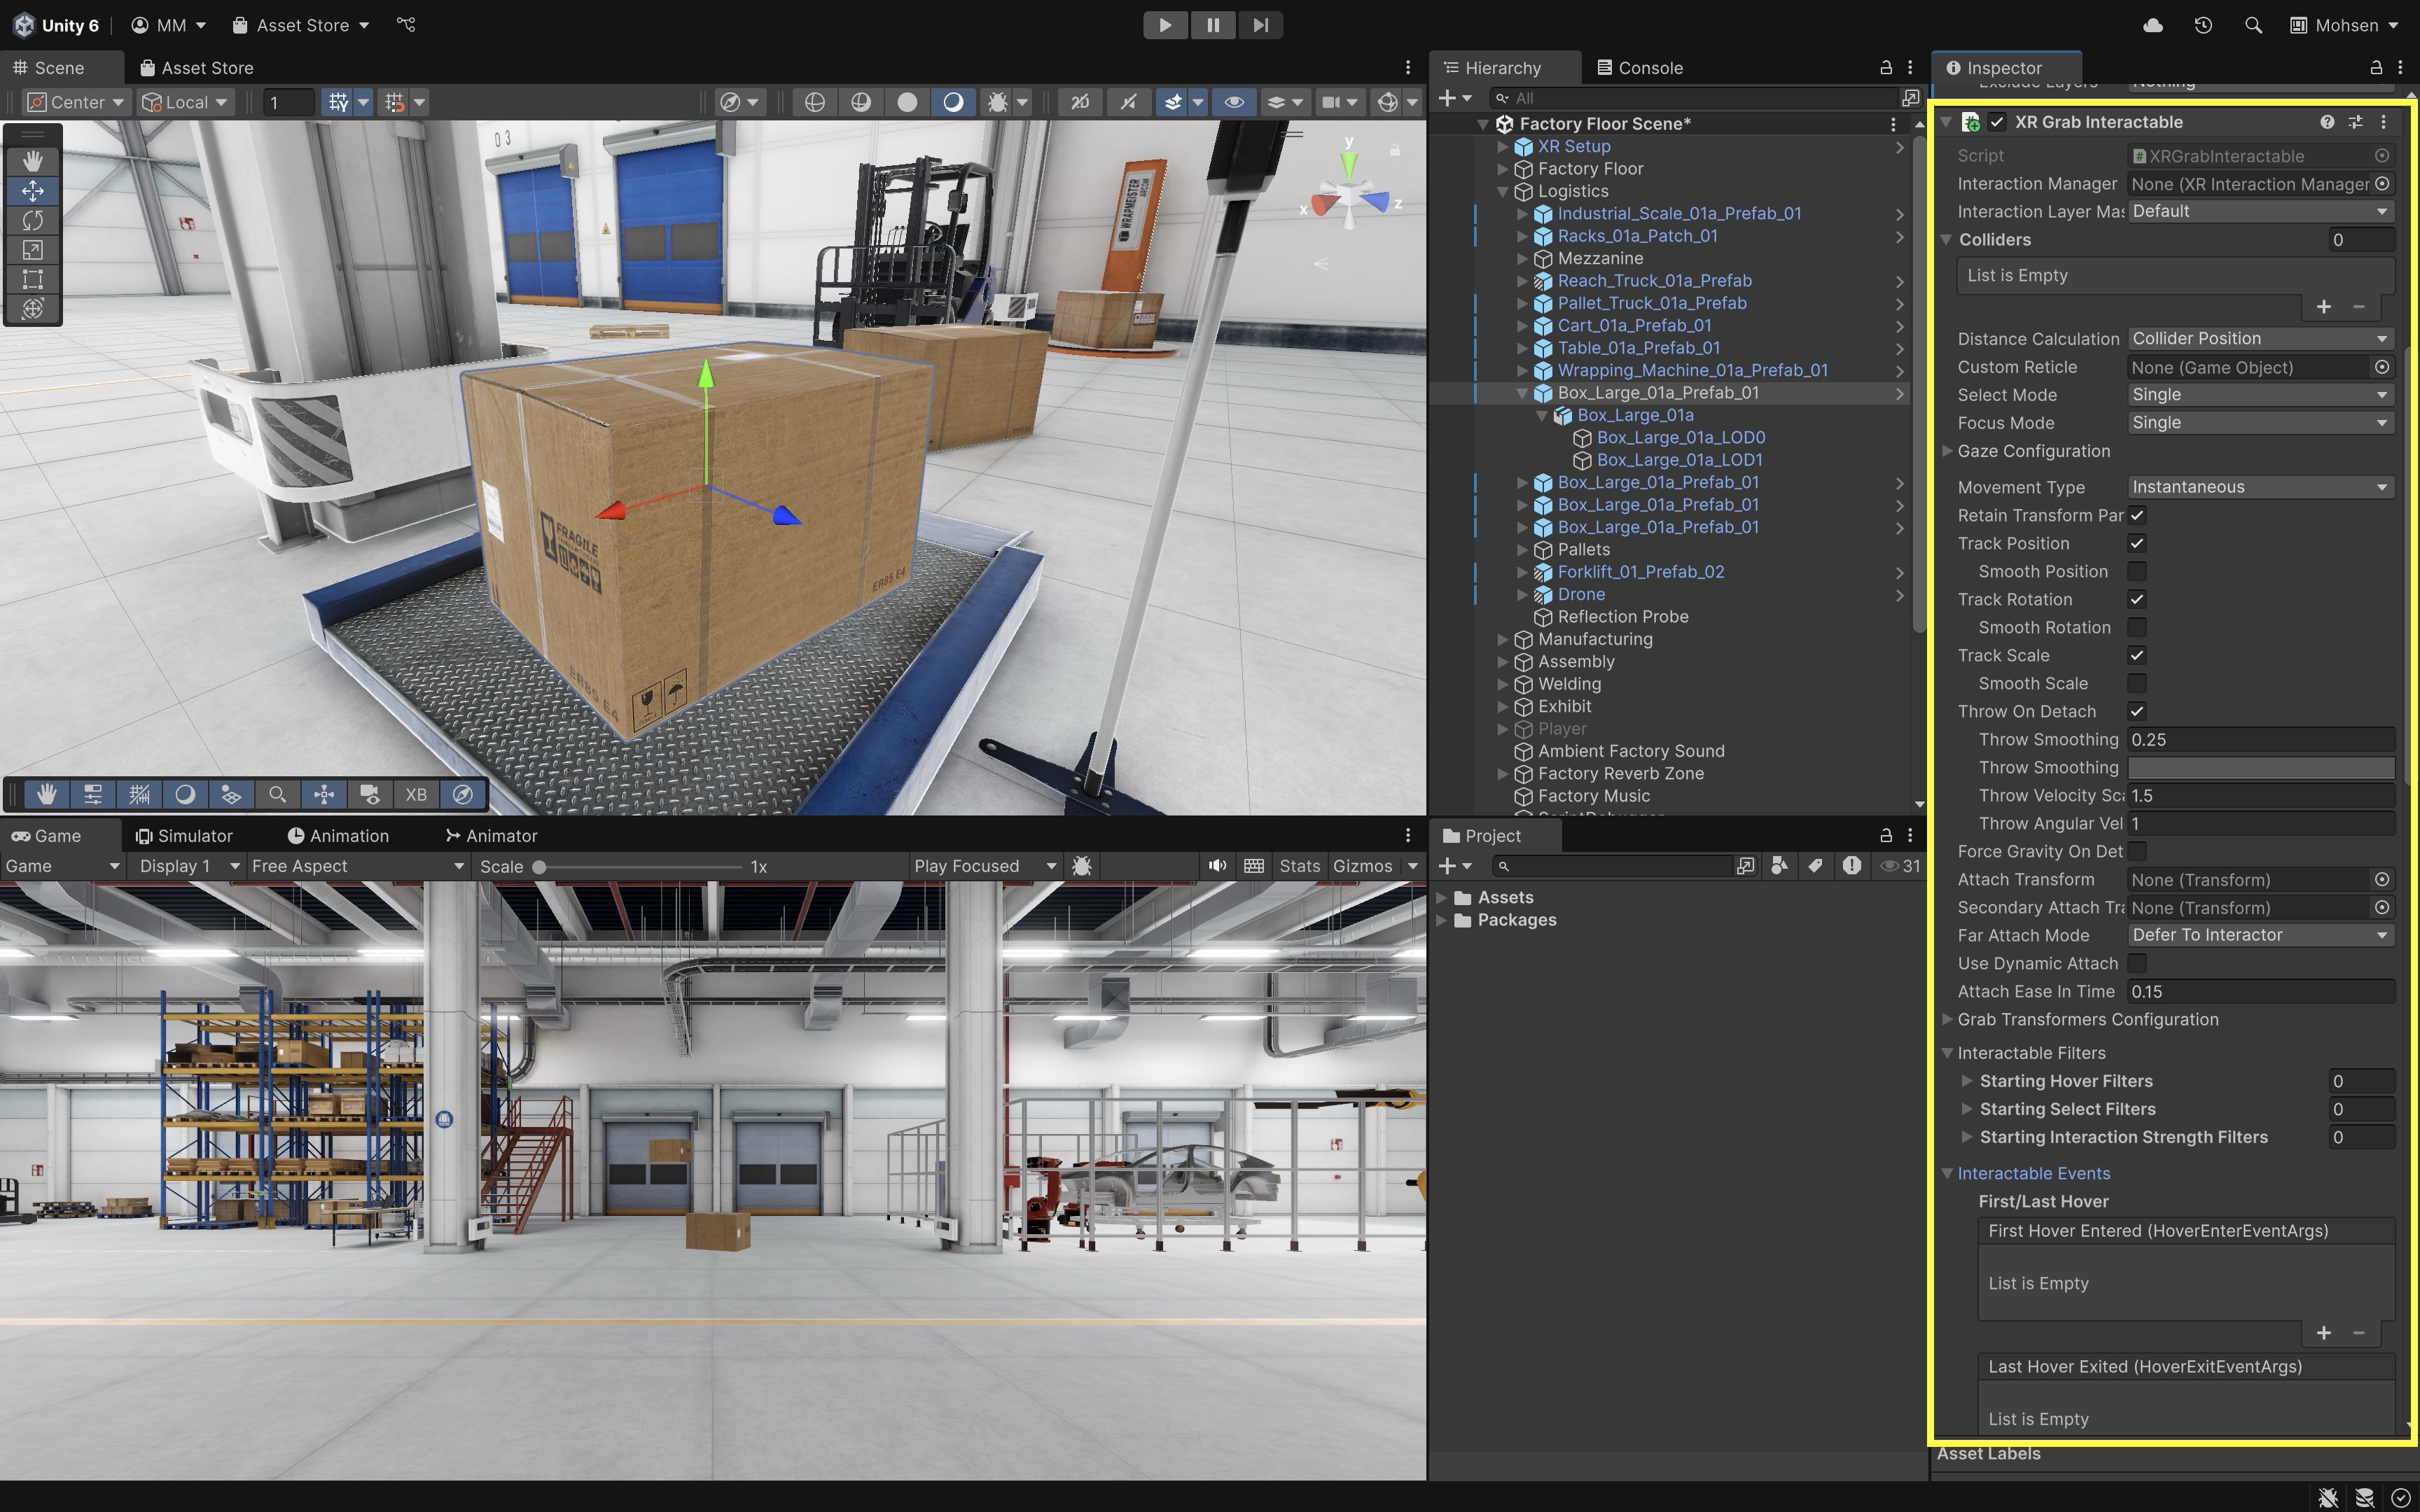
XR Grab Interactable
XR Grab Interactable is a component from the XR Interaction Toolkit that, when attached to a GameObject, makes it grabbable and interactable in VR. This allows users to pick up, hold, move, and release objects using VR controllers or hand tracking. The component provides multiple configuration options to control how objects attach, move, and behave physically, enabling both realistic and specialized interaction patterns.
Review this Unity Documentation to learn more about
XR Grab Interactable.
Core Settings
-
Interaction Manager: Defines whichXR Interaction Managerthe object communicates with. This ensures the interactable can be managed consistently within the overall interaction system. -
Interaction Layer Mask: Filters which interactors are allowed to grab the object. For example, safety-critical equipment might only be interactable by a “Maintenance” layer interactor. -
Colliders: The object can have one or more colliders assigned to define its physical grab regions. -
Distance Calculation: Determines how distance is calculated for far or ray-based grabs. This affects how the object prioritizes selection when multiple targets are in reach. -
Collider Position: Adjusts how the system evaluates the grab point relative to colliders, useful for fine-tuning precision in ray or gaze interactions. -
Custom Reticle: A visual indicator that replaces the default reticle when targeting this object, providing custom feedback (e.g., a highlight icon when focusing on a control panel).
Selection and Focus
-
Select Mode: Defines how the object can be selected — either allowing multiple interactors (toggle mode) or restricting to a single interactor (single mode). -
Focus Mode: Controls how the object responds to focus (hovering before selection). For example, an object might highlight while hovered, even before being grabbed. -
Gaze Configuration: Enables and configures gaze-based interactions, allowing users to select objects with eye-tracking or head direction instead of hand controllers.
Movement and Physics
Movement Type: Sets how the object moves when grabbed:Kinematic— precise, smooth control using a kinematicRigidbody.Velocity Tracking— applies velocity and angular velocity for realistic throwing and momentum.Instantaneous— updates theTransformdirectly each frame for the most responsive (but least physical) behavior.
-
Retain Transform Parent: Determines whether the object keeps its original parent in the hierarchy after being released or reverts to the scene root. -
Track Position: Toggles whether the object follows the interactor’s position. Disabling this can create interactions like rotating knobs without movement. -
Track Rotation: Toggles whether the object inherits the interactor’s rotation. Useful for objects that should only move but not reorient. -
Track Scale: Toggles whether the object scales with the interactor. Can be used for resizing interactions if supported. -
Throw On Detach: Applies the interactor’s velocity to the object when released, enabling natural throwing or tossing. Force Gravity On Detach: Ensures gravity is applied immediately after release, regardless of the Rigidbody’s prior settings.
Attachment Options
-
Attach Transform: The main point where the object attaches when grabbed. Often set to an empty child object to ensure correct alignment (e.g., tool handles). -
Secondary Attach Transform: An optional second attach point that enables two-handed interactions or alternate grab positions. -
Far Attach Mode: Controls how objects behave when grabbed from a distance (e.g., snapping instantly vs. flying smoothly to the hand). -
Use Dynamic Attach: When enabled, generates an attach point dynamically at the grab location, preserving the natural feel of where the user picked it up. -
Attach Ease In Time: Sets the interpolation time for moving into place after being grabbed, smoothing the transition instead of snapping immediately.
Filters and Events
-
Interactable Filters: Conditions that determine whether the object can currently be interacted with. For example, access could be locked until prerequisites are met. -
Interactable Events: Unity Events triggered during the grab lifecycle (hover enter, select enter, select exit, etc.). These can drive feedback such as sounds, haptics, or activating systems. Developers can connect these events to custom scripted methods in the Inspector or via code to implement custom behaviors.
Near-Far Interaction
The Near-Far Interactor is a unified interactor in the XR Interaction Toolkit that combines both near and far interaction into a single component. It replaces the need for separate Direct Interactor and Ray Interactor, enabling seamless transitions between touching objects directly and interacting with them at a distance. It also supports UI interaction using far caster data. It works seamlessly with interactables like XR Grab Interactable, as well as Unity UI elements when UI Interaction is enabled.
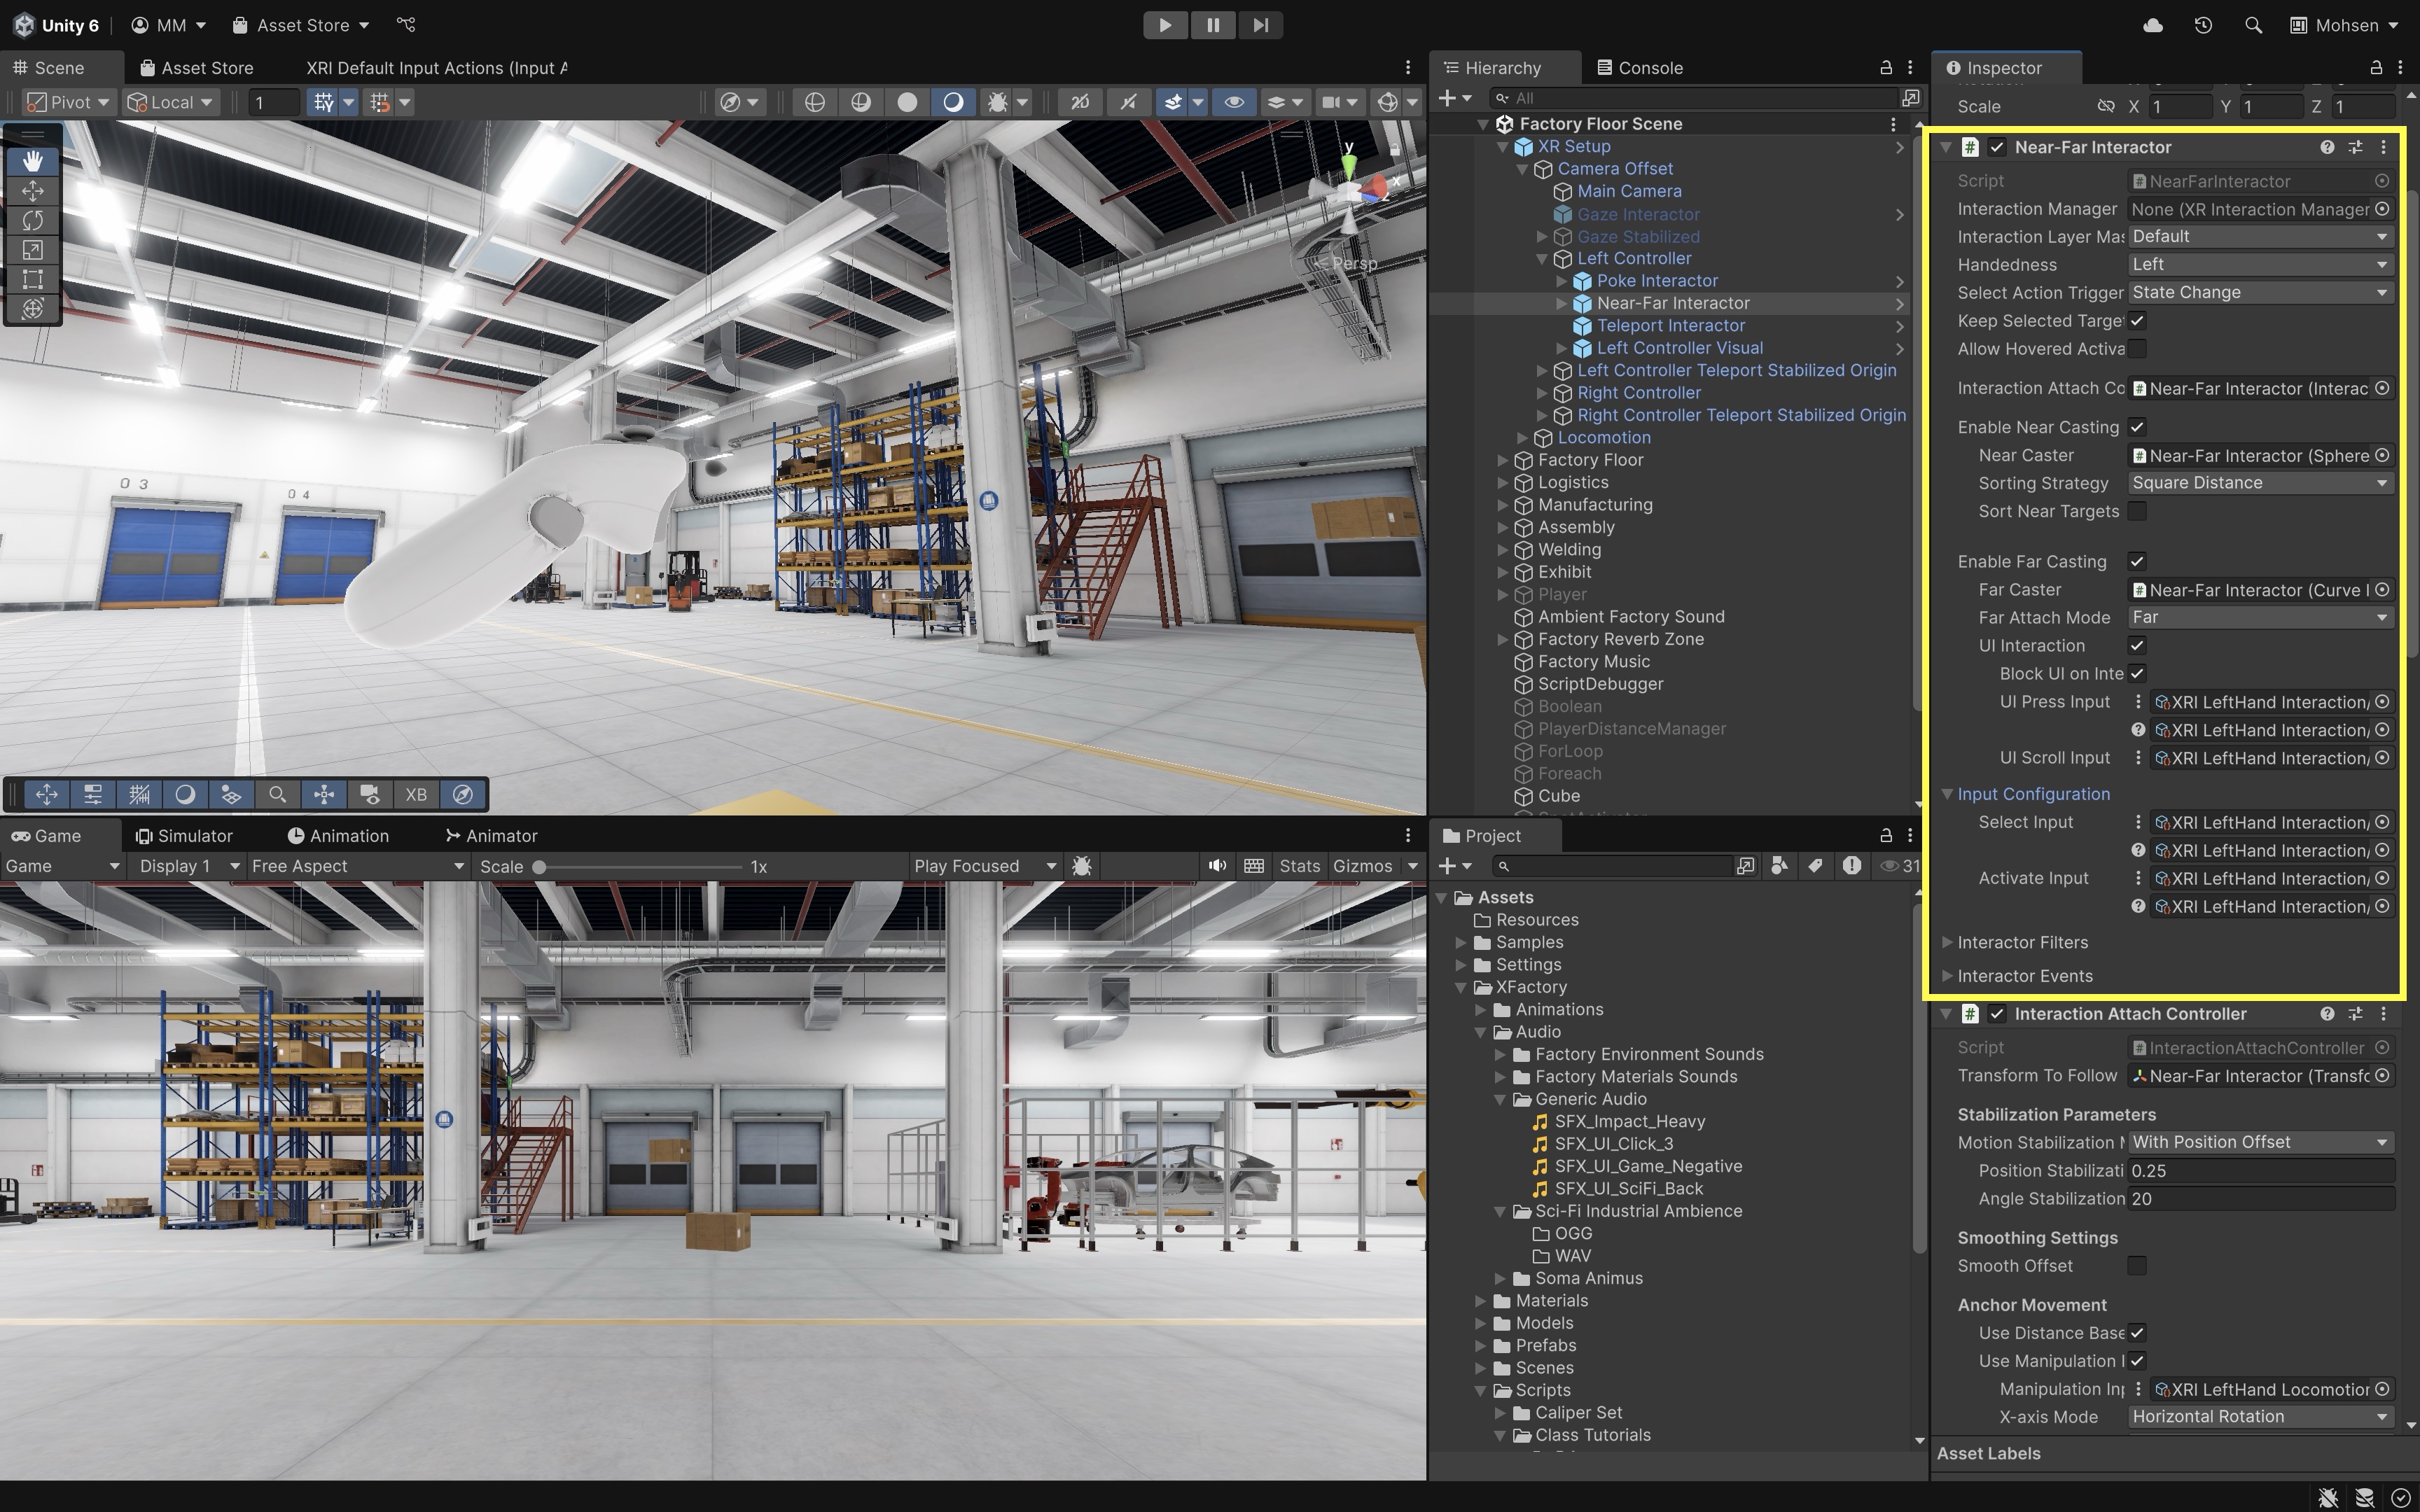
Properties
Interaction Manager: Handles communication with the XR Interaction Manager.Interaction Layer Mask: Defines which interactables this interactor can affect.Select Action Trigger: Sets how selection input is interpreted (hold, toggle, sticky).Keep Selected Target Valid: Keeps an object selected even when no longer pointed at.Allow Hovered Activate: Sends activate/deactivate events to hovered interactables.Target Priority Mode: Determines how many interactables are tracked at once.Parent Interactable: Specifies a dependency to control processing order.Interaction Attach Controller: Controls how objects attach and follow the hand.Enable Near/Far Casting: Toggles near or far interaction capability.Near/Far Casters: Components that detect nearby or distant targets.Sorting Strategy: Chooses how near targets are prioritized (distance, collider, etc.).Far Attach Mode: Sets whether far-grabbed objects move to the hand or stay at distance.UI Interaction: Enables interaction with Unity UI elements.UI Press & Scroll Input: Defines input for clicking and scrolling UI.Select & Activate Input: Configures inputs for selecting and activating objects.Interactor Filters & Events: Extends behavior and hooks into interaction events.
Key Features
- Dual Interaction Modes: Uses a near caster (touch/overlap) and a far caster (curve/ray) in one interactor, with automatic switching and UGUI support from the far cast. Quick tuning cab be done via Near target sorting (e.g., SquareDistance) and Far Attach Mode (bring to hand vs. stay at hit point).
- Attach Control: An Interaction Attach Controller drives the attach transform (position/rotation). Default gives distance-based velocity scaling for smooth pull-in, works with hand or controller. Swap in a custom controller to change pull profiles, offsets, or constraints.
- Visual Support
CurveVisualControllerrenders the far interaction path using curve data. Decoupled from logic, so visuals are easy to restyle or replace.
Example
You can make tools, parts, and devices within XFactory grabbable in VR using Unity’s XR Interaction Toolkit. In this example, we’ll make the barcode scanner in the Logistics Station interactable using the XR Grab Interactable. When grabbed, it will play a click sound and trigger haptic feedback for immersion.
- Locate the Barcode Scanner in the Logistics Station:
- Find the
Scanner_01ain the scene or place it from theProjectwindow. - Rename the instance to
BarcodeScannerif you want. - Position it on the table inside the logistics station.
- Find the
- Add Physics and Interaction Components:
- Add a
Rigidbodycomponent to theBarcodeScannerGameObject. - Set
Collision DetectiontoContinuous Dynamicto handle fast hand movements. - Verify that it has a
Box ColliderorMesh Collider(Convexchecked).
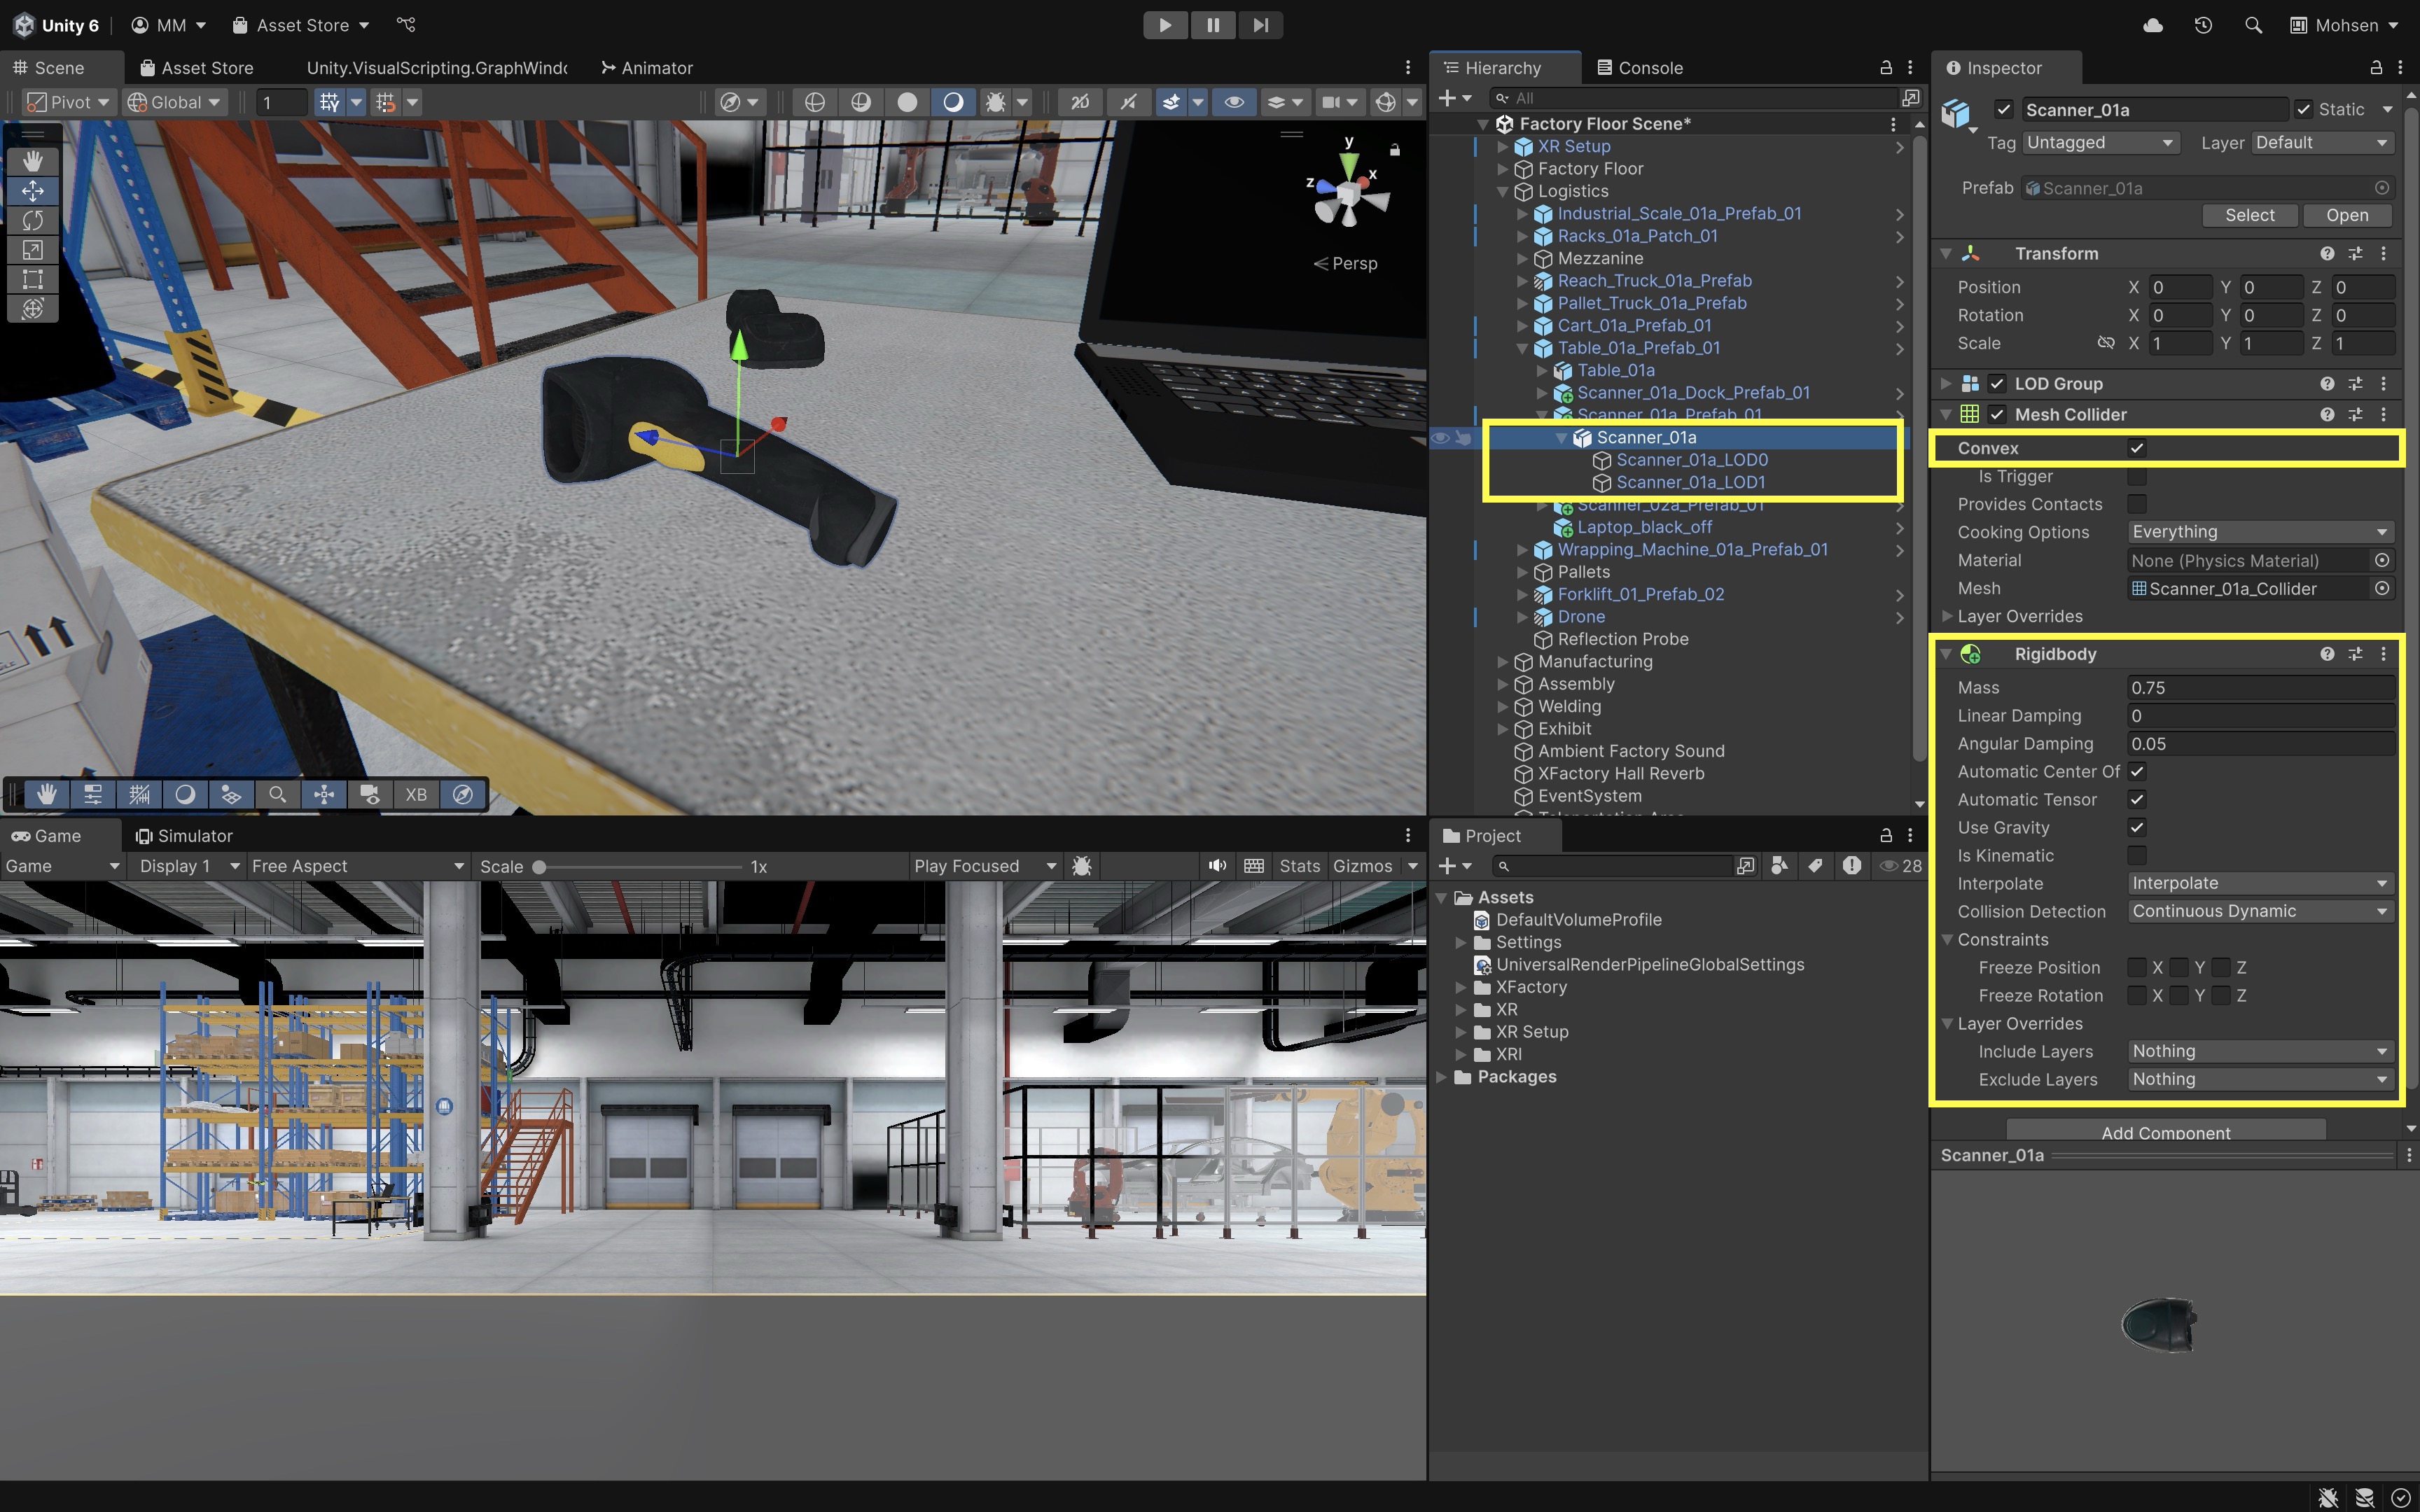
- Add a
- Enable Grab Interaction:
- Add an
XR Grab Interactablecomponent. - Set
Movement TypetoVelocity Tracking. - Enable
Smooth PositionandSmooth Rotation. - Set
Throw On Detach=true. - Set
Throw Velocity Scale=1.0. - Set
Throw Angular Velocity Scale=0.5.
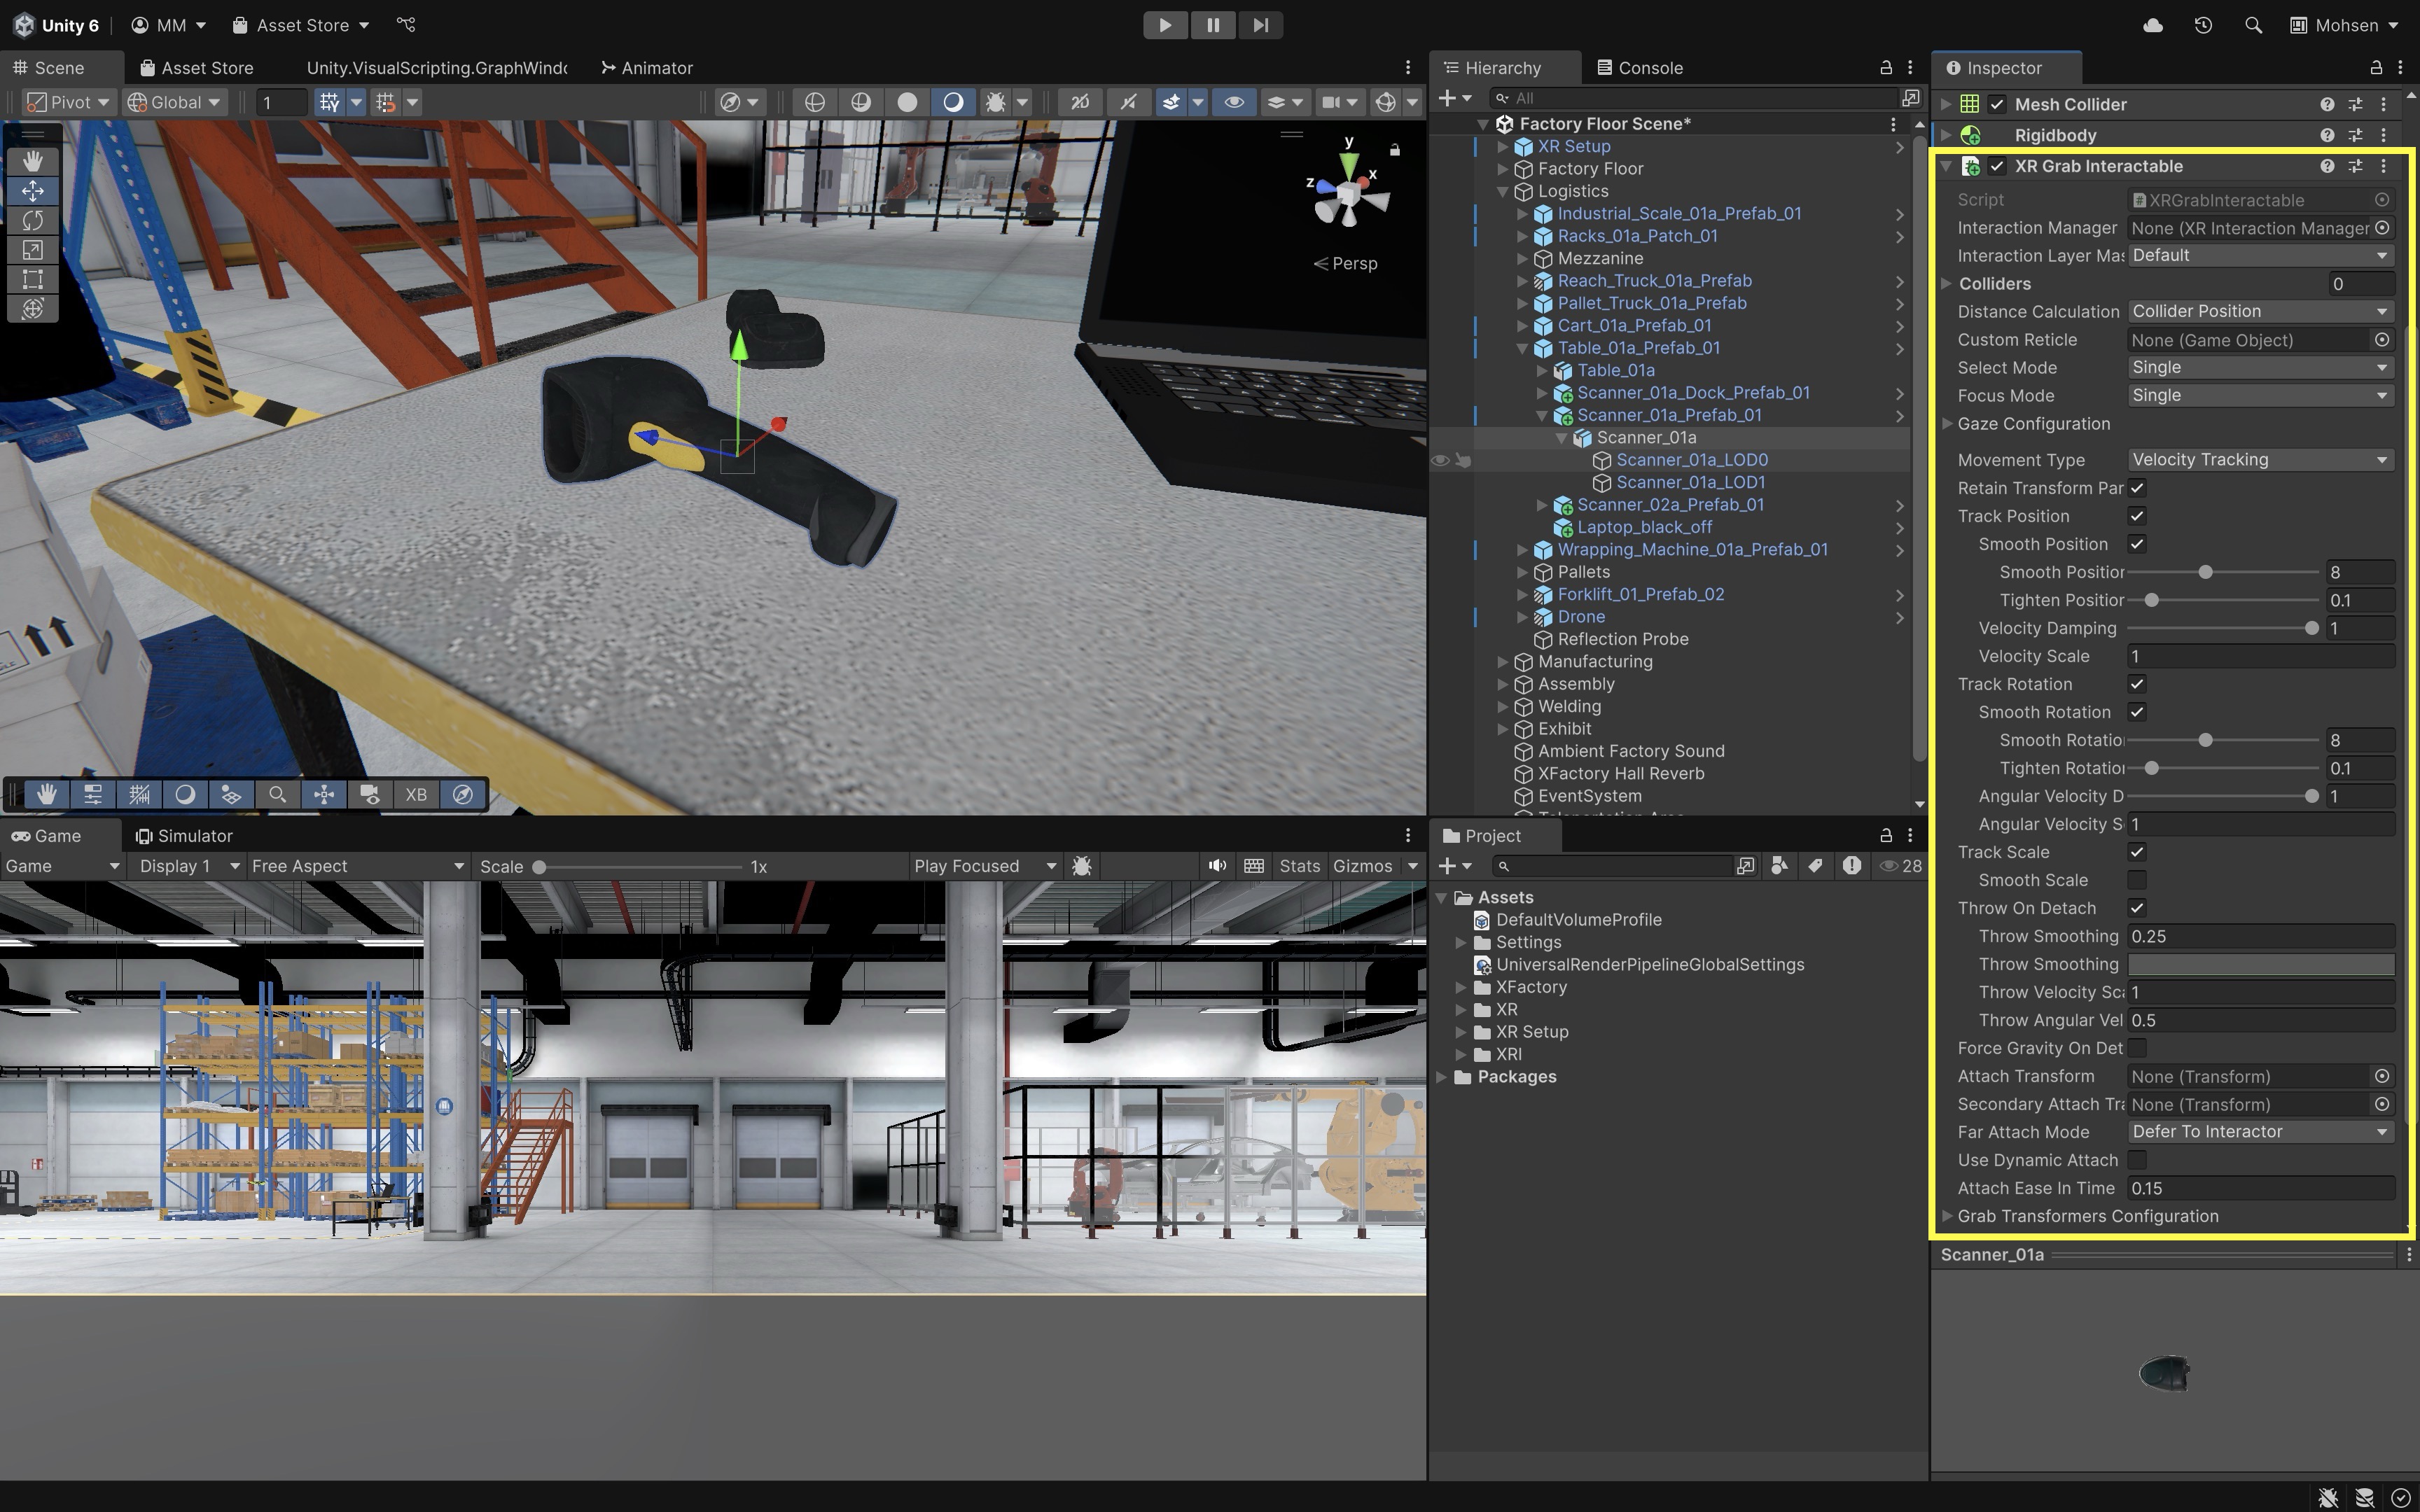
- Add an
- Create a Grab Feedback Script (Event-based):
- Create a new
MonoBehaviourscript namedBarcodeScanFeedbackEvents.cs. - Attach this script directly to the
BarcodeScannerGameObject.
using UnityEngine; using UnityEngine.XR.Interaction.Toolkit; public class BarcodeScanFeedbackEvents : MonoBehaviour { [Header("Audio")] [SerializeField] private AudioClip beepClip; [Header("Haptics")] [SerializeField, Range(0f, 1f)] private float hapticAmplitude = 0.5f; [SerializeField] private float hapticDuration = 0.1f; // Called by XR Grab Interactable → Interactable Events → Select Entered public void OnSelectEntered(SelectEnterEventArgs args) { PlayBeep(); SendHaptics(args.interactorObject); } // (Optional) Called by XR Grab Interactable → Interactable Events → Select Exited public void OnSelectExited(SelectExitEventArgs args) { // You can play a different sound or a lighter haptic here if desired. // Example: // SendHaptics(args.interactorObject, 0.2f, 0.05f); } private void PlayBeep() { if (beepClip != null) AudioSource.PlayClipAtPoint( beepClip, transform.position ); } private void SendHaptics( UnityEngine.XR.Interaction.Toolkit.Interactors.IXRSelectInteractor interactor ) { if (interactor is UnityEngine.XR.Interaction.Toolkit.Interactors.XRBaseInputInteractor controller ) { controller.SendHapticImpulse( hapticAmplitude, hapticDuration ); } } } - Create a new
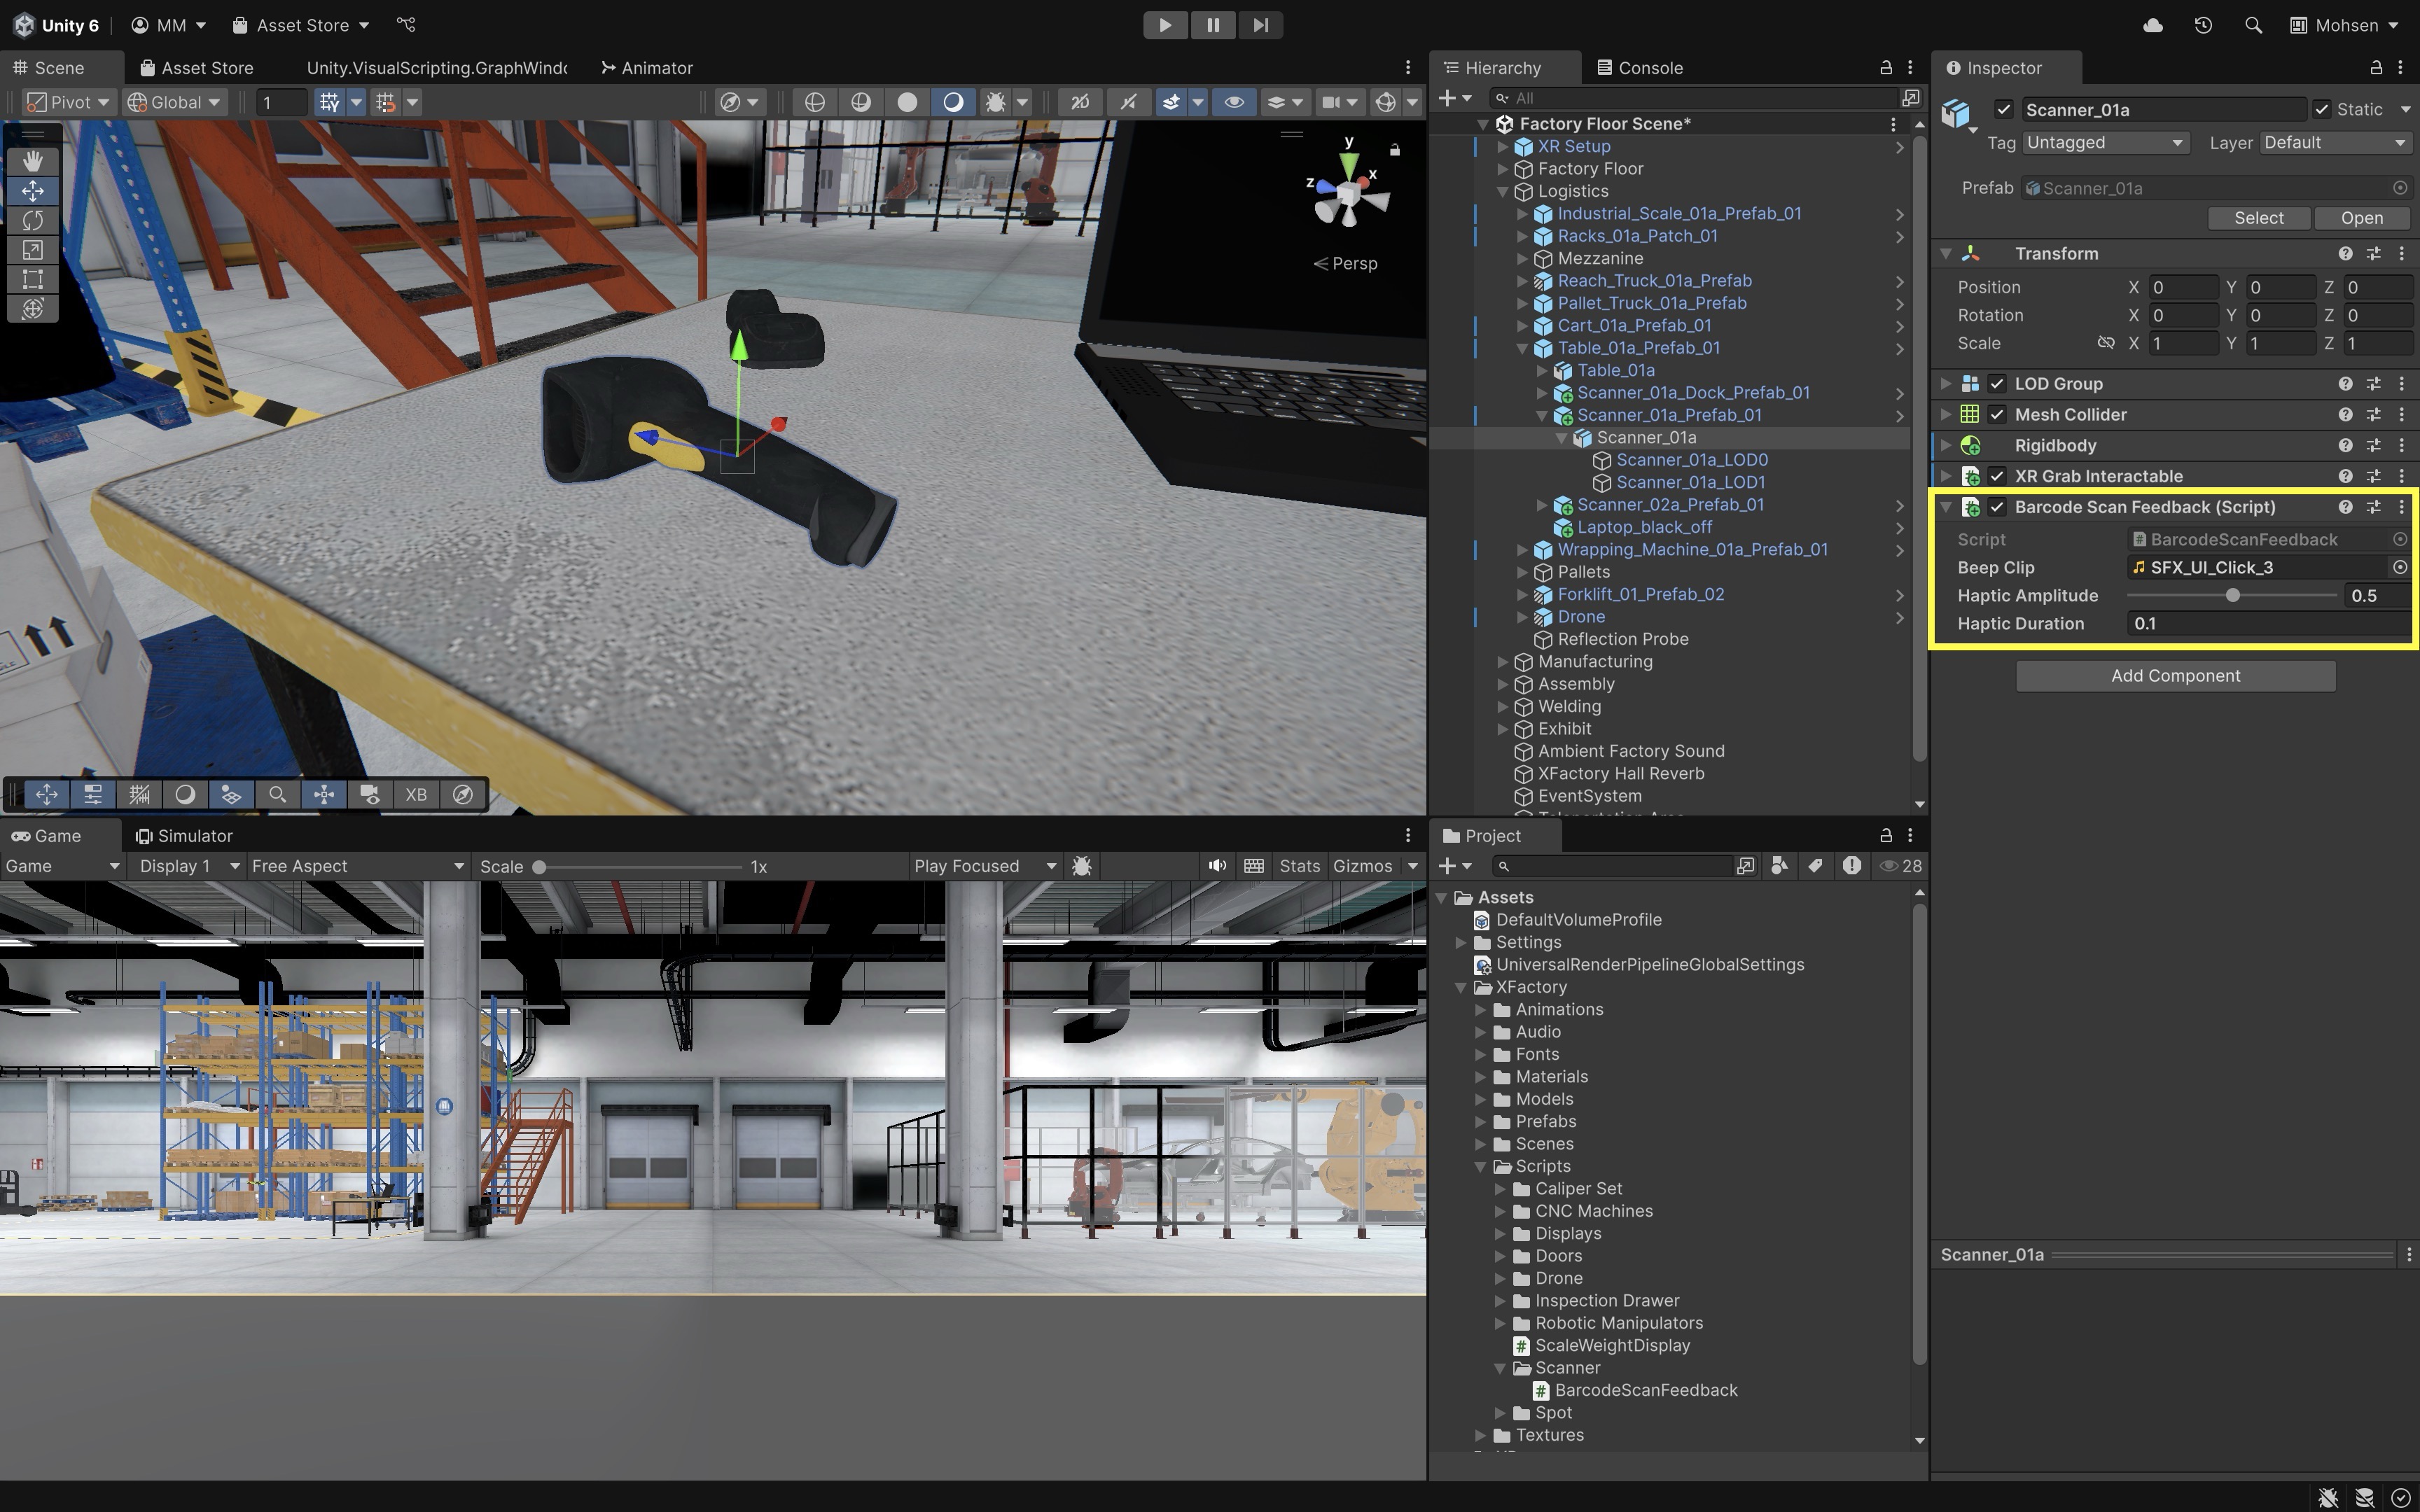
- Configure the Script:
- Select
BarcodeScannerin theHierarchy. - In
BarcodeScanFeedbackEvents, assign a short beep clip (e.g.,SFX_UI_Click_3.ogg). - Set
Haptic Amplitude(e.g.,0.5) and Haptic Duration (e.g.,0.1s).
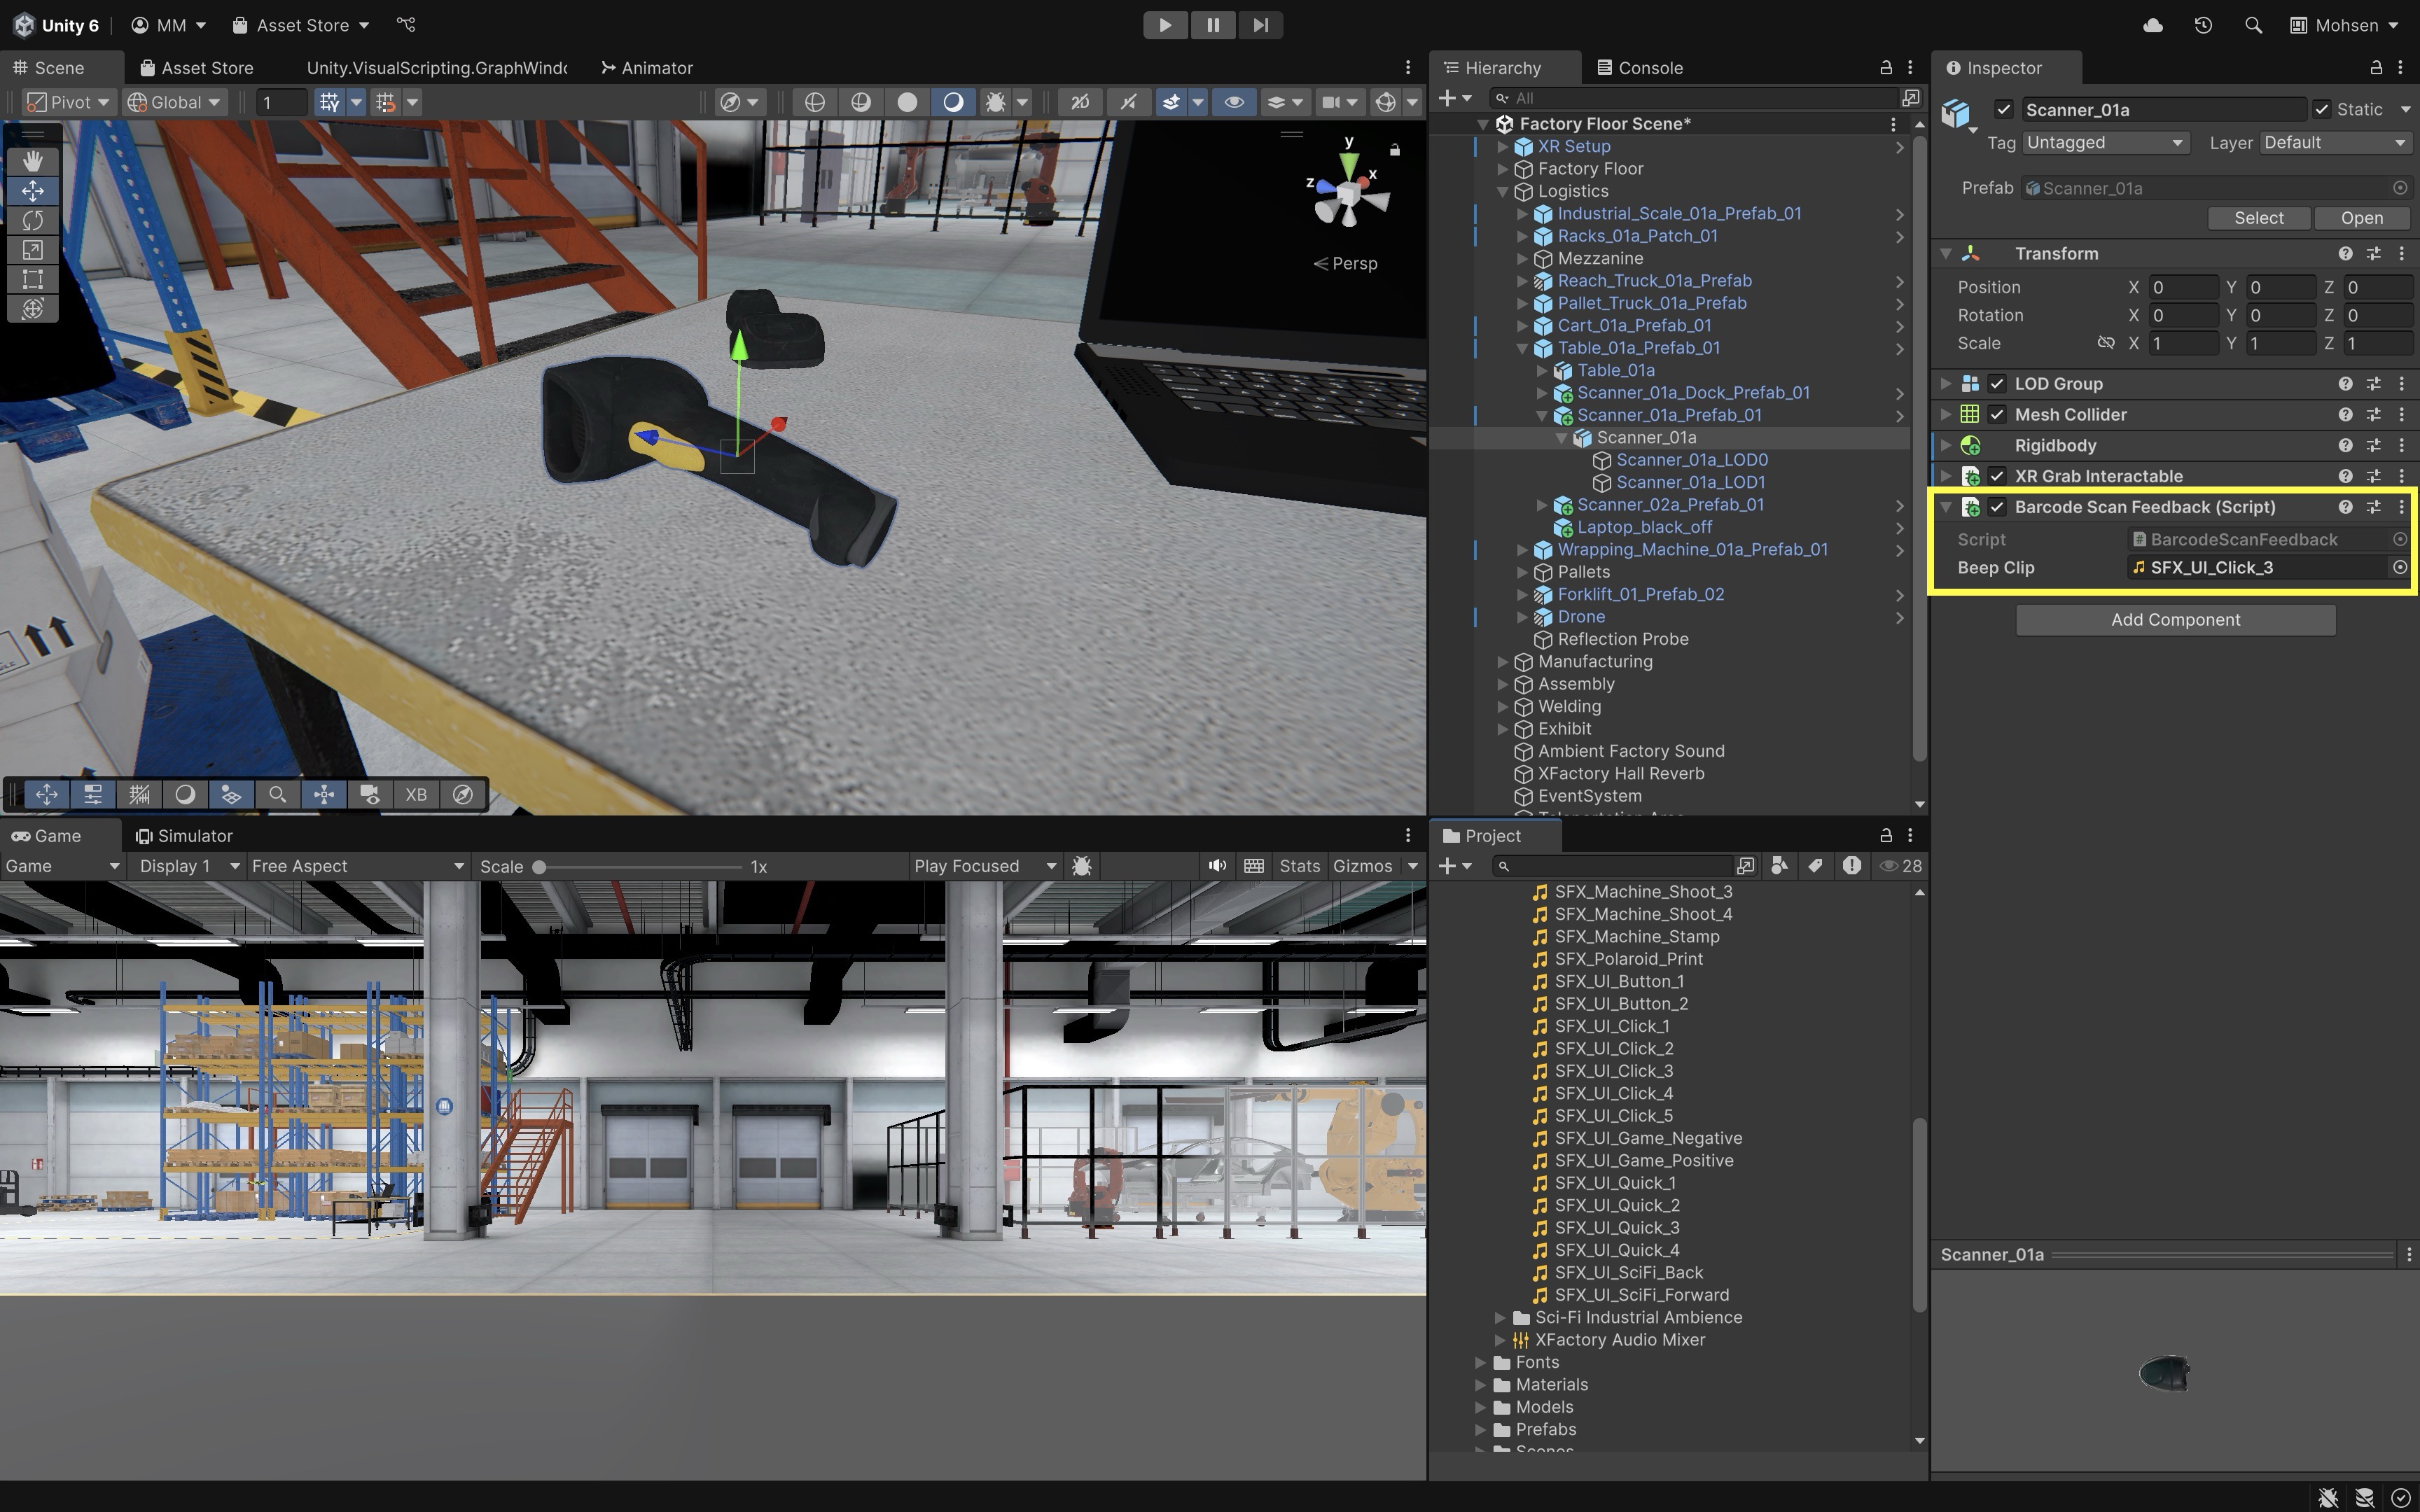
Note:
AudioSource.PlayClipAtPointmeans you don’t need an AudioSource on the object. - Select
- Hook Up
XR Grab Interactable → Interactable Events(Inspector Only):- On
BarcodeScanner, openXR Grab Interactablein theInspector. - Expand
Interactable Event. - Under
Select Entered, click+, dragBarcodeScanner(the object withBarcodeScanFeedbackEvents.cs) into the object field, then chooseBarcodeScanFeedbackEvents → OnSelectEntered(SelectEnterEventArgs).
These are the dynamic event signatures that pass the correct args to your methods. Optional variations: In
OnSelectExited, call the overload with lighter values, e.g.SendHaptics(args.interactorObject, 0.2f, 0.05f);or hookActivated/Deactivated(trigger press) to play a distinct sound or toggle a “laser” glow. - On
- Deploy & Test:
- Enter Play Mode or deploy to device.
- Grab the scanner → you should hear the beep and feel a short vibration on the grabbing controller.
- Release (if wired) → optional exit feedback plays.
Direct Interaction
The XR Direct Interactor is a touch-based interactor for objects your hand/controller is physically overlapping. It uses a trigger volume (or an optimized sphere-cast mode) to detect nearby interactables and handles direct grabs without any ray/curve.
Ensure the interactor has a trigger collider (or enable Improve Accuracy With Sphere Collider). Configure
Select Action Trigger,Interaction Layer Mask, and optional feedback viaInteractable Events.
Properties
Interaction Manager: Links to the XR Interaction Manager.Interaction Layer Mask: Which interactables you can touch.Handedness: Left/right association for the interactor.Attach Transform: Anchor used when an object is selected.Improve Accuracy With Sphere Collider: Per-frame sphere-cast overlap (performance/accuracy tradeoff).Physics Layer Mask/Physics Trigger Interaction: Limits and rules for overlap hits.Select Action Trigger: How selection input is interpreted.Keep Selected Target Valid: Stay selected even when no longer overlapping.Hide Controller On Select: Hide the controller model during grabs.Audio Events/Haptic Events/Interactor Events: Built-in hooks for feedback and logic.
Note: Direct Interactor is near-only (no far/ray interaction). For combined near + far, use Near-Far Interactor.
Key Features
- Touch-Only Selection: Uses a trigger collider on the interactor to detect overlaps (or Improve Accuracy With Sphere Collider to sphere-cast each frame). Ideal for natural, hands-on grabbing and manipulation of nearby items.
- Attach & Hand Context: Per-hand setup via Handedness and an Attach Transform (auto-created if missing) for stable object attachment. Options like Hide Controller On Select and Keep Selected Target Valid (stay selected after contact ends).
- Input Model: Flexible Select Action Trigger modes: State, State Change (recommended), Toggle, Sticky.
- Filtering & Ordering:
Interaction Layer Mask,Physics Layer Mask/Trigger Interactionto limit what you can touch.Target Priority Mode,Parent Interactable(withAuto Find) to tune processing order and performance. - Built-in Feedback Hooks:
Interactor Eventsplus convenientAudio EventsandHaptic Eventsfor hover/select enter/exit/cancel.
Example
To make objects in XFactory interactable only at close range (i.e., users must reach out and grab them with their virtual hands), you can use XR Direct Interactors from Unity’s XR Interaction Toolkit. This disables ray-based grabbing while still supporting tactile, immersive object handling — ideal for realistic experiences in tasks like picking up tools or parts. Follow these steps to enable near-only interaction for the barcode scanner or any other interactable item.
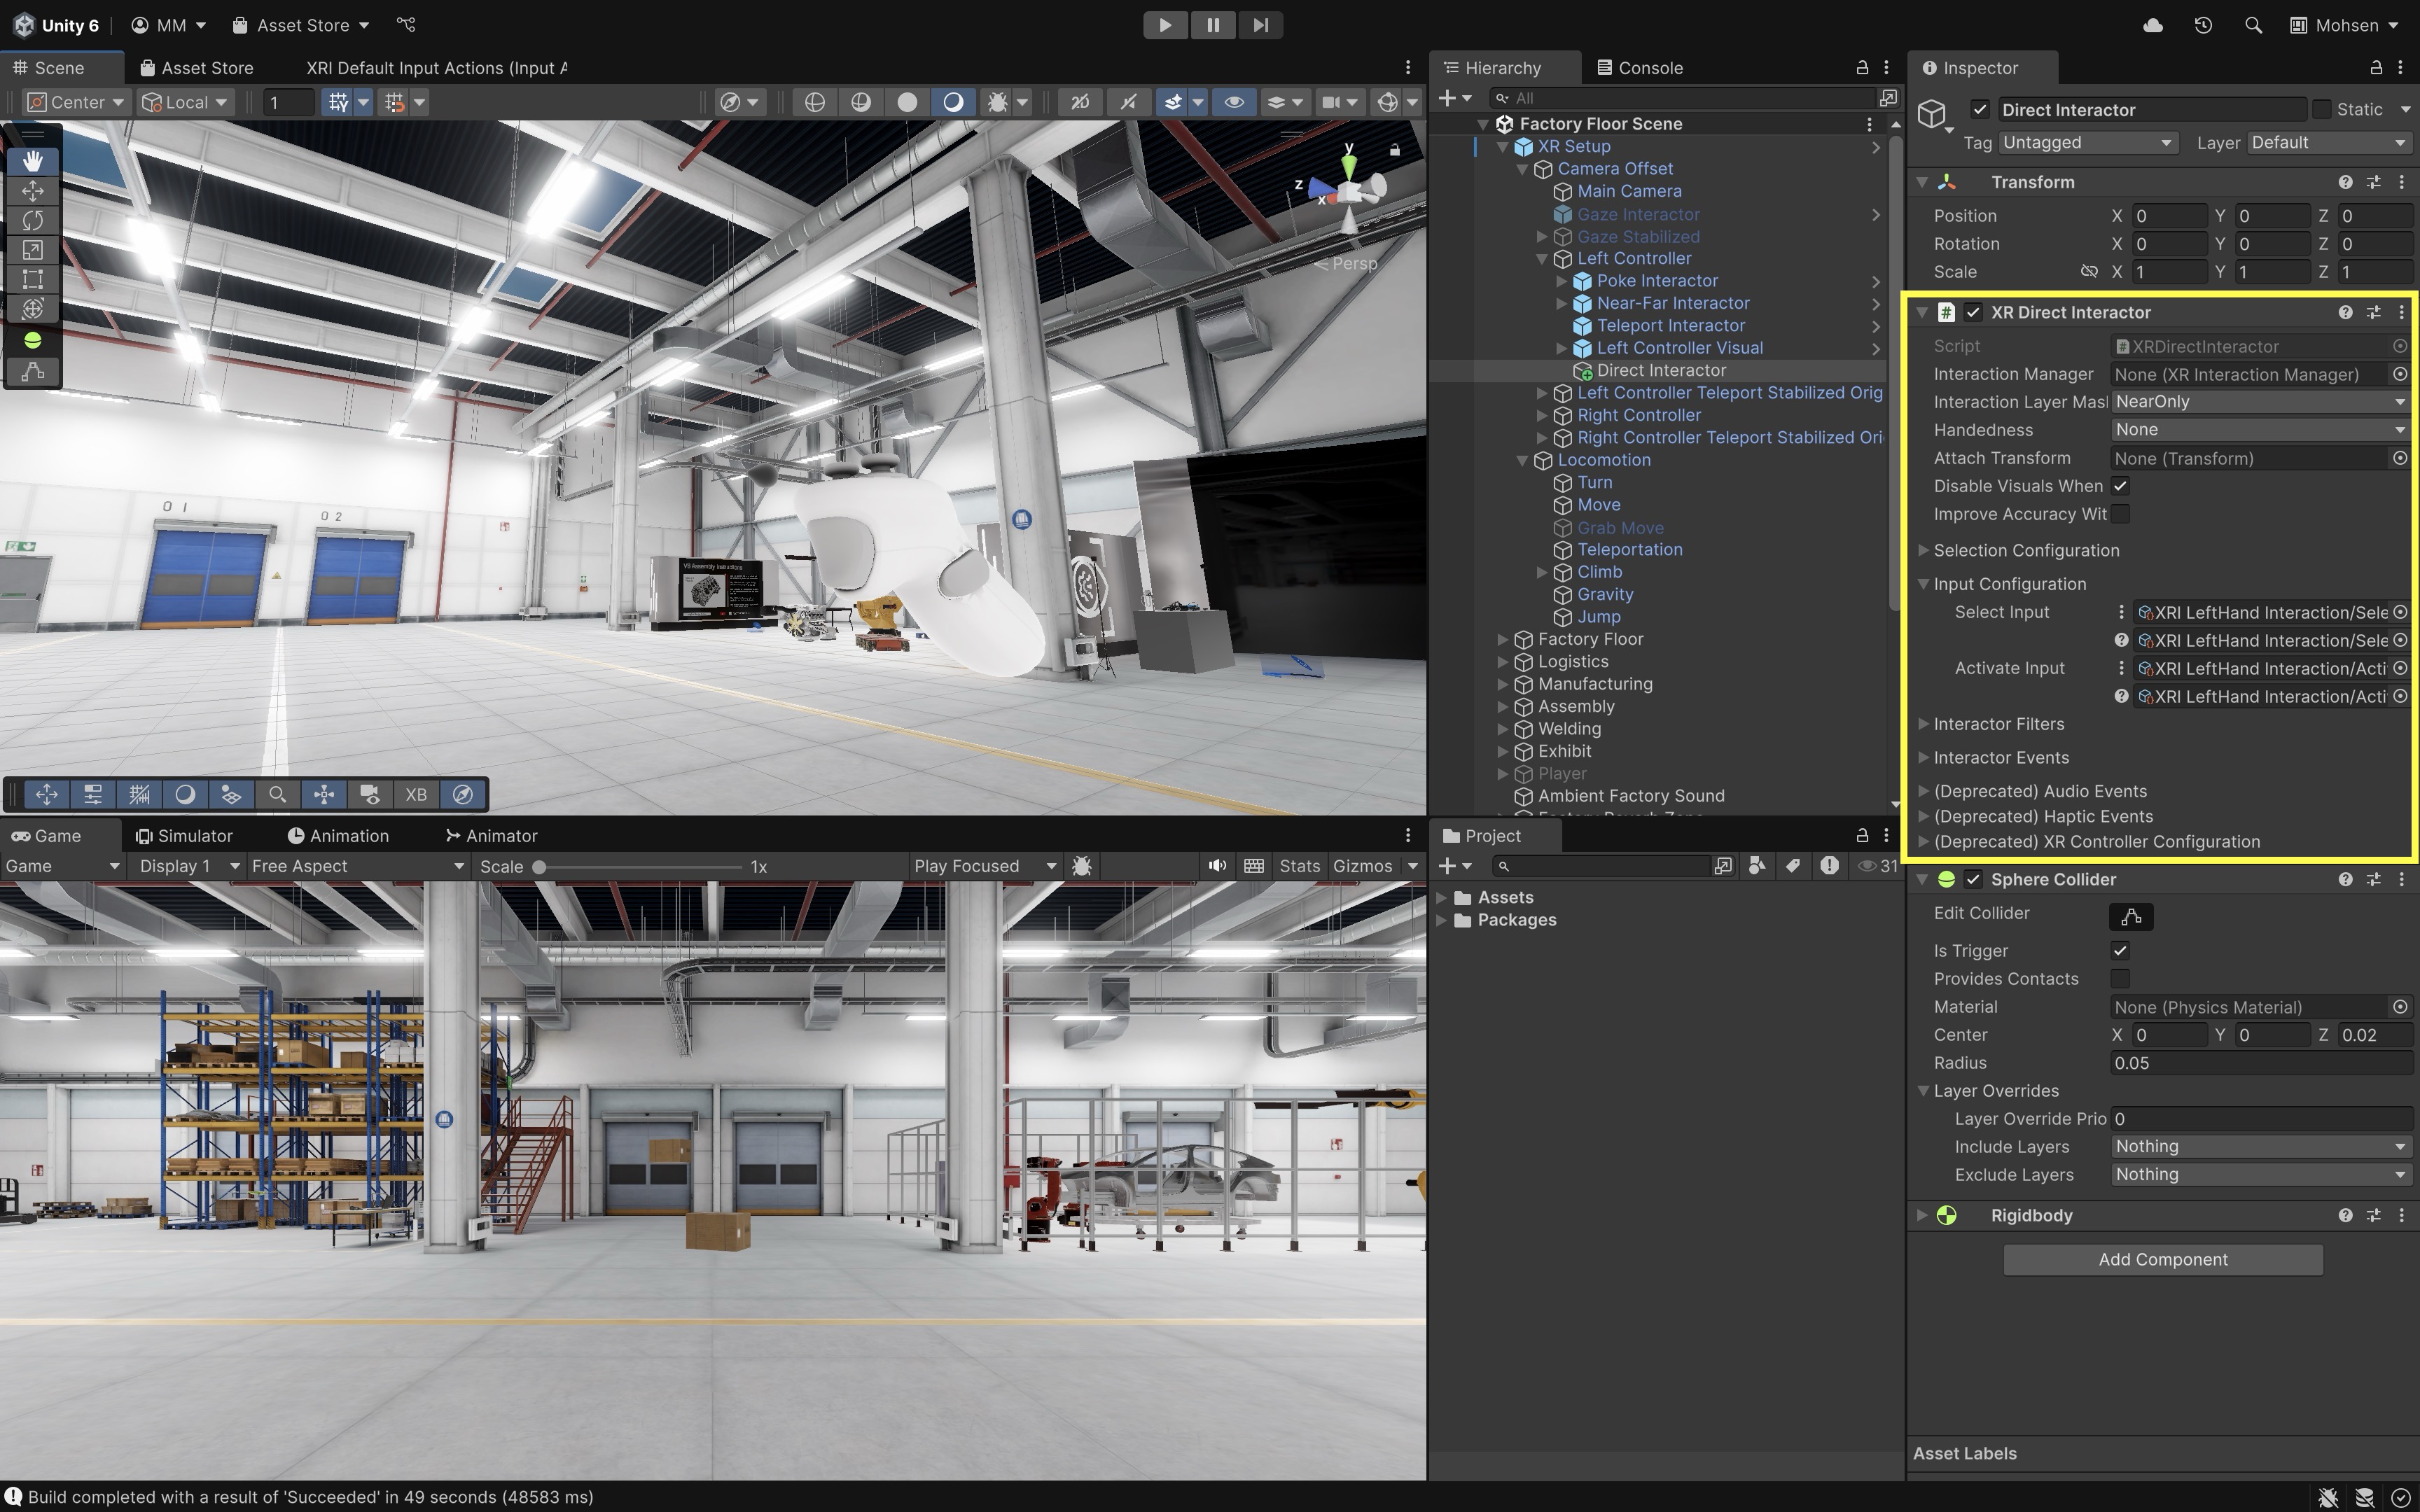
- Configure the
Left Controllerfor Near Grabbing:- In the
Hierarchy, select theLeft Controller. - Right-click on it and select
Create Empty. Rename itDirect Interactor. - Click
Add Component, search forXR Direct Interactor, and add it. - Click on the
Left ControllerGameObject. - Under
XR Interaction Group, click+. Drag theXR Direct InteractorGameObject into it. - Adjust
Interaction Override Configurationas appropriate.
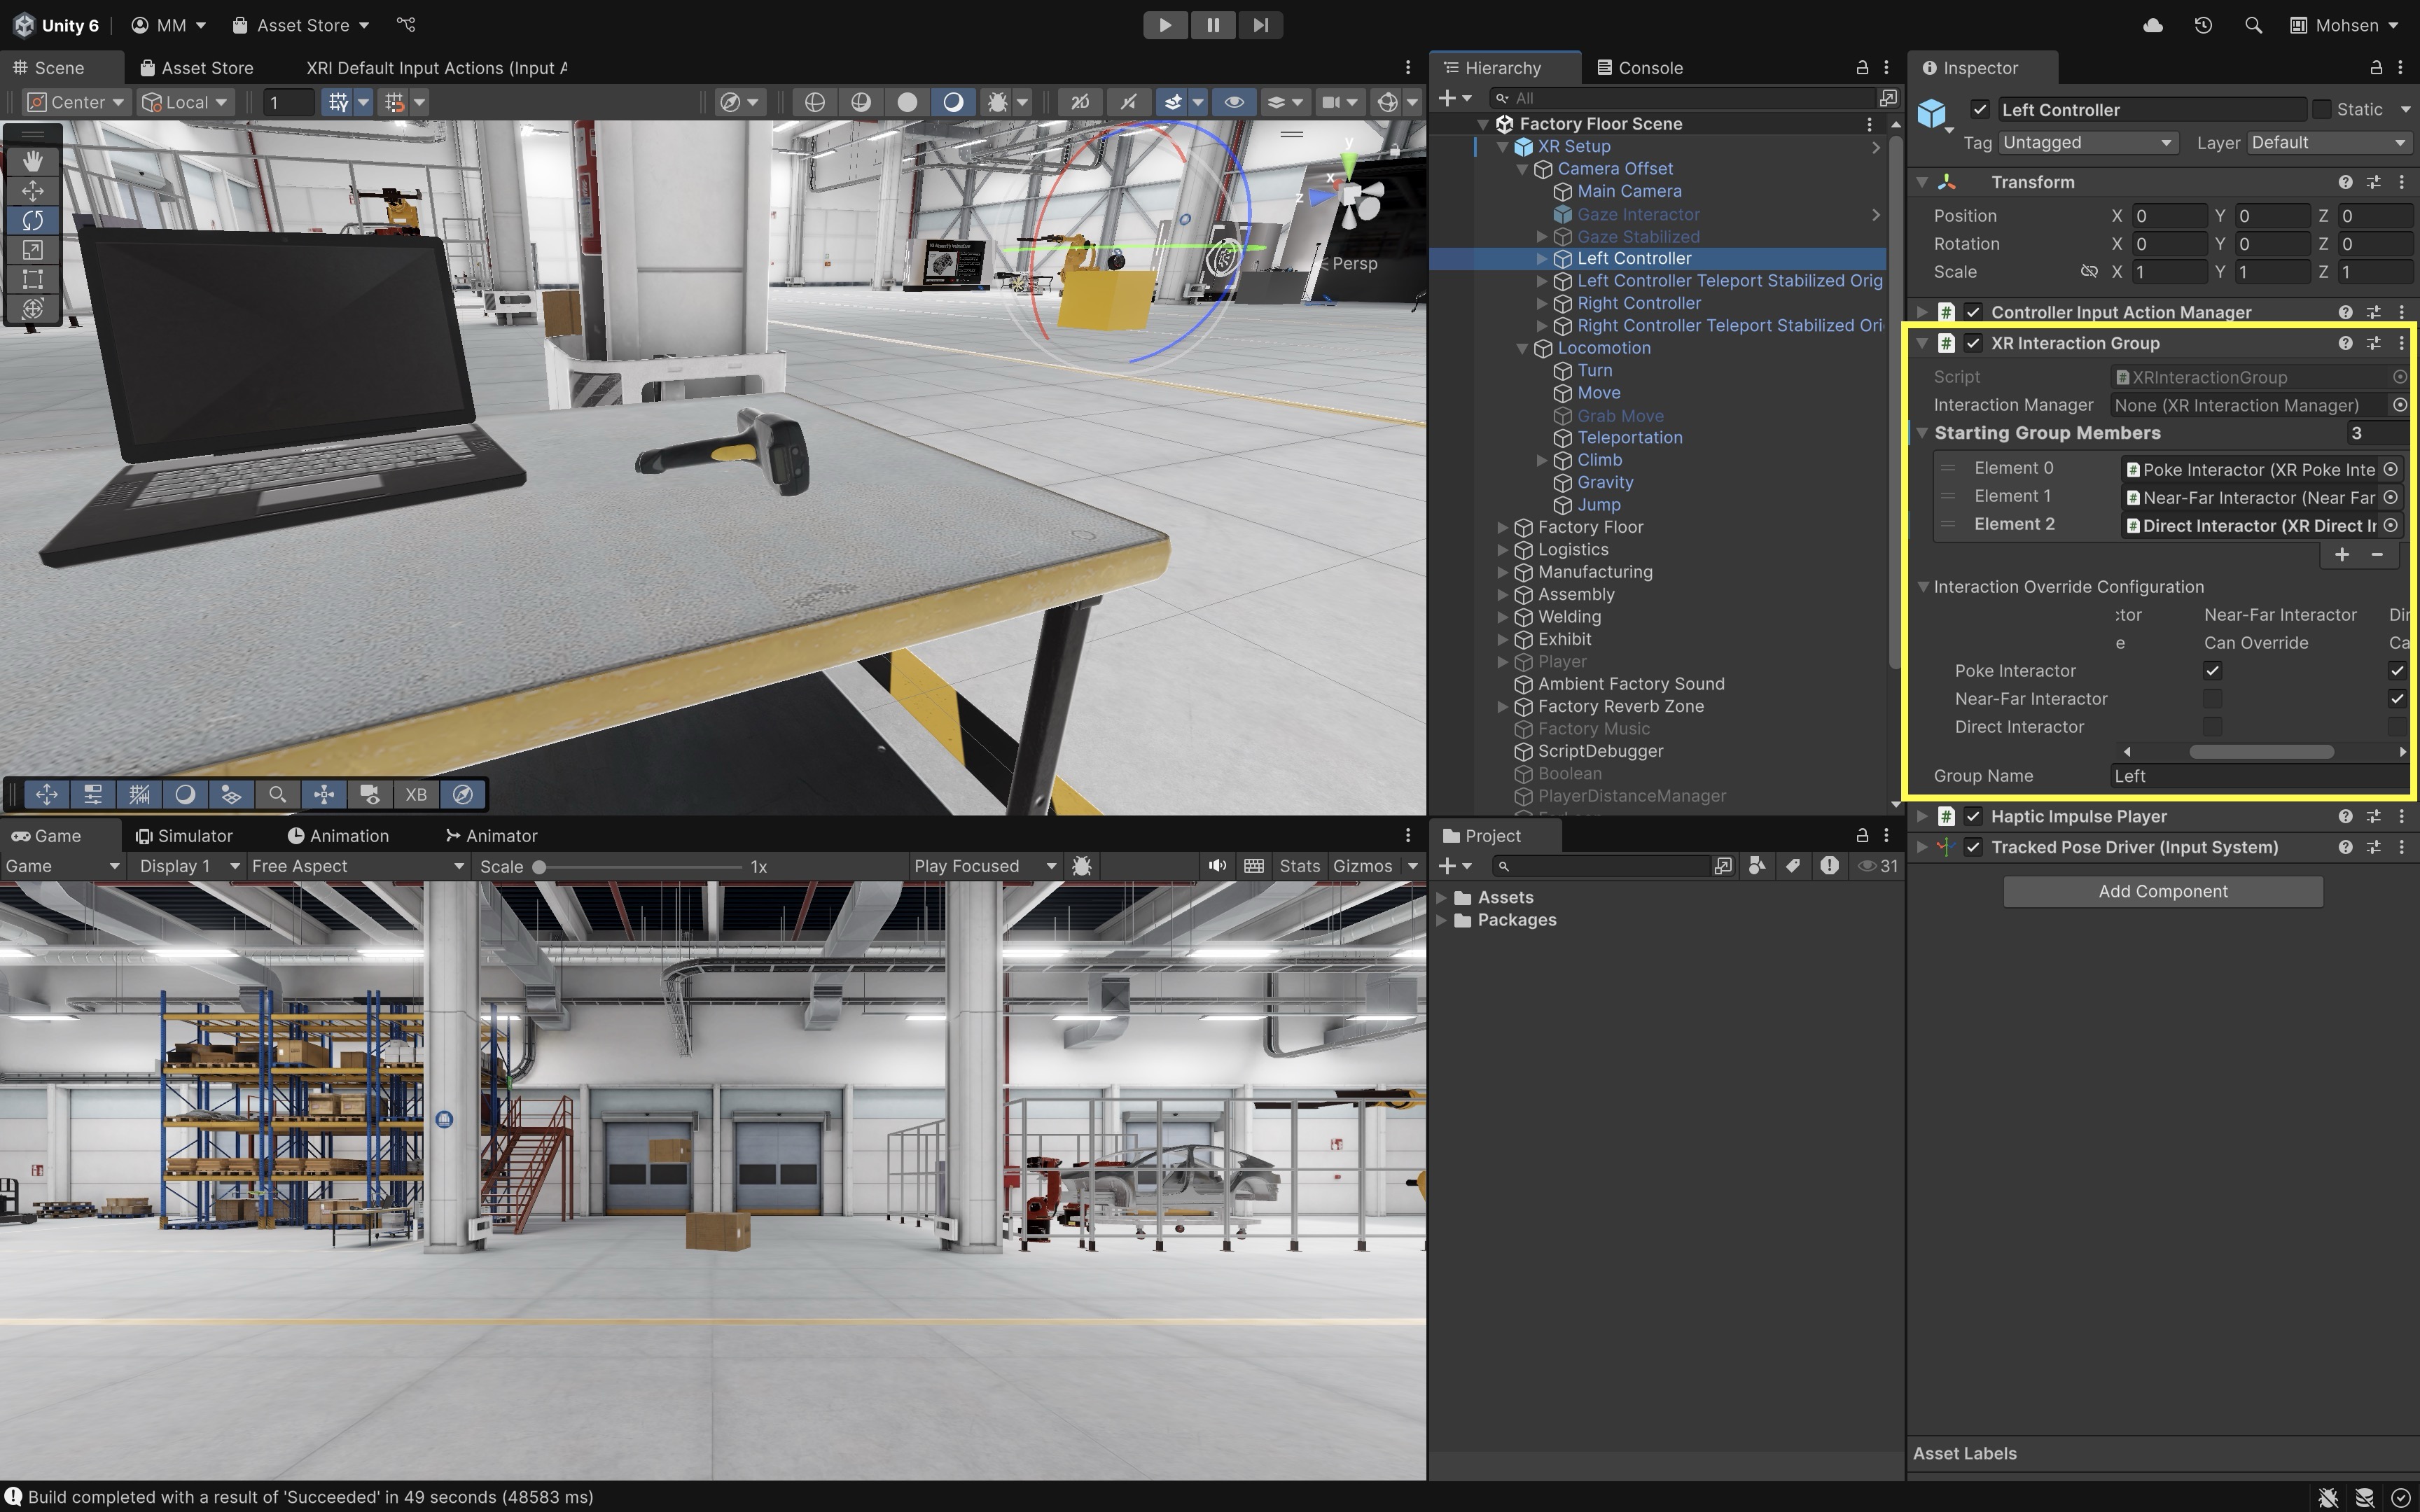
- In the
- Assign Interaction Layer:
- Create a new Unity Layer called
NearOnly(Project Settings → Tags and Layers). - On the
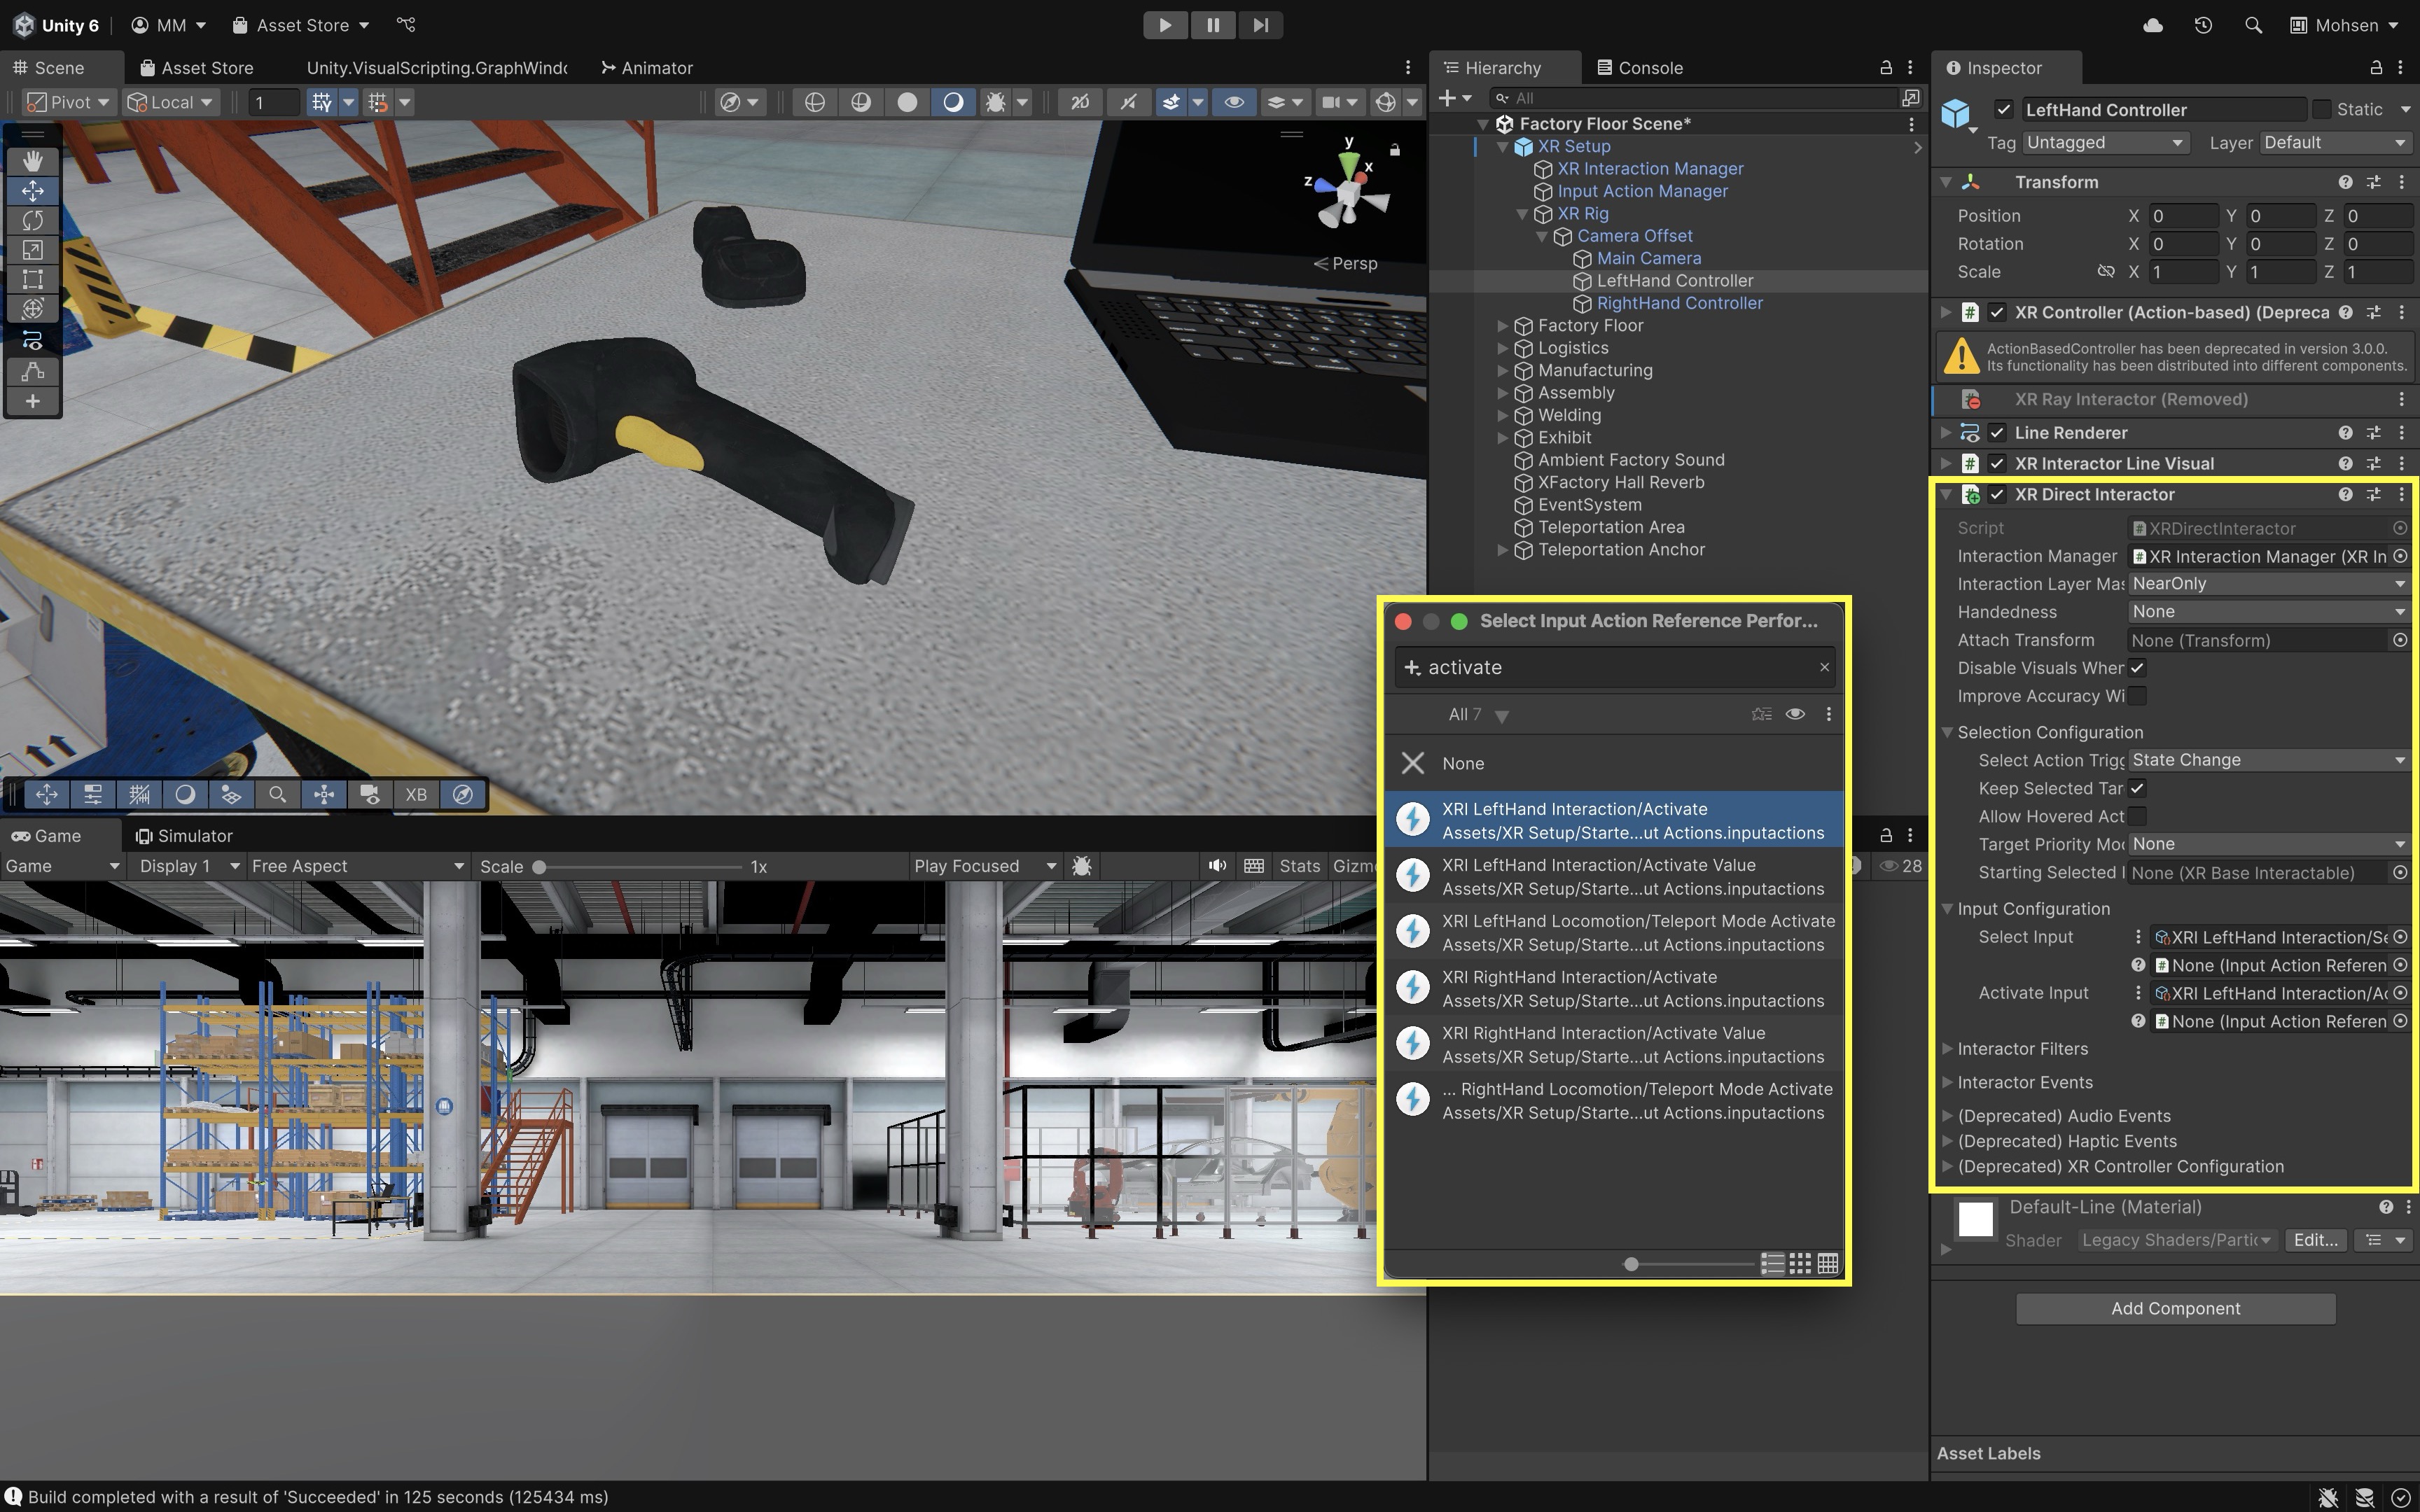
XR Direct Interactor, setInteraction Layer MasktoNearOnly. - Locate the
XR Direct Interactorinputs. - Set
Select InputtoXRI LeftHand Interaction/Select. - Set
Activate InputtoXRI LeftHand Interaction/Activate.
- Create a new Unity Layer called
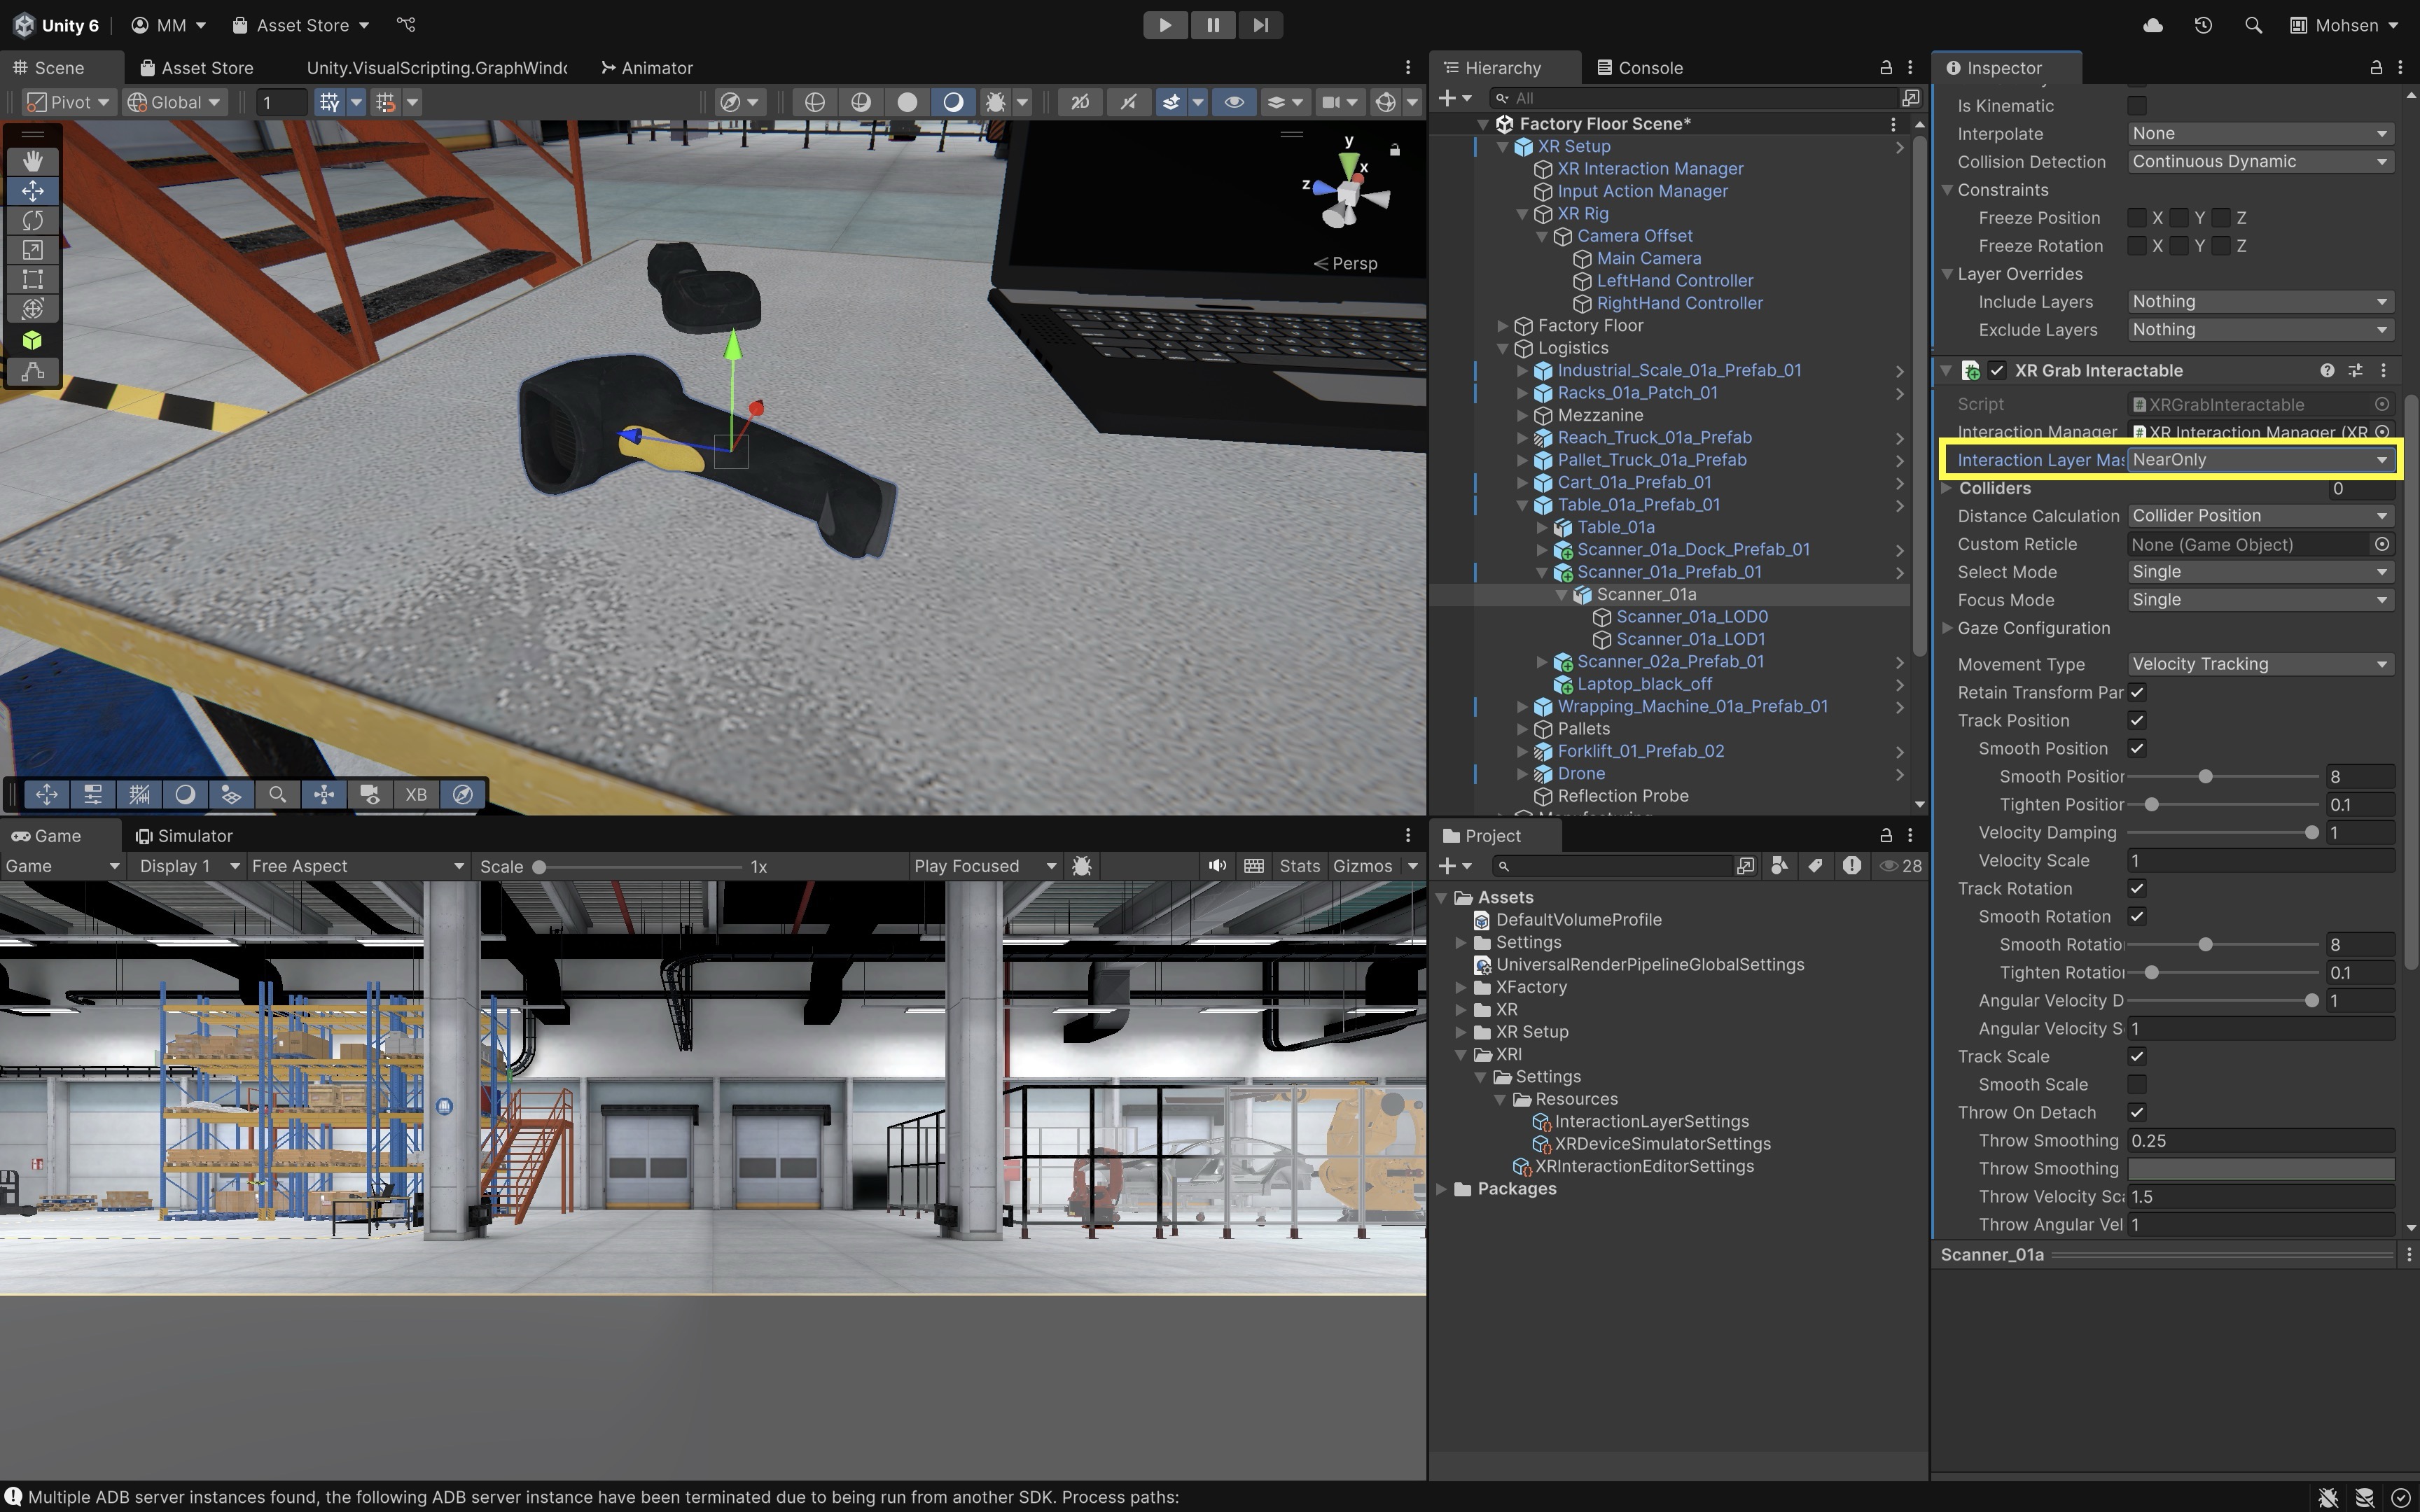
- Update the Interactable Object (Barcode Scanner):
- Select the other barcode scanner on the table (
Scanner_02a_Prefab_01) in theHierarchy. - Ensure the object has a
Rigidbodyand aCollider(Box or Convex Mesh). - Add an
XR Grab Interactablecomponent and setInteraction Layer MasktoNearOnly.
- Select the other barcode scanner on the table (
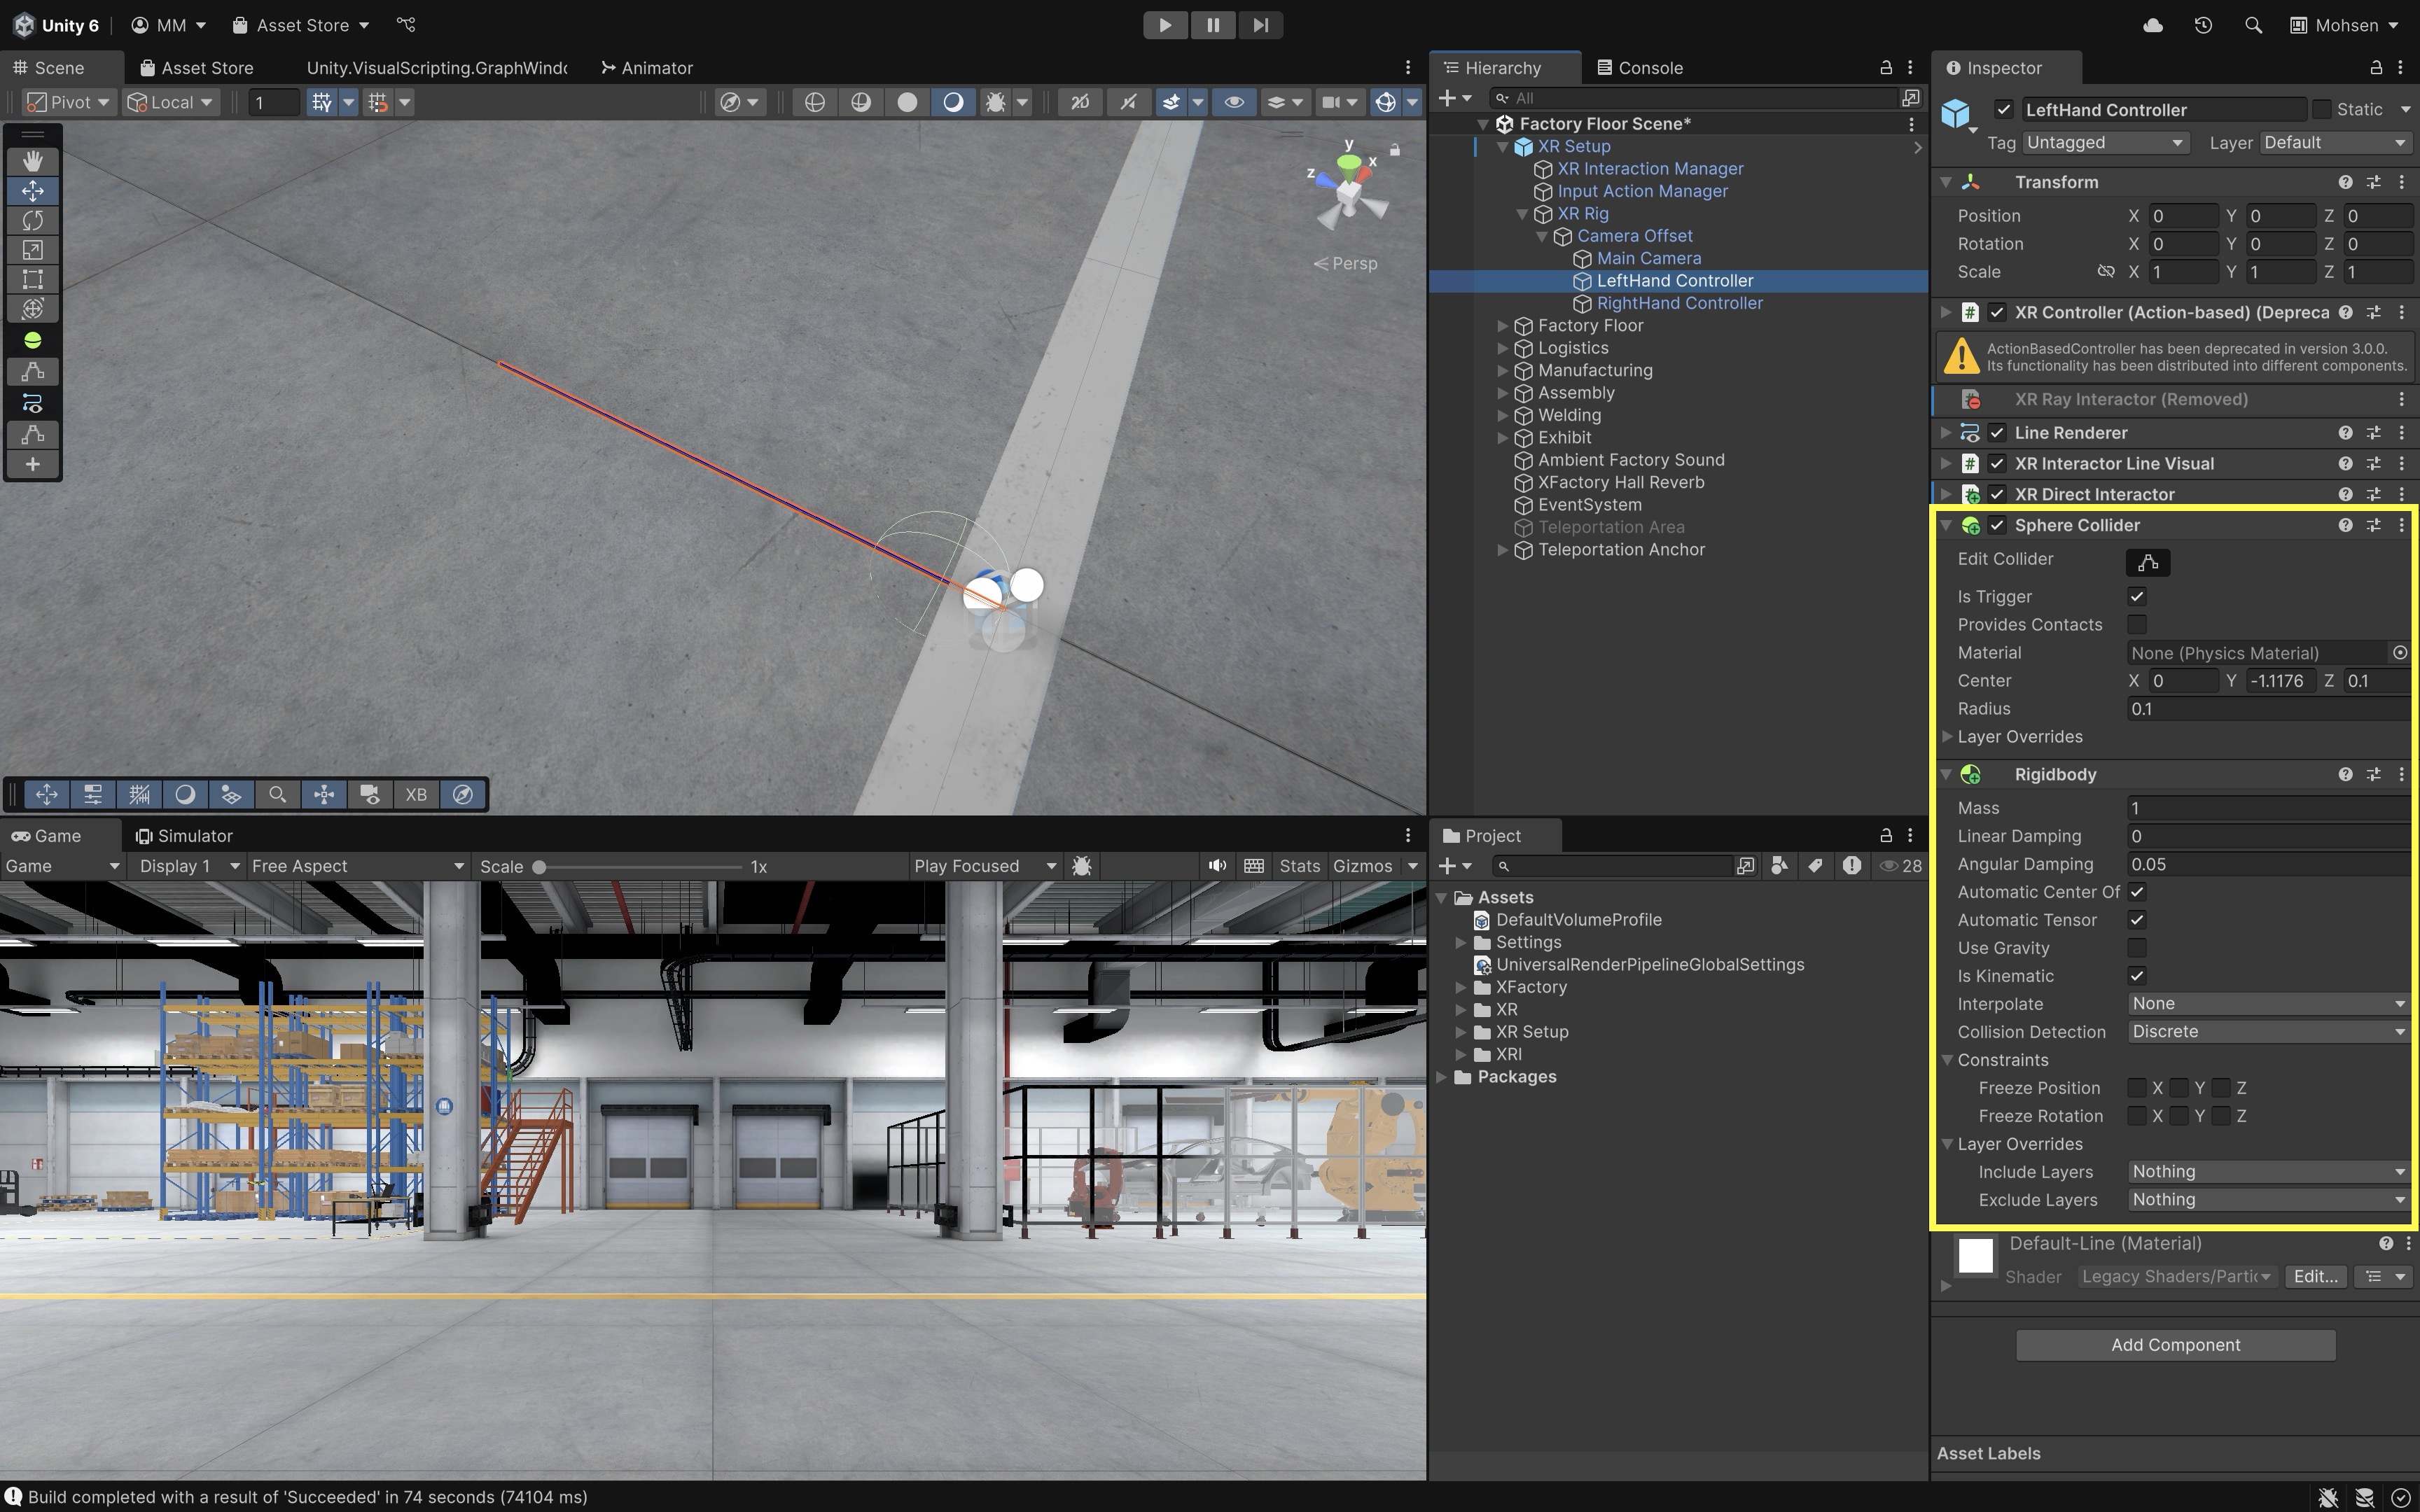
- Add a Trigger Collider (for Direct Interactor overlap mode):
- Select the
Direct InteractorGameObject under theLeft ControllerGameObject. - Add a
Sphere Collider, checkIs Trigger. - Set
Radiusto about0.05–0.1and adjustCenter(e.g.,Z = 0.02) so it sits just in front of the hand.
- Select the
- Add a Kinematic
Rigidbodyto the Controller (for trigger events):- With
Direct InteractorGameObject still selected, add aRigidbody. - Uncheck
Use Gravityand checkIs Kinematic. - This ensures reliable trigger detection without unintended physics.
- With
- Test the Interaction in Play Mode or on Device:
- On Windows, connect your Quest via Link and enter Play Mode.
- On macOS, Build & Run for Android to deploy.
- Try grabbing the barcode scanner.
- Your left hand (near-only) should grab when close.
- Your right hand (near-far-interaction-based) should not grab the scanner.
- This setup provides a clear side-by-side comparison of near-only grabbing vs. ray-based grabbing in XFactory.
Custom Grab Behavior
Fine-tuning interactions in XR goes beyond just making objects grabbable. You can control how they align with the user’s hands, how controller models behave during interaction, and how the system responds to subtle inputs. These customizations help create a polished and realistic experience—especially in environments like XFactory, where precision matters when handling tools, devices, and user interfaces.
Attach Transform
To improve the realism and ergonomics of object interaction in VR, you can define a custom attach point so that grabbed items align properly with the user’s hand. Let’s set this up for the barcode scanner in the logistics station.
- Create a Custom Attach Point:
- Right-click on the
Scanner_02a_Prefab_01GameObject and selectCreate Empty. - Rename the new child GameObject to
GripHandle. - Position
GripHandleon the grip area of the scanner (where a user would naturally hold it). - Rotate
GripHandleso that the controller will align properly with the back of the scanner. - For correct hand alignment in XR, the
GripHandleshould follow this axis convention:
- Z+ (blue): Points out the front of the scanner (in the direction of the controller’s grip).
- Y+ (green) → Points up.
- X+ (red) → Points left.
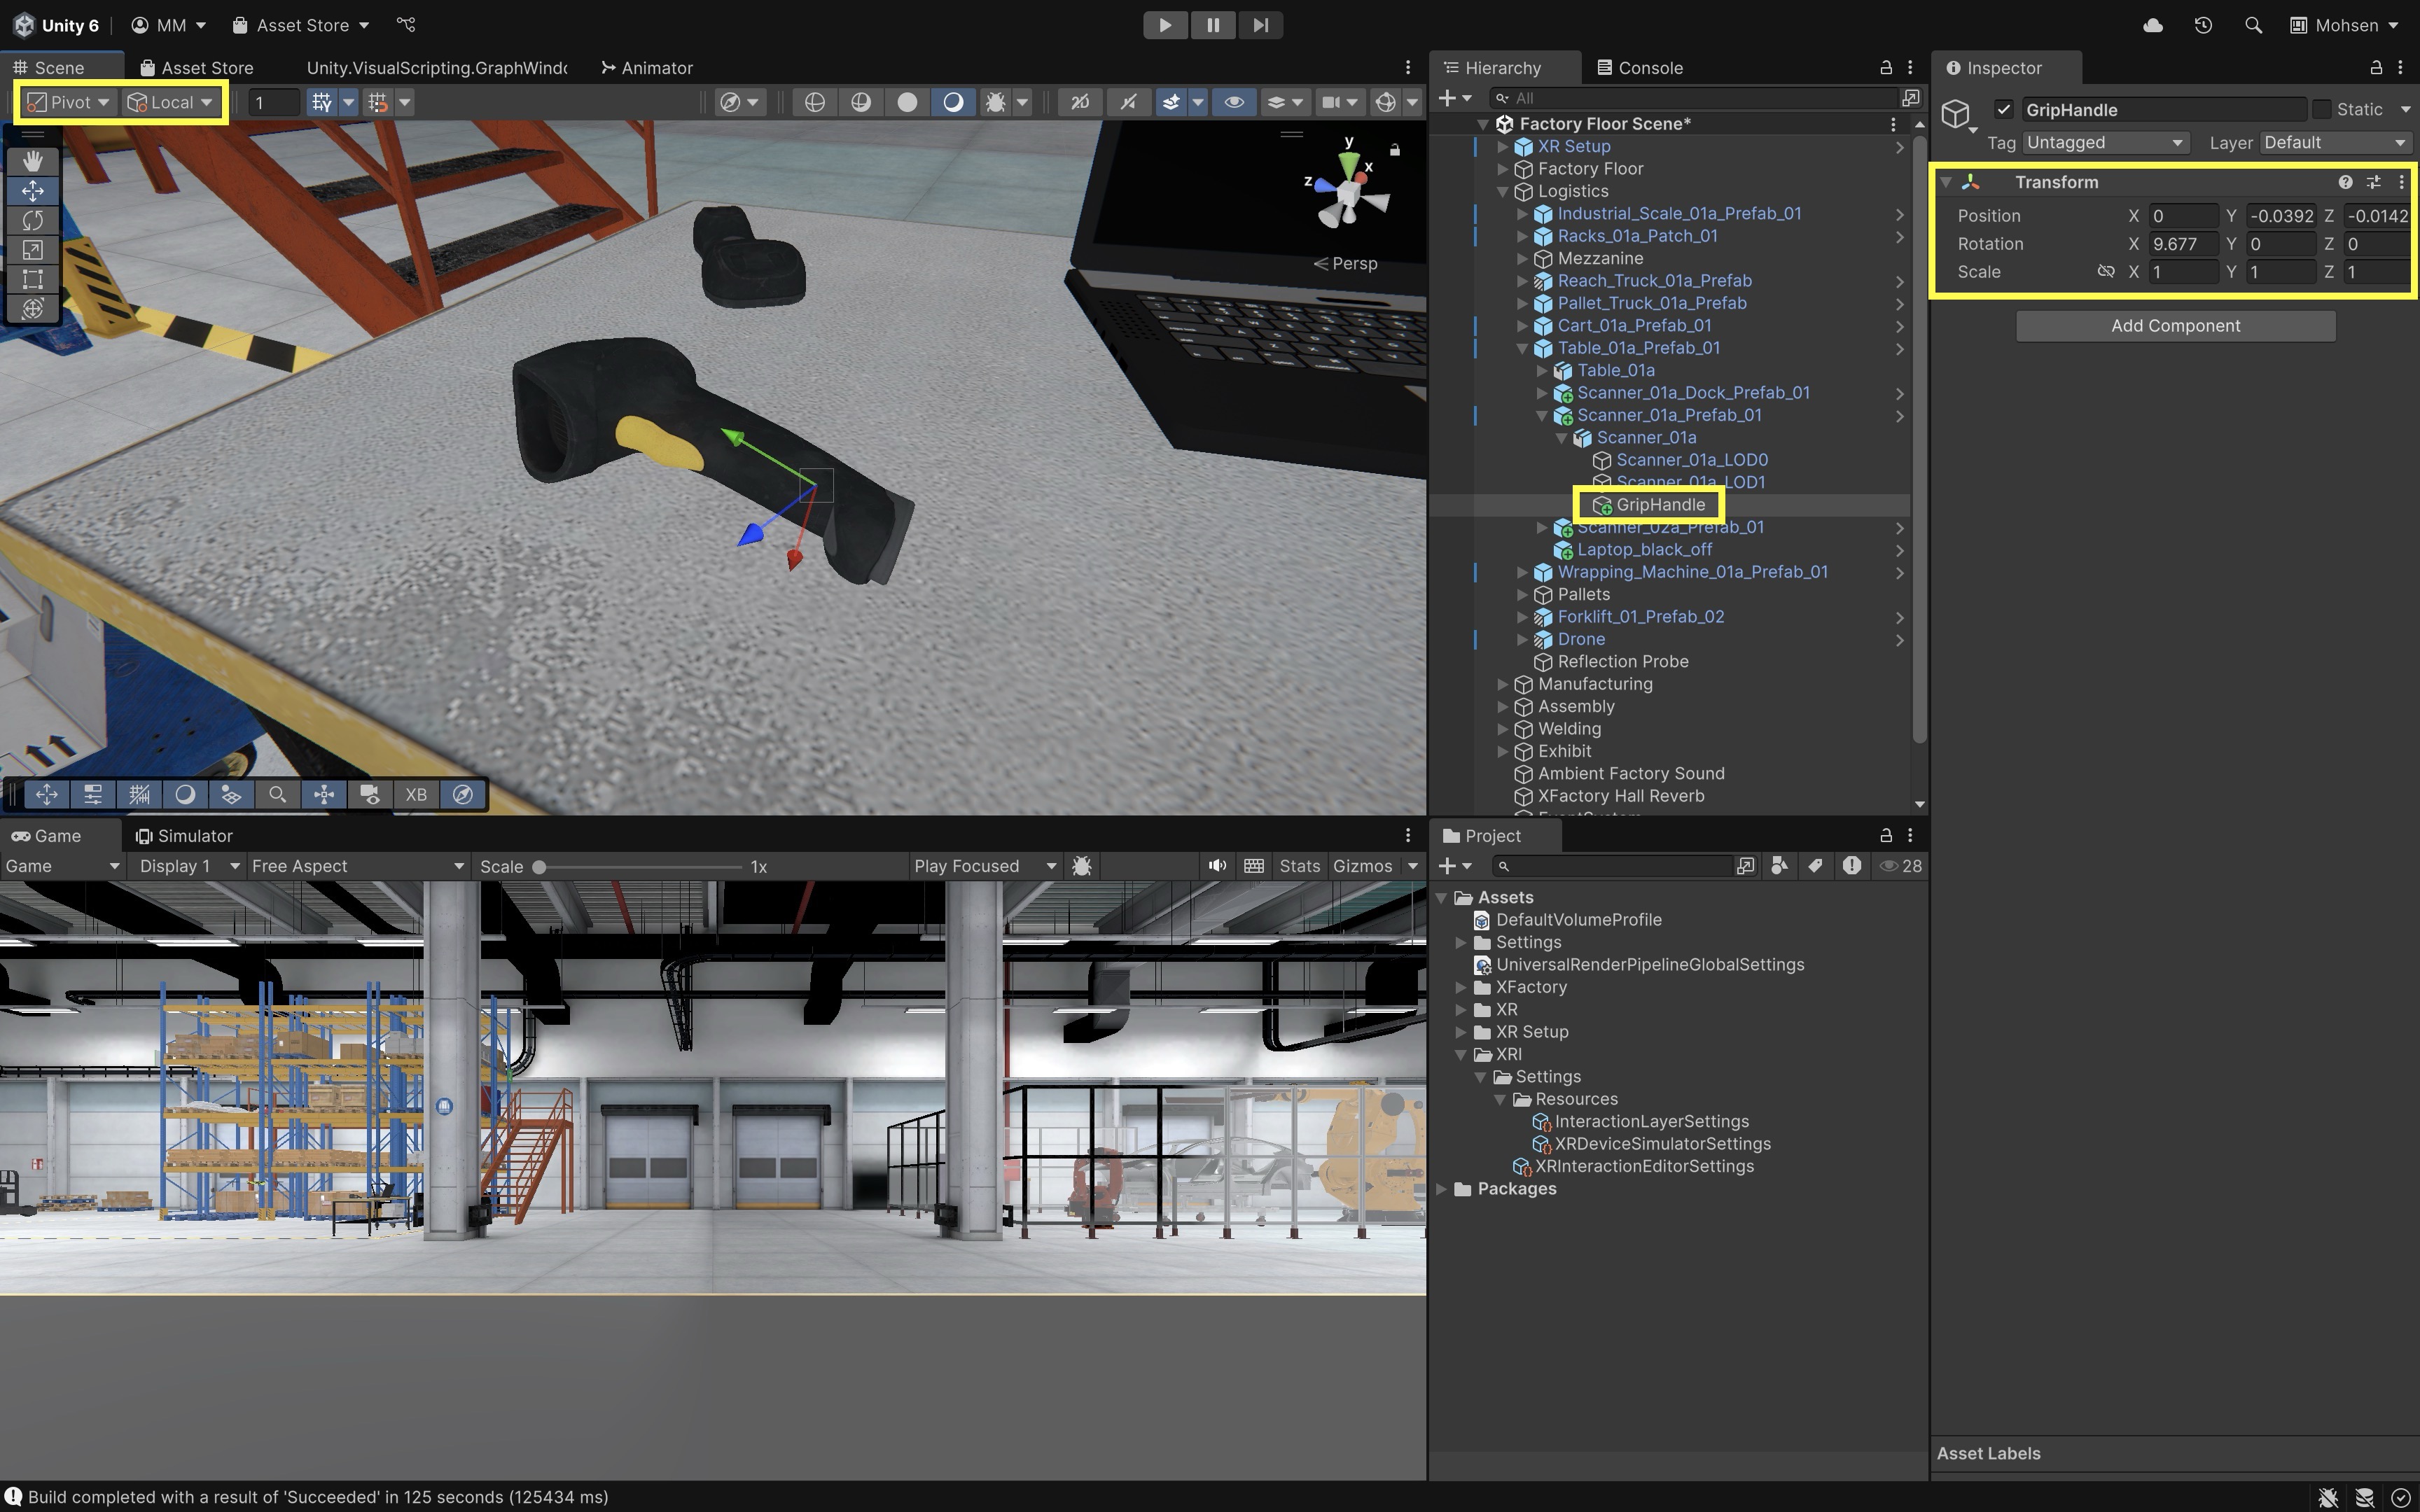
You can enable
PivotandLocalmode in Unity’sSceneview to see the local axes while adjusting the transform. Try temporarily attaching a cube toGripHandleto visualize orientation. - Right-click on the
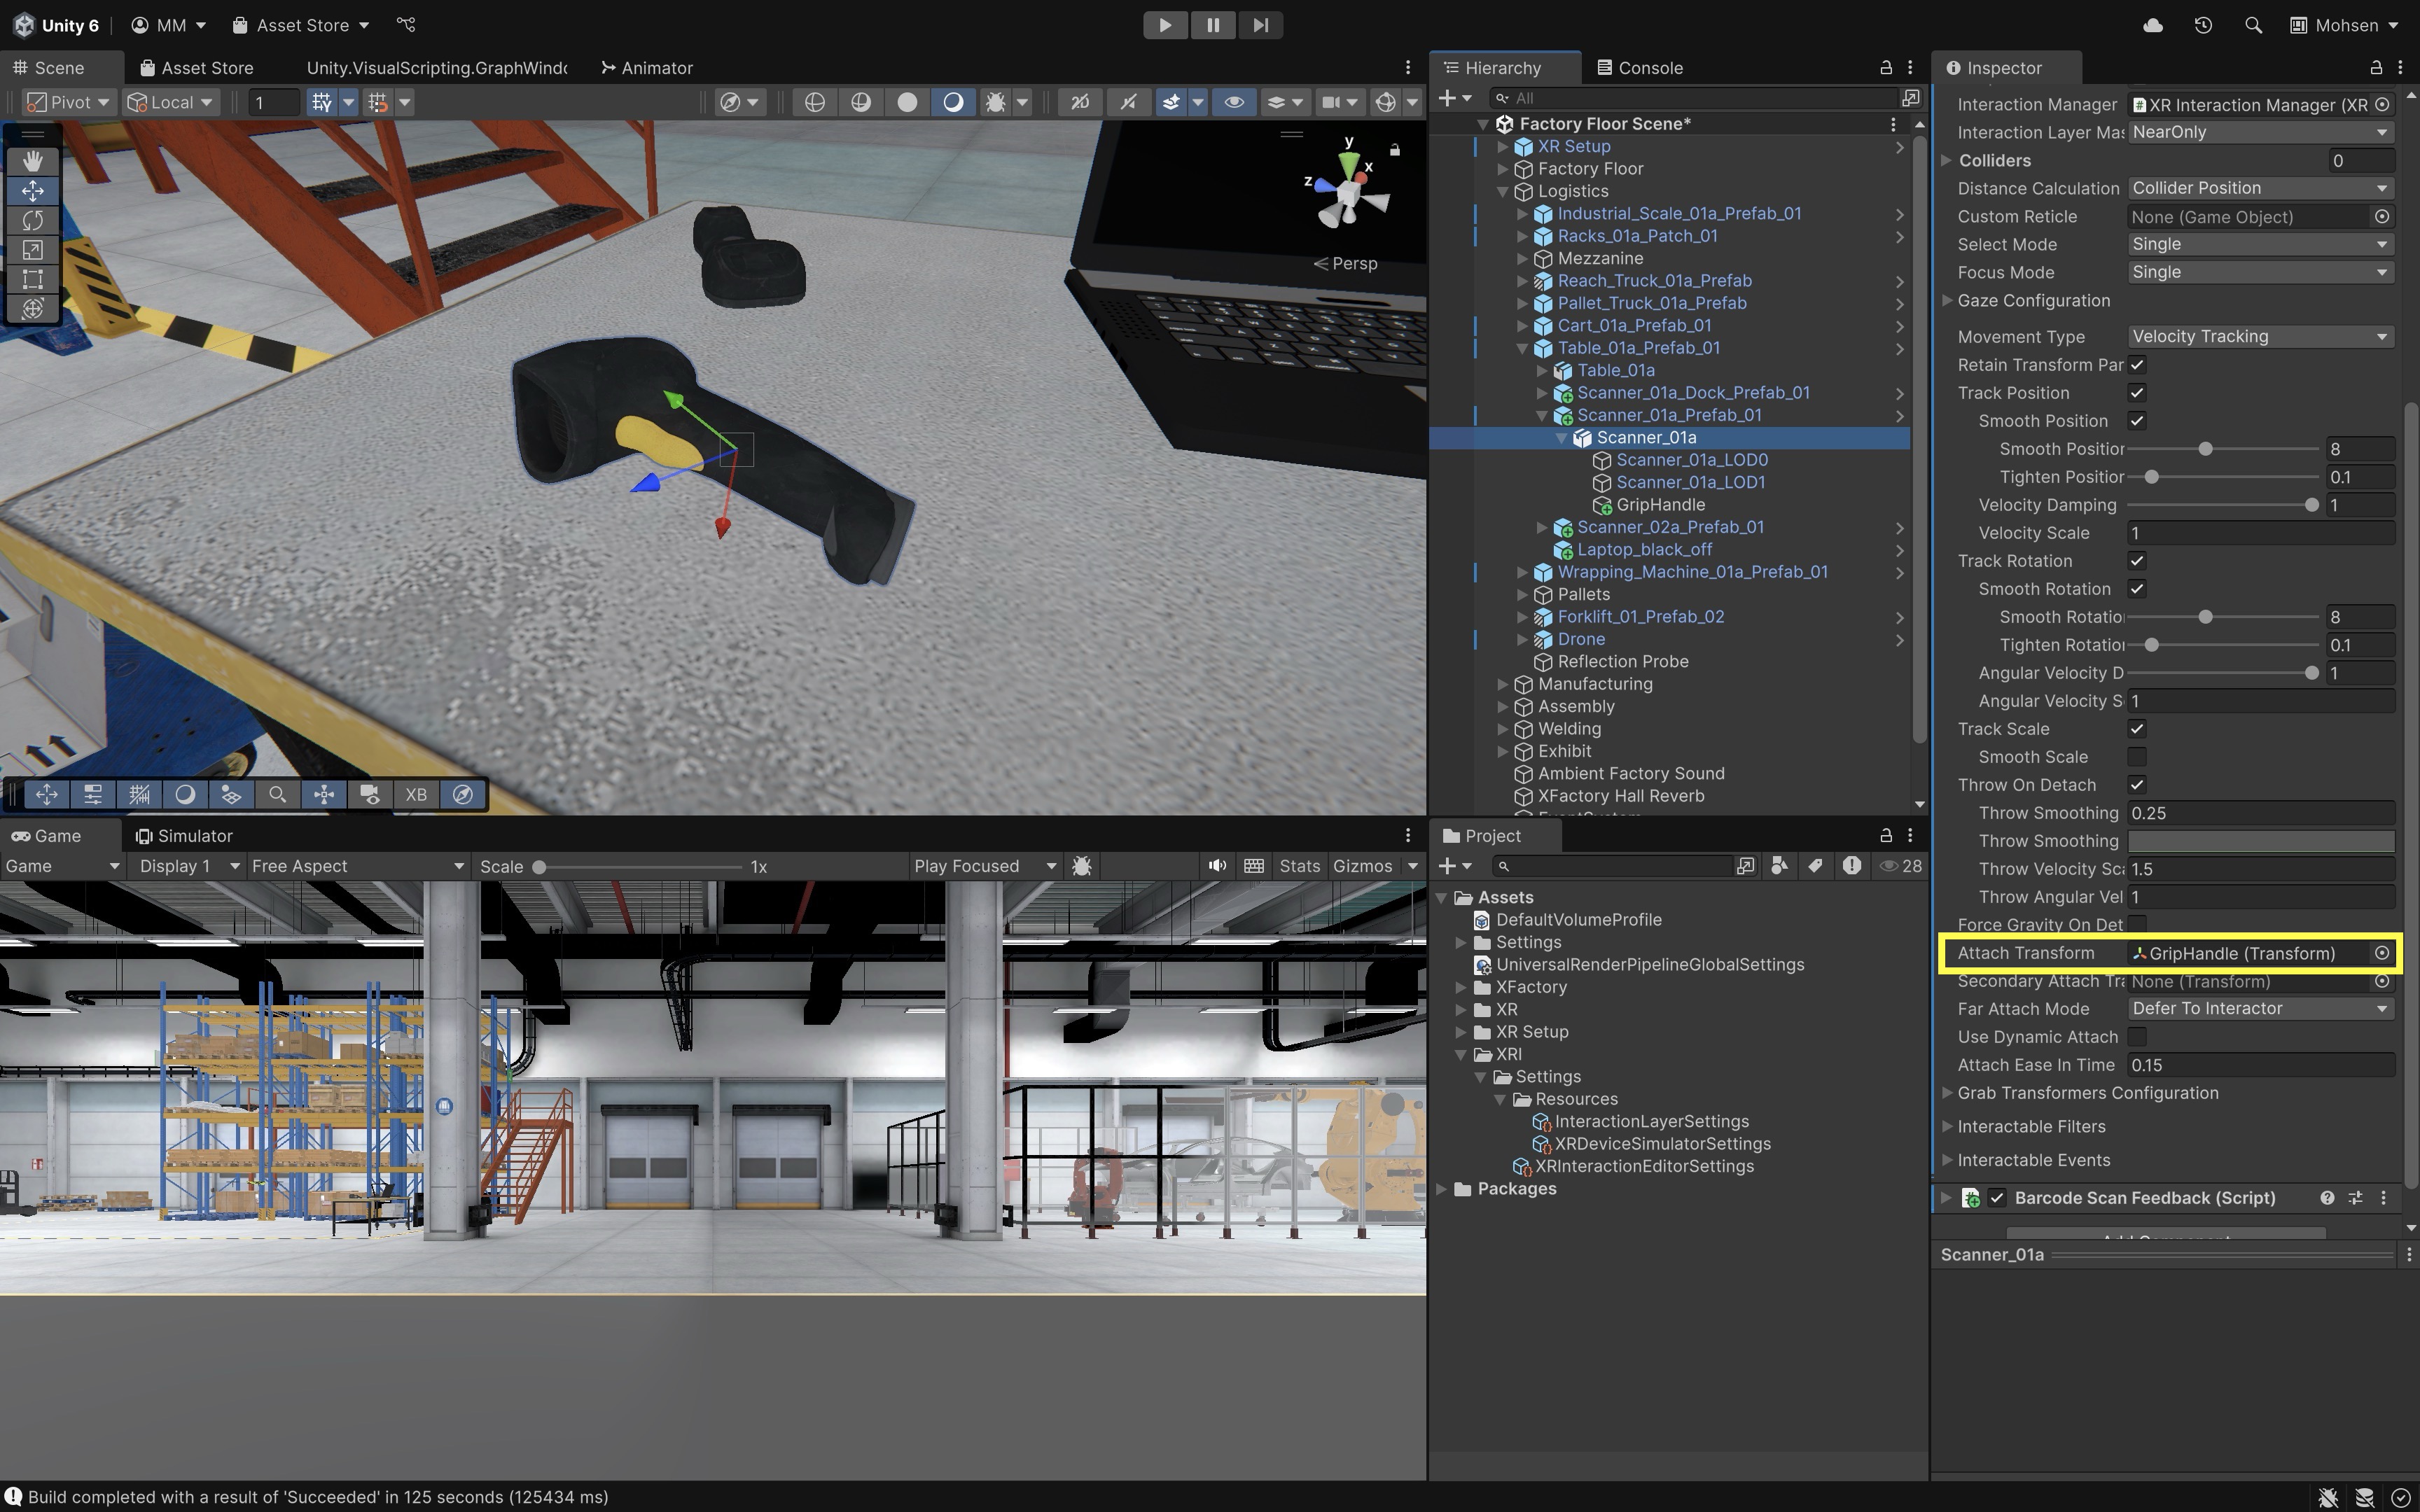
- Assign the Attach Transform:
- Select the
Scanner_02a_Prefab_01GameObject. - In the
XR Grab Interactablecomponent, drag theGripHandleobject into theAttach Transformfield.
- Select the
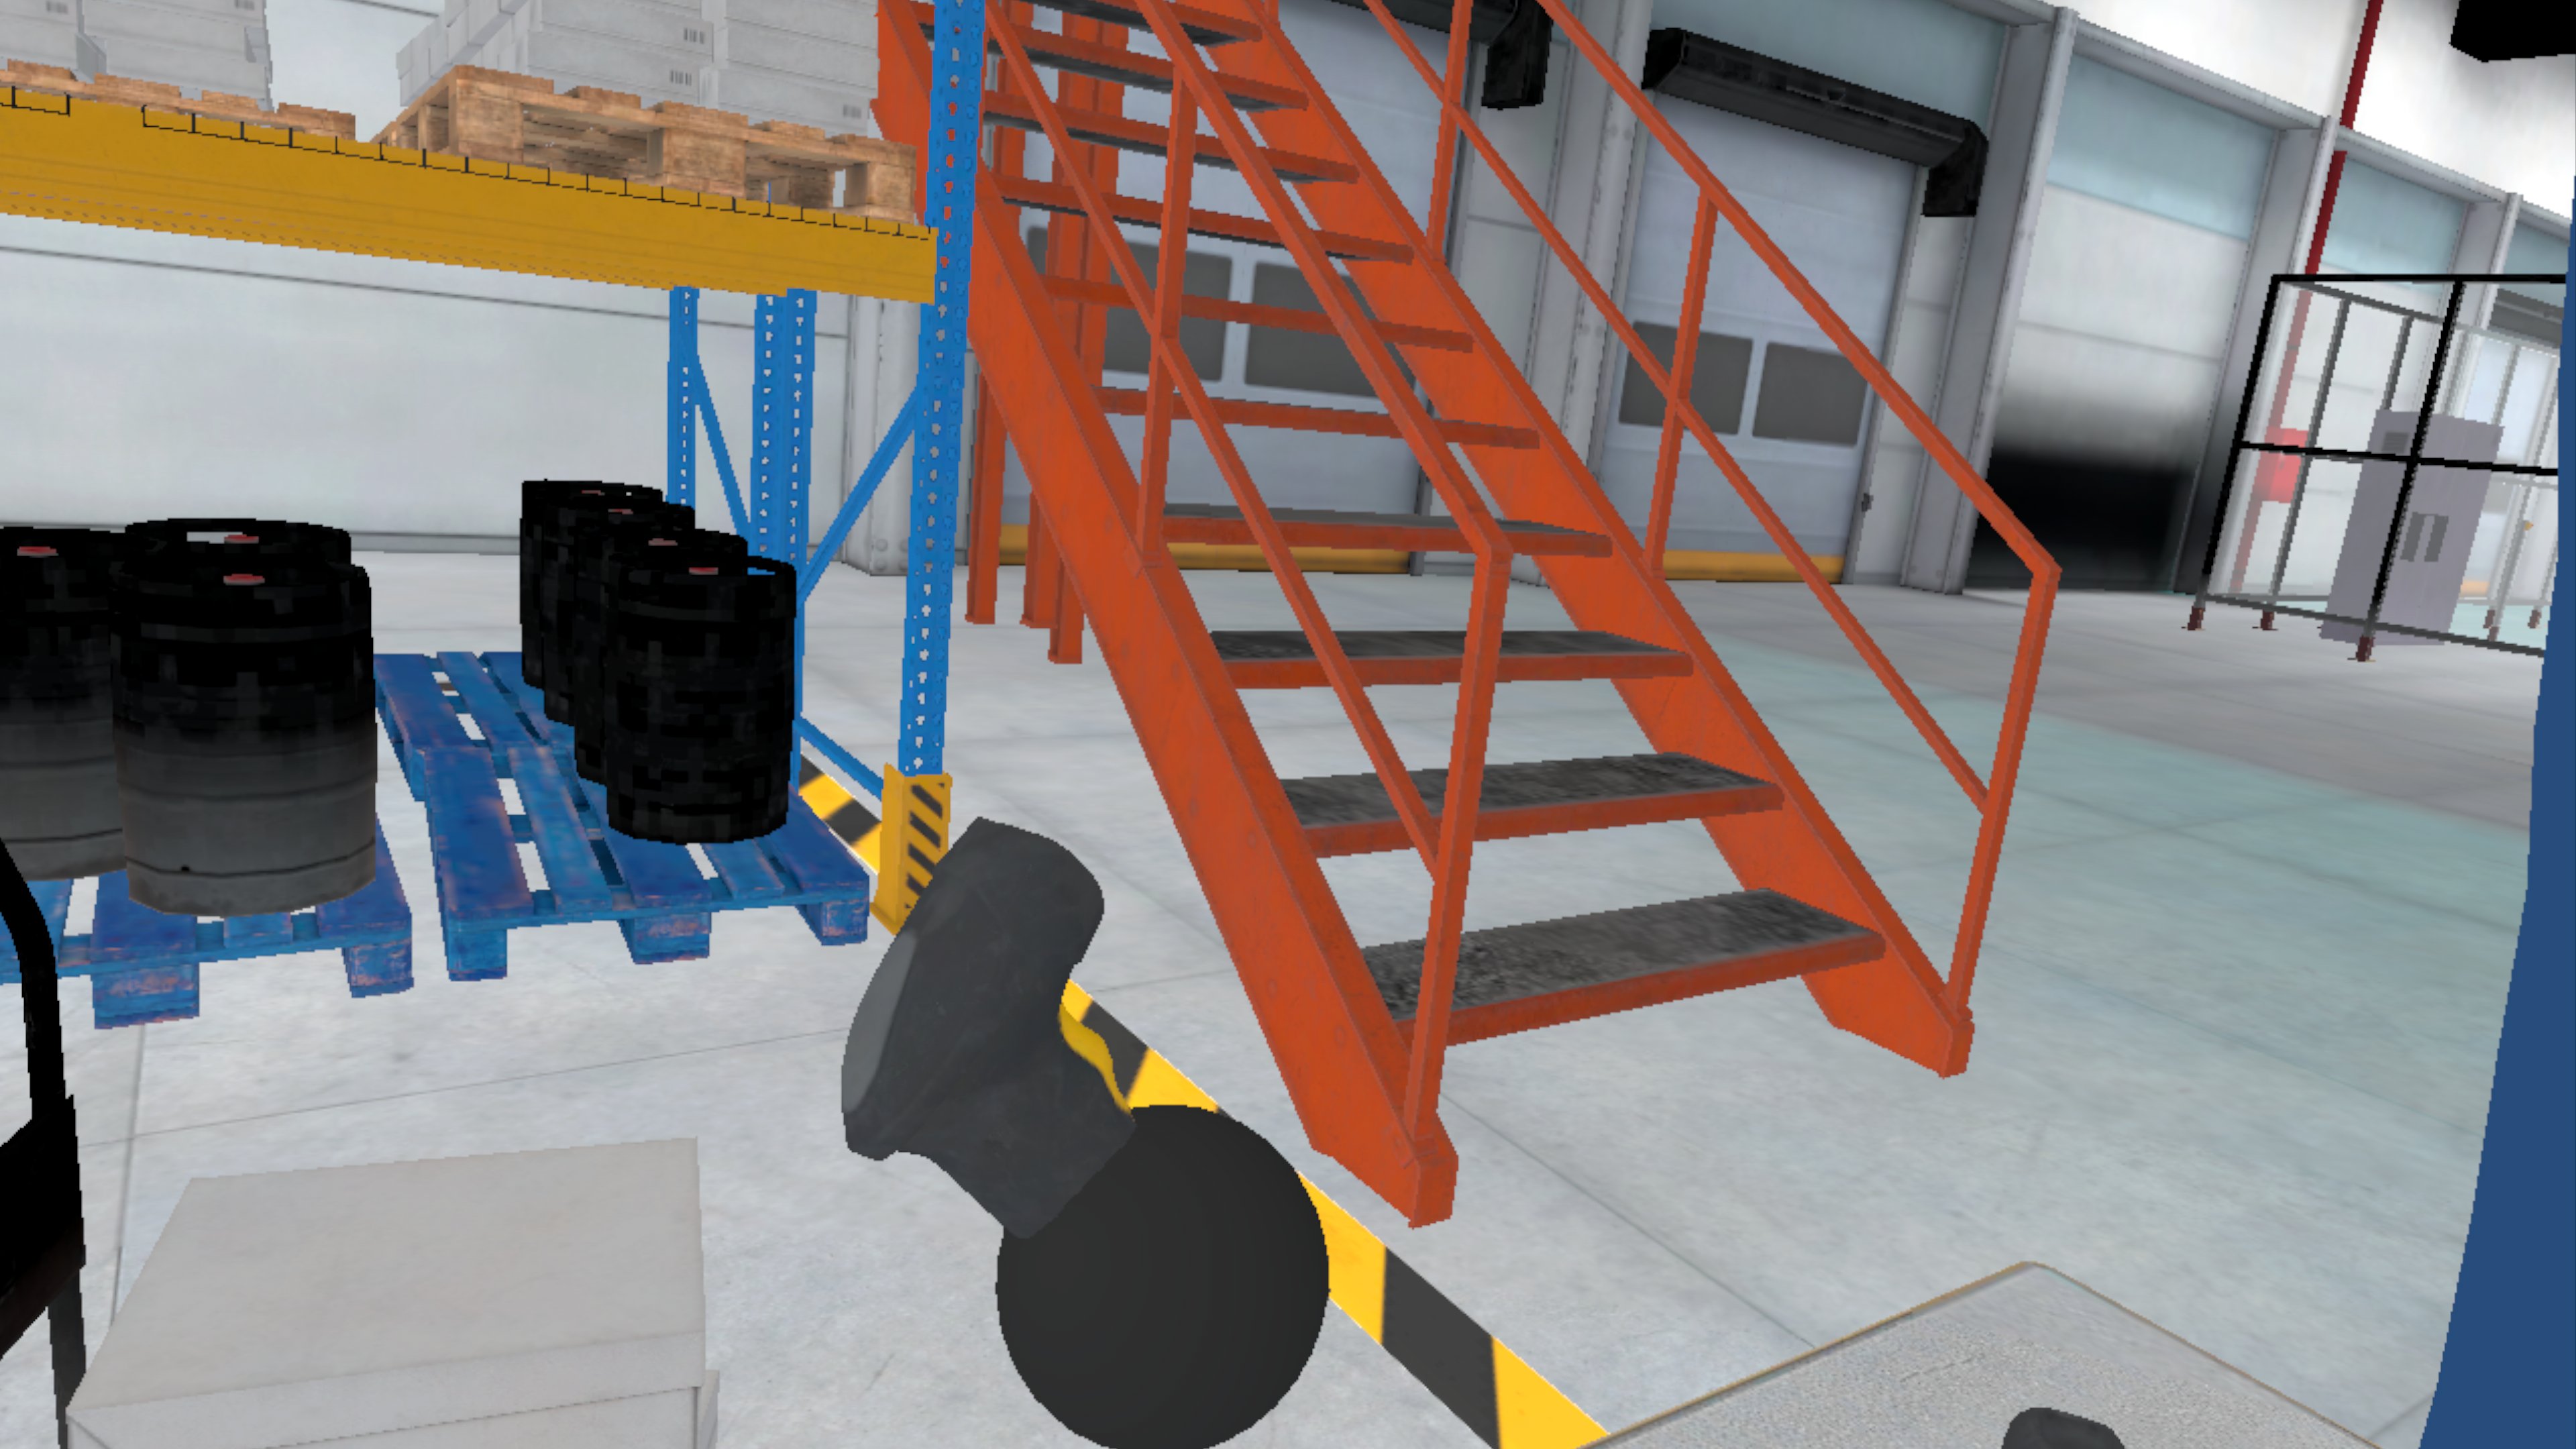
- Deploy and Test the Behavior:
- Deploy the app to your device.
- This makes the scanner sit properly in the user’s virtual hand, improving both comfort and realism when picked up.
Preserving Orientation
In VR, it is important that objects feel physically natural when picked up—whether by directly touching them with your virtual hand (direct interactor) or by pulling them in from a distance (ray interactor in a near-far setup). By default, an object may snap to a predefined orientation when grabbed, which feels unnatural. For example, a barcode scanner might twist or snap when picked up from an odd angle. To create a more immersive interaction, we can configure the system so that the object preserves its current rotation at the moment of pickup, while still following the controller afterward.
- Add/Confirm Required Components:
- Select the
Scanner_02a_Prefab_01in theHierarchy. - Add or confirm the following components:
Rigidbody: EnableUse Gravity. SetCollision DetectiontoContinuous Dynamic.XR Grab Interactable: SetMovement TypetoVelocity Tracking. EnableTrack Position,Track Rotation, andThrow On Detach.
- Select the
- Leave
Attach TransformEmpty:- In the
XR Grab Interactablecomponent, make sure theAttach Transformfield is left blank. - This prevents the object from snapping to a fixed pose when grabbed.

- In the
- Attach the Rotation-Preserving Script:
- In the
Hierarchy, select yourLeft Controller. - Attach the following script to the
Direct InteractorGameObject.
using UnityEngine; using UnityEngine.XR.Interaction.Toolkit; public class PreserveGrabRotation : MonoBehaviour { private XRBaseInteractor interactor; void Awake() { interactor = GetComponent<XRBaseInteractor>(); interactor.selectEntered.AddListener(OnSelectEntered); } private void OnSelectEntered(SelectEnterEventArgs args) { if (args.interactableObject is XRGrabInteractable grab) { var attachTransform = interactor.attachTransform; if (attachTransform != null) { // Align the attach transform to the object’s current rotation attachTransform.rotation = grab.transform.rotation; } } } } - In the
- Test the Interaction:
- Direct Grab: Reach out and pick up the barcode scanner with your hand interactor. Notice that it keeps its original orientation in your hand, without snapping to a predefined pose.
- Ray Grab: Use the ray interactor to pull in the scanner from an angle. The scanner moves toward your hand while maintaining its original rotation.
- Move and rotate your hand — the scanner follows smoothly, creating a natural, realistic feel.
- This setup ensures that whether grabbed directly or from a distance, objects behave consistently, enhancing realism in training and simulation scenarios.
While Unity’s built-in
Use Dynamic AttachwithMatch Rotationhandles most cases, the above custom script can still be useful for fine-grained control—such as applying different offsets per hand, preserving rotation only for certain interactables, mixing dynamic and fixed grips, or overriding behavior dynamically at runtime.
Best Practices
Designing effective VR interactions requires attention to user experience, technical performance, and scene structure. The following best practices will help you create intuitive, efficient, and scalable grab interactions.
UX and Realism
Focus on creating interactions that feel natural, predictable, and immersive. Well-tuned physics, object scaling, and input responsiveness are essential for reinforcing presence in VR.
-
Accurate Scaling: Always ensure that grabbable objects (e.g., tires, boxes, scanners) are modeled and scaled to real-world dimensions. Use reference tools like a “measuring stick” to compare sizes in Unity and maintain physical believability across all XFactory stations.
-
Natural Grabbing (No Attach Transform): For objects like tires, toolboxes, or assembly parts, leave the
Attach Transformfield empty on theXR Grab Interactableto allow grabbing from any position with preserved hand orientation. This technique enhances realism by mimicking how users would pick up these items in the real world. -
Smooth but Responsive Behavior: Enable
Smooth PositionandSmooth Rotationon interactables, but fine-tune their values (e.g., 0.2–0.4) to prevent laggy movement or jitter. This is especially important when handling heavy tools (like a welding torch) or delicate items (like a headset in the exhibit station). -
Feedback and Clarity: Reinforce grab actions with subtle audio cues, haptic feedback (if supported), and visual indicators. For example, when a user picks up a barcode scanner, a gentle beep can signal readiness—supporting user confidence and immersion.
Performance Optimization
Smooth and stable performance is crucial, especially on mobile VR platforms (e.g., Meta Quest). Optimize physics and visuals to maintain low latency and high frame rates during all grab interactions.
-
Simplified Colliders: Use primitive colliders (e.g.,
Box Collider,Capsule Collider) instead ofMesh Colliderwherever possible—particularly for frequently grabbed items like boxes, tools, or drone parts. Simplified colliders drastically reduce the overhead of physics calculations. -
Efficient
RigidbodySettings: For objects with complex interactions (e.g., assembly parts that can be thrown or placed in sockets), adjustRigidbodyparameters mindfully. Set appropriatemassfor realism (heavier for engine parts, lighter for handheld tools). UseContinuous Dynamiccollision detection to prevent tunneling. Adjustdragandangular dragto simulate material friction or air resistance. -
Object Pooling for Interactables: When using repeatable objects (e.g., boxes in Logistics or printed parts in production), implement pooling systems to reduce instantiation cost and garbage collection spikes during gameplay.
Scene Organization
Structured scenes improve efficiency and ensure consistent workflows and easier troubleshooting.
-
Clean Hierarchy Structure: Group related objects under meaningful parent GameObjects (e.g.,
AssemblyStation/Tools,LogisticsStation/Interactables). This organization speeds up navigation, testing, and prefab modifications. -
Consistent Naming Conventions: Name GameObjects, prefabs, and scripts with clear, descriptive labels (e.g.,
Tire_Assembly,Box_Logistics_A,Scanner_UI). Avoid generic names like “Cube” or “Object001”. -
Logical Layer and Tag Usage: Define interaction-specific layers (e.g.,
Grabbable,UI,MachineOnly) and use tags to distinguish object roles (e.g.,Tool,SocketTarget,Fragile). This practice allows for precise control over interaction filters, collision handling, and logic in your code. -
Prefab Modularity: Turn frequently reused items (e.g., tools, teach pendants, screens) into modular prefabs with configurable grab settings. This allows you to reuse and adjust objects across multiple XFactory stations without duplicating logic or assets.
Key Takeaways
Grabbing objects in VR with Unity’s XR Interaction Toolkit centers on effectively configuring the XR Grab Interactable to balance realism, responsiveness, and user comfort. By understanding and applying movement types like velocity tracking for natural throwing, kinematic for precision control, and smoothing for tactile fidelity, developers can create interactions that feel intuitive and immersive. Features such as ray and near grab modes, custom attach points, preserved object rotation, and well-integrated feedback (audio and haptics) enhance realism and usability, while best practices in scaling, collider simplification, and scene organization ensure both performance and maintainability. Together, these approaches make VR object interaction both technically robust and engaging for the user.