C3. Collections & Object‐Orientation

Learning Outcomes
- Explain what collections are and their role in Unity development. Before class, read about arrays, lists, dictionaries, and iterators to understand their purposes without worrying about full syntax details yet.
- Create and iterate through arrays in Unity C#. In your prep, build a single-dimensional array and loop through it with
fororforeach, then skim examples of multidimensional and jagged arrays to imagine potential uses.- Manipulate and access data in lists. Ahead of the session, work with a
List<T>to add, remove, and sort items, check itsCountproperty, and practice iterating with bothforandforeach.- Use dictionaries for key–value data storage. As part of your preparation, make a dictionary, populate it with entries, access values by key, and test
TryGetValue()—focusing on when dictionaries outperform lists.- Apply object-oriented programming concepts in Unity. Prior to class, review abstraction, encapsulation, inheritance, and polymorphism, and think about how these principles map to Unity components in XR contexts like robots, sensors, or machines.
What Is a Collection?
Collections are essential tools in C# programming, especially when developing interactive and data-intensive applications in Unity. They allow you to group, manage, and manipulate sets of related objects. A solid understanding of collections is critical for managing data in Unity. Whether you’re working with static arrays, dynamic lists, dictionaries, or custom iterators, the right collection can make your code more efficient and easier to manage. At its core, a collection is a data structure designed to store multiple items. C# provides a variety of collection types that you can use based on your needs:
- Indexable Collections: Some collections (like arrays and generic lists) allow you to access elements by their numerical index.
- Key/Value Pair Collections: Other collections (such as dictionaries) let you access elements using a unique key.
- Dynamic Sizing: Some collections (e.g., lists and dictionaries) can grow or shrink dynamically. In contrast, arrays are fixed in size once declared.
- Performance Considerations: Each collection type has a different performance profile.
- Arrays offer fast, direct index access when the size is constant.
- Lists provide more flexibility and methods (like
Add,Insert, andRemove) for dynamic scenarios. - Dictionaries are optimized for fast lookups by key.
- Iteration and Interfaces: Most collections implement
Innumerable<T>, which enables the use offoreachloops to traverse the items. Iterators can be custom-built to generate sequences on the fly using theyield returnstatement.
Indexable Collections
Indexable collections allow you to access and manipulate data using a numeric index. In Unity and XR development, the most common indexable types are:
- Arrays (
T[]): Fixed size; great for predefined data like team assignments. Arrays are useful when you know the size of the collection in advance and need fast, index-based access. In XFactory, you might use an array to represent static teams responsible for different factory areas. Arrays are best for structured data that doesn’t change in size.
using UnityEngine;

public class ArrayExample : MonoBehaviour
{
    // Simulated positions of virtual objects in XR space
    Vector3[] objectPositions;

    void Start()
    {
        // Initialize with fixed positions (e.g., controller, hand, etc.)
        objectPositions = new Vector3[3];
        objectPositions[0] = new Vector3(0, 1, 2);
        objectPositions[1] = new Vector3(1, 1, 2);
        objectPositions[2] = new Vector3(-1, 1, 2);

        // Log all positions (simulate debug of virtual tracked objects)
        for (int i = 0; i < objectPositions.Length; i++)
        {
            Debug.Log($"Object {i} position: {objectPositions[i]}");
        }
    }
}
- Lists (
List<T>): Resizable collections; ideal for dynamic data like changing robot configurations. Lists are useful when your data needs to grow or shrink dynamically—such as a list of robot types that may change during simulation setup or runtime. Lists are ideal when your simulation involves dynamic systems.
using System.Collections.Generic;
using UnityEngine;

public class ListExample : MonoBehaviour
{
    // Simulate tracked object names (like interactive XR objects)
    List<string> trackedObjects = new List<string>();

    void Start()
    {
        // Add objects as if they’ve appeared in view
        trackedObjects.Add("HologramPanel");
        trackedObjects.Add("ToolTray");
        trackedObjects.Add("FloatingMenu");

        // Log all currently tracked objects
        foreach (string obj in trackedObjects)
        {
            Debug.Log("Tracked Object: " + obj);
        }

        // Simulate one object disappearing and a new one appearing
        trackedObjects.Remove("ToolTray");
        trackedObjects.Add("VoiceCommandIcon");

        // Show updated list
        for (int i = 0; i < trackedObjects.Count; i++)
        {
            Debug.Log($"Object {i}: {trackedObjects[i]}");
        }
    }
}
Key/Value Pair Collections
Key/value pair collections are designed for scenarios where you need to look up values quickly by a unique key. The most common type is the Dictionary<TKey, TValue>. In Unity, dictionaries are especially useful for mapping unique identifiers (such as machine IDs to status reports, AR marker IDs to equipment names, or user IDs to interaction logs) to game objects or configuration settings.
Example: In XR, it is common to associate tracked objects (via IDs) with their display names, instructions, or functions. This example simulates that by mapping virtual object IDs to their labels, like what you’d show in an AR heads-up display or holographic overlay.
using System.Collections.Generic;
using UnityEngine;

public class DictionaryExample : MonoBehaviour
{
    void Start()
    {
        // Simulate mapping XR object IDs to their holographic labels.
        Dictionary<string, string> objectLabels = new Dictionary<string, string>
        {
            { "OBJ001", "Control Panel" },
            { "OBJ002", "Charging Dock" },
            { "OBJ003", "Maintenance Hub" }
        };

        // Simulate the user gazing at or selecting an object with ID "OBJ001"
        string focusedId = "OBJ001";

        // Safely retrieve the label for the object
        if (objectLabels.TryGetValue(focusedId, out string label))
        {
            Debug.Log($"Gazed object '{focusedId}' is labeled: {label}");
        }
        else
        {
            Debug.Log($"No label found for object ID: {focusedId}");
        }

        // Direct access example (you know the ID exists)
        string dockLabel = objectLabels["OBJ002"];
        Debug.Log($"Known object OBJ002 label: {dockLabel}");
    }
}
Language-Integrated Query
Language-Integrated Query (LINQ) extends collection capabilities by enabling powerful queries that can filter, sort, and group data—all directly integrated into the language. LINQ enables you to perform complex queries on collections. LINQ queries integrate seamlessly with collections that implement IEnumerable<T>, making it easier to write expressive and readable code.
Example: In XR, you often manage multiple objects and only want to interact with or display information about those currently visible or active (e.g., hand joints, scanned items, UI panels). This example simulates filtering such objects using LINQ.
using System.Collections.Generic;
using System.Linq;
using UnityEngine;

public class LinqExample : MonoBehaviour
{
    // Represents a tracked object in XR space
    public class XRObject
    {
        public string Id;
        public string Label;
        public bool IsVisible;
    }

    void Start()
    {
        // Simulate a list of tracked XR objects (e.g., virtual panels or anchors)
        List<XRObject> trackedObjects = new List<XRObject>
        {
            new XRObject { Id = "OBJ_A", Label = "Scan Panel", IsVisible = true },
            new XRObject { Id = "OBJ_B", Label = "Status Display", IsVisible = false },
            new XRObject { Id = "OBJ_C", Label = "Control Button", IsVisible = true }
        };

        // Use LINQ to filter only visible objects
        var visibleObjects = trackedObjects.Where(obj => obj.IsVisible);

        // Log them for debugging
        foreach (var obj in visibleObjects)
        {
            Debug.Log($"Visible XR Object: {obj.Id} - {obj.Label}");
        }
    }
}
Iterators
Iterators allow you to define custom methods for traversing collections. By using the yield return statement, you can generate elements one at a time. This is particularly useful when working with large or complex datasets—such as stepping through a simulation of tasks in the welding station.
Example: You can use iterators to assign unique IDs to XR-tracked elements. It is useful for labeling, referencing, or logging interactions in XR—for instance, giving each interactable object a unique identifier in spatial order.
using System.Collections;
using System.Collections.Generic;
using UnityEngine;

public class IteratorExample : MonoBehaviour
{
    void Start()
    {
        // Simulate assigning unique IDs to virtual XR targets.
        foreach (int targetId in GenerateTargetIDs(100, 104))
        {
            Debug.Log($"Assigned XR Target ID: XR_{targetId}");
        }
    }

    // Custom iterator for generating sequential XR target IDs.
    IEnumerable<int> GenerateTargetIDs(int startId, int endId)
    {
        for (int id = startId; id <= endId; id++)
        {
            yield return id;
        }
    }
}
XR environments often need runtime-assigned IDs for spawned or tracked elements.
yield returnis efficient for streaming in XR scenes where performance matters. It is great for debug logging, interaction tracking, or assigning behavior.
Arrays
Arrays are fundamental data structures in C# that allow you to store collections of homogeneous data elements in contiguous memory. In Unity, arrays are used extensively to manage collections of objects—such as positions, sensors, machine states, or spatial markers. Understanding arrays is crucial for writing efficient, maintainable code—especially in simulations and interactive systems like those you will build for XR.
Core Concepts
- Fixed Size: An array’s size is determined when it is created and cannot change later. For dynamic datasets—like scanned parts, or user-placed waypoints—consider using collections such as
List<T>. - Homogeneous Elements: All elements in an array are of the same type, ensuring type safety and consistency. This is ideal when storing uniform data like robot IDs, voltage readings, or machine speeds.
- Zero-Indexed: The first element is at index
0, and the last is at indexLength - 1. - Reference Type: Arrays are reference types, even when they store value types. When you pass an array to a method, changes inside the method affect the original array—this is useful for sharing common configuration data (like temperature limits or input mappings) across multiple modules.
Single-Dimensional Arrays
A single-dimensional array is the simplest form of an array—a linear list of elements. It’s commonly used in Unity to track things like sensor readings, event states, or machine positions in simulation scenarios.
// Declaration with a fixed size (elements set to default values)
int[] inventoryCounts = new int[5];

// Declaration with initialization
string[] stationNames =
{
    "Logistics",
    "Manufacturing",
    "Assembly",
    "Welding",
    "Exhibit"
};

// Accessing an element by index
Debug.Log(stationNames[0]);  // Outputs: Logistics
Multidimensional Arrays
Multidimensional arrays represent data in more than one dimension (e.g., a grid or table). Multidimensional arrays are useful for grid-based systems like virtual layout of stations, a heatmap of machine statuses, or sensor arrays within a station.
// 2D array (2 rows x 3 columns)
int[,] heatMap = new int[2, 3] { { 30, 35, 33 }, { 28, 32, 31 } };

// Accessing an element
Debug.Log("Temperature at (0, 1): " + heatMap[0, 1]);  // Outputs: 35

// Iterating with nested loops
for (int row = 0; row < heatMap.GetLength(0); row++)
{
    for (int col = 0; col < heatMap.GetLength(1); col++)
    {
        Debug.Log($"Temp at ({row}, {col}) = {heatMap[row, col]}°C");
    }
}
Jagged Arrays
A jagged array is an array of arrays, allowing each inner array to have a different length. This structure is useful for non-uniform datasets, such as robot paths of varying lengths or task sequences where each robot at the assembly station may have a different number of subtasks.
// Declaration of a jagged array with three inner arrays
int[][] robotPaths = new int[3][];

// Initializing each inner array individually
robotPaths[0] = new int[] { 0, 2, 4, 6, 8 };
robotPaths[1] = new int[] { 1, 3, 5 };
robotPaths[2] = new int[] { 10, 12 };

// Accessing elements: first index for the inner array, second for the element
Debug.Log("First point in path 1: " + robotPaths[0][0]);

// Iterating over a jagged array
for (int i = 0; i < robotPaths.Length; i++)
{
    for (int j = 0; j < robotPaths[i].Length; j++)
    {
        Debug.Log($"robotPaths[{i}][{j}] = {robotPaths[i][j]}");
    }
}
Implicitly Typed Arrays
Implicitly typed arrays use the var keyword so that the compiler infers the array’s type based on the initializer. This leads to cleaner and more concise code. Implicitly typed arrays are especially helpful when the element type is obvious or when using anonymous types.
// Compiler infers that this is an int array
var alertLevels = new[] { 1, 2, 3, 4 };

// Compiler infers that this is a string array
var messages = new[] { "Start", null, "Shutdown" };

// Accessing elements
Debug.Log("Initial alert level: " + alertLevels[0]);
Debug.Log("First system message: " + messages[0]);
Accessing Array Elements
Elements are accessed by their index. Be cautious to avoid indexing errors, especially in systems that depend on real-time feedback like drones or robotic arms.
string currentStation = stationNames[0];  // "Logistics"

// Always ensure the index is within bounds to avoid runtime exceptions:
if (0 < stationNames.Length)
{
    Debug.Log(stationNames[0]);
}
else
{
    Debug.LogError("Index out of range!");
}
Iteration Techniques
- Using a
forLoop: This is useful when you need the index for calculations, such as time-based triggers or animation sequences.
for (int i = 0; i < stationNames.Length; i++)
{
    Debug.Log("Station " + i + ": " + stationNames[i]);
}
- Using a
foreachLoop: This simplifies iteration when the index is not needed, such as broadcasting messages to all components in a station.
foreach (string station in stationNames)
{
    Debug.Log("Active station: " + station);
}
Error Handling
Always perform bounds checking to avoid the IndexOutOfRangeException error—especially important in XFactory when array indices may be influenced by external input (e.g., user actions or machine data).
int index = 4;
if (index >= 0 && index < stationNames.Length)
{
    Debug.Log(stationNames[index]);
}
else
{
    Debug.LogError("Station index out of range!");
}
Example: GameObject[]
Let’s create a simple script to reference five GameObjects from XFactory (e.g., CNC_Mill_Set, CNC_Lathe, Heavy Payload Robot Arm, Engine V8, AGV_Omniwheel) and store them in a GameObject[] array. You will then use a loop to print the names of each object on the large display in the manufacturing station. This exercise will help you learn how to you use a GameObject[] array to manage scene objects, practice iteration using foreach, and connect array theory to an actual Unity scene setup.
- Create the Script:
- Create a new C# script and name it
XFactoryArrayManager.cs. - Paste in the following code:
using UnityEngine; using TMPro; public class XFactoryArrayManager : MonoBehaviour { [Header("UI")] public TMP_Text myText; // Reference to the UI text field (TextMeshPro) [Header("XFactory Objects")] public GameObject[] factoryObjects; // Array of assigned objects from the scene // This method can be called from a UI button's OnClick event public void RunDiagnostics() { myText.text = "Diagnostics started...\n\n" + "Listing XFactory objects:\n"; for (int i = 0; i < factoryObjects.Length; i++) { GameObject obj = factoryObjects[i]; if (obj != null) { myText.text += $"[{i}] {obj.name}\n"; } else { myText.text += $"[{i}] <missing object reference>\n"; } } } } - Create a new C# script and name it
- Attach the Script in Unity:
- In the
Hierarchy, attach the script to theScriptDebuggerGameObject underManufacturing > Display GT > Canvas. - Drag the
Text (TMP)to theMy Textfield. - Configure the
Buttonif you haven’t done so already. - Select the
ScriptDebuggerGameObject in theHierarchy. - In the
Inspector, find theFactory Objectsarray field exposed by the script. - Set the array size to
5. - Drag and drop your five selected GameObjects from the Hierarchy into the array slots.
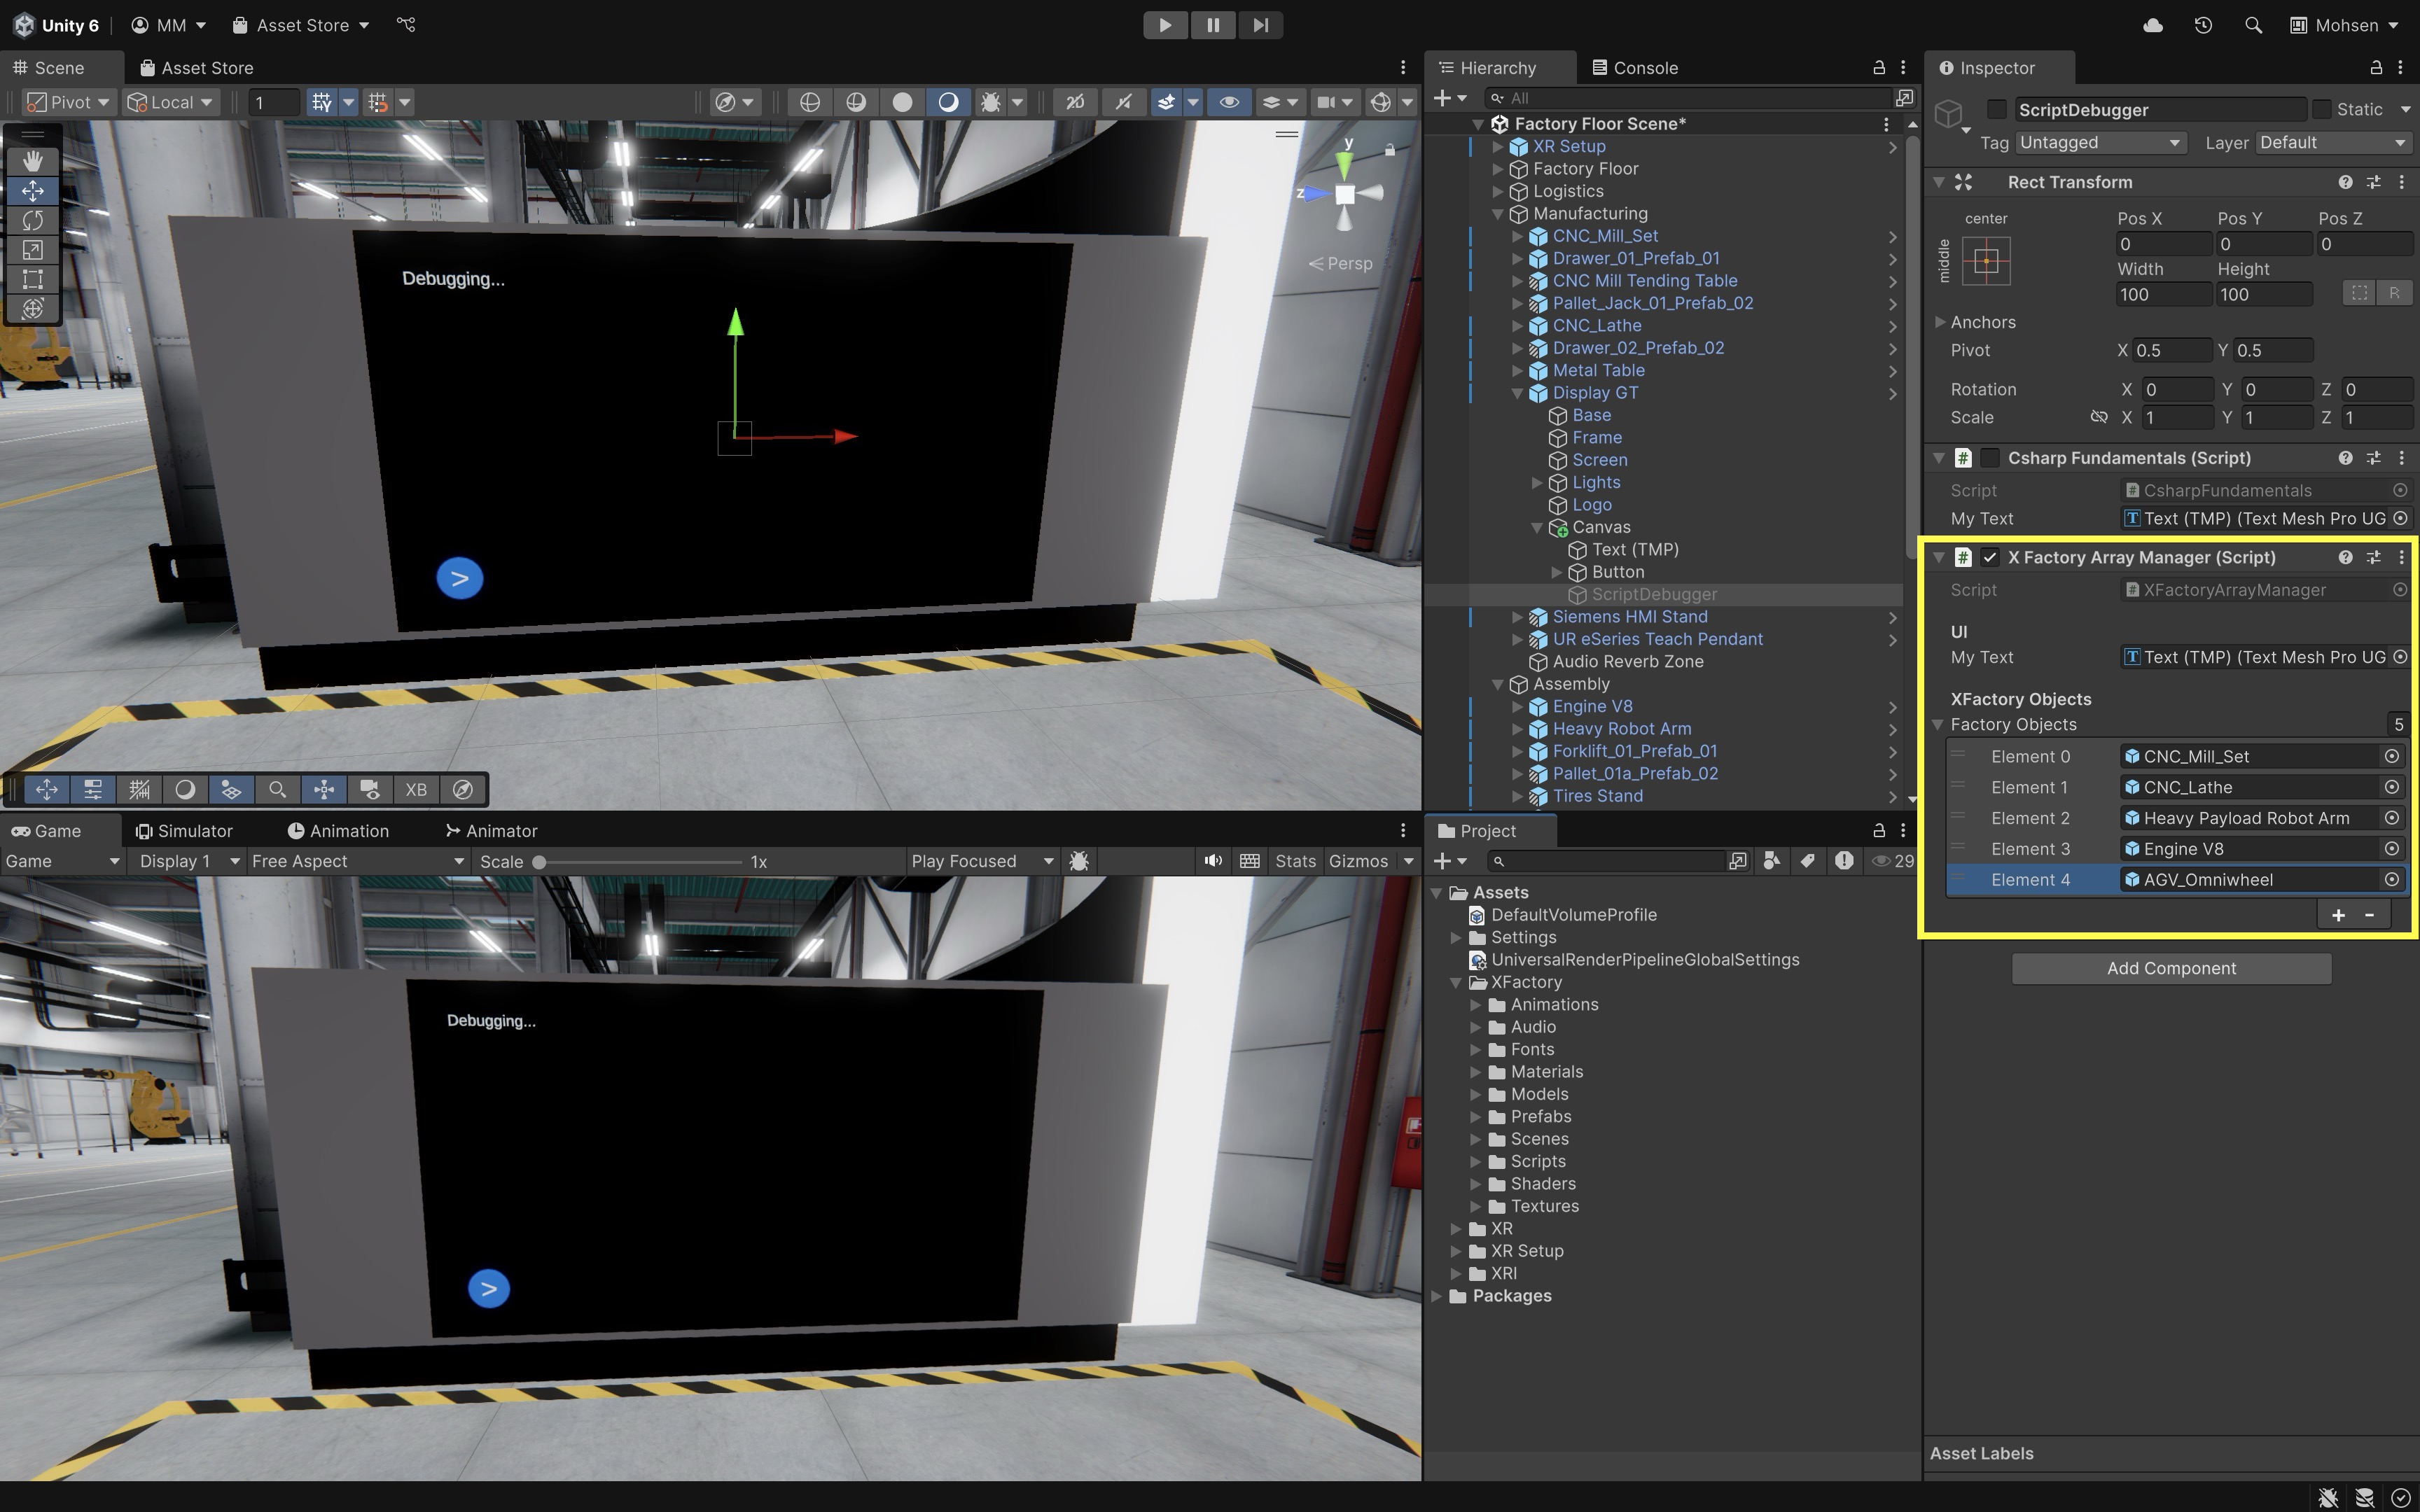
- In the
- Run the Scene:
- Click the Play button in Unity.
- Press the Play button (>) on Display GT.
- On the display, you should see the names of the five XFactory GameObjects assigned. If any element in the array is
null, the script will log a warning message.
Managing object references in arrays is a foundational skill when building multi-part simulation systems (e.g., machines, conveyor units, robots), interactive stations where components must be controlled together, or scenarios where looping over physical or logical elements is required (e.g., enabling/disabling systems, monitoring status, triggering events). You will use similar patterns in XR development to track interactables, sync visuals, or apply behaviors to groups of objects in AR/VR environments.
Lists
Lists are one of the most versatile data structures available in C#. They allow you to work with collections of data that can dynamically grow or shrink during runtime. Unlike arrays, which require you to define a fixed size ahead of time, lists adapt as your data changes. A List<T> is a generic collection class found in the System.Collections.Generic namespace. It allows you to store, manage, and manipulate a sequence of elements where the data type is specified by T.
Benefits Over Arrays
- Dynamic Sizing: Lists automatically resize when you add or remove items, eliminating the need to declare a fixed size—ideal for runtime scenarios such as tracking scanned boxes at the logistics station or dynamically spawning parts in the production line.
- Rich API: With built-in methods for common operations—such as adding, inserting, removing, sorting, and searching—lists streamline many data management tasks in your interactive XR factory simulation.
- Type-Safety and Flexibility: By defining the type of elements, lists prevent runtime type errors and work with any data type, including custom classes (like
MachineStatus) and Unity-specific types (likeGameObject,Vector3, orTransform).
Declaring Lists
Basic Declaration: You can declare a list for any data type using the following syntax:
List<string> stationNames = new List<string>();
Using Collection Initializers: Ideal for initializing lists with predefined values, such as a list of factory zones.
List<string> stationNames = new List<string>
{
    "Logistics",
    "Manufacturing",
    "Assembly",
    "Welding",
    "Exhibit"
};
Basic Operations on Lists
Adding Elements: The Add() method appends an element to the end of the list. This is especially useful when the size of your collection isn’t known until runtime.
stationNames.Add("R&D Station");
Inserting Elements: Insert an element at a specific index using Insert(). This method shifts the current element at that index and subsequent elements to accommodate the new value.
stationNames.Insert(1, "Maintenance");
Removing Elements: You can remove elements by value, using the Remove() method, or by index, using the RemoveAt() method.
stationNames.Remove("QA Inspection");  // Removes first occurrence
stationNames.RemoveAt(2);              // Removes the third element
Accessing Elements: Elements in a list can be accessed by their zero-based index.
Debug.Log(stationNames[0]); // Logs "Logistics"
Getting the Count: Use the Count property to determine the number of elements.
Debug.Log("Total stations: " + stationNames.Count);
Iterating Over Lists
Using foreach Loops: The foreach loop is ideal for reading or processing each element in a list. This loop abstracts away the index, making the code cleaner when you don’t need to modify elements based on their position.
foreach (var station in stationNames)
{
    Debug.Log("Active station: " + station);
}
Using for Loops: When you require index-based manipulation or need to update elements, a for loop is more appropriate.
for (int i = 0; i < stationNames.Count; i++)
{
    Debug.Log("Station " + i + ": " + stationNames[i]);
}
Searching and Sorting Lists
Searching for Elements: The IndexOf() method helps locate the position of an element. Always check the return value since IndexOf() returns -1 if the element is not present.
int index = stationNames.IndexOf("Assembly");
if (index != -1)
{
    Debug.Log("Assembly station found at index " + index);
}
else
{
    Debug.Log("Station not found.");
}
Sorting Lists: You can sort a list alphabetically or numerically using the Sort() method. Sorting can be essential for displaying ordered data, such as leaderboards or inventories.
stationNames.Sort();
foreach (var station in stationNames)
{
    Debug.Log(station);
}
Lists of Other Data Types
Lists are not limited to strings. They can hold any data type, from primitive types like int to complex custom classes. In XFactory, for example, you might use a list of Vector3 to represent waypoints for a mobile robot navigating between stations:
List<Vector3> waypoints = new List<Vector3>
{
    new Vector3(0, 0, 0),
    new Vector3(1, 0, 2),
    new Vector3(2, 0, 4)
};

foreach (var point in waypoints)
{
    Debug.Log("Robot waypoint: " + point);
}
Example: List<string>
Now, let’s use a List<string> to store and manipulate the names of active stations in your XFactory scene. Instead of defining all stations up front like with an array, you will simulate dynamic updates at runtime—adding, inserting, and removing stations—then printing the list to Display GT at the manufacturing station. This exercise will help you learn how to use List<string> to manage a dynamic set of stations, practice Add(), Insert(), Remove(), and Sort(), and display the contents of the list in a UI text field using TextMeshPro.
- Create the Script:
- Create a new C# script named
StationListManager.cs. - Paste the following code:
using UnityEngine; using TMPro; using System.Collections.Generic; public class StationListManager : MonoBehaviour { [Header("UI")] public TMP_Text stationText; private List<string> stationNames = new List<string>(); public void UpdateStationList() { // Clear and add some initial stations stationNames.Clear(); stationNames.Add("Logistics"); stationNames.Add("Manufacturing"); stationNames.Add("Assembly"); stationNames.Add("Welding"); // Insert a new station dynamically stationNames.Insert(2, "Maintenance"); // Remove a station that is shut down stationNames.Remove("Welding"); // Sort alphabetically stationNames.Sort(); // Display in the UI stationText.text = "Active Stations:\n"; for (int i = 0; i < stationNames.Count; i++) { stationText.text += $"{i + 1}. {stationNames[i]}\n"; } stationText.text += $"\nTotal stations: {stationNames.Count}"; } } - Create a new C# script named
- Assign Components in the Editor:
- In the
Hierarchy, attach the script to theScriptDebuggerGameObject underManufacturing > Display GT > Canvas. - Drag the
Text (TMP)to theStation Textfield. - Select the
Buttonin theCanvas. - In the
Button (Script) > OnClick()section, click the+button to add a new event. - Drag in the
ScriptDebuggerGameObject and chooseStationListManager → UpdateStationList().
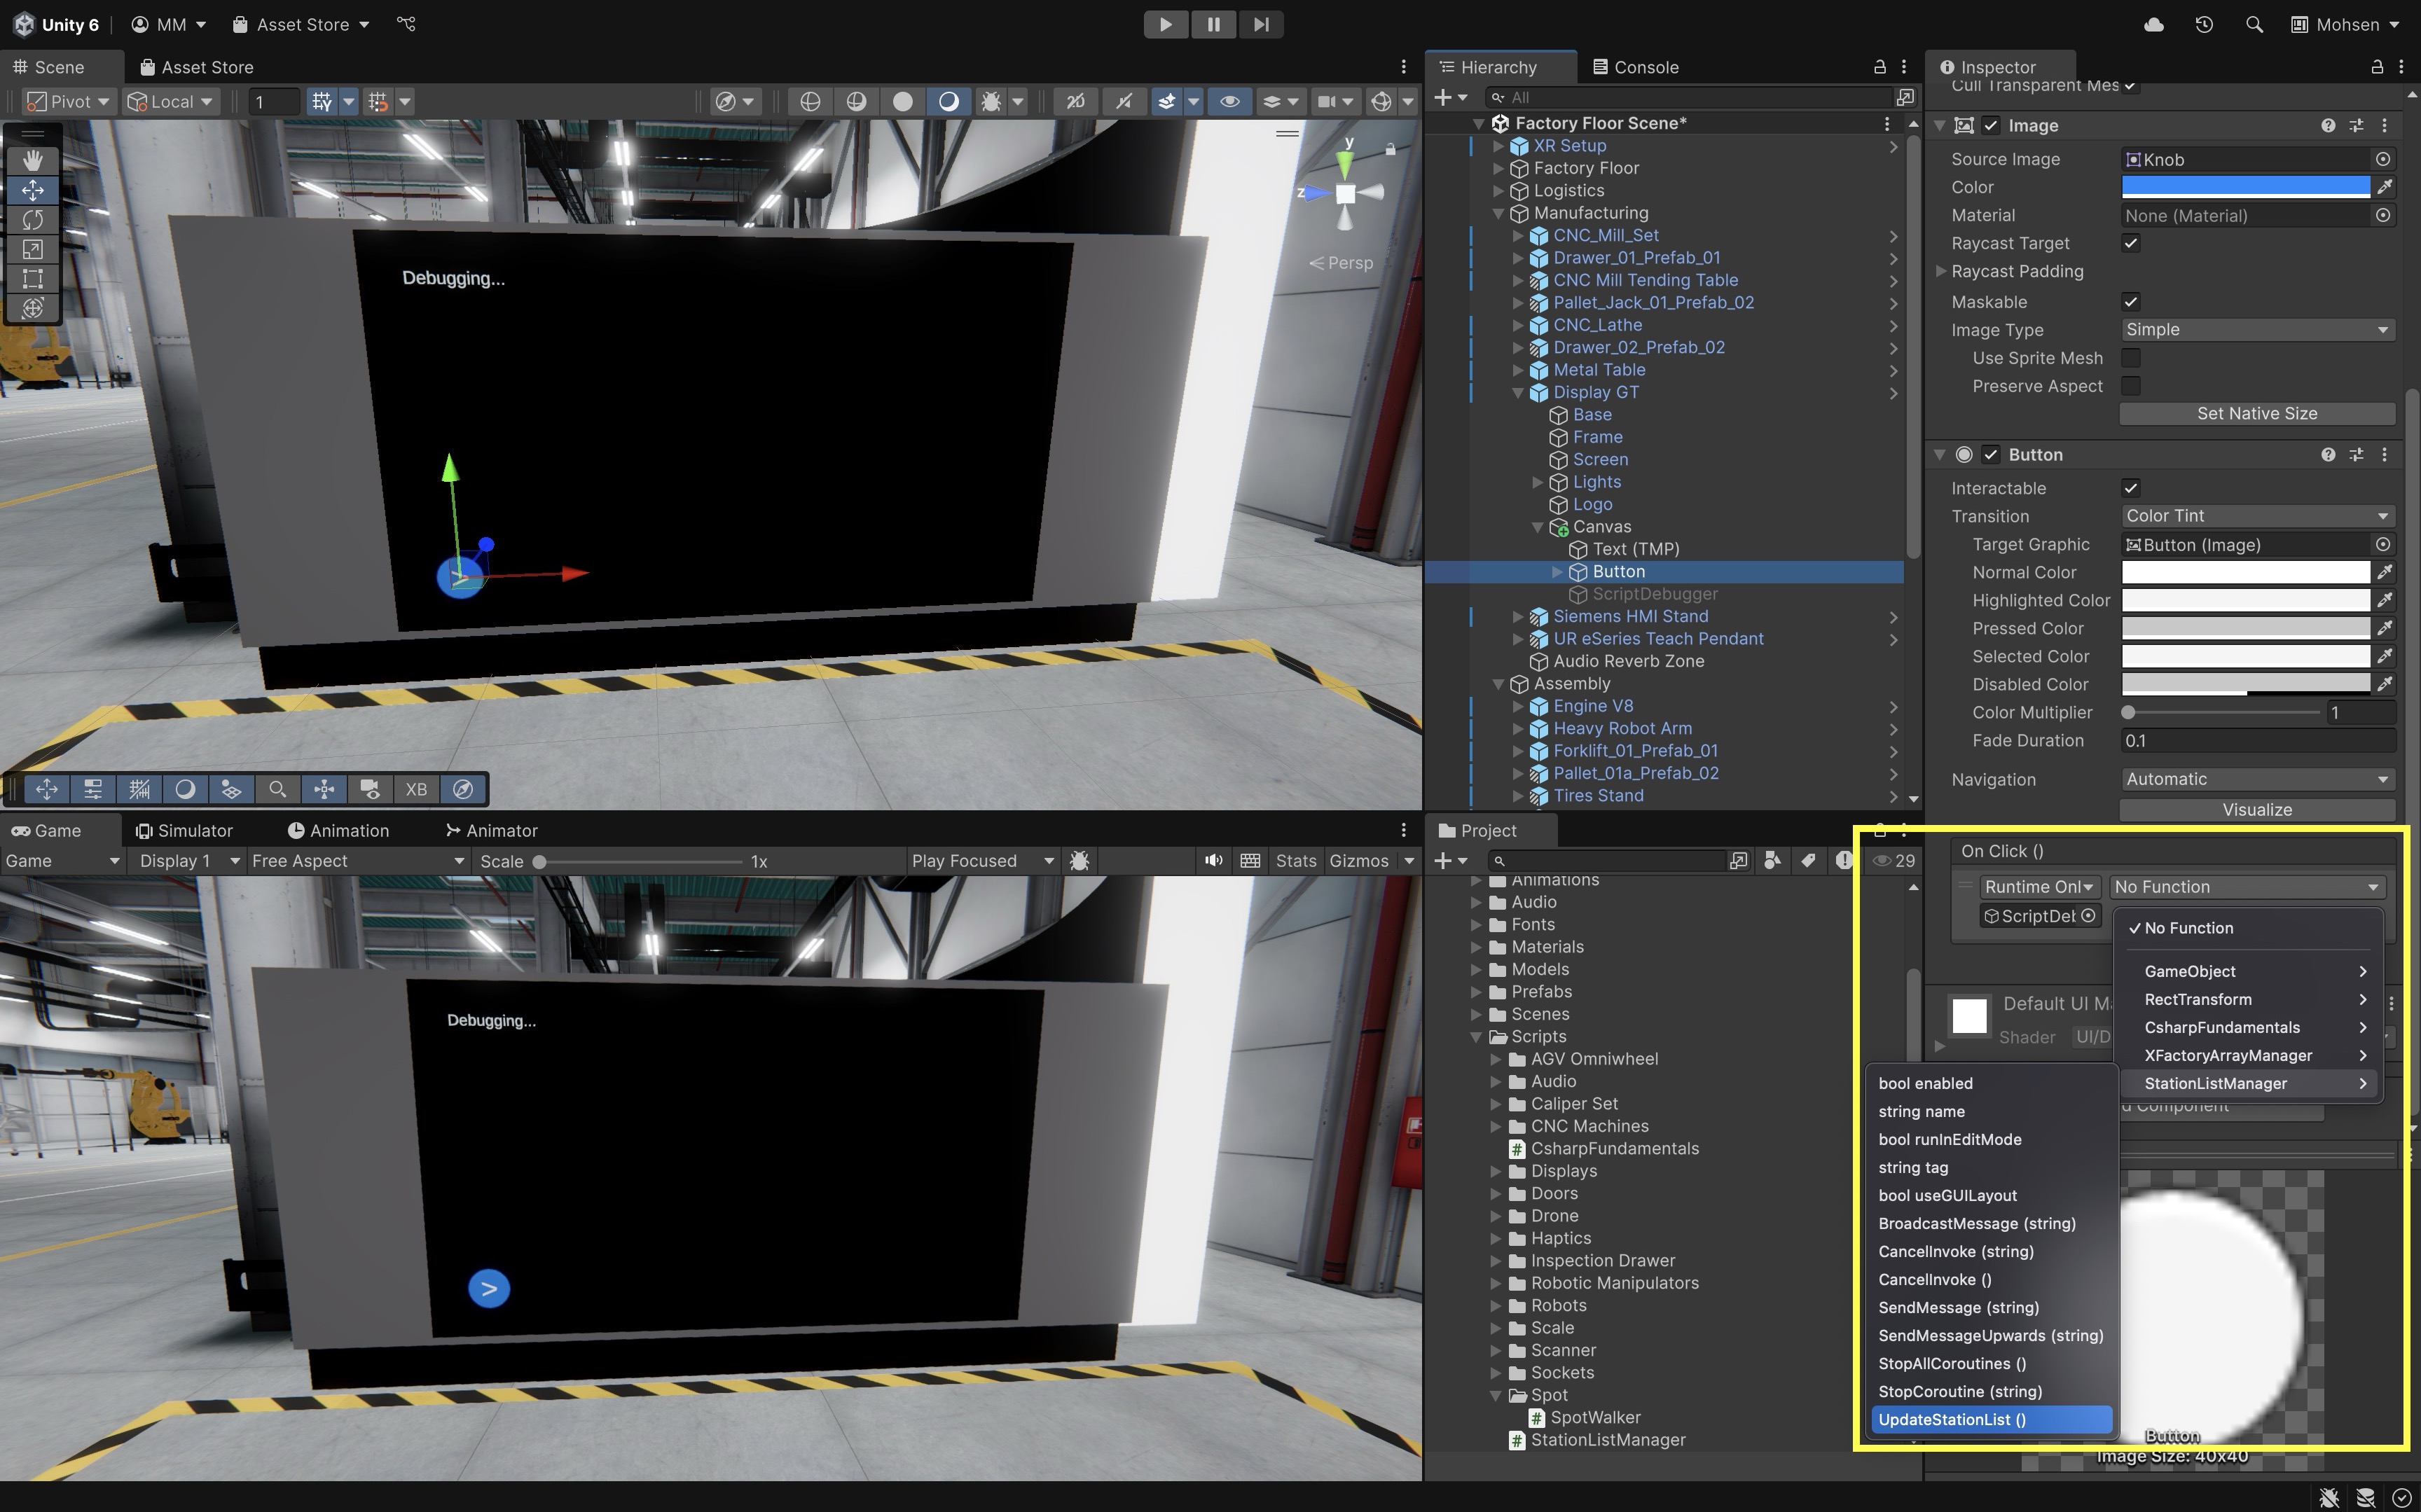
- In the
- Run the Scene:
- Click the Play button in Unity.
- Press the Play button (>) on Display GT.
- On the display, the content will be updated with a list of current stations: Assembly, Logistics, Maintenance, Manufacturing, Total stations: 4. You can modify the script to simulate runtime changes, such as adding a station when a new part is scanned, or removing one when a system goes offline.
This example shows how
List<string>can be used to reflect dynamic system state (e.g., active workstations), respond to user input or machine status in simulations, and prepare for runtime object management in XR systems, such as tracking parts, tools, or operators. In upcoming lessons, you’ll build on this pattern usingList<GameObject>orList<Vector3>for VR/AR development.
Dictionaries
Dictionaries in C# are generic collections that store data as key-value pairs. They are especially useful when you need fast lookups and want to ensure that each key is unique. In Unity development, dictionaries are invaluable for tasks like managing XR objects, mapping identifiers to game components, or organizing configuration data.
Core Concepts
- Key-Value Pair Structure: Each element consists of a key (which must be unique) and an associated value.
- Efficient Lookup: Dictionary operations—such as adding, retrieving, and removing entries—are typically O(1), making them ideal for time-sensitive lookups (e.g., scanning RFID tags at the logistics station).
- Dynamic Growth: Dictionaries expand as needed, supporting real-time interactions, such as assigning virtual parts to tracked objects in the factory.
Declaring a Dictionary
Include the System.Collections.Generic namespace:
using System.Collections.Generic;
Declare your dictionary using the generic syntax:
Dictionary<string, GameObject> stationAssets = new Dictionary<string, GameObject>();
In this example, each
stringkey represents a station name (e.g., “Welding”), and eachGameObjectrepresents the corresponding virtual asset in the XFactory scene.
Initializing Dictionaries
Using Collection Initializers: You can initialize dictionaries with a collection initializer—useful when preloading assets or mapping XR components at startup:
Dictionary<string, GameObject> stationAssets = new Dictionary<string, GameObject>()
{
    { "Welding", weldingRobot },
    { "Assembly", assemblyRobot },
    { "Exhibit", demoDisplay }
};
Using Index Initializers:
Dictionary<string, GameObject> stationAssets = new Dictionary<string, GameObject>()
{
    ["Welding"] = weldingRobot,
    ["Assembly"] = assemblyRobot,
    ["Exhibit"] = demoDisplay
};
Accessing Elements
You can retrieve values using the key as an index:
GameObject weldingStation = stationAssets["Welding"];
But if the key doesn’t exist, this throws a KeyNotFoundException. To avoid crashes, use TryGetValue():
if (stationAssets.TryGetValue("Welding", out GameObject robot))
{
    // Use the robot object safely
}
else
{
    Debug.LogWarning("Welding station not found in dictionary.");
}
Adding Elements
Add() Method: Inserts a new key-value pair into the dictionary and throws an exception if the key is already present. Example:
stationAssets.Add("Logistics", logisticsStationObject);
Indexer: Directly assigns a value to a key, updating the existing entry if the key exists or adding a new entry if it does not. Example:
stationAssets["Logistics"] = logisticsStationObject;
TryAdd() Method: Attempts to add a new key-value pair and returns a boolean indicating success without throwing an exception when the key already exists.
if (!stationAssets.TryAdd("Logistics", logisticsStationObject))
{
    Debug.LogWarning("Key already exists: Logistics");
}
Removing Elements
Remove() Method: Removes the specified key and its associated value from the dictionary, if the key exists. Example:
stationAssets.Remove("Assembly");
Clear() Method: Removes all key-value pairs from the dictionary, effectively emptying it. Example:
stationAssets.Clear();
Iterating Over Dictionaries
Iterate Over Key-Value Pairs:
foreach (KeyValuePair<string, GameObject> pair in stationAssets)
{
    Debug.Log($"Station: {pair.Key}, GameObject: {pair.Value.name}");
}
Iterate Through Just the Keys or Values:
// Iterate through keys
foreach (string station in stationAssets.Keys)
{
    Debug.Log($"Station ID: {station}");
}

// Iterate through values
foreach (GameObject obj in stationAssets.Values)
{
    Debug.Log($"Asset Name: {obj.name}");
}
Dictionary Indexer
The indexer property this[TKey key] allows you to get or set the value associated with a key using a simple bracket notation. Here’s how it works.
Getting a Value:
GameObject exhibitObj = stationAssets["Exhibit"];
Setting a Value:
stationAssets["Exhibit"] = updatedDisplayObject;
Since accessing a non-existent key throws an exception, always consider using
TryGetValue()when the key may not be present—especially when data comes from user interactions or external APIs.
Example: Dictionary<string, GameObject>
Let’s assign five GameObjects of your choice (e.g., robots, machines, scanners, drones, boxes) to fixed station names in XFactory. You will use a Dictionary<string, GameObject> to map each station name to its corresponding GameObject, and display the mappings on the large display in the manufacturing station. This exercise will help you practice assigning GameObjects to logical roles (station names), use a Dictionary<string, GameObject> to map unique keys to values, and safely iterate and display dictionary content using a UI text field.
- Create the Script:
- Create a script called
StationAssignmentManager.cs. - Attach the script to the
ScriptDebuggerGameObject underManufacturing > Display GT > Canvas. Disable its other custom scripts to avoid conflict. - Paste the following code:
using UnityEngine; using TMPro; using System.Collections.Generic; public class StationAssignmentManager : MonoBehaviour { [Header("UI")] public TMP_Text stationText; [Header("Station Assignments")] public GameObject assemblyObject; public GameObject manufacturingObject; public GameObject logisticsObject; public GameObject weldingObject; public GameObject exhibitObject; private Dictionary<string, GameObject> stationMap = new Dictionary<string, GameObject>(); public void AssignStations() { // Clear existing data (if any) stationMap.Clear(); // Map each station to its assigned object stationMap.Add("Assembly", assemblyObject); stationMap.Add("Manufacturing", manufacturingObject); stationMap.Add("Logistics", logisticsObject); stationMap.Add("Welding", weldingObject); stationMap.Add("Exhibit", exhibitObject); // Display the station assignments in the UI stationText.text = "Station Assignments:\n\n"; foreach (KeyValuePair<string, GameObject> entry in stationMap) { if (entry.Value != null) { stationText.text += $"{entry.Key} → {entry.Value.name}\n"; } else { stationText.text += $"{entry.Key} → [No object assigned]\n"; } } stationText.text += $"\nTotal stations assigned: {stationMap.Count}"; } } - Create a script called
- Configure the Script in the Inspector:
- Drag the
Text (TMP)GameObject onto theStation Textfield in theInspector. - Select the
Buttonin yourCanvas. - In the
Inspector, scroll to theOnClick()section. - Click the
+to add a new event. - Drag the
ScriptDebuggerGameObject (the one with the script) into the event field. - From the dropdown, select
StationAssignmentManager → AssignStations().
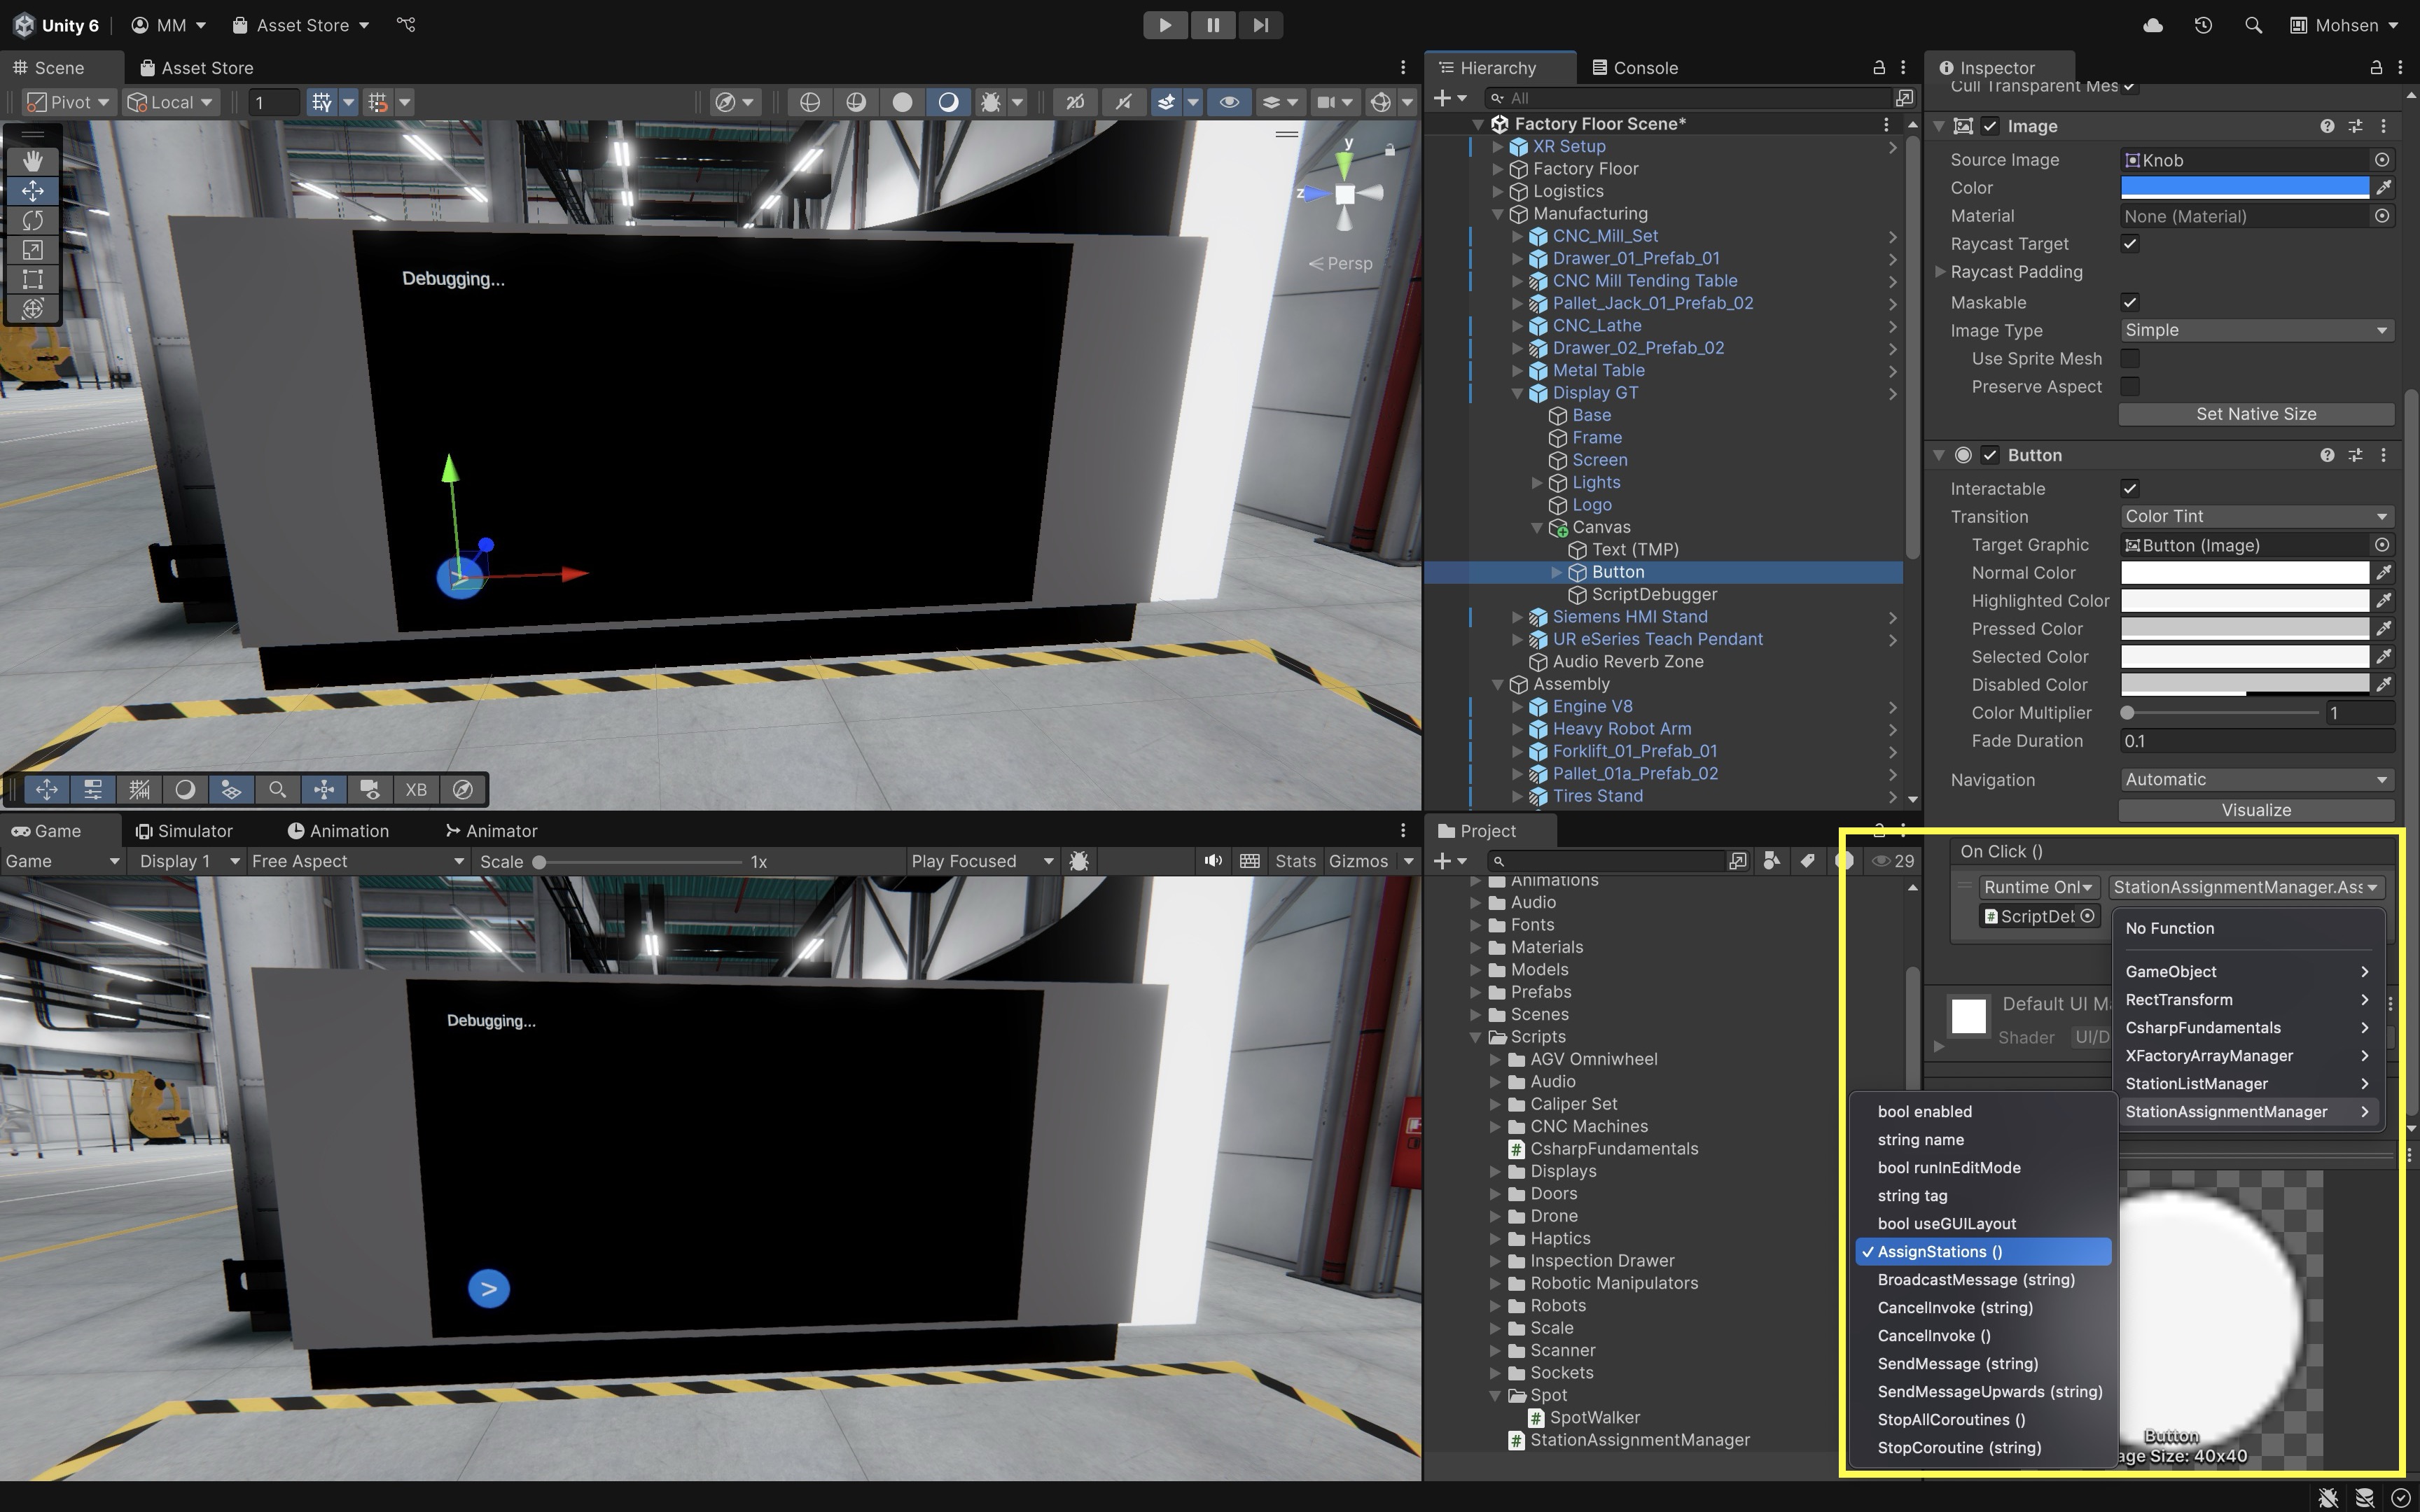
- Drag the
- Assign GameObjects to Stations:
- Choose five GameObjects that represent equipment for each of the five stations in XFactory.
- Drag and drop your selected GameObjects into the station fields:
Engine V8 > Assembly ObjectCNC_Mill_Set > Manufacturing ObjectDrone > Logistics ObjectRobot Arm Arc Welder > Welding Object` Spot > Exhibit Object`

- Run the Scene:
- Click the Play button in Unity.
- Then, press the play button (>) in the UI.
- The display should update with the desired output as shown below. If any GameObject is unassigned (left
nullin the Inspector), the output will show:Exhibit → [No object assigned].

In engineering simulations and XR workflows, you often need to logically group machines or devices by location or function. Dictionaries offer quick, readable mapping between a station name and its associated object. This mirrors how real factories operate—with clear assignments and fast access to device metadata. Use this pattern when creating XR inspection tools, assigning tasks or behaviors to objects based on station identity, or managing assets in modular scenes.
Object-Oriented Programming
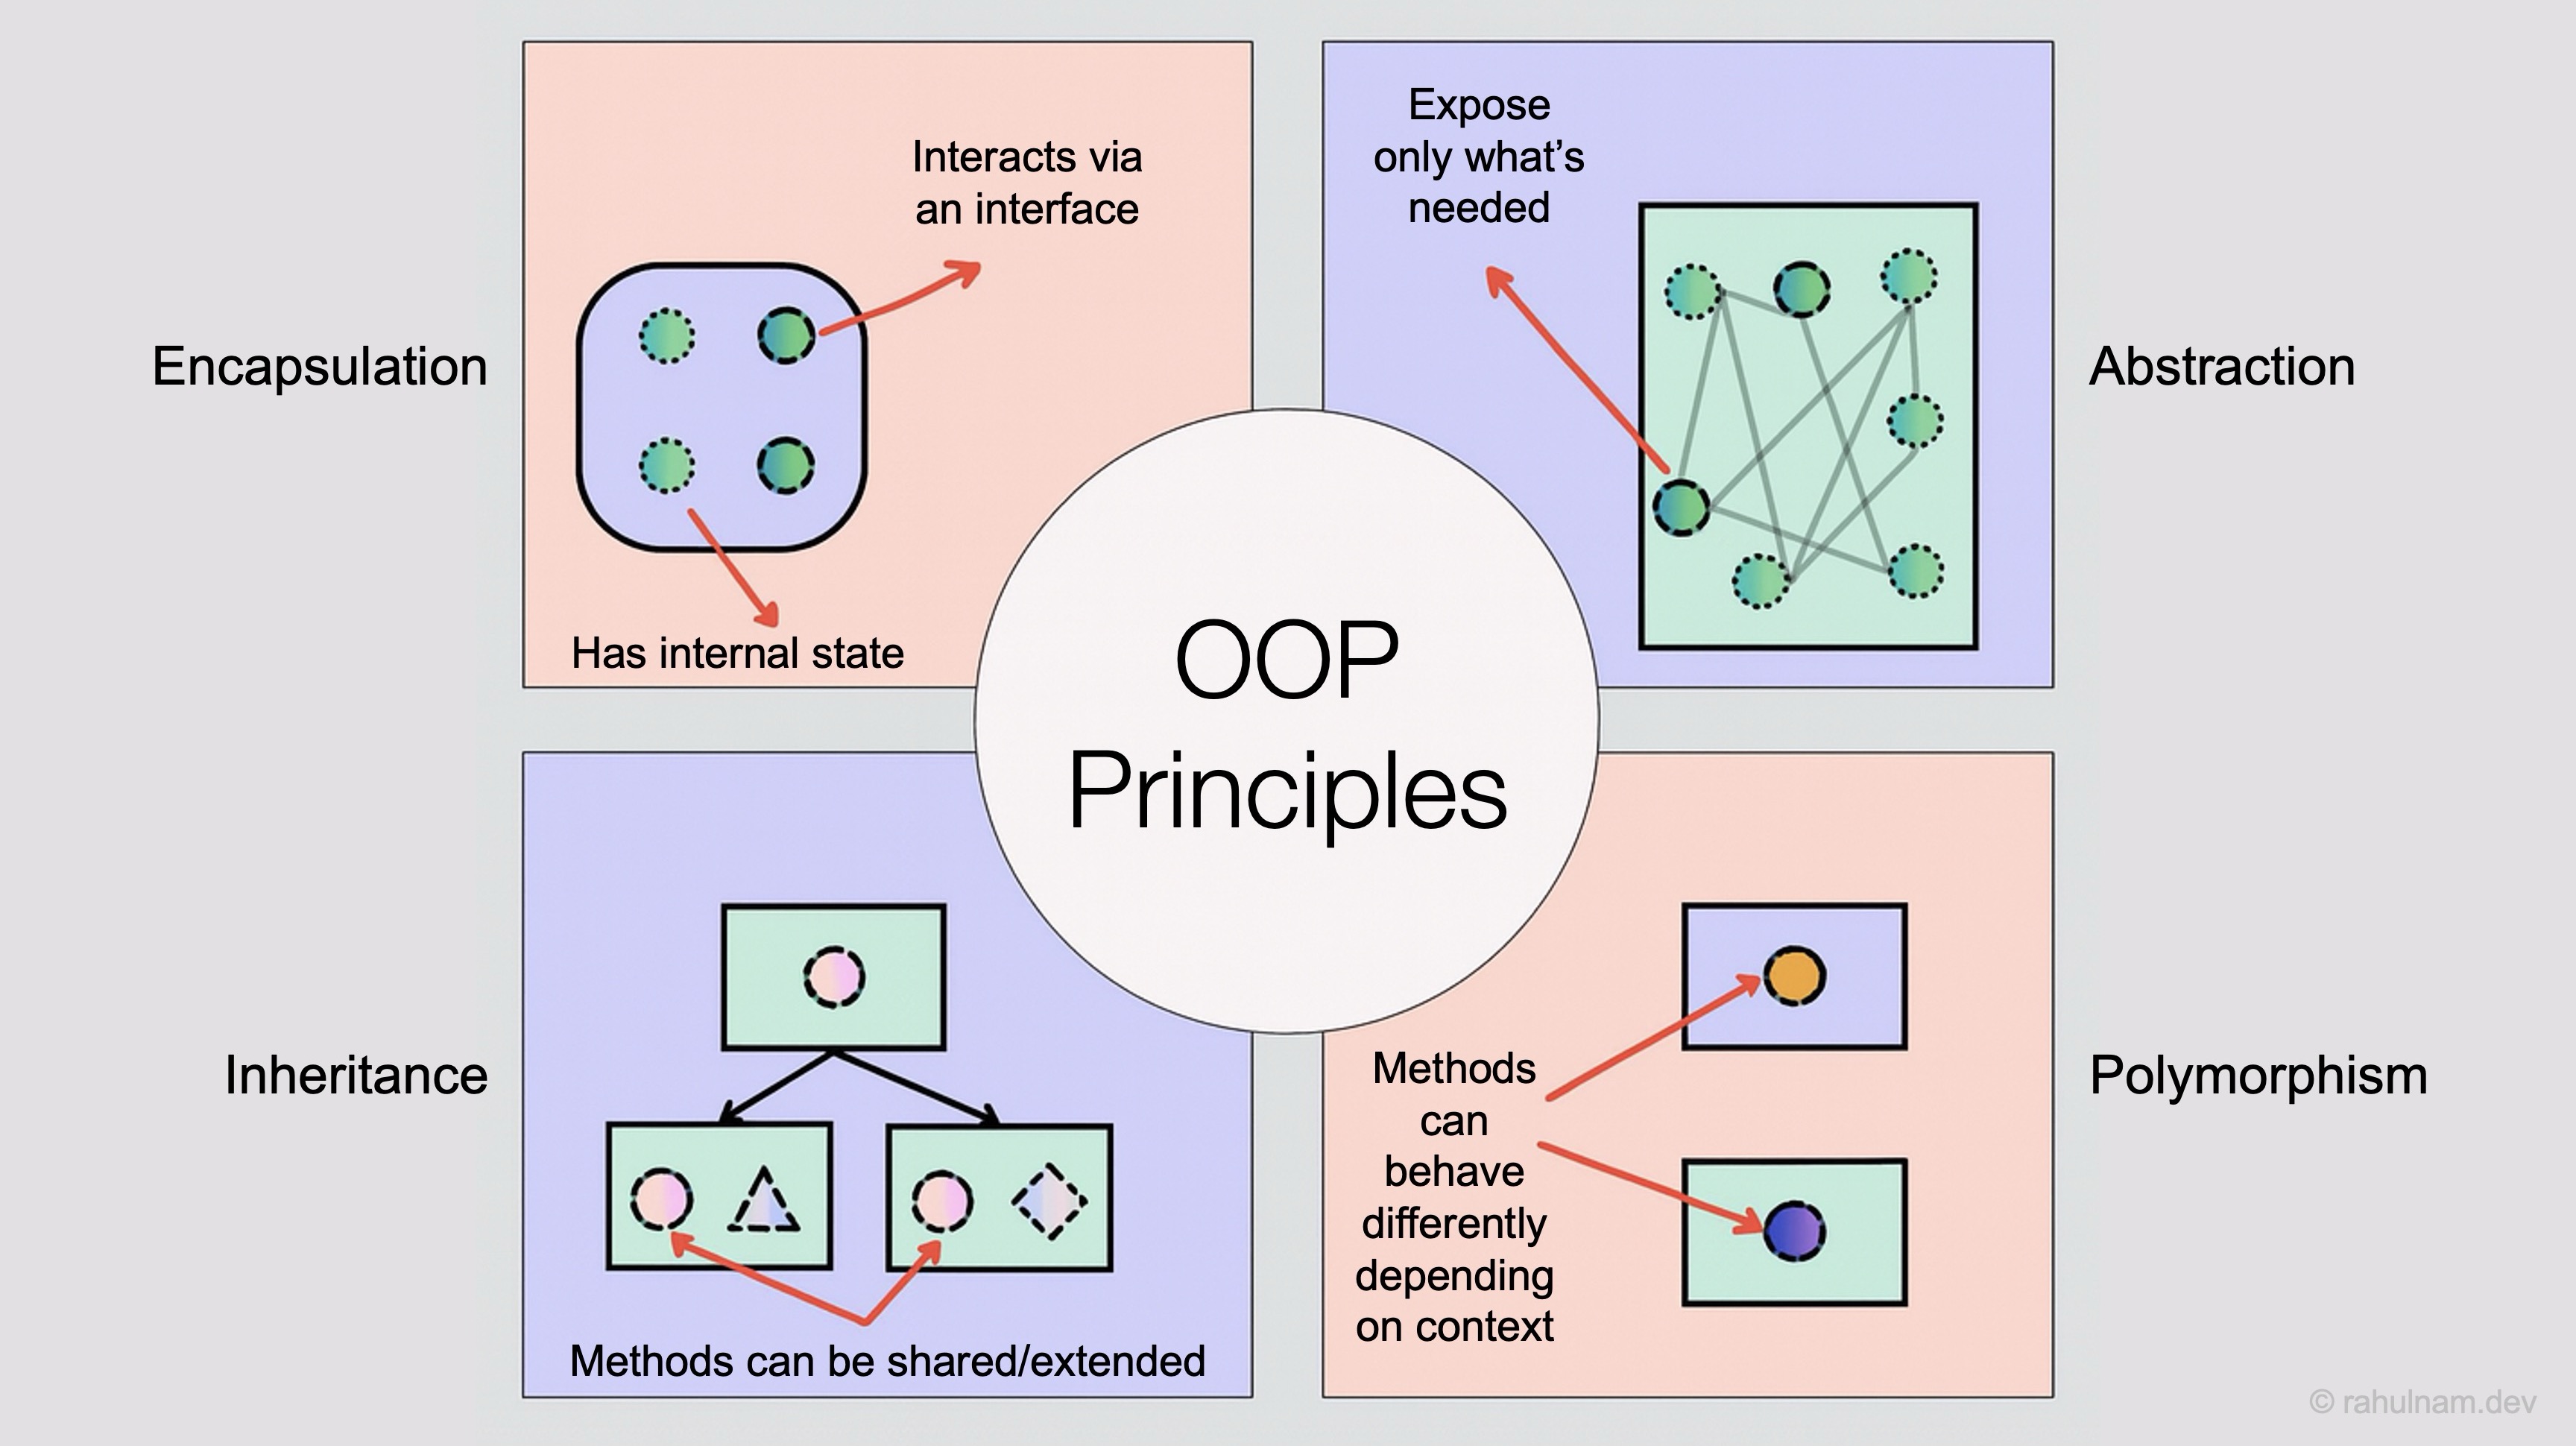
Object-Oriented Programming (OOP) is a programming paradigm based on the concept of “objects”—entities that combine data (fields) and behavior (methods). OOP enables developers to model real-world systems more intuitively, making it particularly well-suited for XR applications where interactive components represent physical or logical entities. In Unity-based XR development, objects can represent anything from industrial robots and control panels to users and AR overlays. Using OOP, you can build these components in a modular, reusable, and maintainable way. OOP offers several fundamental features necessary for C# development in Unity and beyond:
-
Maintainability (Abstraction): Objects expose only essential features through public interfaces while hiding implementation details. This abstraction simplifies understanding and modification of the codebase, as changes to internal logic don’t impact how other parts of the system interact with the object.
-
Modularity (Encapsulation): Code is organized into self-contained objects (e.g.,
Robot,Scanner,AGV), each encapsulating its own internal state and behavior. This protects the internal details of each object and allows it to be developed, tested, and debugged independently. -
Reusability (Inheritance): Shared functionality (such as movement or UI interaction) can be defined in base classes and inherited by subclasses. This promotes code reuse and reduces duplication, making it easier to build and extend new components with consistent behavior.
-
Scalability (Polymorphism): Different object types can implement shared interfaces or inherit from common base classes, allowing them to be used interchangeably. This polymorphism supports adding new features (like new machine types or UI modes) without modifying existing code, making it easier to extend the system.
Abstraction
Abstraction is the process of exposing only the relevant functionality of an object while hiding its internal complexity. It allows developers to interact with a simplified interface, focusing on what the object does rather than how it does it. In C#, abstraction is achieved using abstract classes and interfaces.
Abstract Classes: They define a blueprint or base class with partially implemented or unimplemented functionality. In XFactory, various machines operate differently but share common behavior like having a name and an Operate() action. We can define an abstract base class for this:
using UnityEngine;

public abstract class FactoryMachine : MonoBehaviour
{
    [SerializeField]
    protected string machineName;

    // Abstract method that must be implemented by derived classes
    public abstract void Operate();
}
Now we define a specific machine that inherits from this base class. This abstraction allows simulation code to treat all machines generically as FactoryMachine objects, while the actual behavior is defined by each specific machine type.
using UnityEngine;

public class CNCMachine : FactoryMachine
{
    public override void Operate()
    {
        Debug.Log($"{machineName} is cutting a part.");
    }

    private void Start()
    {
        Operate(); // Example usage
    }
}
Interfaces: They define a strict contract that implementing classes must follow, without any predefined behavior. In many cases, different systems across the factory—like robots or inspection units—must support periodic maintenance. We can define this using an interface:
public interface IMaintainable
{
    void PerformMaintenance();
}
Now, any system that needs maintenance functionality implements the interface below. The IMaintainable interface ensures a consistent way to call PerformMaintenance() across different machine types, even if their internal logic is different.
using UnityEngine;

public class WeldingRobot : MonoBehaviour, IMaintainable
{
    public void PerformMaintenance()
    {
        Debug.Log("Welding robot calibration completed.");
    }

    private void Start()
    {
        PerformMaintenance(); // Example usage
    }
}
Encapsulation
Encapsulation is the mechanism of wrapping the data (variables) and code (methods) acting on the data together as a single unit. It also restricts direct access to some of an object’s components, which is a means of preventing accidental interference and misuse of the data. Fields are made private and accessed via public properties or methods.
using UnityEngine;

public class Sensor : MonoBehaviour
{
    private float temperature;

    public float Temperature
    {
        get { return temperature; }
        private set { temperature = value; }
    }

    public void UpdateTemperature(float newTemp)
    {
        if (newTemp >= -40 && newTemp <= 125)
        {
            Temperature = newTemp;
        }
    }

    private void Start()
    {
        UpdateTemperature(22.5f);  // Example usage
        Debug.Log($"Sensor initialized with temp: {Temperature}");
    }
}
This approach ensures that the internal state of the object cannot be modified directly, preserving data integrity. Auto-implemented properties simplify this pattern when no additional logic is needed. Encapsulation allows developers to change internal implementations without affecting external code that uses the object, fostering safe design boundaries.
using UnityEngine;

public class Battery : MonoBehaviour
{
    public float ChargeLevel { get; set; } = 100f;

    private void Start()
    {
        Debug.Log($"Battery charge: {ChargeLevel}%");
    }
}
Inheritance
Inheritance is the process by which one class takes on the properties and methods of another. The class that is inherited from is called the base class, and the class that inherits is called the derived class.
using UnityEngine;

public class FactoryDevice : MonoBehaviour
{
    [SerializeField]
    protected string deviceID;

    public virtual void Activate()
    {
        Debug.Log($"{deviceID} is now active.");
    }
}
A derived class can reuse and extend that behavior as shown below. Inheritance reduces code duplication and facilitates logical hierarchies in your systems.
using UnityEngine;

public class Scanner : FactoryDevice
{
    public override void Activate()
    {
        Debug.Log($"{deviceID} is scanning a QR code.");
    }

    private void Start()
    {
        Activate();  // Example usage
    }
}
Polymorphism
Polymorphism means “many forms.” It allows methods to do different things based on the object that is invoking them. In C#, this is typically implemented via method overriding and interfaces. If multiple classes inherit from a common base and override the same method, they can be used interchangeably through the base class reference.
Abstract Base Class: Robot.cs. Marking this class as abstract ensures it can’t be instantiated directly—only extended by other specific robot types.
using UnityEngine;

public abstract class Robot : MonoBehaviour
{
    public abstract void PerformTask();
}
Derived Robot Types: PickAndPlaceRobot.cs and WeldingRobotPoly.cs. Ensure these robot scripts are attached to different GameObjects in your scene. Unity only executes behavior from scripts that are part of active GameObjects. You can use polymorphism to call the same method on different types, as follows. Polymorphism enables dynamic behavior switching at runtime and clean interface-based programming.
using UnityEngine;

public class PickAndPlaceRobot : Robot
{
    public override void PerformTask()
    {
        Debug.Log("Picking and placing a part.");
    }
}
using UnityEngine;

public class WeldingRobotPoly : Robot
{
    public override void PerformTask()
    {
        Debug.Log("Performing welding operation.");
    }
}
Robot Manager: Executing polymorphic behavior.
using UnityEngine;

public class RobotManager : MonoBehaviour
{
    [SerializeField] private Robot[] robots;

    private void Start()
    {
        foreach (Robot r in robots)
        {
            r.PerformTask();
        }
    }
}
Why Polymorphism? This design allows you to add new robot types without modifying existing logic, keep your code clean and modular, and loop over diverse robot types with a single, unified method call. Alternatively, you could also use an interface (e.g.,
IRobotTask) if you want to decouple robot logic fromMonoBehaviourinheritance.
Key Takeaways
In this session, we explored how collections and object-oriented programming principles work together to build efficient, flexible systems in Unity—especially for XR applications. You learned the strengths and use cases for arrays, lists, and dictionaries, as well as how to iterate over them using loops, LINQ, and custom iterators. We connected these concepts to real-world XR scenarios, from managing dynamic object sets to mapping station IDs to assets. We also examined core OOP principles—abstraction, encapsulation, inheritance, and polymorphism—and saw how they enable modular, reusable, and maintainable code for interactive simulations. Together, these skills form a foundation for managing data and behavior in complex Unity projects, ensuring your XR systems are both scalable and easy to extend.