C2. Decision Logic & Methods

Learning Outcomes
- Explain the concept of custom GameObject behaviors in Unity. Before class, review how
MonoBehaviourscripts define interactivity in XR experiences and skim common C# keywords such asif,for, andvoid.- Write and test Boolean logic using
ifstatements. As prep work, create simple scripts with expressions using==,!=,<, and logical operators, then log results to the Unity Console.- Implement branching logic with
switch-case. In your pre-class practice, take an existingif-else-ifexample and rewrite it as aswitch-caseblock to compare structure and usage.- Apply loop constructs (
for,foreach,while,do-while) to repeat actions in Unity. Ahead of the session, practice iterating over objects in a scene, printing names or tags, and experimenting with conditions to see how each loop type behaves.- Define and call basic methods in Unity C#. Prior to class, review the structure of a method and implement one that prints a debug message.
- Pass parameters to methods to customize behavior. Update an existing method in your project to accept a parameter (e.g., int, float, or array) and call it with different values.
- Use return values from methods in Unity. For preparation, run an example that returns a number or string, log the result, and think about how it might integrate into a larger system.
Custom GameObject Behaviors
As you start to build custom behaviors and interactive features in your XR projects, understanding decision logic and methods (i.e., functions) becomes absolutely critical. In Unity—especially in complex, real-time simulations like XFactory—these foundational programming constructs enable you to design smart, reactive systems that feel natural, purposeful, and immersive.
Core Concepts
- Boolean Logic (
if): Enables decision-making based on conditions. Use it to make objects respond to inputs, sensor values, or environmental changes—e.g., opening a door when a user is near, or changing color based on temperature thresholds. - Branching Logic (
switch-case): Handles multiple distinct outcomes cleanly. Ideal for scenarios like switching machine modes, selecting camera views, managing dialogue trees, or controlling device states based on object types. - Iterative Logic (
for,foreach,while,do-while): Automates repetition and sequence handling. Use these loops to scan collections of objects in a scene, perform timed actions (like step-by-step assembly), iterate through lists or arrays, or continuously monitor input from multiple sources. - Methods with Parameters: Encapsulate logic into reusable blocks that accept input. Use parameters like position vectors, object names, or force levels to perform dynamic actions—e.g., deploying different effects based on object size or category.
- Methods with Return Values: Produce results for further use. Great for checking conditions (e.g., has the player reached a zone?), computing values (e.g., speed or angle), or querying systems (e.g., fetching sensor states or nearest interactable).
- Coroutines: Enable asynchronous or delayed operations in Unity. Use them for tasks like waiting between animation steps, triggering effects over time, or sequencing events without freezing the main update loop.
- Event-Driven Logic (using UnityEvents or C# delegates): Allows decoupling of triggers from behaviors. Use this to signal when a user presses a button, a timer completes, or an object enters a zone—enabling modular, reactive design patterns.
Key Features
- Dynamic Interactivity: Build responsive systems that adapt to player presence, gaze, gesture, or controller input—ensuring immersive and context-sensitive feedback.
- Automation & Repetition: Use loops and coroutines to streamline repeated actions like inventory updates, animation control, data polling, or batch interactions with multiple objects.
- Modular Code Design: Break complex behaviors into clear, manageable functions—simplifying debugging, maintenance, and feature extension.
- Customization & Reuse: Use parameterized methods and switch statements to reuse logic across multiple object types—keeping your scripts clean and adaptable.
- Scalability: Structure your codebase to accommodate growth. Good use of methods, logic blocks, and events allows your XR environment to scale from prototypes to production.
- Real-Time Feedback: Combine logic with sensor input or user tracking to adapt visuals, behaviors, or sounds in real time—boosting realism and user engagement.
Boolean Logic
In C#, decision-making is often driven by Boolean expressions—expressions that evaluate to either true or false. Whether you are checking a robot’s status, validating sensor data, or controlling simulation flow, Boolean expressions form the backbone of your decision logic in XR development. Key concepts in Boolean logic include:
- Expression vs. Statement: An expression is any snippet of code that evaluates to a value. For example,
speed + 5orplayerHealth > 0are expressions. A statement is a complete instruction that performs an action. For example,if (playerHealth > 0) { ... }is a statement that contains the Boolean expressionplayerHealth > 0to decide whether to run its code block. - Boolean Expression: A Boolean expression is a specific kind of expression that evaluates to either
trueorfalse. Examples includeisGateClosed && isSensorActiveorscore >= 100. These expressions don’t do anything by themselves—they provide the condition that Boolean statements likeiforwhileuse to control program flow.
Operators
Equality Operator (==): Checks if two values are the same.
// Validate if the active material handling equipment ID matches a scanned ID
string scannedID = "Reach_Truck_01a_Prefab";
string activeID = "Pallet_Truck_01a_Prefab";

bool isMatch = scannedID == activeID;
Debug.Log(isMatch); // Output: False
Inequality Operator (!=): Checks if two values are not the same.
// Check if the current task is different from the previous task
string currentTask = "Scanning";
string previousTask = "Scanning";

bool isDifferent = currentTask != previousTask;
Debug.Log(isDifferent); // Output: False
Comparison Operators: Use these when comparing numerical values like a drone’s battery level or a machine’s cycle time:
- Greater than (
>) - Less than (
<) - Greater than or equal to (
>=) or - Less than or equal to (
<=)
// Drone battery check
int actualBatteryLevel = 85;   // Current drone battery level
int minimumBatteryLevel = 50;  // Minimum required level for operation

bool isBatterySufficient = actualBatteryLevel > minimumBatteryLevel;
Debug.Log(isBatterySufficient); // Output: True

bool needsCharging = actualBatteryLevel <= 50;
Debug.Log(needsCharging); // Output: False
Logical Negation Operator (!): The logical negation operator inverts a Boolean value. Although the inequality operator (!=) uses !, it should not be confused with the standalone negation operator.
bool is3DPrinterIdle = false;
Debug.Log(!is3DPrinterIdle); // Output: True, indicating the 3D printer is running.
Conditional Operator (?:): The conditional operator offers a compact syntax for decision logic. It evaluates a Boolean expression and returns one of two values. The basic syntax is <condition> ? <value if true> : <value if false>.
int scannedBoxes = 12;
int reward = scannedBoxes > 10 ? 100 : 50;
Debug.Log($"Reward Points: {reward}"); // Output: Reward Points: 100
When comparing strings, especially those from user input, it is important to handle cases and extra spaces. Use methods like
Trim()andToLower()to “massage” the data. This is especially useful in Unity UI systems where engineers interact with labels, control panels, or machine status displays.string tag1 = " qr_code"; string tag2 = "QR_Code "; Debug.Log(tag1.Trim().ToLower() == tag2.Trim().ToLower()); // Output: True
if Statement
The if statement is one of the most fundamental decision-making tools in C#. It evaluates a Boolean expression and executes a block of code only if the expression is true. In XFactory, if statements can be used to control simulation logic, such as robot movement, safety checks, machine activation, alert handling, and post-processing readiness. In any if statement, if the condition evaluates to true, the code inside the { } executes; otherwise, it is ignored:
if (condition)
{
    // Code to execute if the condition is true
}
Types of if Statements:
- Simple
ifStatement: A simpleifstatement executes a block of code when a condition is met. if-elseStatement: Theif-elsestructure allows execution of different code blocks depending on whether the condition istrueorfalse.if-else-ifLadder: Anif-else-ifladder helps evaluate multiple conditions in a sequence.- Nested
ifStatement: A nestedifis anifstatement placed inside anotherifblock. - Multiple Conditions with Logical Operators: C# allows combining multiple conditions using logical operators, including
&&(AND: Ensures both conditions are true) and||(OR: Ensures at least one condition is true).
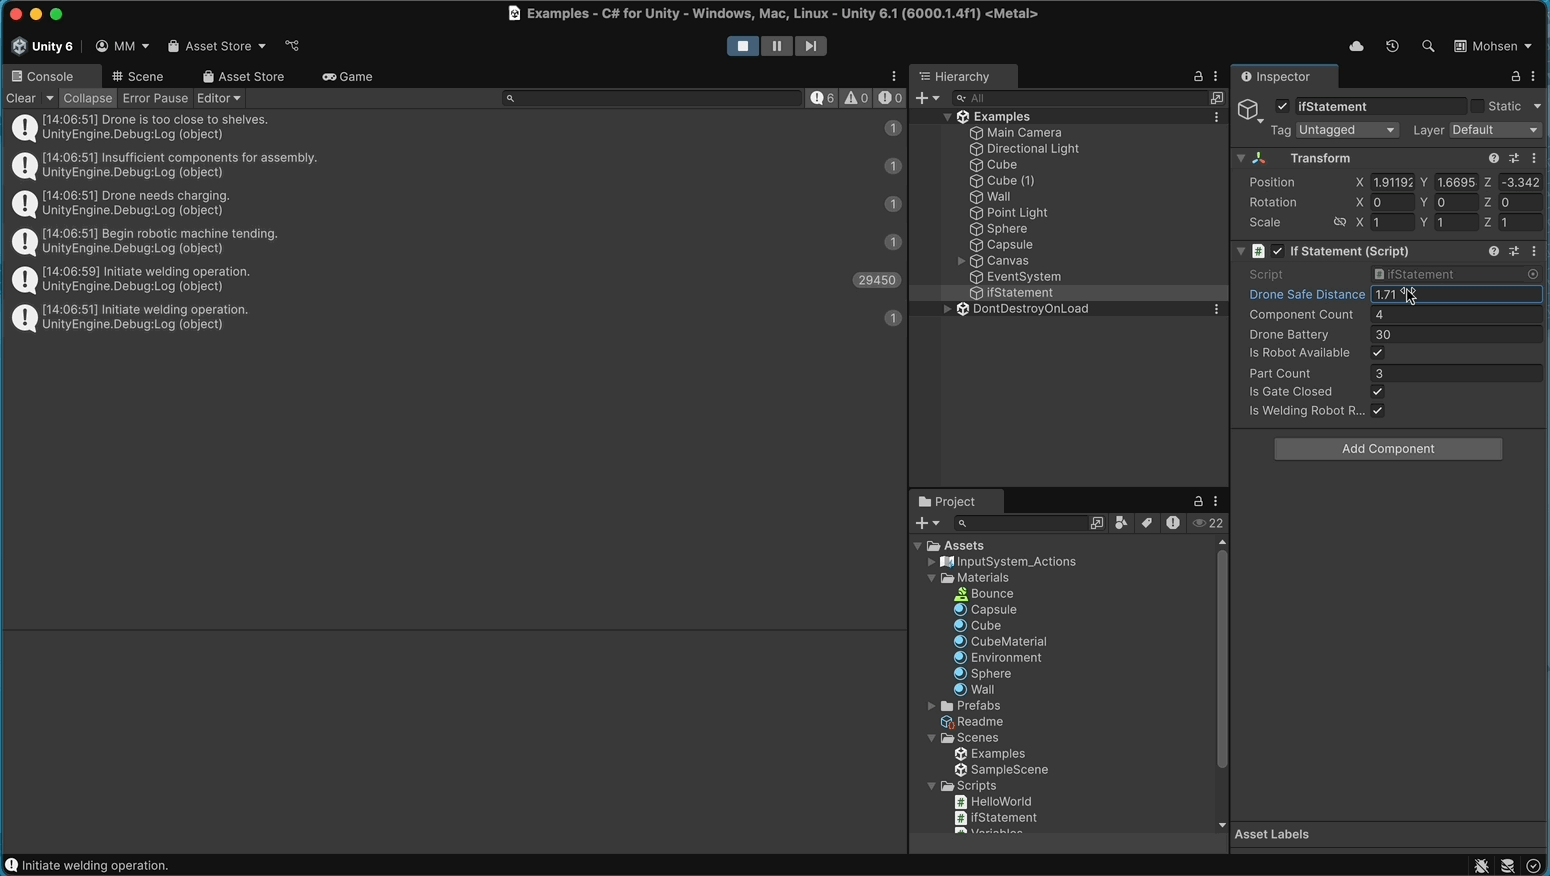
Example: Let’s create a simple script to showcase the if–else if–else statement. You will be able to move the player in Play Mode and observe different messages appear on a display, depending on the distance.
- Create the Script:
- In the
Projectwindow, right-click in theAssetsfolder and chooseCreate > C# Script. - Name it:
IfStatements. - Double-click to open it in your code editor.
- Replace the contents with the following:
using UnityEngine; using TMPro; // needed for TextMeshProUGUI public class IfStatements : MonoBehaviour { public GameObject player; // assign in Inspector public GameObject display; // assign in Inspector public TextMeshProUGUI displayText; // assign the TextMeshProUGUI component in Inspector void Update() { // Measure distance between player and display float distance = Vector3.Distance(player.transform.position, display.transform.position); // Check distance ranges with if–else if–else if (distance > 5f) { displayText.text = "Step closer to read the display."; } else if (distance > 3f) { displayText.text = "Perfect viewing distance!"; } else { displayText.text = "You’re standing too close!"; } } } - In the
- Configure the GameObject:
- In the
Hierarchy, make sure you have: - A
Playerobject (this can be a simple cube or your player prefab). - A
Displayobject (for example, a cube, plane, or a world-space canvas). - A
TextMeshProUGUIcomponent on the display (add aCanvas > TextMeshPro - Text). - Create an empty GameObject named
DistanceLogicand attach theIfStatements.csscript to it. - In the
Inspector, drag yourPlayer,GT Display, and theTextMeshProUGUIcomponent into the corresponding script fields.
- In the
- Enter Play Mode and Test the Logic:
- Click the Play button at the top of the Unity editor.
- Move the
Playercloser and farther from the display using the arrow keys. - Observe the text update on the display.
"Step closer to read the display."→ when the player is far away."Perfect viewing distance!"→ when the player is in the right range."You’re standing too close!"→ when the player is very close.
You can expand this example beyond simple messages. For instance, instead of only updating text, you could trigger sounds, play animations, or control gameplay events when the player moves into different distance ranges. You might also connect it to UI elements like sliders or buttons, letting you adjust the distance thresholds interactively during Play Mode.
Branching Logic
C# provides several ways to implement branching logic. While if-else if-else constructs are versatile, switch-case statements can offer a more concise and readable alternative when evaluating a single variable against multiple known values. This makes them especially useful in contexts such as game state management, handling user inputs, or processing enumerated types in Unity. switch-case is ideal for tasks such as mapping game states, assigning roles or titles based on numerical values, or interpreting commands and user inputs. These statements are most effective when:
- Single Value Comparison: You are evaluating one variable or expression against a list of discrete values.
- Limited and Defined Cases: There are a finite number of known outcomes.
- Clarity: Grouping related outcomes in a single construct can simplify code maintenance and readability.
The switch-case Construct
The switch-case statement allows you to match a variable or expression against a set of potential values:
switch (expression): The variable or expression to be evaluated. Theswitchexpression is evaluated once.caseLabels: The switch expression is compared sequentially against eachcaselabel.breakStatement: When a match is found, the corresponding block of code executes until abreak(or another terminating statement likereturn) is encountered. Without it, C# prevents accidental “fall-through” from one case to the next.defaultCase: If no match is found and adefaultcase exists, its code block is executed.
switch (expression)
{
    case value1:
        // Code executed if expression equals value1.
        break;
    case value2:
        // Code executed if expression equals value2.
        break;
    // Add more cases as needed.
    default:
        // Code executed if no cases match.
        break;
}
if-else vs. switch-case
switch-case can simplify code that might otherwise be cluttered with lengthy if-else if-else constructs. Let’s revisit our example where the player’s distance from a display determines which message appears.
Original if-else if-else:
using UnityEngine;
using TMPro;   // needed for TextMeshProUGUI

public class IfStatements : MonoBehaviour
{
    public GameObject player;
    // assign in Inspector
    public GameObject display;
    // assign in Inspector
    public TextMeshProUGUI displayText;
    // assign the TextMeshProUGUI component in Inspector

    void Update()
    {
        // Measure distance between player and display
        float distance = Vector3.Distance(
            player.transform.position,
            display.transform.position
        );

        // Check distance ranges with if–else if–else
        if (distance > 5f)
        {
            displayText.text = "Step closer to read the display.";
        }
        else if (distance > 3f)
        {
            displayText.text = "Perfect viewing distance!";
        }
        else
        {
            displayText.text = "You’re standing too close!";
        }
    }
}
Converted to switch-case:
using UnityEngine;
using TMPro;

public class SwitchStatements : MonoBehaviour
{
    public GameObject player;
    public GameObject display;
    public TextMeshProUGUI displayText;

    void Update()
    {
        float distance = Vector3.Distance(
            player.transform.position,
            display.transform.position
        );

        // Map distance to an index without if-else
        // 0 = Close, 1 = Medium, 2 = Far
        int rangeCategory =
            distance <= 3f ? 0 :
            distance <= 5f ? 1 :
            2;

        switch (rangeCategory)
        {
            case 0:
                displayText.text = "You’re standing too close!";
                break;
            case 1:
                displayText.text = "Perfect viewing distance!";
                break;
            case 2:
                displayText.text = "Step closer to read the display.";
                break;
            default:
                displayText.text = "Unable to determine distance.";
                break;
        }
    }
}
By switching from
if-elsechains to aswitch-case, you streamline logic that’s both easier to read and extend. Useswitch-caseif you are evaluating one variable or expression against a list of discrete, known values and want cleaner, more readable branching logic for maintenance and clarity.
Iterative Logic
In Unity, loops are essential for iterating through arrays, controlling simulation logic, and managing frame-based updates. C# provides several loop constructs to handle different scenarios: the for loop is ideal when the number of iterations is known, the foreach loop offers clean iteration over collections like arrays, lists, and dictionaries, and the while / do-while loops are useful when repetition depends on a condition that may change at runtime. Together, these loops form the foundation of iterative logic in Unity scripts, enabling developers to process data, repeat actions, and control program flow efficiently.
for Loop
The for loop is especially useful when you need precise control over how many times a block of code should execute—such as iterating through robots on an assembly line, scanning QR codes on boxes, or updating conveyor belts in the XFactory environment. A for loop executes a block of code a specific number of times. Its syntax consists of three main components:
- Initializer: Sets up the iteration variable (e.g.,
int i = 0). - Condition: Determines how long the loop will run (e.g.,
i < 10). - Iterator: Updates the variable after each iteration (e.g.,
i++).
for (int i = 0; i < 5; i++)
// i: Initializer — Start at rack index 0
// i < 5: Condition — Loop through 5 logistics racks
// i++: Iterator — Move to the next rack
{
    // Simulate scanning rack i in the logistics station
    Debug.Log($"Scanning Rack #{i} for inventory...");
}
Special Cases:
-
Iterating in Reverse:
forloops allow you to control the direction of iteration. This is especially useful in factory scenarios—like unloading scanned packages from a drone delivery log or reversing robot actions in a fault recovery system. For example, the following loop simulates unloading from5logistics racks in reverse order (4to0):for (int i = 4; i >= 0;i--) { Debug.Log($"Unloading package from Rack #{i}..."); } -
Custom Increments: You can change how fast the loop progresses by modifying the increment step. This can be useful in XFactory to model actions that occur less frequently—like checking every third item on a machine tending table or sampling sensor data at longer intervals. For example, the following loop inspects every third slot:
0,3,6,9:for (int i = 0; i < 12; i += 3) { Debug.Log($"Inspecting item slot {i} on the machine tending table..."); } -
Exiting a Loop Early: Sometimes, a loop needs to stop before reaching its natural end—like when a scanner detects a defective box or a robot exceeds its temperature threshold. You can use the break keyword to do this. For example, this loop stops as soon as the defective package (at index
6) is found:for (int i = 0; i < 10; i++) { Debug.Log($"Scanning package #{i}..."); if (i == 6) { Debug.Log("Defective package detected — stopping scan."); break; } }
foreach Loop
The foreach loop provides a clean and readable way to iterate over every element in a collection (such as an array or list) without needing to manage indexes manually. It is ideal when you want to inspect or use each item in a sequence, especially for tasks like scanning inventory, displaying package labels, or logging inspection results in the XFactory logistics station. Unlike for, however, a foreach loop is read-only with respect to the collection—it does not allow modification of the elements directly. If you need to update values, you typically use a for loop, then confirm or display the changes with foreach.
using UnityEngine;
using System.Collections.Generic;

public class ForeachExample : MonoBehaviour
{
    void Start()
    {
        // Array
        string[] packages = { "Box_Large_01a", "Shipping_Crate_01a", "Box_01b_Stack" };
        foreach (var p in packages)
            Debug.Log($"Array item: {p}");

        // List
        var damaged = new List<string> { "Box_01b_Stack", "Box_Small_01a_Stack" };
        foreach (var d in damaged)
            Debug.Log($"List item: {d}");

        // Dictionary
        var inventory = new Dictionary<string, int>
        {
            { "Box_Large_01a", 10 },
            { "Box_Small_01a_Stack", 8 }
        };
        foreach (var kv in inventory)
            Debug.Log($"Dictionary item: {kv.Key} → {kv.Value}");
    }
}
Compared to a
forloop, which is well-suited when you need index control or want to modify elements directly, aforeachloop is preferable when you simply need to iterate through every element in a collection with cleaner, more readable code. In C#, the best practice is to usevarinforeachloops when the type is obvious, as it keeps the code concise and readable, while reserving explicit types for cases where clarity is needed.
while & do-while Loops
A do-while loop in C# is an iteration statement that guarantees its code block executes at least once before checking a condition. This makes it useful when the logic inside the loop must run first, and only afterward should the program decide whether to continue. By contrast, a standard while loop checks its condition before executing the code block. If the condition is false at the start, the loop body may never run at all. That is,
whileloop: Check first, then run.int counter = 5; while (counter < 3) { Debug.Log("Counter is: " + counter); counter++; } // Output: (nothing, loop never runs)do-whileloop: Run first, then check.int counter = 5; do { Debug.Log("Counter is: " + counter); counter++; } while (counter < 3); // Output: "Counter is: 5"
Compared to a
forloop, which is best when the number of iterations is known in advance and may not run if the condition is false initially, ado-whileloop is preferable when the code block must execute at least once regardless of the starting condition.
Methods in C#
A method (also called a function) is a reusable block of code designed to perform a specific task. In C#, methods are essential for breaking down complex problems into smaller, manageable units. They improve organization by dividing code into logical sections, enhance readability when well-named, and support reusability by avoiding repetition. Methods also encapsulate functionality, exposing only what’s necessary through parameters and return values, while promoting modularity by isolating functionality—making updates, testing, and debugging much easier.
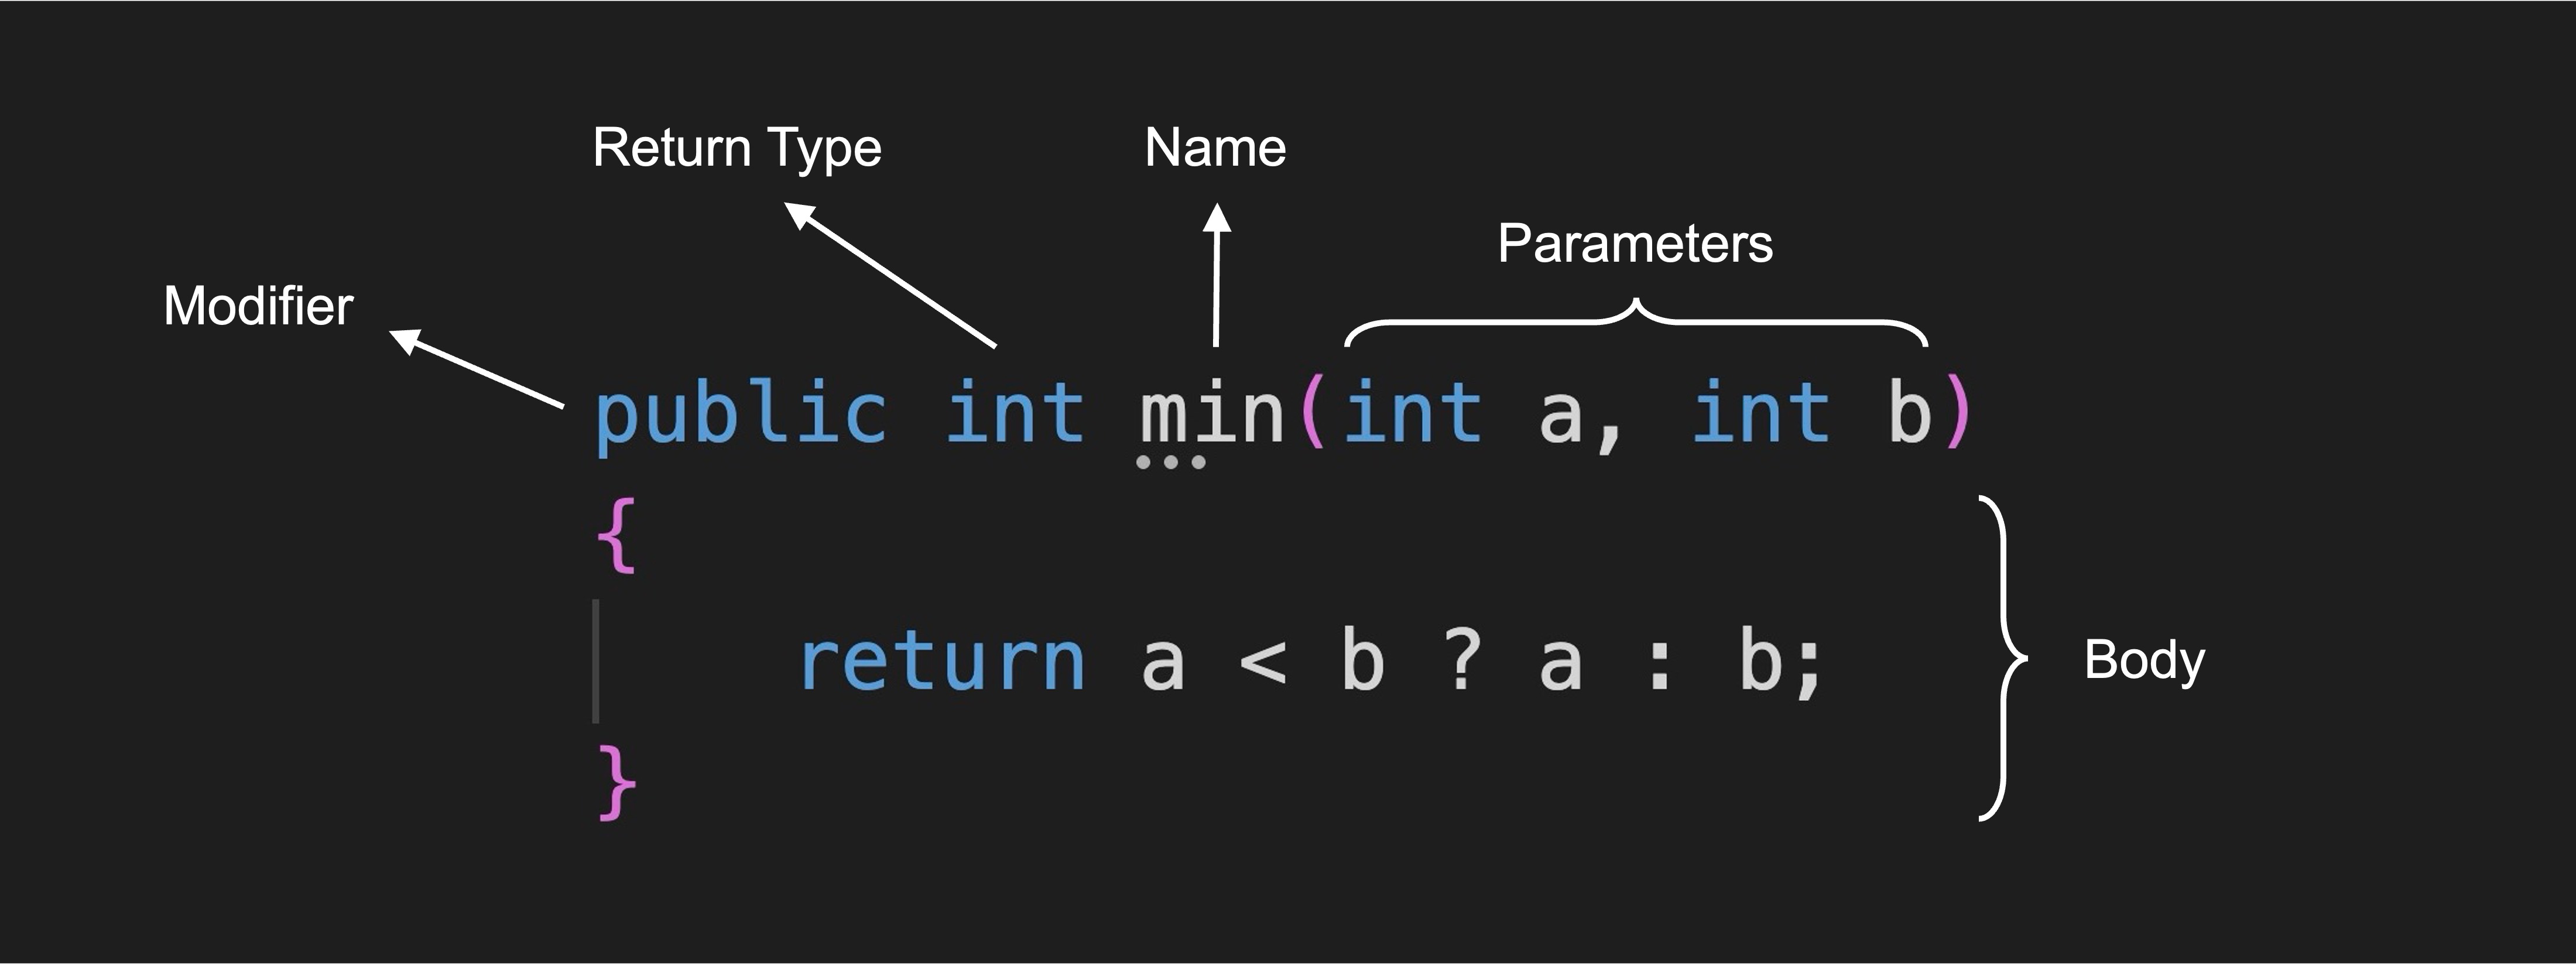
-
Method Signature: A method signature uniquely identifies the method within a class by declaring the method’s. The return type specifies the type of data the method will return to the caller. If no data is returned, the return type is
void. The name should be descriptive, using PascalCase (each word capitalized) to indicate the action the method performs. Parameters are optional inputs to the method that allow it to work with external data. They are specified inside parentheses and separated by commas. -
Method Body: The method body is enclosed in curly braces
{ }and contains the actual code to be executed when the method is called. This is where the logic of the method is defined.// Complete method with a signature and a body. void PlayIntroNarration() { Debug.Log("Welcome to the XFactory immersive experience!"); } -
Parameters: Parameters allow methods to accept input values, making them versatile. They work as placeholders that are replaced with actual values (arguments) when the method is called. Each parameter must have a declared data type (e.g.,
int,string,double). You can define multiple parameters, separated by commas. Parameter names should be meaningful to clarify what type of data is expected.// Method that moves a forklift a certain distance at a given speed. void MoveForklift(float distance, float speed) { // Simulated forklift movement logic here } -
Return Values: A method can return a value to its caller. The return type specified in the method signature must match the type of value returned. The
returnstatement is used to return a value back to the caller. If a method does not return any data, its return type is declared asvoid.// Method that calculates the dimensions of a CNC raw material. float CalculateFloorArea(float length, float width, float height) { return length * width * height; }
Calling Methods
Calling (or invoking) a method transfers control from the calling code to the method, executes its body, and then returns control back to the caller. Methods can be invoked from other methods, loops, conditionals, or any context where they’re in scope.
Invoking Methods from Unity Events: In this example, PlayIntroNarration() is invoked inside Start(), so it runs automatically once when the GameObject is initialized. You could also call methods from Update() (to run every frame) or from other methods and events, depending on when you want the logic to execute.
void Start()
{
    Debug.Log("Initializing XFactory...");
    PlayIntroNarration(); // Runs once at the start
    Debug.Log("Initialization complete.");
}

void PlayIntroNarration()
{
    Debug.Log("Hello, Jackets! Welcome to XFactory!");
}
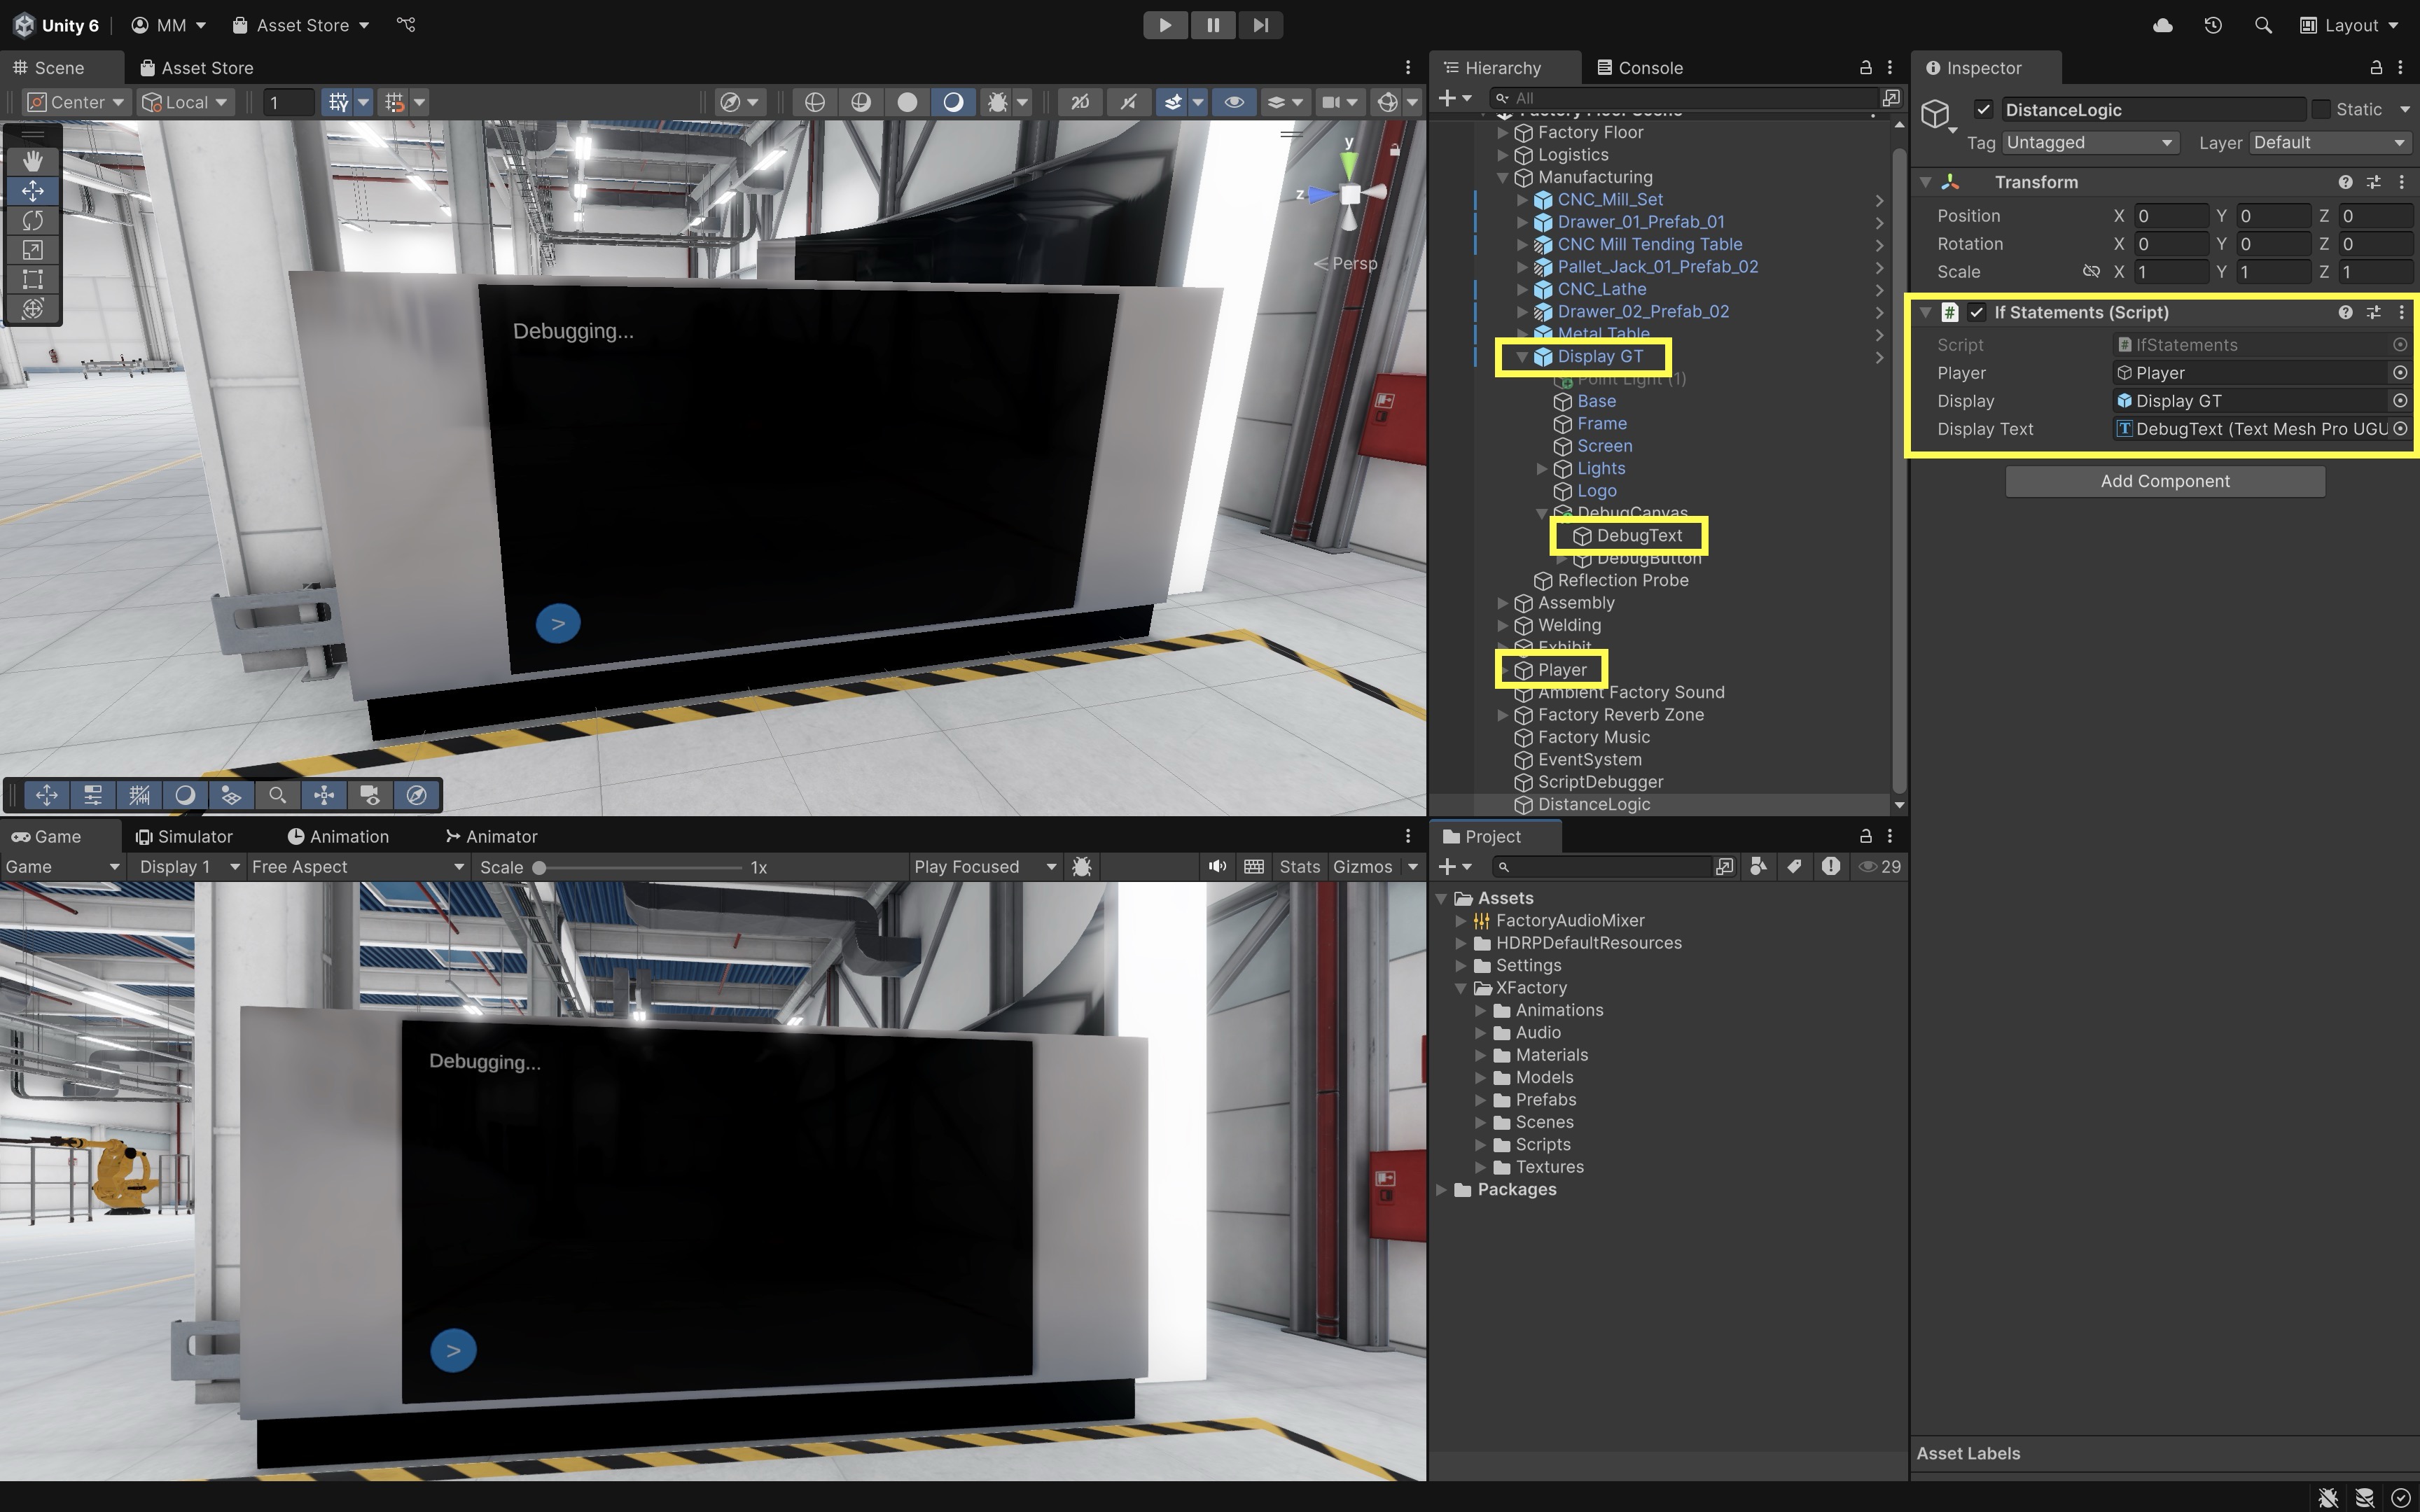
Invoking Methods from UI Events: In Unity, you can also call a method in response to events, such as clicking a button in the UI or interacting with objects in an XR scene. This allows your scripts to respond dynamically to player input. For example, you can call a method when the Play Button on Display GT is pressed to trigger a custom action like running diagnostics or starting an animation:
-
Replace the content of the
CsharpFundamentals.csscript attached toScriptDebuggerwith the following script:using UnityEngine; using TMPro; public class CsharpFundamentals : MonoBehaviour { public TMP_Text myText; // Reference to the display text (TextMeshPro) // This method can be called from a UI button's OnClick event public void RunDiagnostics() { myText.text = "Diagnostics started...\nAll systems nominal."; } } - In the
Hierarchy, select the playButtononDisplay GT. - In the
Inspector, scroll to theButton (Script)component. - Under the
OnClick()section, click the+button to add a new event. -
Drag the
ScriptDebuggerGameObject into the object field.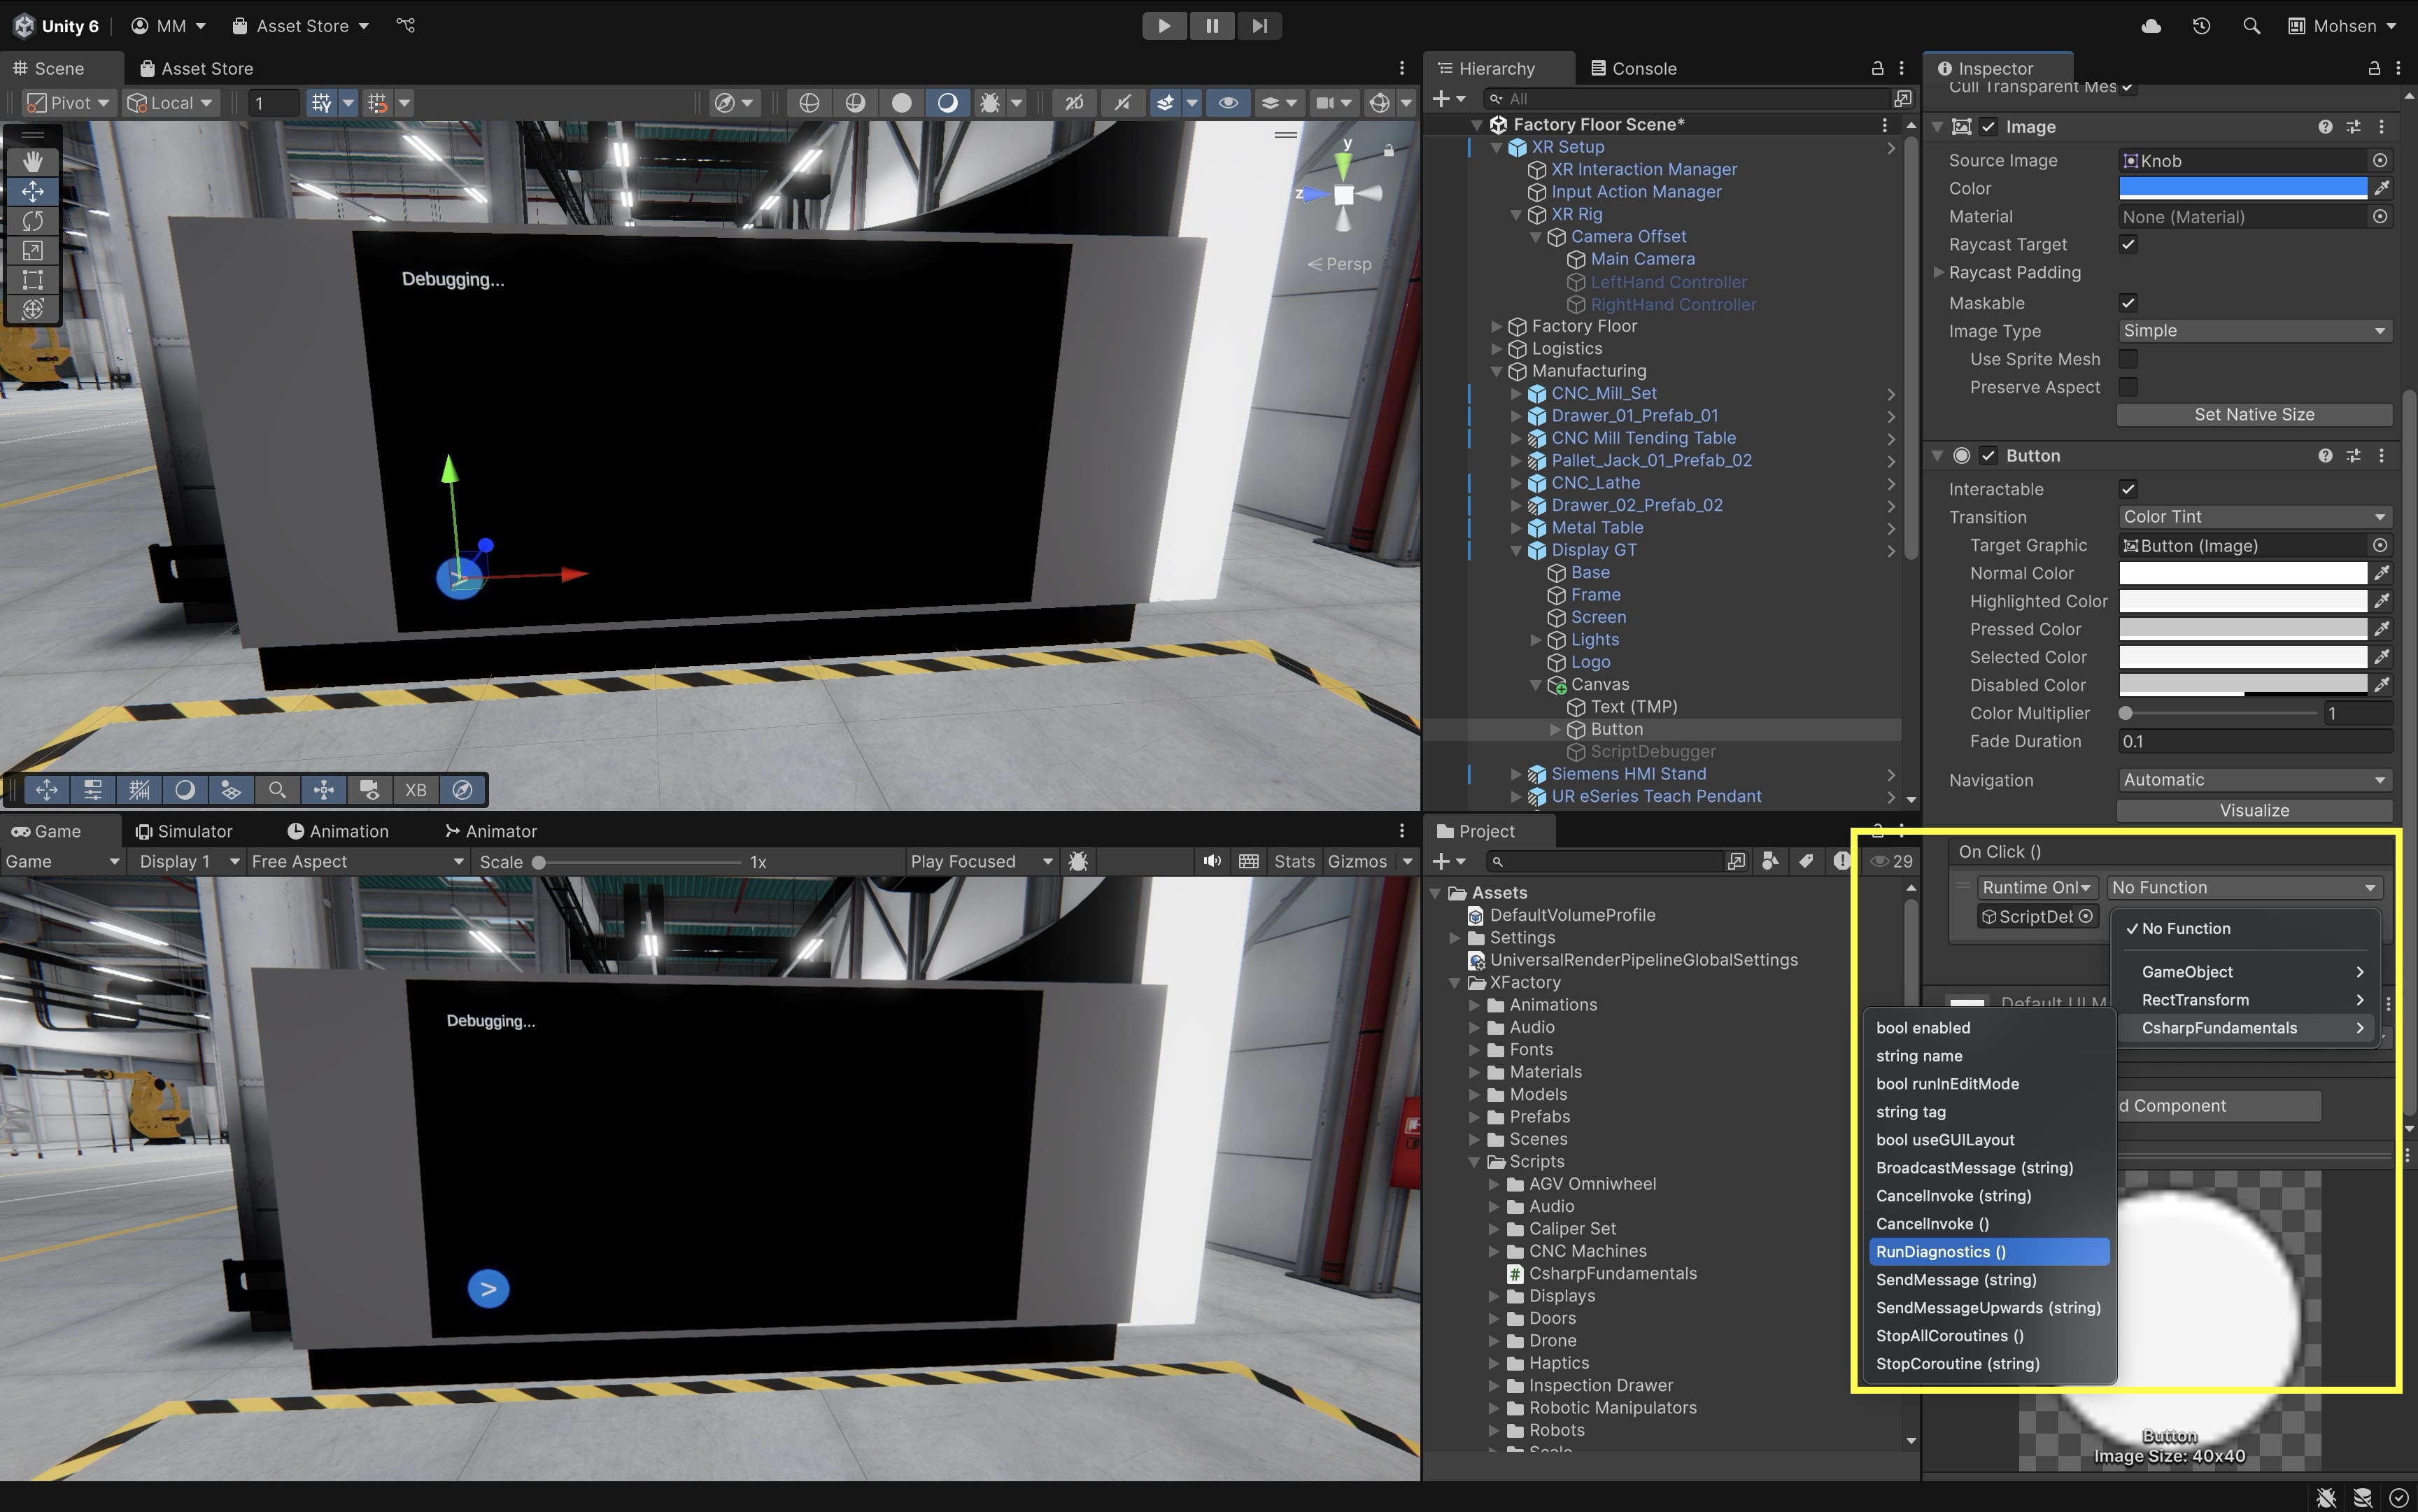
-
From the function dropdown, choose:
ScriptDebugger → RunDiagnostics(). Once connected, whenever the player presses the Play Button in XR, Unity will invoke theRunDiagnostics()method—and your display will update in real time.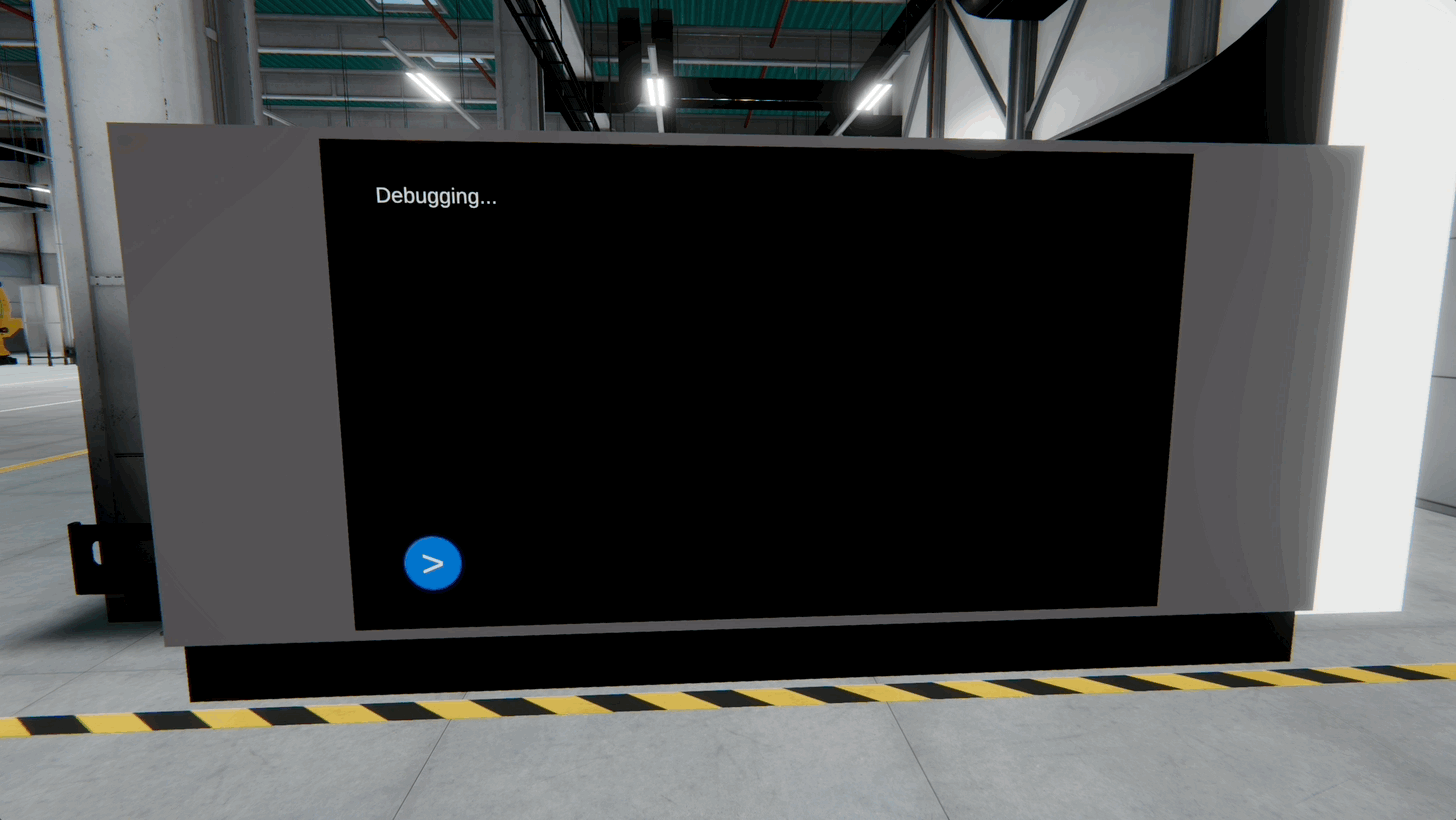
For Unity’s button
OnClick()events, methods must bepublic, returnvoid, and either take no parameters or only simple types (int,float,string,bool) that can be set in theInspector. Methods with return values or complex parameters will not appear in theOnClick()dropdown.
Overloading Methods
C# allows you to create multiple methods with the same name but different parameter lists. This is known as method overloading. It enables you to perform similar operations using different inputs, improving code flexibility and readability. These overloaded methods let you call TriggerAlert() with no context, a specific station, or a station with a detailed issue—supporting flexible alert handling in simulation scenarios.
// Overloaded methods to trigger an alert in the XFactory control system.

void TriggerAlert()
{
    Debug.Log("General alert issued across the factory.");
}

void TriggerAlert(string stationName)
{
    Debug.Log($"Alert issued at {stationName} station.");
}

void TriggerAlert(string stationName, string issue)
{
    Debug.Log($"Alert at {stationName} station: {issue}");
}
Recursive Methods
A recursive method is one that calls itself to solve a problem by breaking it down into smaller, similar subproblems. In XR-based factory simulations, recursion can be used for structured tasks such as traversing assembly steps, hierarchy trees, or performing countdowns. The script below simulates a product assembly sequence, where each recursive call represents progressing through one stage until the process is complete.
using UnityEngine;

public class RecursiveFunction : MonoBehaviour
{
    void Start()
    {
        RunAssemblyStage(5); // Start at stage 5
    }

    // Recursive method to simulate stepping through assembly stages for a product
    void RunAssemblyStage(int stage)
    {
        if (stage <= 0)
        {
            Debug.Log("Assembly process complete.");
        }
        else
        {
            Debug.Log($"Running assembly stage {stage}...");
            RunAssemblyStage(stage - 1); // Call itself with one less stage
        }
    }
}
Methods with Parameters
Think of a method as a “black box” that takes input (parameters), processes it, and optionally returns a result. When you add parameters to your methods, you enable them to accept input values-making your code more flexible, reusable, and easier to maintain. A parameter refers to a variable defined in the method’s signature; it acts as a placeholder for the input values. An argument is the actual value or reference passed to a method when it is called. When you create a method, you can declare one or more parameters, each defined by its type and name:
public class ParameterDemo : MonoBehaviour
{
    // A method that simulates scanning boxes up to a given number
    void ScanBoxes(int max)
    {
        for (int i = 0; i < max; i++)
        {
            Debug.Log("Scanning Box #" + i);
        }
    }

    void Start()
    {
        // Scan 5 boxes at the logistics station
        ScanBoxes(5);
    }
}
Reuse Code Using Parameters
Imagine you need to display sensor data from multiple areas of the factory (like power usage, machine uptime, or item counts). Instead of duplicating code, you write a single method that accepts the data as a parameter.
public class DisplayArrayDemo : MonoBehaviour
{
    // Method that displays each value from a sensor array
    void DisplaySensorData(int[] data)
    {
        foreach (int reading in data)
        {
            Debug.Log("Sensor Reading: " + reading);
        }
    }

    void Start()
    {
        int[] assemblyData = { 10, 20, 15 }; // Data from the assembly station
        int[] weldingData = { 90, 85, 88 };  // Data from the welding station

        DisplaySensorData(assemblyData);
        DisplaySensorData(weldingData);
    }
}
Method Scope
Local variables are declared inside a method and are only accessible within that method. Class-level variables (sometimes called global) are declared outside any method and can be accessed by all methods in the same class. The following example shows how status is only visible inside ShowStatus(), while stationName can be accessed throughout the class:
public class ScopeExample : MonoBehaviour
{
    string stationName = "Welding Station"; // Class-level variable

    void ShowStatus()
    {
        string status = "Operational"; // Local variable
        Debug.Log(stationName + " is " + status);
    }

    void Start()
    {
        ShowStatus();

        // Debug.Log(status); // Error: 'status' is not accessible here
        Debug.Log("Monitoring: " + stationName); // OK: class-level variable
    }
}
Value Type Parameters
When value types like int, float, or bool are passed into a method, a copy of the value is made. Changes inside the method do not affect the original variable outside the method. In the following example, even though totalWeight is updated inside the method, the original total variable in Start() remains unchanged because it was passed by value:
public class ValueTypeExample : MonoBehaviour
{
    void CalculateTotalWeight(int boxWeight, int count, int totalWeight)
    {
        totalWeight = boxWeight * count;
        Debug.Log("Inside method: Total weight = " + totalWeight);
    }

    void Start()
    {
        int boxWeight = 10;
        int count = 3;
        int total = 0;

        CalculateTotalWeight(boxWeight, count, total);
        Debug.Log("After method call: Total weight = " + total); // Still 0
    }
}
Reference Type Parameters
When reference types like arrays or objects are passed into a method, the method receives a reference to the original data. Changes inside the method directly affect the original object—useful for updating factory data in real time. Since arrays are reference types, modifying them inside the method also changes the original array.
public class ReferenceTypeExample : MonoBehaviour
{
    void ResetPackageWeights(int[] weights)
    {
        for (int i = 0; i < weights.Length; i++)
        {
            weights[i] = 0; // Reset each package's weight
        }
    }

    void Start()
    {
        int[] packageWeights = { 10, 15, 20 };
        ResetPackageWeights(packageWeights);

        foreach (int weight in packageWeights)
        {
            Debug.Log("Weight after reset: " + weight); // All values will be 0
        }
    }
}
Optional Parameters
C# supports optional parameters by allowing default values in method definitions. This is helpful when a method has sensible defaults, like logging machine status. Optional parameters reduce the need for method overloads and make calls more concise when default values suffice.
public class OptionalParamsExample : MonoBehaviour
{
    void LogStatus(
        string stationName,
        string status = "Online",
        bool notify = true
    )
    {
        Debug.Log($"Station: {stationName}, Status: {status}, Notify: {notify}");
    }

    void Start()
    {
        LogStatus("Assembly");                        // Uses default status and notify
        LogStatus("Welding", "Offline", false);       // All parameters provided
    }
}
Methods with Return Values
When a method has a return value, it processes input (via parameters) and then produces an output. This design allows you to build modular, maintainable, and reusable code in your Unity projects. Methods with return values receive input, process them, and return output. They help isolate functionality and improve code readability.
// Adds two numbers and returns the sum.
int AddNumbers(int a, int b)
{
    return a + b;
}
Return Type Syntax
The return type is the first part of a method’s signature and specifies what kind of value the method will output. Use the return keyword to send a result back to the caller. In void methods, return is optional and is only used to exit early. A method can return a primitive type (e.g., int, float, bool), a reference type (e.g., string, arrays, or objects), or void if it doesn’t return a value. For example, the LogStationStatus() method below performs an action without returning a result, while CalculatePowerUsage() returns a calculated value that can be reused in the simulation:
// Logs a simple message — returns nothing.
void LogStationStatus(string station)
{
    Debug.Log($"Status check at: {station} station.");
}

// Calculates total power used by a machine — returns a float.
float CalculatePowerUsage(float voltage, float current)
{
    return voltage * current;
}
Types of Return Values
In C#, methods can return different types of values depending on the task they perform. This makes them powerful tools for calculations, data formatting, decision-making, and managing collections. In Unity projects like XFactory, return values allow you to gather results from a process—such as computing energy costs, generating status messages, checking safety conditions, or listing machines—and use them elsewhere in your simulation for UI, logic, or analytics.
-
Returning Numbers: Methods that return numeric values are commonly used for calculations, measurements, or conversions. The returned value must match the declared return type (
int,float,double, etc.). Use explicit casting when converting between numeric types. Also, ensure operations are performed using the correct types to avoid precision loss. In XFactory, for example, this could be used to monitor or display real-time energy consumption for the welding station in a performance dashboard:// Calculates the estimated energy cost for a welding robot based on time and rate. float CalculateEnergyCost(float durationMinutes, float ratePerMinute) { return durationMinutes * ratePerMinute; } -
Returning Strings: Methods that return strings are often used for tasks such as formatting labels, generating status messages, or transforming text data. Use built-in string methods (e.g.,
ToUpper,Substring,Replace) for efficient operations. Returned strings can be used for UI labels, debug logs, or metadata tags. In XFactory, for example, this could be used to dynamically generate labels like[WELDING] STATUS: ACTIVEfor use on monitors or HUD elements:// Generates a station status label in uppercase for display on the control panel. string FormatStatusLabel(string stationName, string status) { return $"[{stationName.ToUpper()}] STATUS: {status.ToUpper()}"; } -
Returning Booleans: Boolean-returning methods are useful for decision-making, especially when evaluating safety checks, equipment states, or operational rules. Use conditional logic to evaluate system conditions. These methods integrate well with
ifstatements, UI toggles, and safety triggers. In XFactory, for example, this method could be called before activating the welding station to ensure safety compliance:// Checks whether a safety gate is closed before starting welding. bool IsGateClosed(bool leftGate, bool rightGate) { return leftGate && rightGate; } -
Returning Arrays: Methods can return arrays to provide a collection of values, which is useful when multiple related data points need to be sent back from a single method call. The return type defines the array element type and dimensions (e.g.,
int[],string[]). Additionally, ensure the returned array is properly initialized and populated before returning. In XFactory, for example, this method could be used to scan system statuses and list all machines that are currently offline for maintenance or diagnostics:// Identifies all machine IDs currently marked as "offline" from a status array. string[] GetOfflineMachines(string[] machineStatuses) { List<string> offlineMachines = new List<string>(); foreach (string status in machineStatuses) { if (status.Contains("Offline")) { offlineMachines.Add(status); } } return offlineMachines.ToArray(); }
Key Takeaways
Mastering decision logic and methods in Unity equips you to create intelligent, interactive, and scalable XR experiences. By combining Boolean checks, branching structures like switch-case, and iterative loops (for, while, do-while), you can control complex behaviors, automate repetitive tasks, and adapt to dynamic inputs in real time. Methods—especially those with parameters and return values—help you organize code into reusable, modular units, making projects easier to maintain and extend. Whether it’s reacting to player actions, managing simulation states, or processing sensor data, these programming tools form the backbone of responsive, maintainable, and immersive Unity applications.