C1. Fundamentals of C#
Learning Outcomes
- Describe the basics of C# scripting in Unity. For preparation, read the provided descriptions on Unity C# scripting, and if you have time, explore the Unity C# scripting overview for extra context.
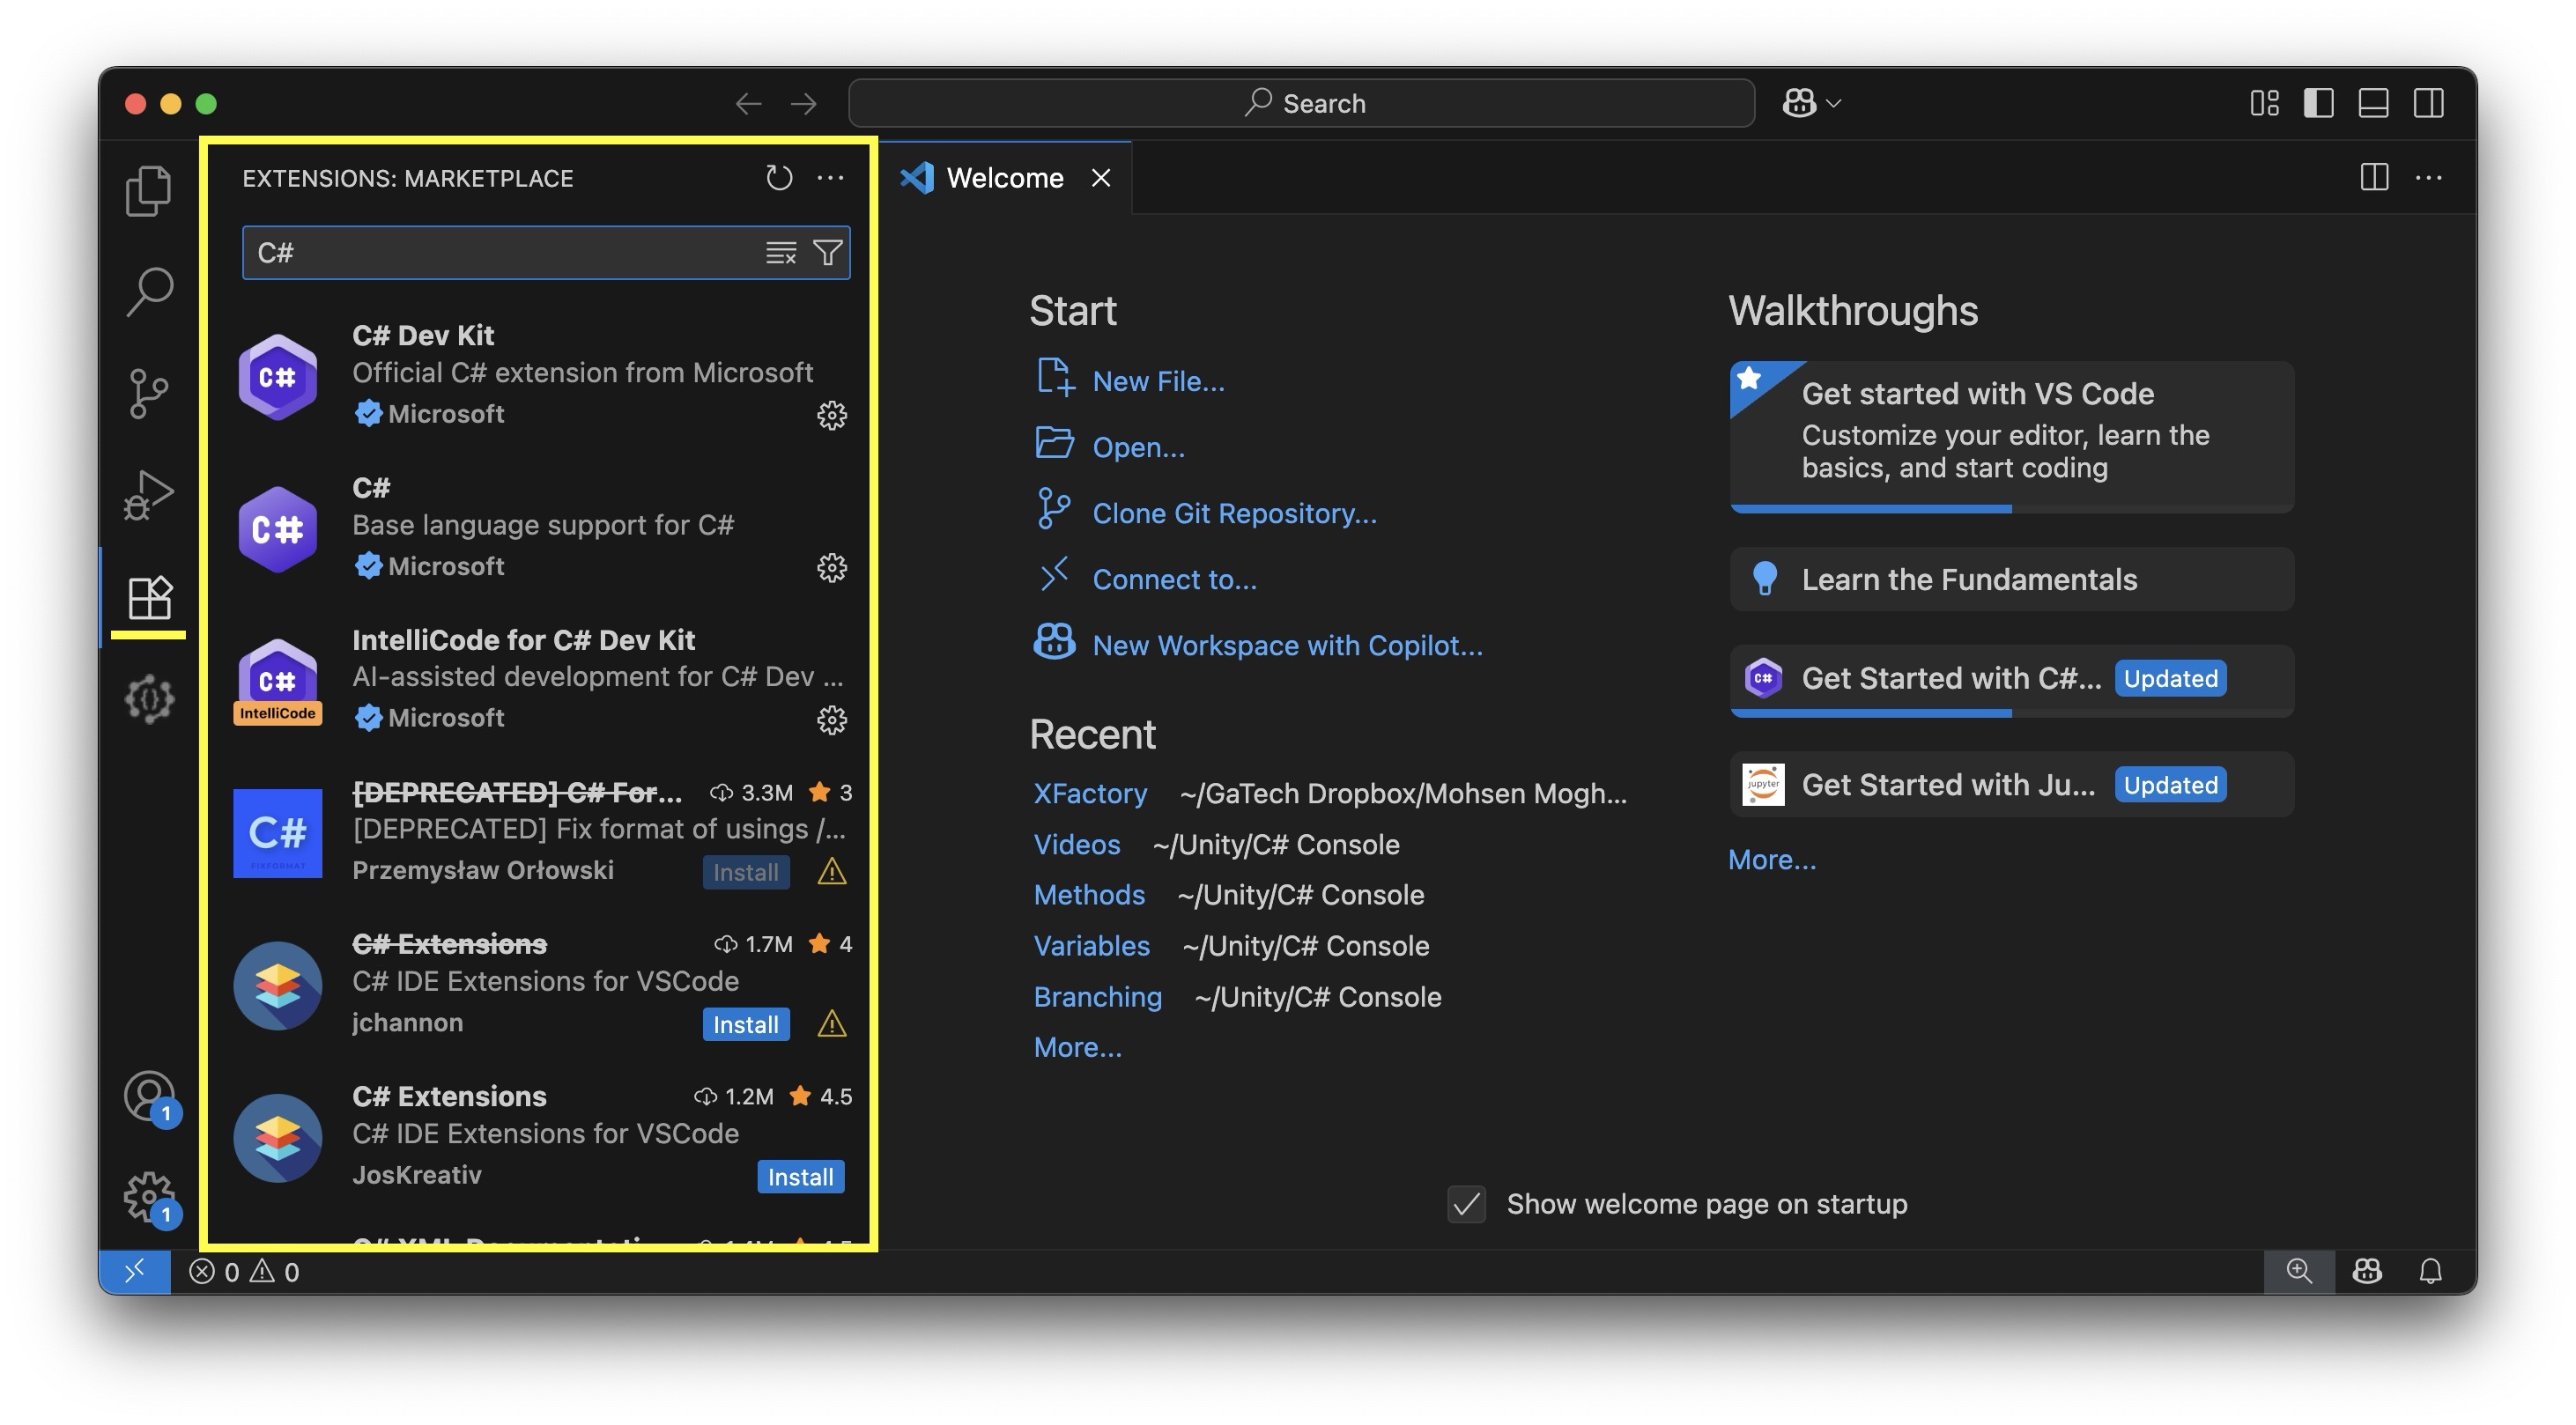
- Set up Visual Studio Code as the external script editor for Unity. Ahead of class, make sure Unity and VS Code are installed, configure VS Code in Unity’s preferences, and add only the “C# for Visual Studio Code” extension.
- Create and attach a script that inherits from
MonoBehaviour. As your pre-class exercise, create a new script, attach it to a GameObject, and log a message inStart()to verify it runs in Play mode.- Declare and print variables in C#. Before the session, write code that defines a
string,int, andbool, then print each one to the Unity Console withDebug.Log().- Use arrays to store and access multiple values. Before the session, review what arrays are in C# and be familiar with how to declare, initialize, and access them.
- Work with lists for dynamic collections. Before class, review what lists are in C# and be familiar with their basic operations (add, insert, remove, sort).
- Apply dictionaries for key-value mappings. To prepare, review what dictionaries are in C# and be familiar with how to declare, add, retrieve, and remove key-value pairs.
C# Scripting in Unity
Unity primarily uses C# (pronounced “C-sharp”) as its scripting language, offering an accessible and powerful way to develop interactive content. Whether you are new to programming or transitioning from another language like C++ or Java, C# provides a modern, flexible, and XR-friendly development environment. C# is essential for developing custom behaviors and immersive interactions in XR applications. In complex, interactive environments like XFactory, where users engage with intelligent systems—from robotic assembly to drone logistics—C# scripting allows you to bring these virtual engineering processes to life.
-
Enables Custom XR Functionality: Unity offers many built-in components (e.g., colliders, rigidbodies, UI elements), but engineering-specific behaviors—like grabbing a CNC tool, triggering a drone delivery, or activating a PLC-driven process—require scripting in C#. With C#, you can define interaction logic using XR Interaction Toolkit and OpenXR for grabbing objects with precise physics, simulating machine states and responses, or managing multi-modal feedback like audio, haptics, and UI overlays in immersive environments.
-
Industry-Standard, Beginner-Friendly: C# is widely adopted in gaming, enterprise, and simulation industries. Its clean syntax, strong type system, and memory safety make it ideal for beginners. C#’s automatic memory management reduces common errors like memory leaks. It is also easier than C++ (used in Unreal Engine) and safer for rapid prototyping in XR environments.
-
Managed Language = Stability: Running on the .NET runtime, C# provides managed execution with garbage collection, helping you build stable, crash-resistant XR applications.
-
Tight Unity Integration: C# scripts integrate directly with Unity through the
MonoBehaviourclass.MonoBehaviouruses lifecycle methods likeStart(),Update(), andOnTriggerEnter()to handle events. You can simply attach scripts to GameObjects in scenes to drive interactivity. -
Object-Oriented Modeling for XR Systems: Object-Oriented Programming (OOP) enables modular, reusable components—essential for scalable XR development. Model your XR scene using classes that represent
RobotArmController.cs,MobileRobotNavigator.cs, andDroneDeliverySystem.cs. -
Powerful Tooling & IDE Support: Use Visual Studio Code or Visual Studio with features like IntelliSense (helps autocomplete XR APIs), Debugger (step through your logic), and Profiler (optimize frame rate).
-
Rapid Iteration in XR Prototyping: Unity’s live play mode lets you immediately test C# scripts. This is vital in XR, where iterative design improves immersion and fast tweaks ensure smooth user interactions (e.g., grabbing, teleporting, UI control).
-
Scalable for Advanced XR Scenarios: C# scales from educational demos to large digital twin simulations. As your app grows to include real-time multimodal data, AI agents, or cloud-based monitoring, your codebase can evolve to meet enterprise-grade needs.
Review Microsoft’s C# Language Documentation, which offers a comprehensive overview of the language, including a guided C# tour, core fundamentals, the C# for Beginners video series, and self-paced Learn C# courses.
Setting Up an IDE
An Integrated Development Environment (IDE) is a one-stop toolset for software development. It typically includes:
- A code editor (with features like syntax highlighting, code completion, and refactoring tools)
- A compiler or interpreter (for building and running your code)
- Debugging tools (to help you inspect variables, monitor execution flow, and fix errors)
- Additional productivity features (e.g., integrated version control, project navigation, code analysis)
Visual Studio Code
Unity supports multiple IDEs (Visual Studio, Visual Studio Code, JetBrains Rider). Visual Studio Code (VS Code) is particularly popular, especially for students and developers working across different platforms, due to its lightweight footprint, cross-platform compatibility (Windows, macOS, Linux), extensive ecosystem of extensions (including C# development and Unity-specific tools), and active developer community.
- Prerequisites: Before configuring VS Code to work with Unity, confirm the following:
- Unity is Installed: If you haven’t already, install a recent version of Unity (Unity 6 or later recommended). The Unity Hub can help manage versions and project templates.
- Visual Studio Code is Installed: Download and install the latest version of Visual Studio Code.
- Unity Editor Project Ready: Open an existing Unity project or create a new one.
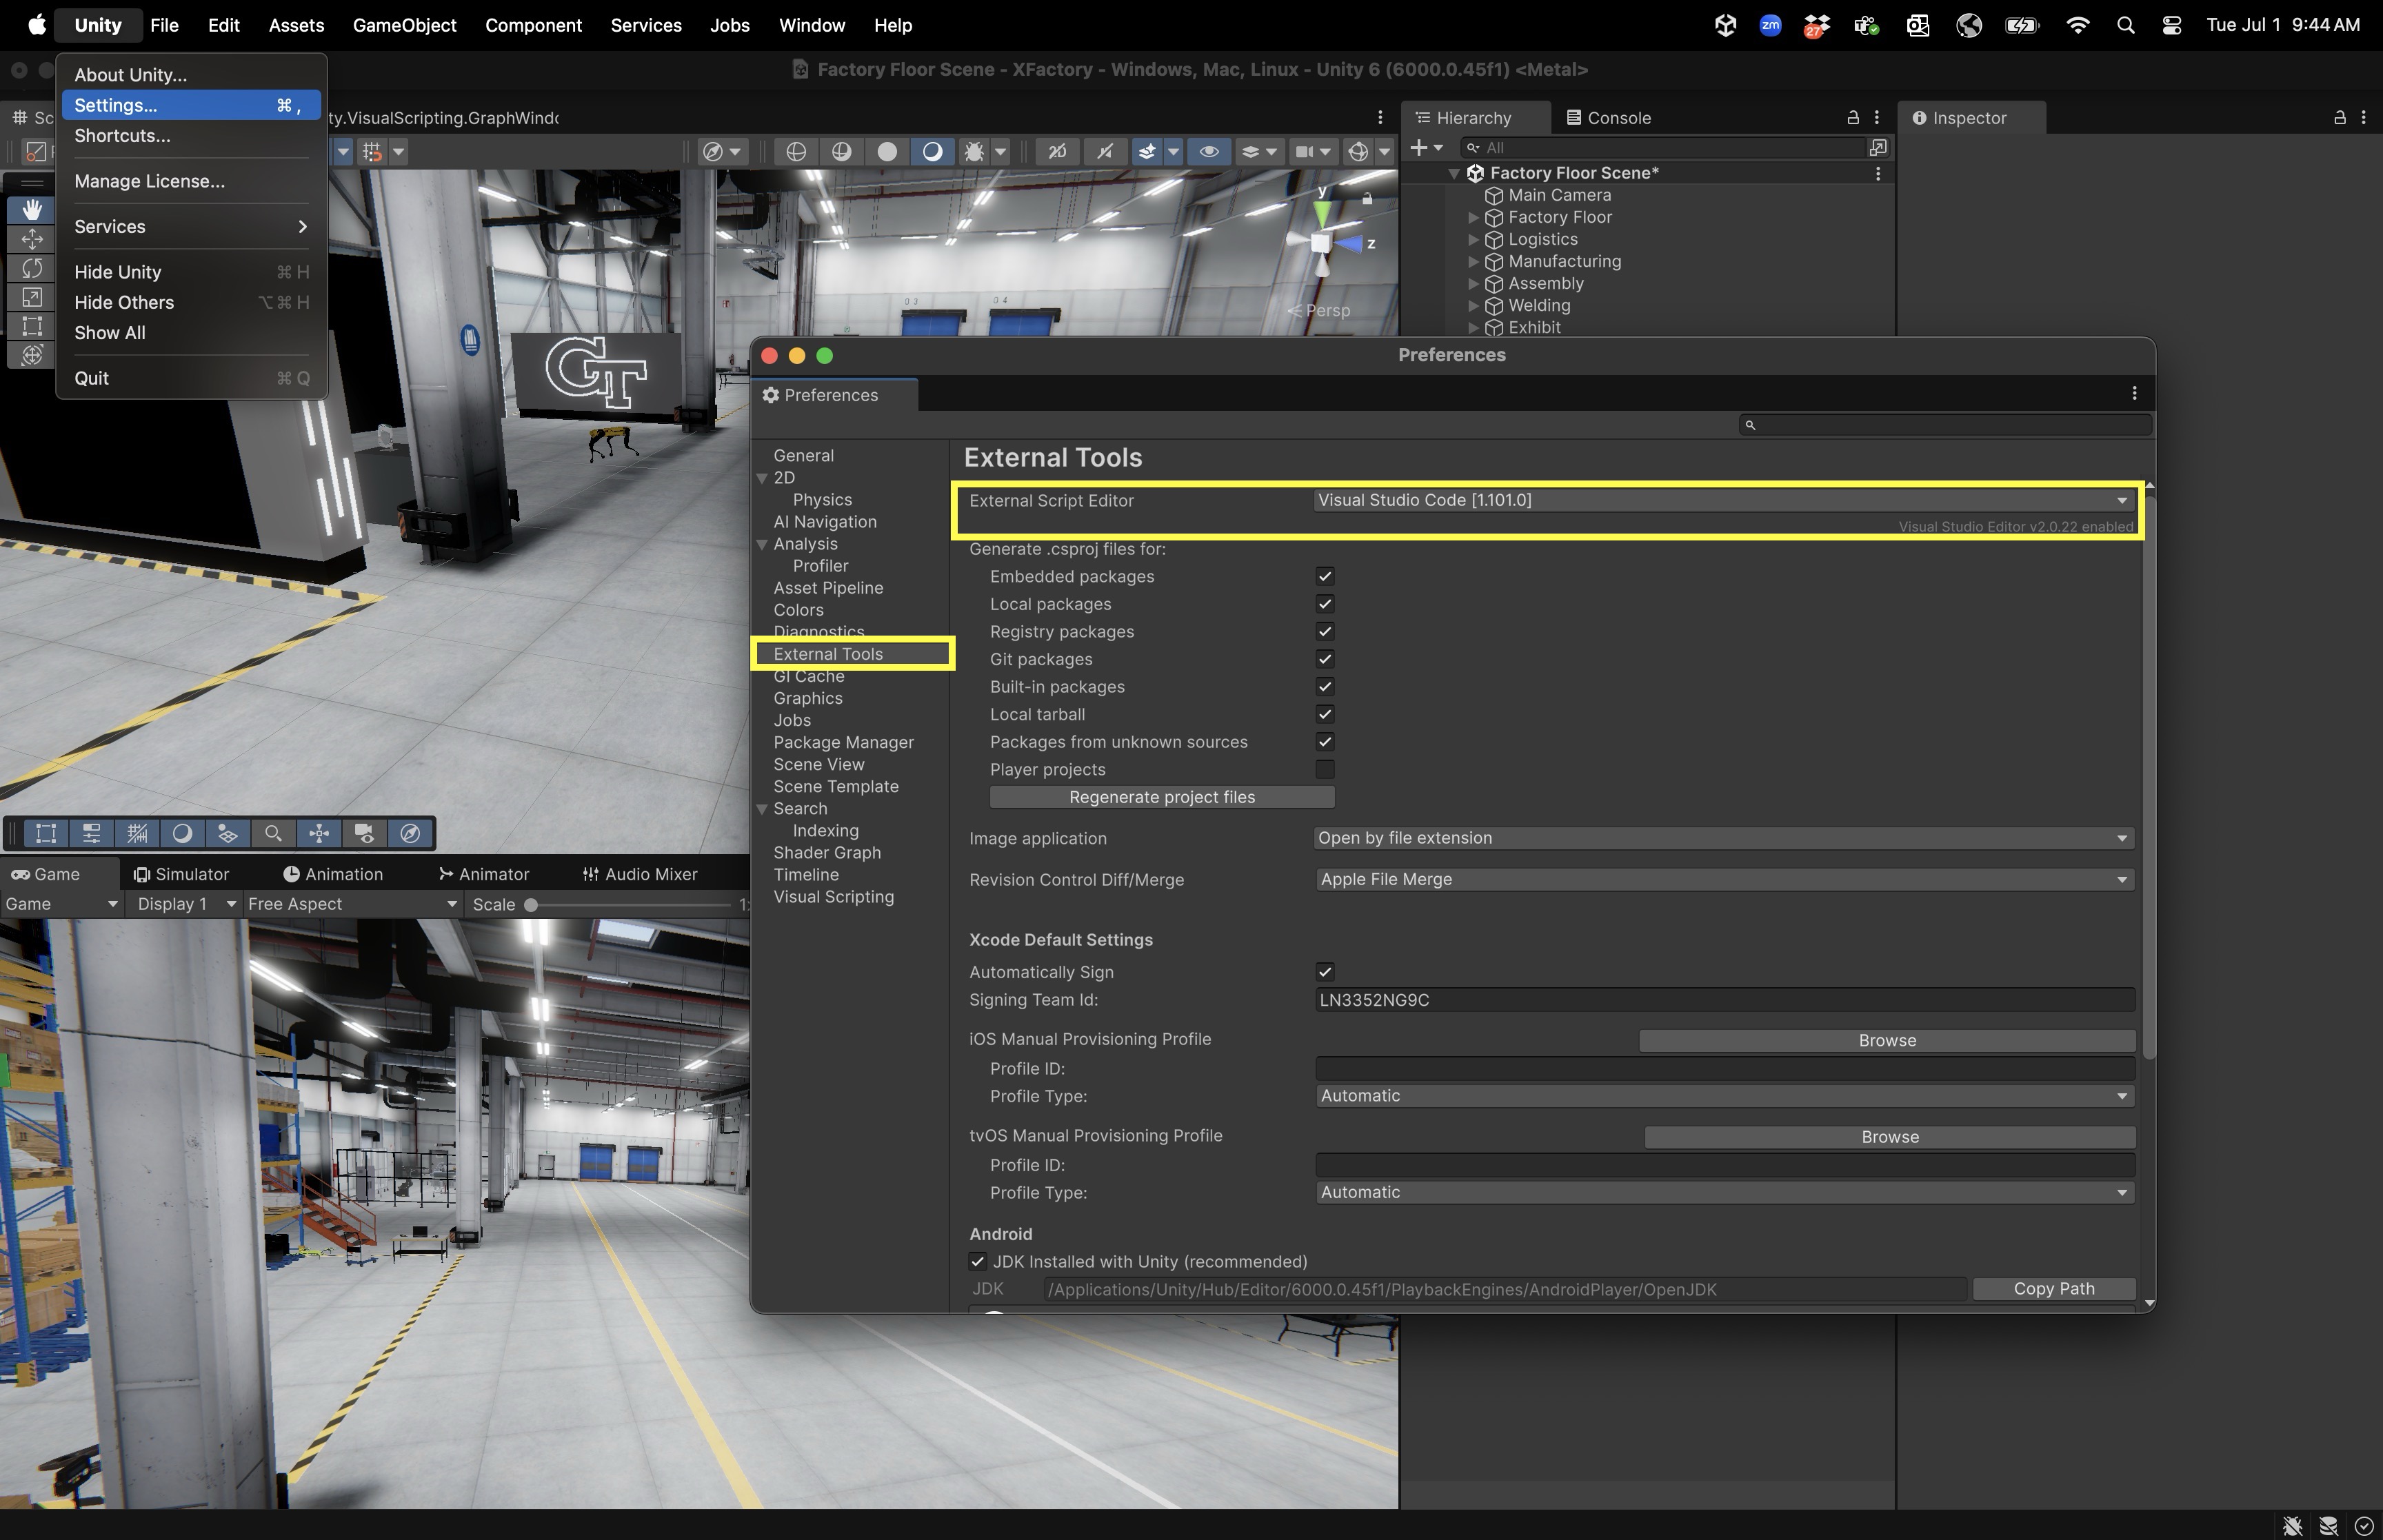
- IDE Preference: To set VS Code as your script editor:
- In the Unity Editor, go to
Edit > Preferences(on macOS,Unity > Settings...). - Select
External Toolsin the left navigation panel. - Under
External Script Editor, selectVisual Studio Codefrom the dropdown. If VS Code is not shown, selectBrowse…and locate your VS Code executable. - When you double-click a C# script in the Unity Editor, it will now open in VS Code by default.
- In the Unity Editor, go to
Configuring VS Code
For a full IDE experience—code completion (IntelliSense), debugging, code analysis, and code generation (GitHub Copilot)—you will need specific extensions and Unity packages.
- VS Code Extensions:
- C# for Visual Studio Code: Provides core C# editing features like IntelliSense, syntax checking, and basic debugging support.
- C# Dev Kit: Enhances the base C# extension with richer editing, diagnostics, and code navigation tools.
- Unity for Visual Studio Code: Offers Unity-specific integrations such as code snippets, event function templates (e.g.,
Start(),OnTriggerEnter()), and helpful Unity metadata.
- Unity Packages:
- Unity Visual Studio Editor: (
com.unity.ide.visualstudio) This package connects Unity with Visual Studio Code or Visual Studio. Version 2.0.20+ is included with most recent Unity installations. - Confirm your
External Script Editoris set to VS Code (as described above).
- Unity Visual Studio Editor: (
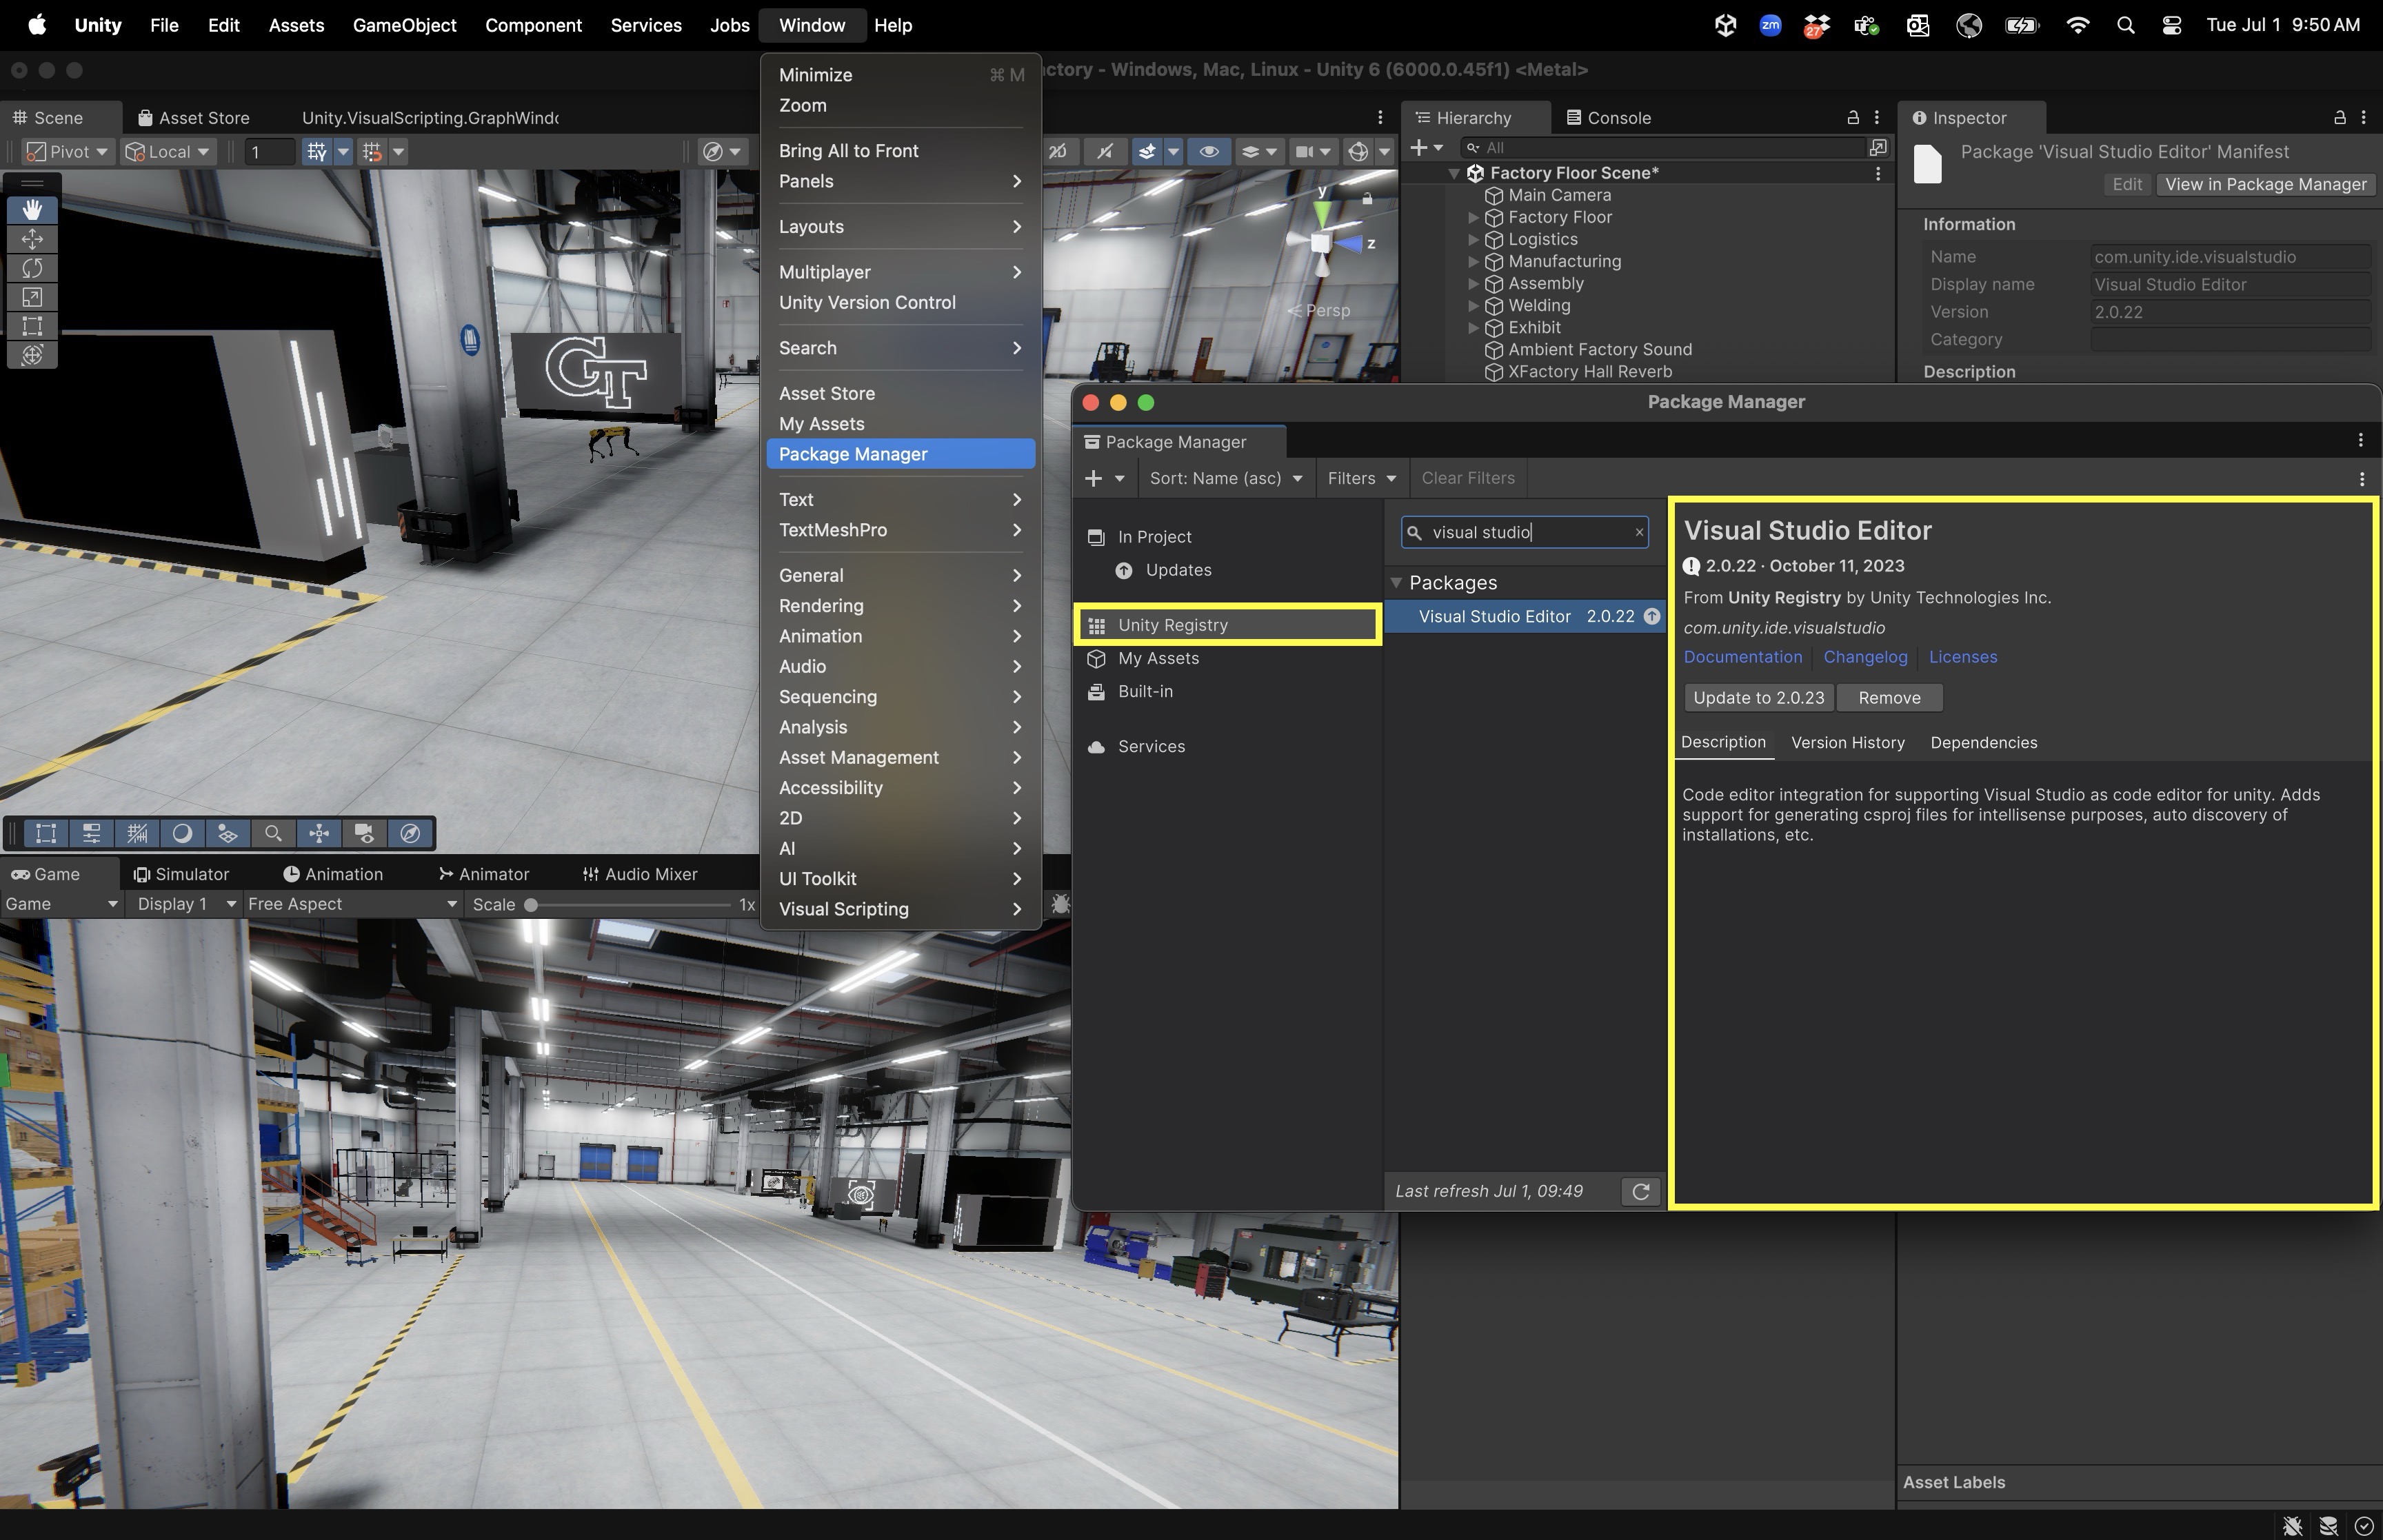
The
com.unity.ide.vscodepackage is deprecated. Stick withcom.unity.ide.visualstudio, which now supports both Visual Studio and VS Code.
IntelliSense
IntelliSense provides real-time code suggestions and helps reduce syntax errors.
-
Code Completion: Open a C# script and start typing. You should see suggestions for Unity types and methods (e.g.,
SetActive()orGetComponent<T>()). If suggestions don’t appear, make sureOmnisharpis running and your Unity project is correctly referenced in VS Code. -
Debugging: In Unity, enable
Script Debuggingin the play/build configuration. In VS Code, go to theRun and Debugview, select the Unity launch configuration, and clickStart Debugging. You can set breakpoints, inspect variables, and trace execution flow.
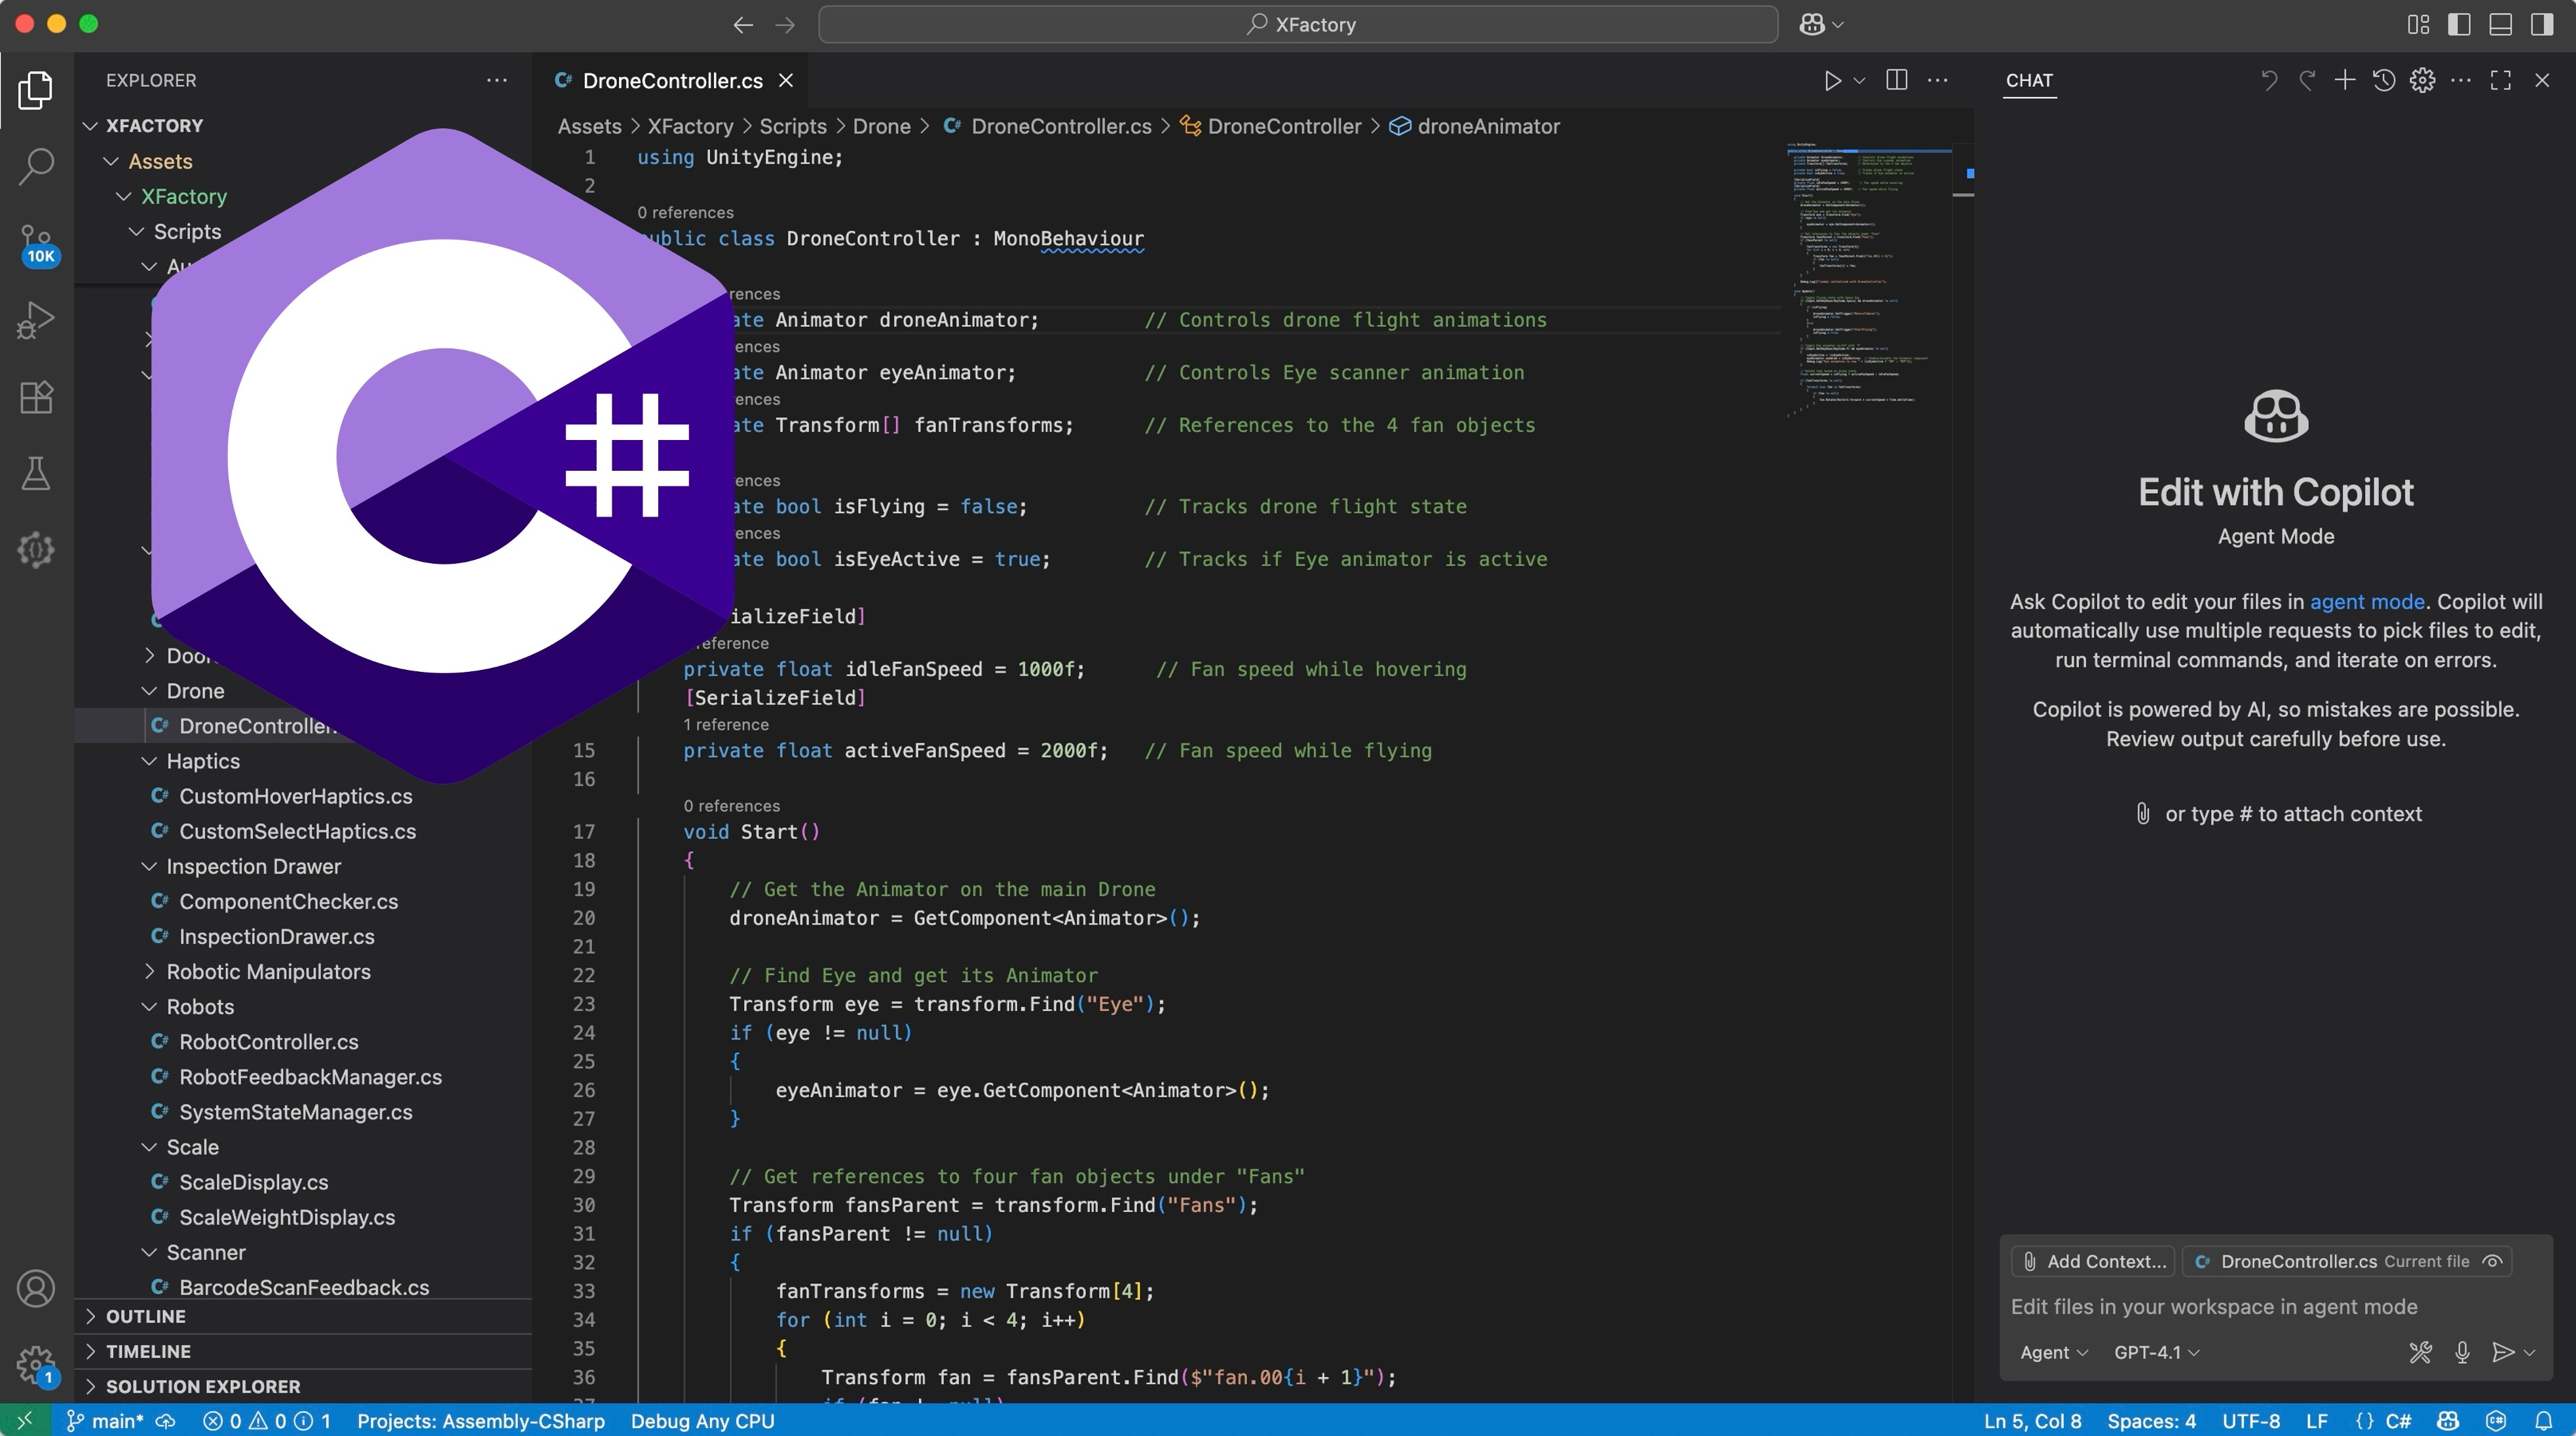
GitHub Copilot
GitHub Copilot is an AI-powered coding assistant that uses large language models to suggest code completions, generate entire functions, and offer documentation-like guidance as you type. It works directly within your IDE, including VS Code, and can be a valuable companion while scripting in Unity.
-
Code Suggestions and Autocompletion: Copilot can suggest complete lines or blocks of C# code based on your comments or partial input. For example, typing a comment like
// Move drone to target positionmay prompt Copilot to generate a fullUpdate()function usingtransform.positionandVector3.MoveTowards(). -
Learning Aid and Productivity Booster: Copilot can serve as a real-time coding tutor, demonstrating Unity scripting patterns as you work. It can help you recall Unity API usage or suggest proper syntax when working with components like
AnimatororCollider. -
Setup Requirements: You need a GitHub account with Copilot enabled (free for students through GitHub Student Developer Pack). Install the GitHub Copilot extension from the VS Code marketplace. Sign in with your GitHub credentials and authorize the extension.
-
Using Responsibly: Treat Copilot’s suggestions as a starting point. Always review and test the generated code to ensure it fits your logic and doesn’t introduce bugs or inefficiencies.

GitHub Copilot is a powerful tool for accelerating development and overcoming coding blocks, but it does not replace understanding the Unity API or C# fundamentals. Use it to support—not substitute—your learning and engineering judgment.
What Is MonoBehaviour?
As we begin working with C# scripts in Unity, it is important to understand what MonoBehaviour is—at a high level for now. MonoBehaviour is a base class from which all Unity scripts derive by default. It provides a wide range of built-in functionality that allows Unity to recognize your script and run specific event-driven methods like Start(), Update(), and OnTriggerEnter(). These methods are called automatically by Unity at appropriate times during the game or simulation loop. You don’t need to write any special code to enable this behavior—just inherit from MonoBehaviour, and Unity takes care of the rest. MonoBehaviour connects your C# code to the GameObject system in Unity. When you create a script and attach it to a GameObject in your scene:
- Unity treats the script as a Component—just like a
Rigidbody,Collider, orAudio Source. - Your script gains access to Unity’s game loop and lifecycle.
- You can define behaviors and interactions that run automatically without needing to call them manually.
Review this Unity documentation to learn more about
MonoBehaviour.
Workflow in Unity
- Create a new script in Unity. It automatically inherits from
MonoBehaviour. - Attach the script to a GameObject (e.g., a robot arm or a cube) using one of the following methods:
- Drag and Drop: Drag the script from the
Projectwindow onto the GameObject in theHierarchyorScenewindow. - Inspector Add Component: Select the GameObject, click
Add Componentin theInspector, then search for and select the script. - From Code: (less common) Use
gameObject.AddComponent<ScriptName>();in another script to attach it programmatically.
- Drag and Drop: Drag the script from the
- Unity runs the appropriate methods based on what’s happening in the game or simulation. For example, Unity calls
Start()once when the GameObject is initialized,Update()once per frame, orOnTriggerEnter()when a collider interacts with another collider.
It is important to remember that
MonoBehaviourscripts are always Components. Therefore, they must be attached to an active GameObject to work. Sometimes, it is better to attach custom scripts to an empty GameObject—such as a “Manager” (e.g., TeleportationManager or InteractionManager)—to keep your scene clean, organized, and easier to maintain.
MonoBehaviour Example
Let’s say we want Spot, the quadruped robot in the assembly station, to move forward as soon as the scene starts. You can make it happen using a simple MonoBehaviour script:
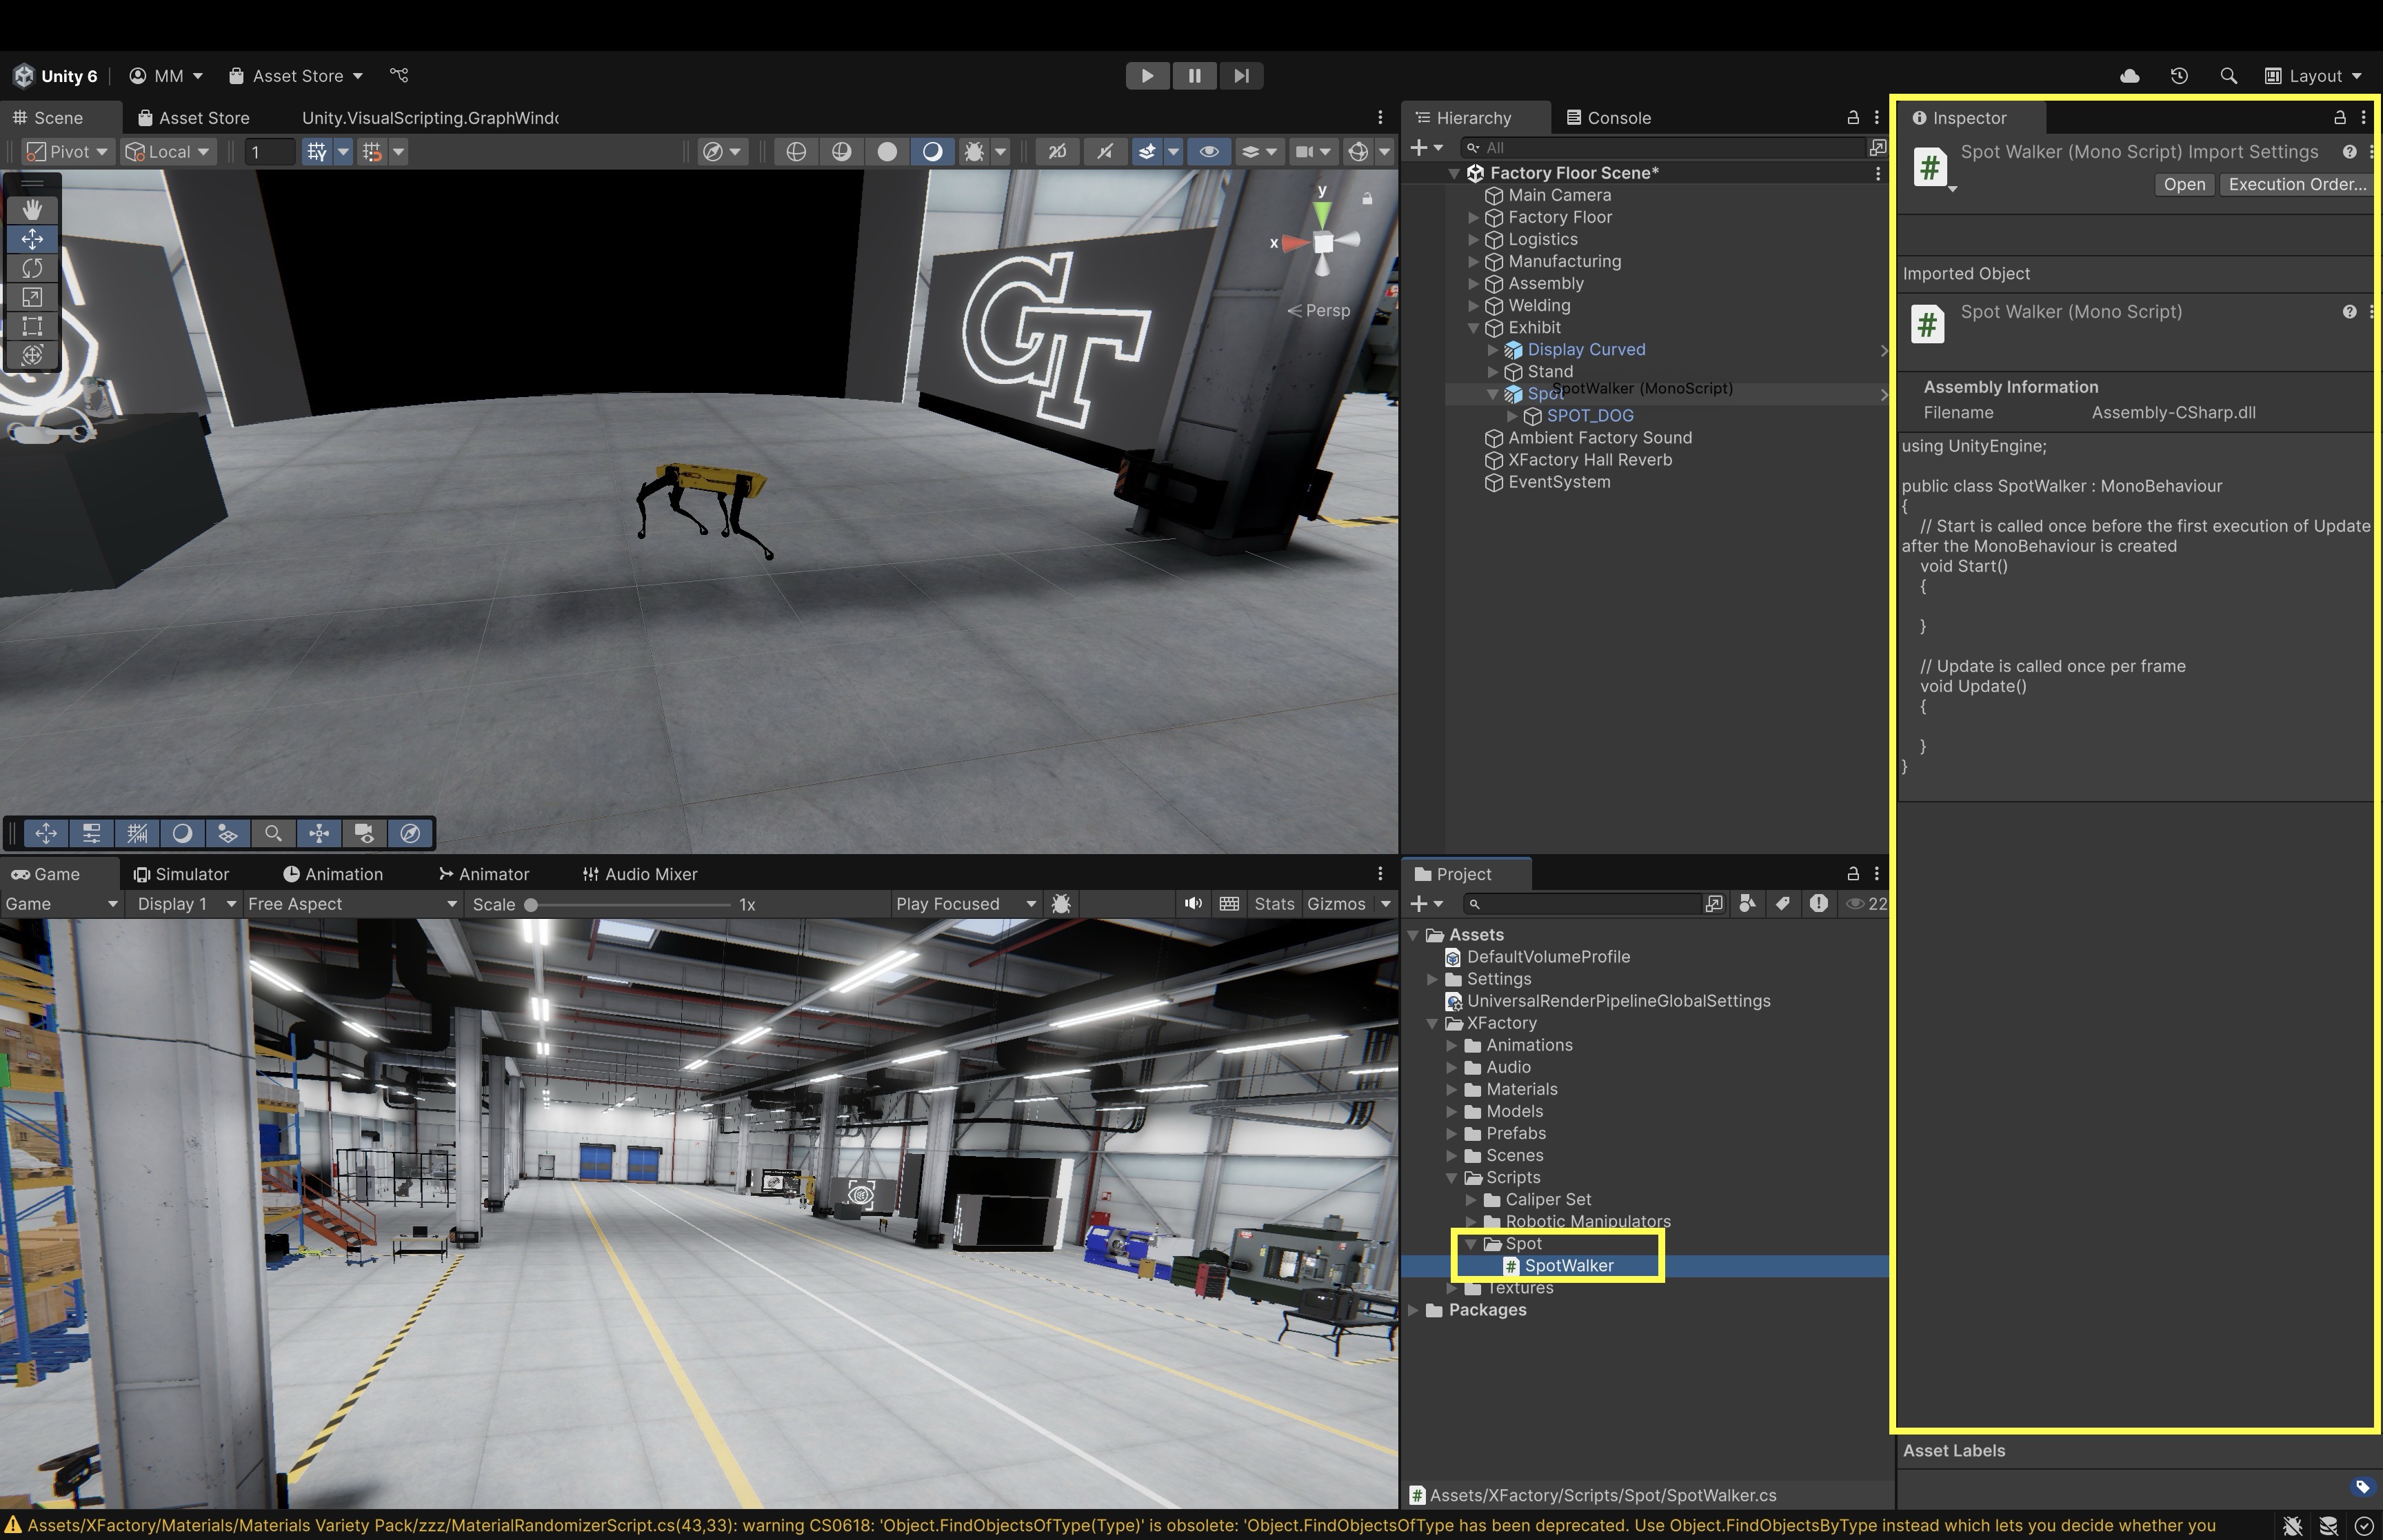
- Create a New Script:
- In the Unity Editor, navigate to the
Projectwindow. - Create a folder where you would like to store your script (e.g.,
Assets/XFactory/Scripts/Spot). - Right click on the folder and select
Create > MonoBehaviour Script. Name the scriptSpotWalker.cs.The name of the script file must exactly match the class name inside the script to avoid compilation errors in Unity.
- In the Unity Editor, navigate to the
- Attach the Script to the GameObject:
- In the
Hierarchywindow, select the quadruped robot GameObject (Spot). - Either drag the
SpotWalker.csscript from theProjectwindow into theInspectorpanel of the selected GameObject, or clickAdd Componentin theInspector, search forMobileRobotMover, and select it.
- In the
- Write the Script:
- Double-click the
SpotWalker.csscript in theProjectwindow to open it in your code IDE (e.g., VS Code). - Replace any existing template code with the following:
using UnityEngine; public class SpotWalker : MonoBehaviour { public float speed = 2.0f; // The Start() method prints a message when the simulation begins. void Start() { Debug.Log("Quadruped robot initialized."); } // The Update() method moves the robot forward every frame, // making it appear to move automatically. void Update() { // Move the robot forward continuously transform.Translate(Vector3.forward * speed * Time.deltaTime); } } - Double-click the
- Test the Movement:
- Click the
Playbutton at the top of the Unity Editor to enterPlaymode. - Adjust the public
Speedvariable from theInspectorand observe the effect. - The robot should automatically begin moving forward, following the logic defined in your script.
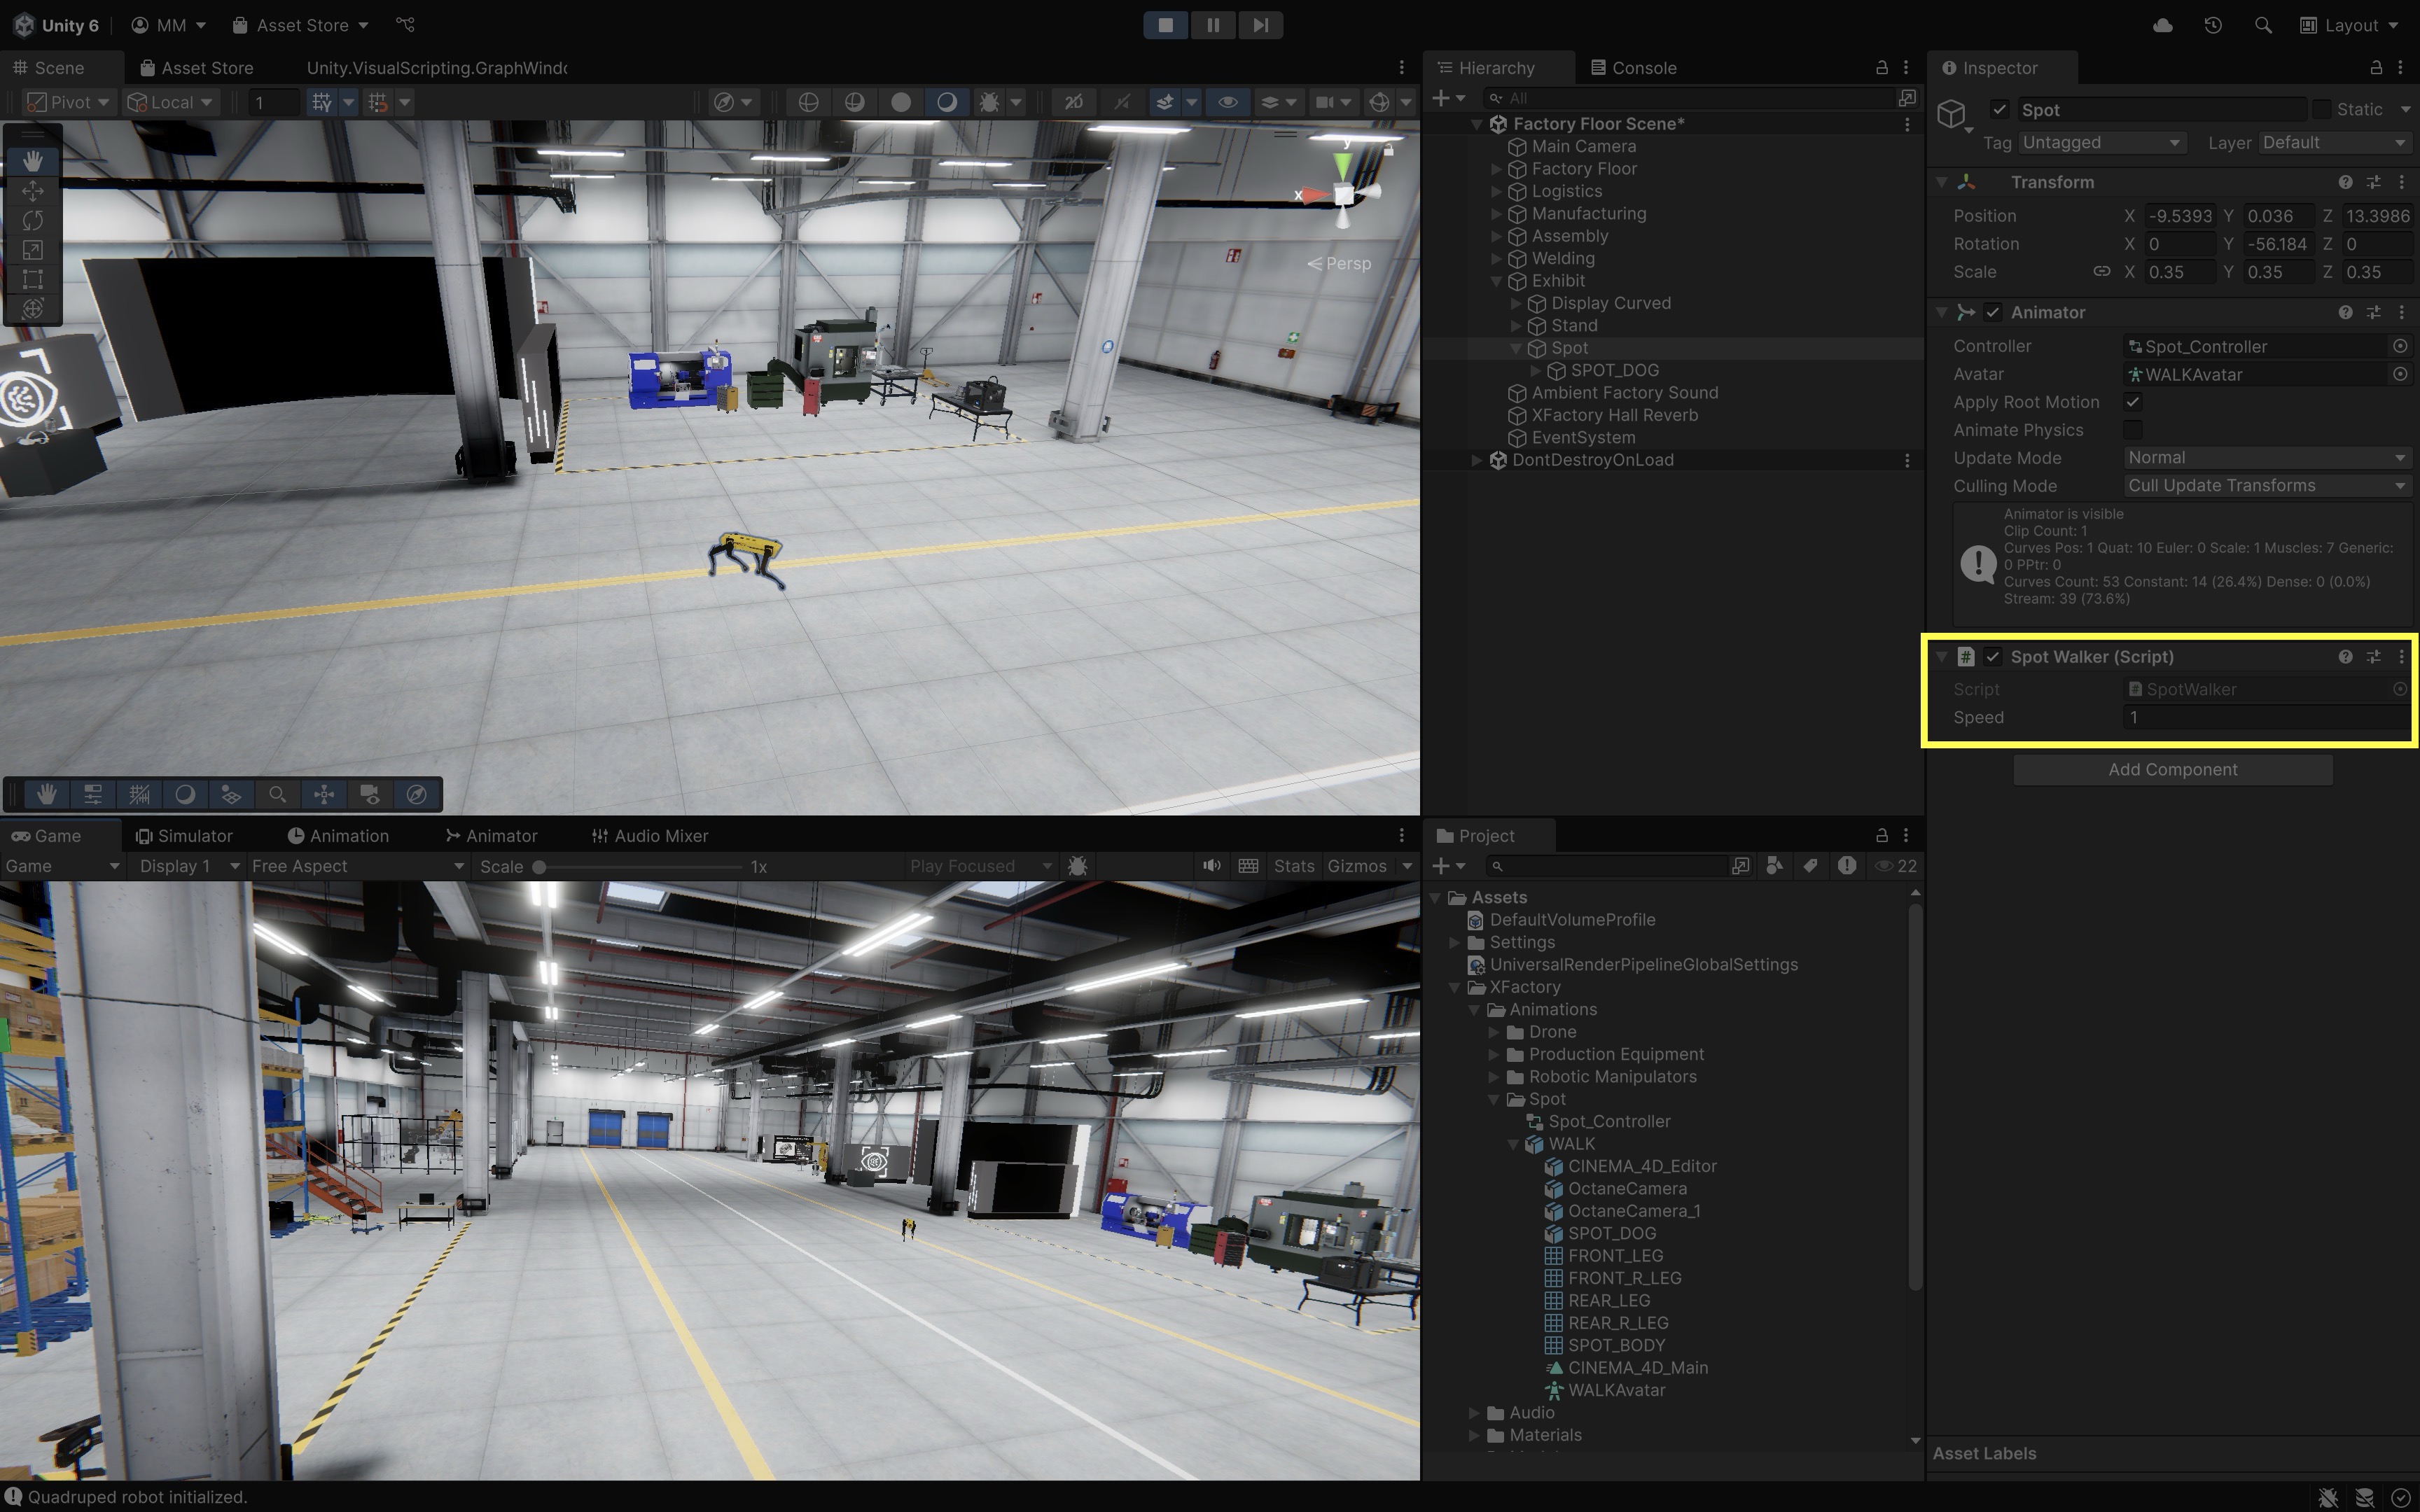
- Click the
Data & Variables in C#
In Unity development with C#, data storage and manipulation are essential for creating responsive, dynamic XR applications. C# is a strongly-typed language, which means every variable must be declared with a specific data type. This helps prevent type mismatches and supports clear, maintainable code.
Example Scene
In the remainder of this session, we will review core C# concepts by writing simple MonoBehaviour scripts. Instead of logging output in Unity’s Console with Debug.Log(), let’s create an interactive experience at XFactory’s manufacturing station, where script results appear on a large display screen (Display GT) when you press a Play button.
- Set Up the Display Canvas:
- Follow the instructions in B4 > User Interface to add a
CanvastoDisplay GT. - Set the Canvas to
World Space. - Add a
Text - TextMeshProUI element to display messages. - Add a
Buttonand set its icon to a Play symbol (>).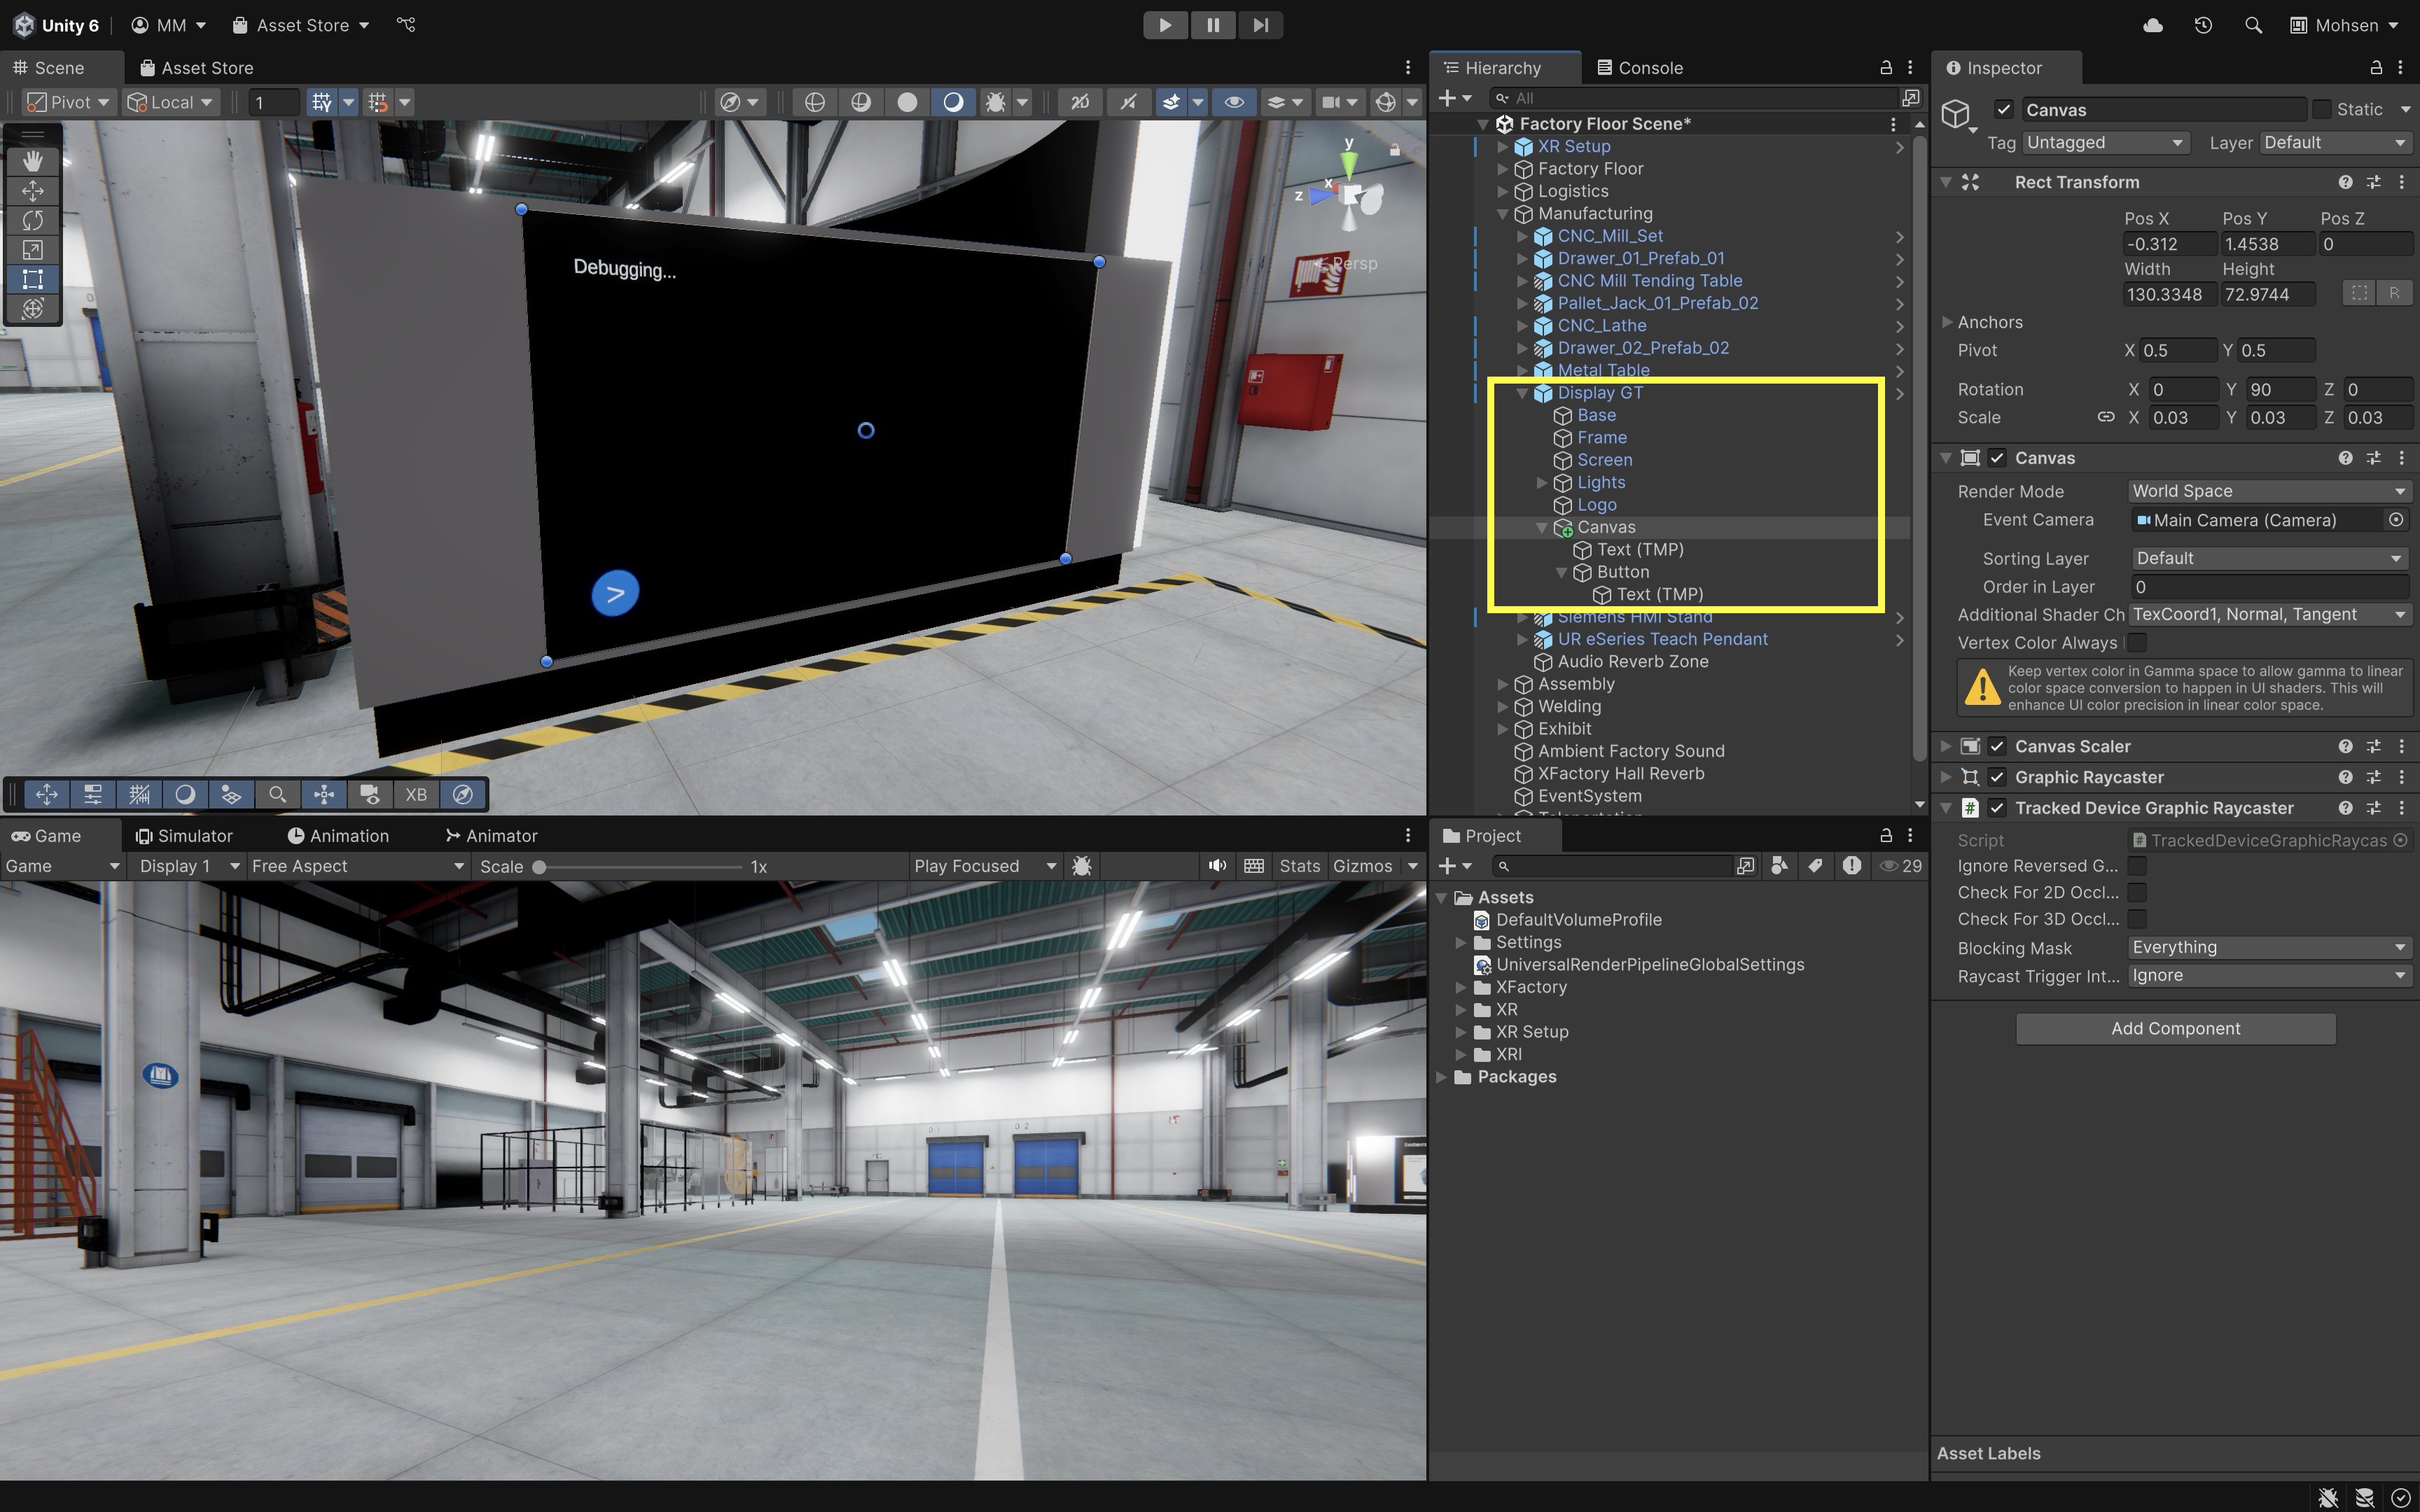
- Follow the instructions in B4 > User Interface to add a
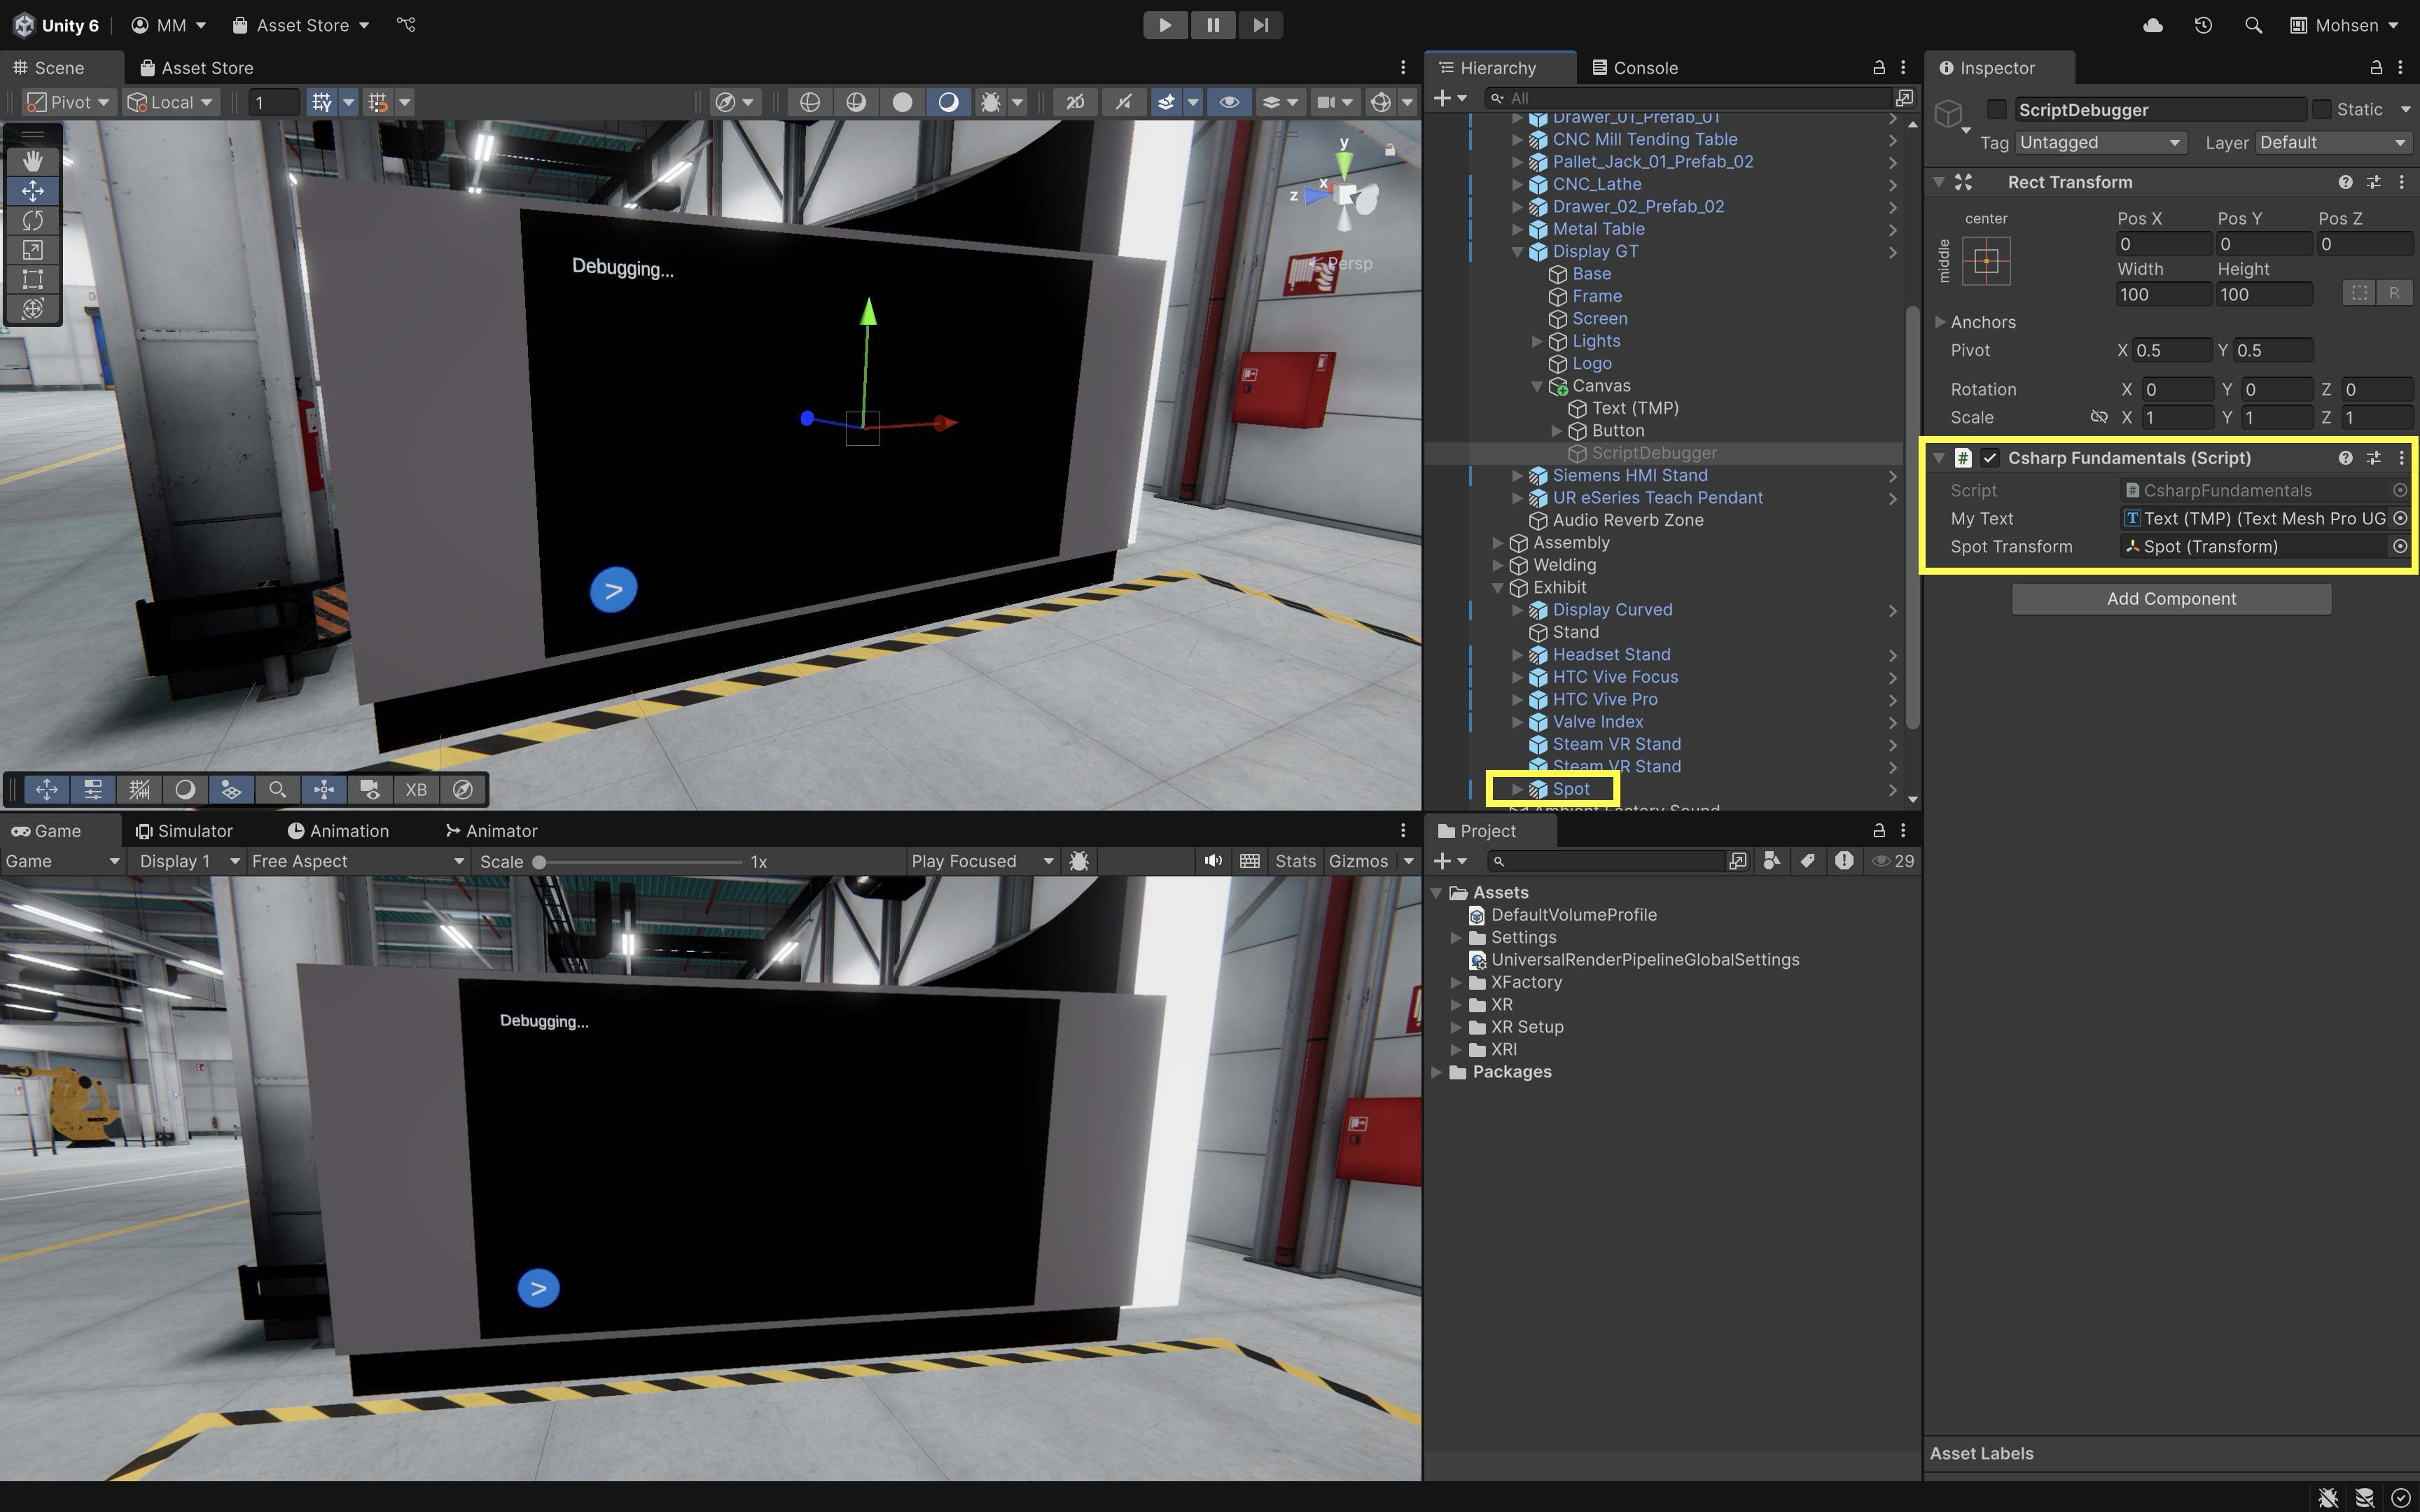
- Create a Manager Object:
- In the
Hierarchy, right-click on the sameCanvasand selectCreate Empty. - Rename it to
ScriptDebugger. - This empty GameObject will hold your custom script and keep your scene organized.
- In the
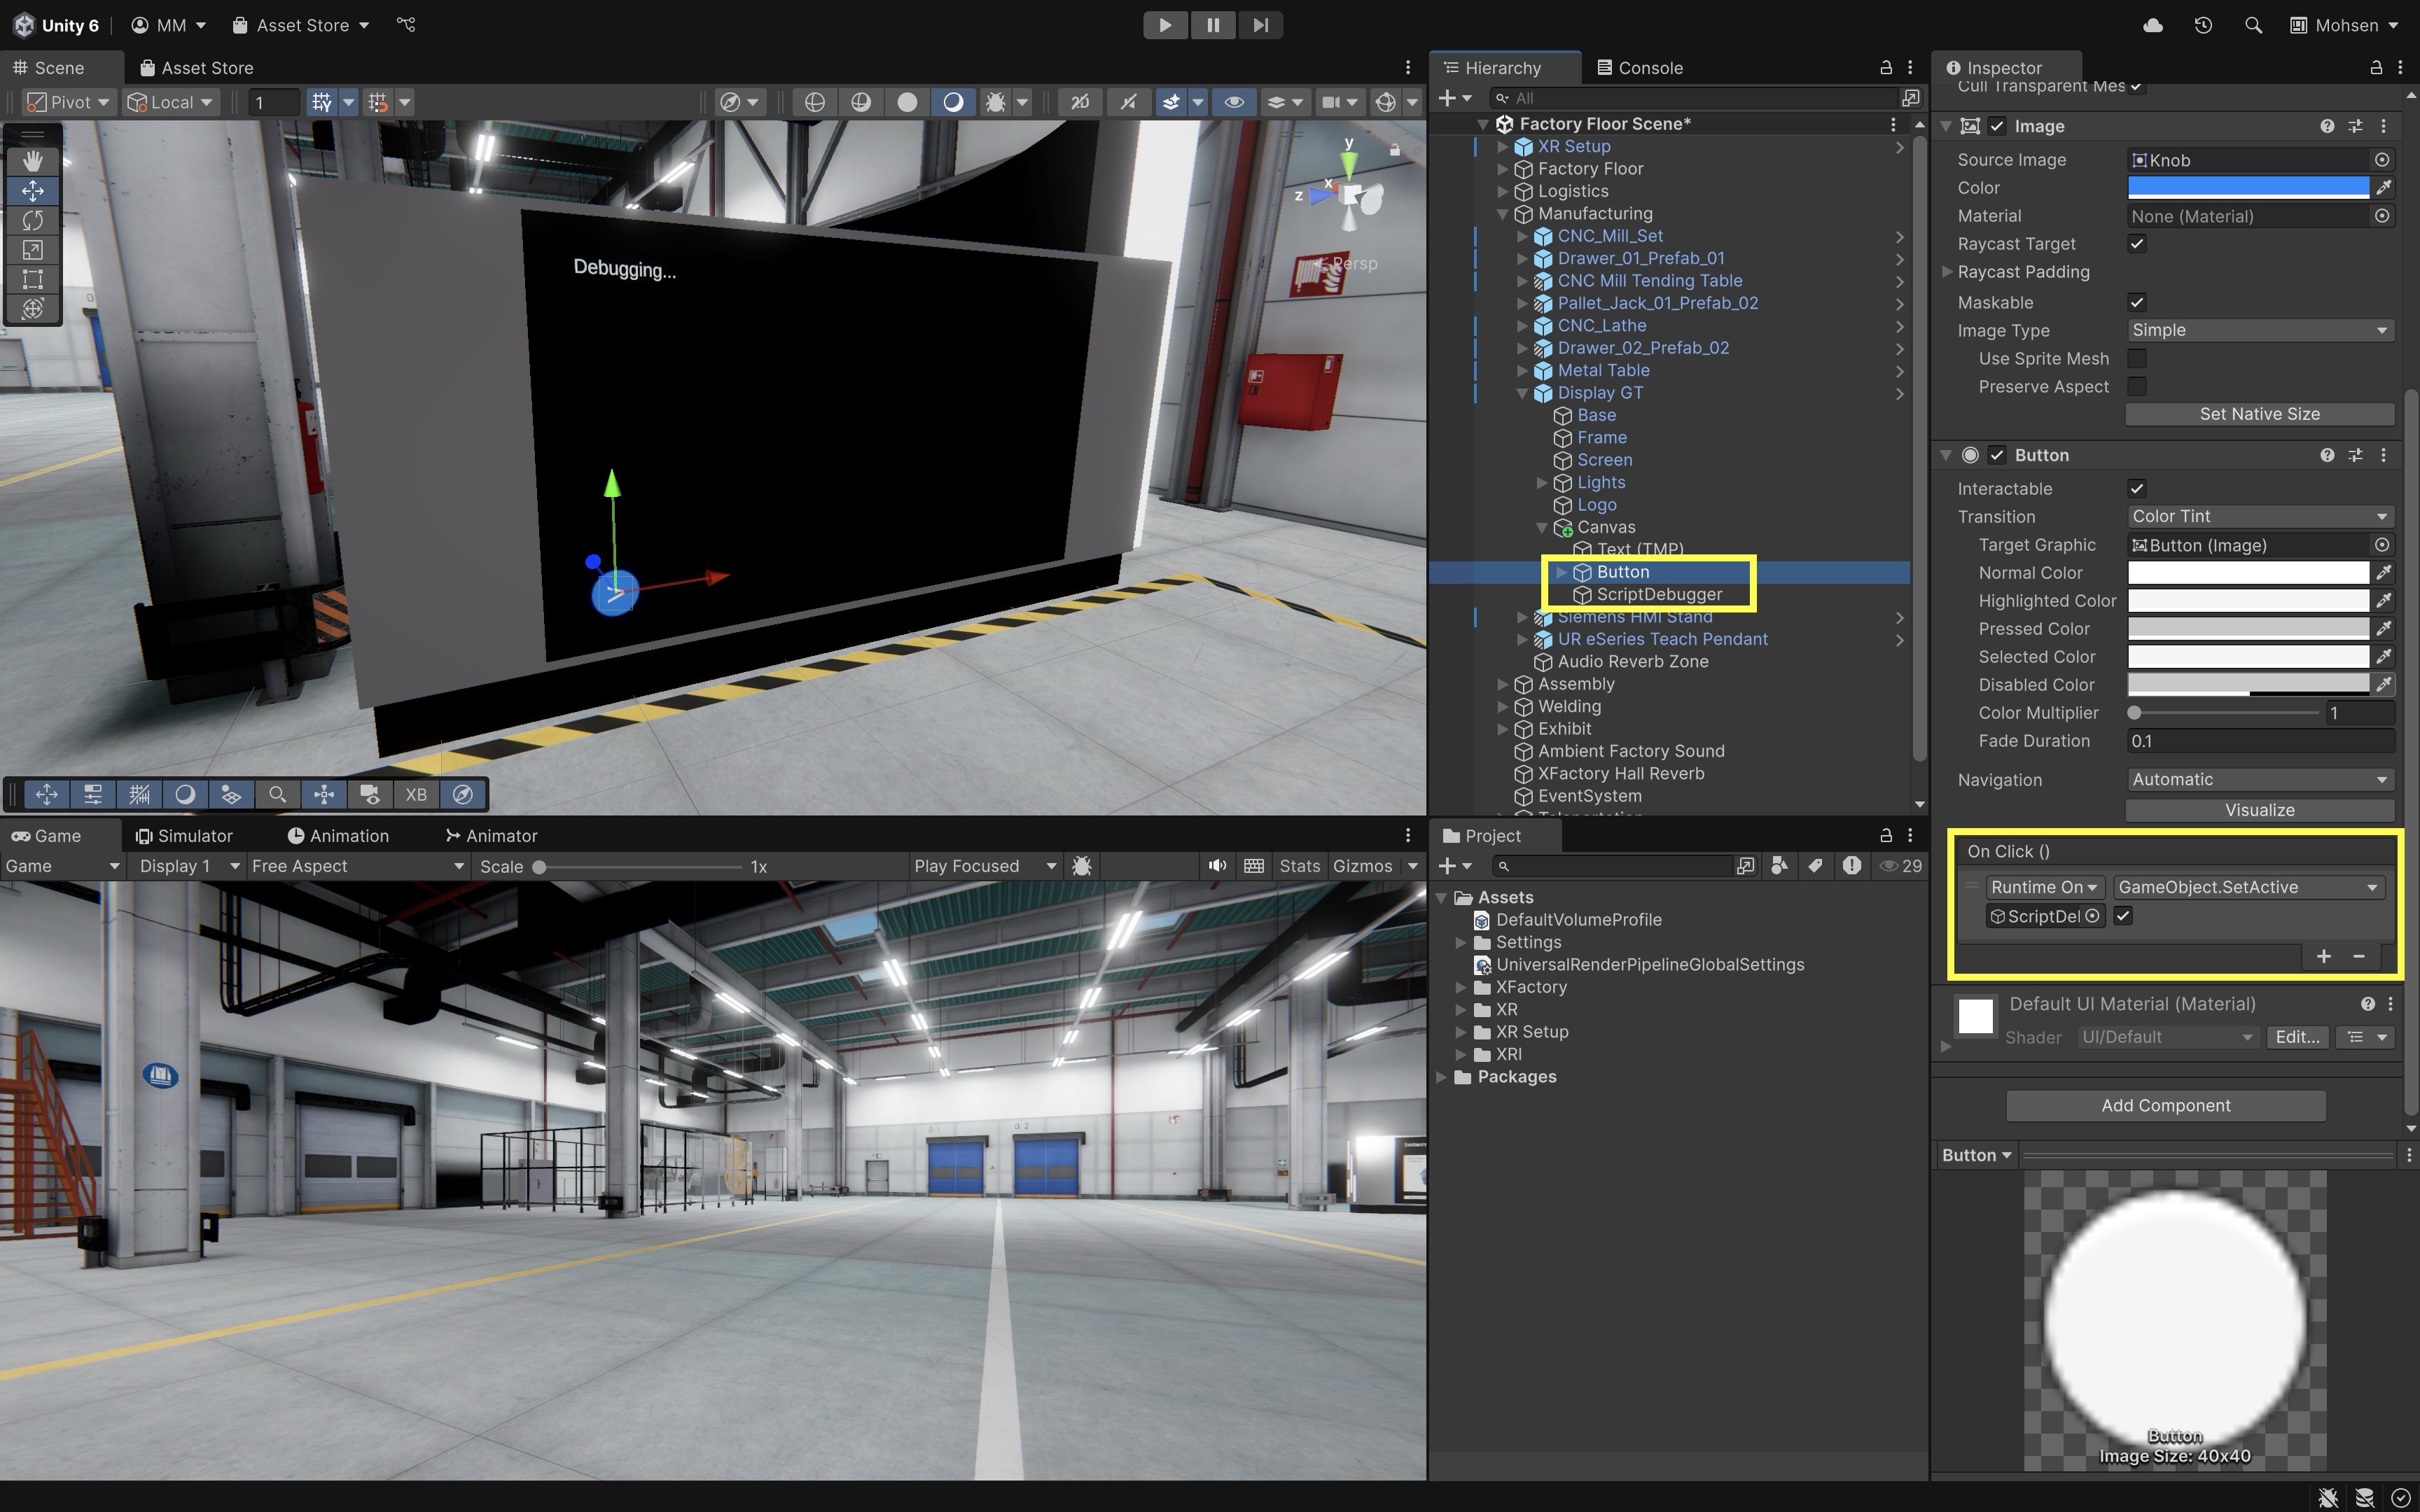
- Hook Up the Button Event:
- Select the play button.
- In the
OnClick()section, add theScriptDebuggerGameObject. - Choose
SetActive (bool)and check the box to activate the debugger when the button is pressed.
- Create the C# Script:
- In the
Projectwindow, right-click theScriptsfolder. - Select
Create > MonoBehaviour Script, and name itCsharpFundamentals. - Double-click to open it in your IDE (e.g., VS Code).
- Replace the default content with the following:
using UnityEngine; using TMPro; public class CsharpFundamentals : MonoBehaviour { public TextMeshProUGUI myText; // Reference to the display text void Start() { myText.text = "Hello, Jackets!"; // Display message at start } void Update() { // Future logic can go here } } - In the
- Configure the Script in
Inspector:- Attach the
CsharpFundamentalsscript to theScriptDebuggerGameObject. - Drag the
Text - TextMeshProelement from the Canvas into themyTextfield in theInspector. - Deactivate the
ScriptDebuggerGameObject by unchecking the box on the top left side of itsInspector, as we want it to be activated on button press.
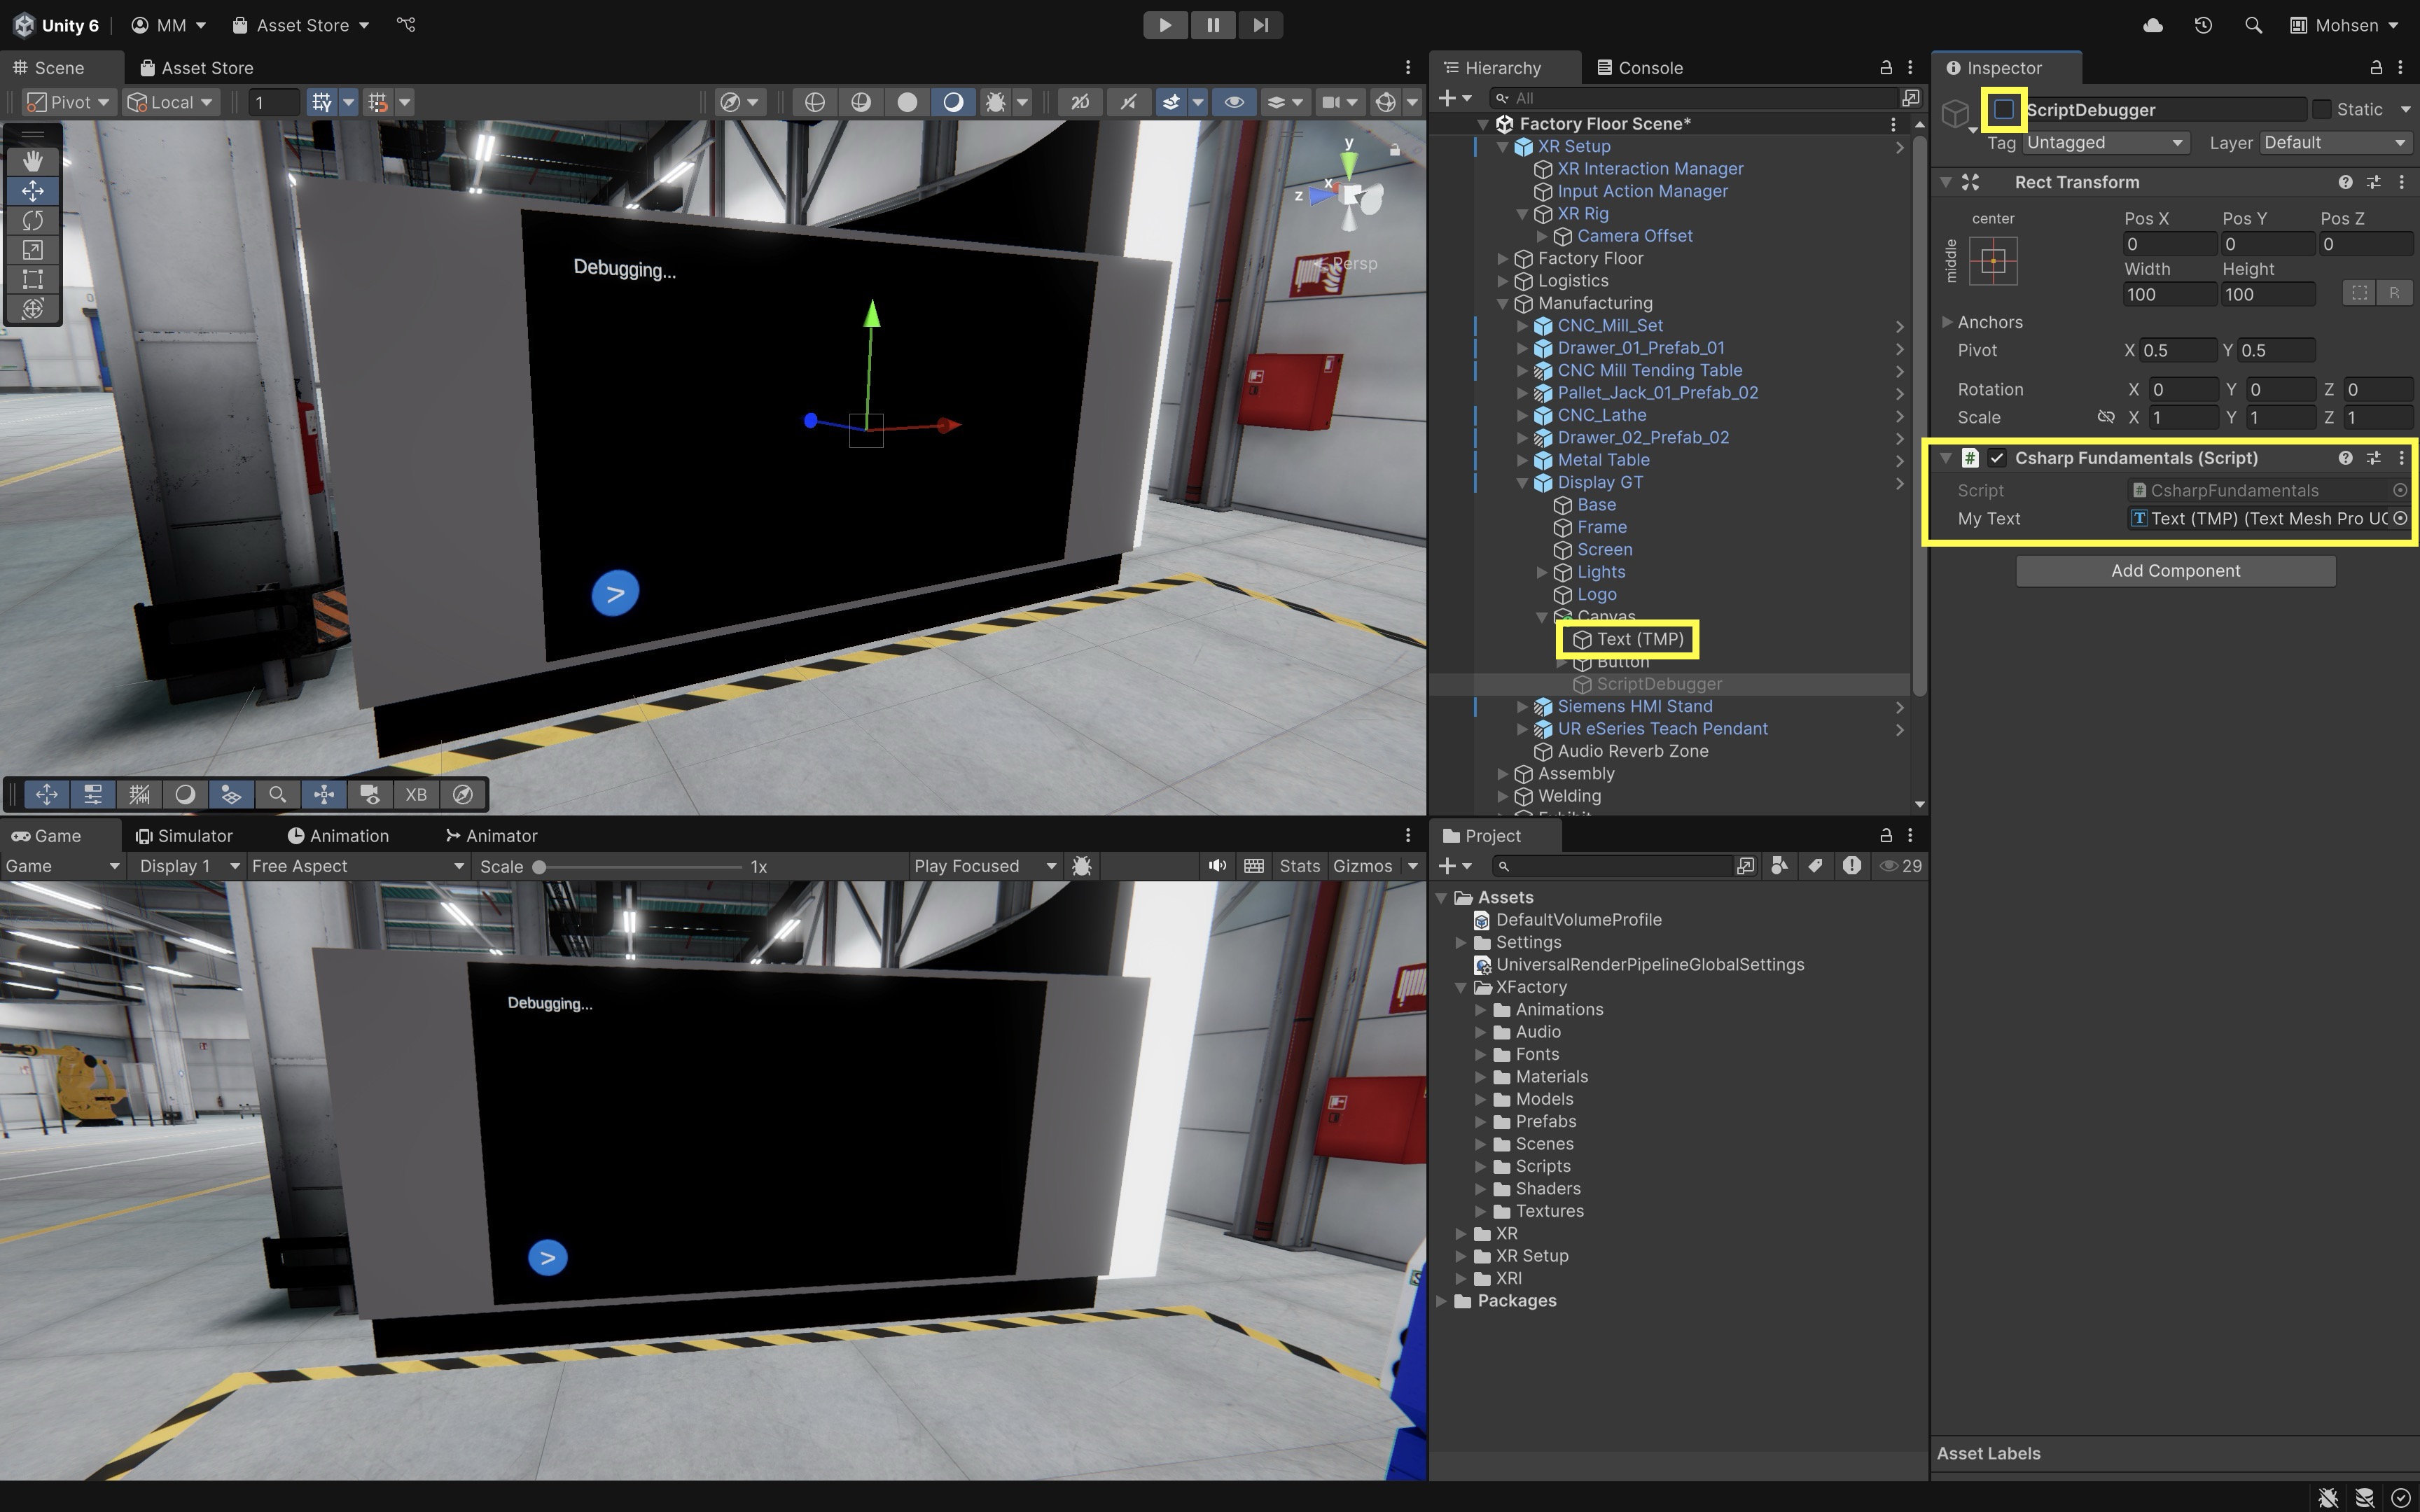
- Attach the
- Run the Scene:
- Press Play in Unity.
- Click the play button (>) on the display.
- The message
"Hello, Jackets!"should appear on theDisplay GT.

Attaching utility scripts like this to empty GameObjects (such as a
ScriptDebugger,InteractionManager, orTeleportationManager) helps keep your scene hierarchy clean and modular. This display-based logging system will be used throughout this session to visually debug and review your C# learning progress.
Literals
A literal is a hardcoded, constant value directly used in code. Literals are used to define specific values like strings, numbers, characters, and booleans in your scripts. The following updated CsharpFundamentals script introduces important literals in C# and shows the result on the display at XFactory’s manufacturing station:
using UnityEngine;
using TMPro;

public class CsharpFundamentals : MonoBehaviour
{
    public TextMeshProUGUI myText; // Reference to the display text

    void Start()
    {
        // Clear previous output
        myText.text = "";

        // A string variable initialized with a string literal
        // "Loading logistics station..." is the literal
        string logisticsStatus = "Loading logistics station...";
        myText.text += logisticsStatus + "\n";

        // A char variable initialized with a character literal
        // 'M' is the literal
        char zoneLabel = 'M';
        myText.text += "Zone label: " + zoneLabel + "\n";

        // An int variable initialized with an integer literal
        // 2 is the literal
        int cncMachineCount = 2;
        myText.text += "CNC machines: " + cncMachineCount + "\n";

        // A float variable initialized with a floating-point literal
        // 3.14F is the literal
        float droneSpeed = 3.14F;
        myText.text += "Drone speed: " + droneSpeed + " m/s\n";

        // A double variable initialized with a double literal
        // 2.71828 is the literal
        double machiningTolerance = 2.71828;
        myText.text += "Machining tolerance: " + machiningTolerance + " mm\n";

        // A decimal variable initialized with a decimal literal
        // 10.25m is the literal (m suffix required)
        decimal exhibitBudget = 10.25m;
        myText.text += "Exhibit budget (k$): " + exhibitBudget + "\n";

        // A bool variable initialized with a boolean literal
        // true is the literal
        bool isWeldingActive = true;
        myText.text += "Is welding station active? " + isWeldingActive + "\n";
    }
}
- String (
string): A sequence of text characters enclosed in double quotes (e.g.,"Loading logistics station..."). - Character (
char): A single character enclosed in single quotes (e.g.,'R'). - Integer (
int): Whole numbers, both positive and negative (e.g.,2,-20,2025). - Floating-Point Numbers (
float,double): Numbers with decimal points. Usefloatwith anFsuffix for lower precision (e.g.,3.14F). Usedoublefor higher precision without a suffix (e.g.,2.71828) - Decimal (
decimal): High-precision decimal values, typically used for financial calculations. Note that it requires anmorMsuffix (e.g.,10.25m). - Boolean (
bool): Represents a truth value—eithertrueorfalse.
In C#, character escape sequences are used to insert special characters into strings, starting with a backslash (
\). They are especially useful in Unity for formattingDebug.Logmessages or multi-line tooltips. For example,\ncreates a new line,\tadds a tab,\"allows double quotes inside a string, and\\inserts a single backslash. On the other hand, string interpolation lets you embed variables directly inside a string by using the$prefix and braces{}, making code more readable than concatenation. For example, instead of writingmyText.text += "Drone speed: " + droneSpeed + " m/s\n";you can writemyText.text += $"Drone speed: {droneSpeed} m/s\n";, which is cleaner and easier to maintain.
Variables
A variable is a named container used to store information in your program. You define a variable by specifying its type followed by its name. In the CsharpFundamentals.cs script above, we use variables to represent real-world values from the XFactory environment. Here are examples from the script that demonstrate different literal types stored in variables:
string factoryName = "XFactory";— the name of the facility.int cncMachineCount = 2;— number of CNC machines in the production area.bool isWeldingActive = true;— status of the welding station.char zoneLabel = 'M';— identifier for the manufacturing zone.float droneSpeed = 3.14F;— speed of a drone in meters/second.double armTolerance = 2.71828;— movement tolerance of robotic arms.decimal exhibitBudget = 10.25m;— high-precision budget for installations (in thousands).
Declaring First, Naming Later: You can declare a variable without giving it a value right away:
int robotCount;
robotCount = 3;
Modifying Variables: Variables are mutable—you can update their values as the application runs:
int score = 0;
score += 10;
Variable Naming Rules:
- Must begin with a letter or underscore (
_). - Cannot begin with a number.
- Cannot contain special characters except underscores.
- Cannot use C# reserved keywords (e.g.,
class,public,int) - Are case-sensitive —
statusandStatusare treated as different variables
Variable Naming Conventions: Use the camelCase style for naming local variables. This means the first word starts with a lowercase letter, while each additional word starts with an uppercase letter. Choose names that are descriptive but concise—your goal is clarity, not cleverness.
- Good examples:
robotName,droneStatus,isEngineInstalled. - Avoid:
iei(too vague),PName(doesn’t follow camelCase),123score(starts with a number).
In XR systems, data often comes in as strings but must be converted to numeric types (
int,float) for calculations, checks, and display. Conversions can be implicit (safe, no data loss), explicit/casting (may truncate), or done with methods likeParse(),Convert, andTryParse()(safe for user input). Always convert back to strings (e.g., withToString()or interpolation) when showing results in the UI.
Data Types
Choosing the right data type helps save memory, improve performance, and prevent bugs. Unity uses both standard C# types and Unity-specific types in XR development. In the CsharpFundamentals.cs script, we explored how these types behave through XR-related examples.
Value Types: Value types store their actual data directly in memory—like writing a number on two different sticky notes. If you change one, the other doesn’t change.
- What they are: Store the actual data directly in memory.
- Copy behavior: When assigned or passed to a method, the data is copied. Each variable has its own separate copy, so changes don’t affect the original.
- Where stored: Usually on the stack, which is fast and automatically cleared when a method finishes.
- Best for: Small, simple pieces of data where identity doesn’t matter (like numbers, flags, or coordinates).
int cncMachineCount = 2;   // number of CNC machines
float droneSpeed = 3.14F;  // drone speed (m/s)
double armTolerance = 2.71828; // precision tolerance
decimal exhibitBudget = 10.25m; // financial value
char zoneLabel = 'M';      // zone identifier
bool isWeldingActive = true; // welding status flag
Reference Types: Reference types store a reference (or pointer) to the data in memory—like two people sharing the same Google Doc. If one edits the file, the other sees the update immediately.
- What they are: Store a reference (or pointer) to the actual data, rather than the data itself.
- Copy behavior: When assigned or passed to a method, only the reference is copied. Both variables now point to the same object in memory. If one changes the object, the other sees the change.
- Where stored: The reference (pointer) lives on the stack, but the actual object is stored on the heap.
- Best for: Larger, more complex data (like objects, arrays, and strings) where sharing the same instance is useful.
string factoryName = "XFactory";
// Strings are reference types (though they behave like values in many cases because they’re immutable).

// Arrays are also reference types:
int[] droneIDs = new int[2];
int[] backupIDs = droneIDs;
backupIDs[0] = 7; // droneIDs[0] is also 7, since both point to the same array
Implicitly Typed Variables
The var keyword lets C# infer the variable’s type based on the value assigned during declaration. It can make code shorter and cleaner—especially when the type is obvious from context. Examples from the he CsharpFundamentals.cs script include:
var robotName = "Robot1";   // Inferred as string
var distance = 12.5f;       // Inferred as float
Important Considerations:
- Implicitly typed variables must be initialized at declaration. You cannot declare a
varwithout assigning a value (e.g.,var x;leads to compilation error). - Type is fixed after inference. Once the compiler infers the type, it cannot be changed. For example,
var score = 10;is inferred asint. Later assigning afloatwill cause an error. - Use
varwhen the type is clear from the context (e.g.,var speed = 5.0f;— obviously afloat), or when you are working with complex or verbose types (e.g.,var components = GetComponentsInChildren<MeshRenderer>();). - Avoid
varwhen it makes the code less readable or the inferred type is not obvious, which can lead to confusion (e.g.,var data = Load();→ What type isdata?). - Use meaningful variable names to compensate for missing type information when using
var.
Unity-Specific Data
Unity extends C# with powerful types that let us control and monitor objects in 3D environments. Here are the key Unity-specific data types:
Vector3: Represents 3D positions or directional vectors. Commonly used for moving objects, setting positions, or determining directions.Vector3is a struct, so it behaves like a value type. Example:
Vector3 position = new Vector3(0f, 1f, 0f); // create a position
Transform: A core Unity component that holds a game object’s position, rotation, and scale. Directly used to manipulate game objects in the scene. Example:
Transform objectTransform = transform;      // reference this object's Transform
objectTransform.position = position;        // apply the position
Quaternion: Represents rotations in 3D space without suffering from gimbal lock. Essential for smoothly rotating game objects. Example:
Quaternion rotation = Quaternion.Euler(0f, 45f, 0f); // create a rotation
Transform objectTransform = transform;               // reference this object's Transform
objectTransform.rotation = rotation;                 // apply the rotation
Example: Let’s build on our previous script to track the real-time position and rotation of the quadruped robot Spot and display it on the Display GT.
- Update the Script:
- Open the
CsharpFundamentals.csscript in your IDE. - Replace the script with the following:
using UnityEngine; using TMPro; public class CsharpFundamentals : MonoBehaviour { public TextMeshProUGUI myText; // Reference to display text public Transform spotTransform; // Assign Spot's Transform in Inspector string staticInfo; // To hold the initial info shown in Start() void Start() { staticInfo = ""; staticInfo += "Loading logistics station...\n"; char zoneLabel = 'M'; int cncMachineCount = 2; float droneSpeed = 3.14F; double machiningTolerance = 2.71828; decimal exhibitBudget = 10.25m; bool isWeldingActive = true; staticInfo += $"Zone label: {zoneLabel}\n"; staticInfo += $"CNC machines: {cncMachineCount}\n"; staticInfo += $"Drone speed: {droneSpeed} m/s\n"; staticInfo += $"Machining tolerance: {machiningTolerance} mm\n"; staticInfo += $"Exhibit budget (k$): {exhibitBudget}\n"; staticInfo += $"Is welding station active? {isWeldingActive}\n"; } void Update() { Vector3 pos = spotTransform.position; // Get the position of the spotTransform Vector3 rot = spotTransform.rotation.eulerAngles; // Get the rotation in Euler angles myText.text = staticInfo + "\nSpot status:\n"; myText.text += $"Position: X={pos.x:F2}, Y={pos.y:F2}, Z={pos.z:F2}\n"; myText.text += $"Rotation: X={rot.x:F1}, Y={rot.y:F1}, Z={rot.z:F1}\n"; } } - Open the
- Configure the Script:
- Select the
ScriptDebuggerGameObject. - In the
Inspector, drag theSpotGameObject into thespotTransformfield.
- Select the
- Run the Scene:
- Press Play in Unity.
- Click the play button (>) on the display.
- You will now see live position and rotation updates on Display GT as Spot moves.

Unity’s
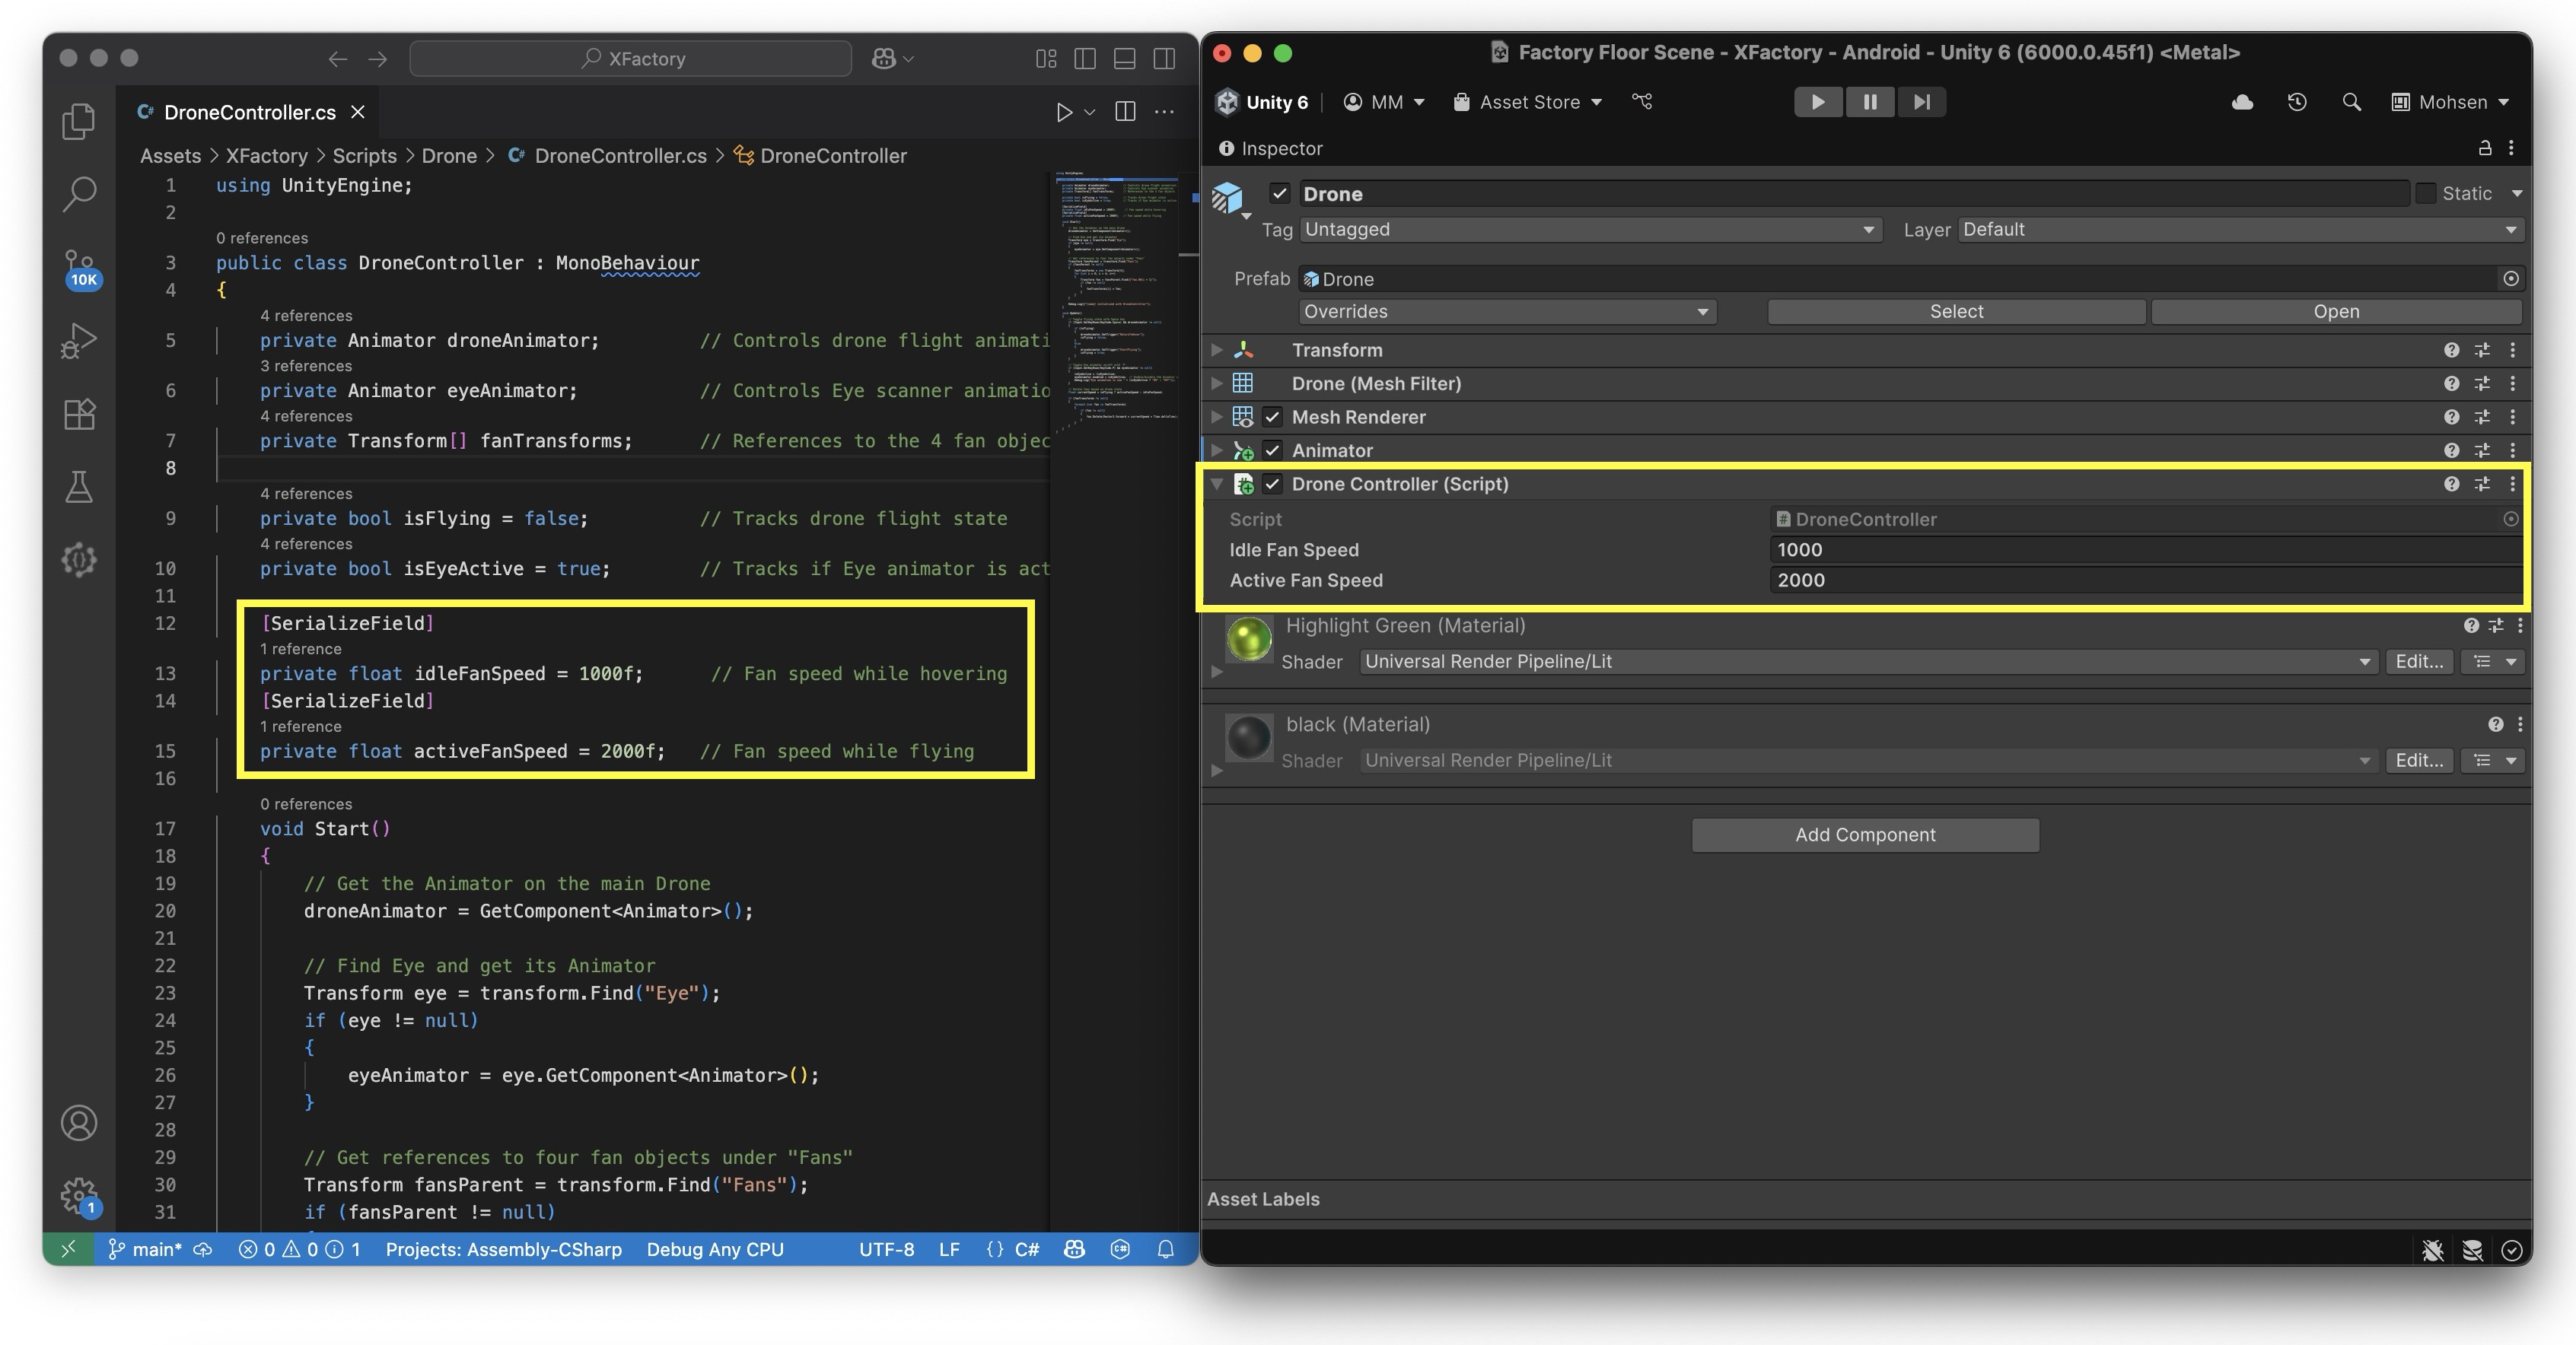
Inspectorallows developers and designers to tweak variables without modifying code. Declaring a variable aspublicmakes it visible and editable in theInspector, while declaring it asprivatehides it from theInspector, helping enforce encapsulation. You can use[SerializeField]with a private variable to expose it in the Inspector without making it publicly accessible in code.
Arrays
Arrays are fundamental data structures in C# that allow you to store collections of homogeneous data elements in contiguous memory. In Unity, arrays are used extensively to manage collections of objects—such as positions, sensors, machine states, or spatial markers. Understanding arrays is crucial for writing efficient, maintainable code—especially in simulations and interactive systems like those you will build for XR. Core concepts include:
- Fixed Size: An array’s size is determined when it is created and cannot change later. For dynamic datasets—like scanned parts, or user-placed waypoints—consider using collections such as
List<T>. - Homogeneous Elements: All elements in an array are of the same type, ensuring type safety and consistency. This is ideal when storing uniform data like robot IDs, voltage readings, or machine speeds.
- Zero-Indexed: The first element is at index
0, and the last is at indexLength - 1. - Reference Type: Arrays are reference types, even when they store value types. When you pass an array to a method, changes inside the method affect the original array—this is useful for sharing common configuration data (like temperature limits or input mappings) across multiple modules.
Single-Dimensional Arrays
A single-dimensional array is the simplest form of an array—a linear list of elements. It’s commonly used in Unity to track things like sensor readings, event states, or machine positions in simulation scenarios.
// Declaration with a fixed size (elements set to default values)
int[] inventoryCounts = new int[5];

// Declaration with initialization
string[] stationNames =
{
    "Logistics",
    "Manufacturing",
    "Assembly",
    "Welding",
    "Exhibit"
};

// Accessing an element by index
Debug.Log(stationNames[0]);  // Outputs: Logistics
Multidimensional Arrays
Multidimensional arrays represent data in more than one dimension (e.g., a grid or table). Multidimensional arrays are useful for grid-based systems like virtual layout of stations, a heatmap of machine statuses, or sensor arrays within a station.
// 2D array (2 rows x 3 columns)
int[,] heatMap = new int[2, 3] { { 30, 35, 33 }, { 28, 32, 31 } };

// Accessing elements directly
Debug.Log("Temperature at (0, 1): " + heatMap[0, 1]);  // Outputs: 35
Debug.Log("Temperature at (1, 2): " + heatMap[1, 2]);  // Outputs: 31
Debug.Log("Temperature at (0, 0): " + heatMap[0, 0]);  // Outputs: 30
Jagged Arrays
A jagged array is an array of arrays, allowing each inner array to have a different length. This structure is useful for non-uniform datasets, such as robot paths of varying lengths or task sequences where each robot at the assembly station may have a different number of subtasks.
// Jagged array (array of arrays) with differing lengths
int[][] robotPaths = new int[][]
{
    new int[] { 0, 2, 4, 6, 8 },
    new int[] { 1, 3, 5 },
    new int[] { 10, 12 }
};

// Direct access
Debug.Log("First point in path 1: " + robotPaths[0][0]);   // 0
Debug.Log("Second point in path 2: " + robotPaths[1][1]);  // 3
Debug.Log("Last point in path 3: " + robotPaths[2][robotPaths[2].Length - 1]); // 12

// Display entire paths
Debug.Log("Path 1: " + string.Join(", ", robotPaths[0]));
Debug.Log("Path 2: " + string.Join(", ", robotPaths[1]));
Debug.Log("Path 3: " + string.Join(", ", robotPaths[2]));

// Path lengths
Debug.Log("Path 1 length: " + robotPaths[0].Length);
Debug.Log("Path 2 length: " + robotPaths[1].Length);
Debug.Log("Path 3 length: " + robotPaths[2].Length);
Implicitly Typed Arrays
Implicitly typed arrays use the var keyword so that the compiler infers the array’s type based on the initializer. This leads to cleaner and more concise code. Implicitly typed arrays are especially helpful when the element type is obvious or when using anonymous types.
// Compiler infers that this is an int array
var alertLevels = new[] { 1, 2, 3, 4 };

// Compiler infers that this is a string array
var messages = new[] { "Start", null, "Shutdown" };

// Accessing elements
Debug.Log("Initial alert level: " + alertLevels[0]);
Debug.Log("First system message: " + messages[0]);
Accessing Array Elements
Elements are accessed by their index. Be cautious to avoid indexing errors, especially in systems that depend on real-time feedback like drones or robotic arms.
// Example array
string[] stationNames = { "Logistics", "Assembly", "Quality Control" };

// Accessing elements by index
string currentStation = stationNames[0];  // "Logistics"
Debug.Log("Current Station: " + currentStation);

Debug.Log("Next Station: " + stationNames[1]);      // "Assembly"
Debug.Log("Final Station: " + stationNames[2]);     // "Quality Control"

// Showing total number of stations
Debug.Log("Total Stations: " + stationNames.Length);
Example
Let’s create a simple script to reference five GameObjects from XFactory (e.g., CNC_Mill_Set, CNC_Lathe, Heavy Payload Robot Arm, Engine V8, AGV_Omniwheel) and store them in a GameObject[] array. You will then use a loop to print the names of each object on the large display in the manufacturing station. This exercise will help you learn how to you use a GameObject[] array to manage scene objects, practice iteration using foreach, and connect array theory to an actual Unity scene setup.
- Create the Script:
- Create a new C# script and name it
XFactoryArrayManager.cs. - Paste in the following code:
using UnityEngine; using TMPro; public class XFactoryArrayManager : MonoBehaviour { [Header("UI")] public TextMeshProUGUI myText; // Reference to the UI text field (TextMeshPro) [Header("XFactory Objects")] public GameObject[] factoryObjects; // Array of assigned objects from the scene // This method can be called from a UI button's OnClick event public void RunDiagnostics() { myText.text = "Diagnostics started...\n\n" + "Listing XFactory objects:\n"; // Directly access and display array elements myText.text += "[0] " + factoryObjects[0].name + "\n"; myText.text += "[1] " + factoryObjects[1].name + "\n"; myText.text += "[2] " + factoryObjects[2].name + "\n"; myText.text += "[3] " + factoryObjects[3].name + "\n"; myText.text += "[4] " + factoryObjects[4].name + "\n"; } } - Create a new C# script and name it
- Attach the Script in Unity:
- In the
Hierarchy, attach the script to theScriptDebuggerGameObject underManufacturing > Display GT > Canvas. - Drag the
Text (TMP)to theMy Textfield. - Configure the
Buttonif you haven’t done so already. - Select the
ScriptDebuggerGameObject in theHierarchy. - In the
Inspector, find theFactory Objectsarray field exposed by the script. - Set the array size to
5. - Drag and drop your five selected GameObjects from the Hierarchy into the array slots.
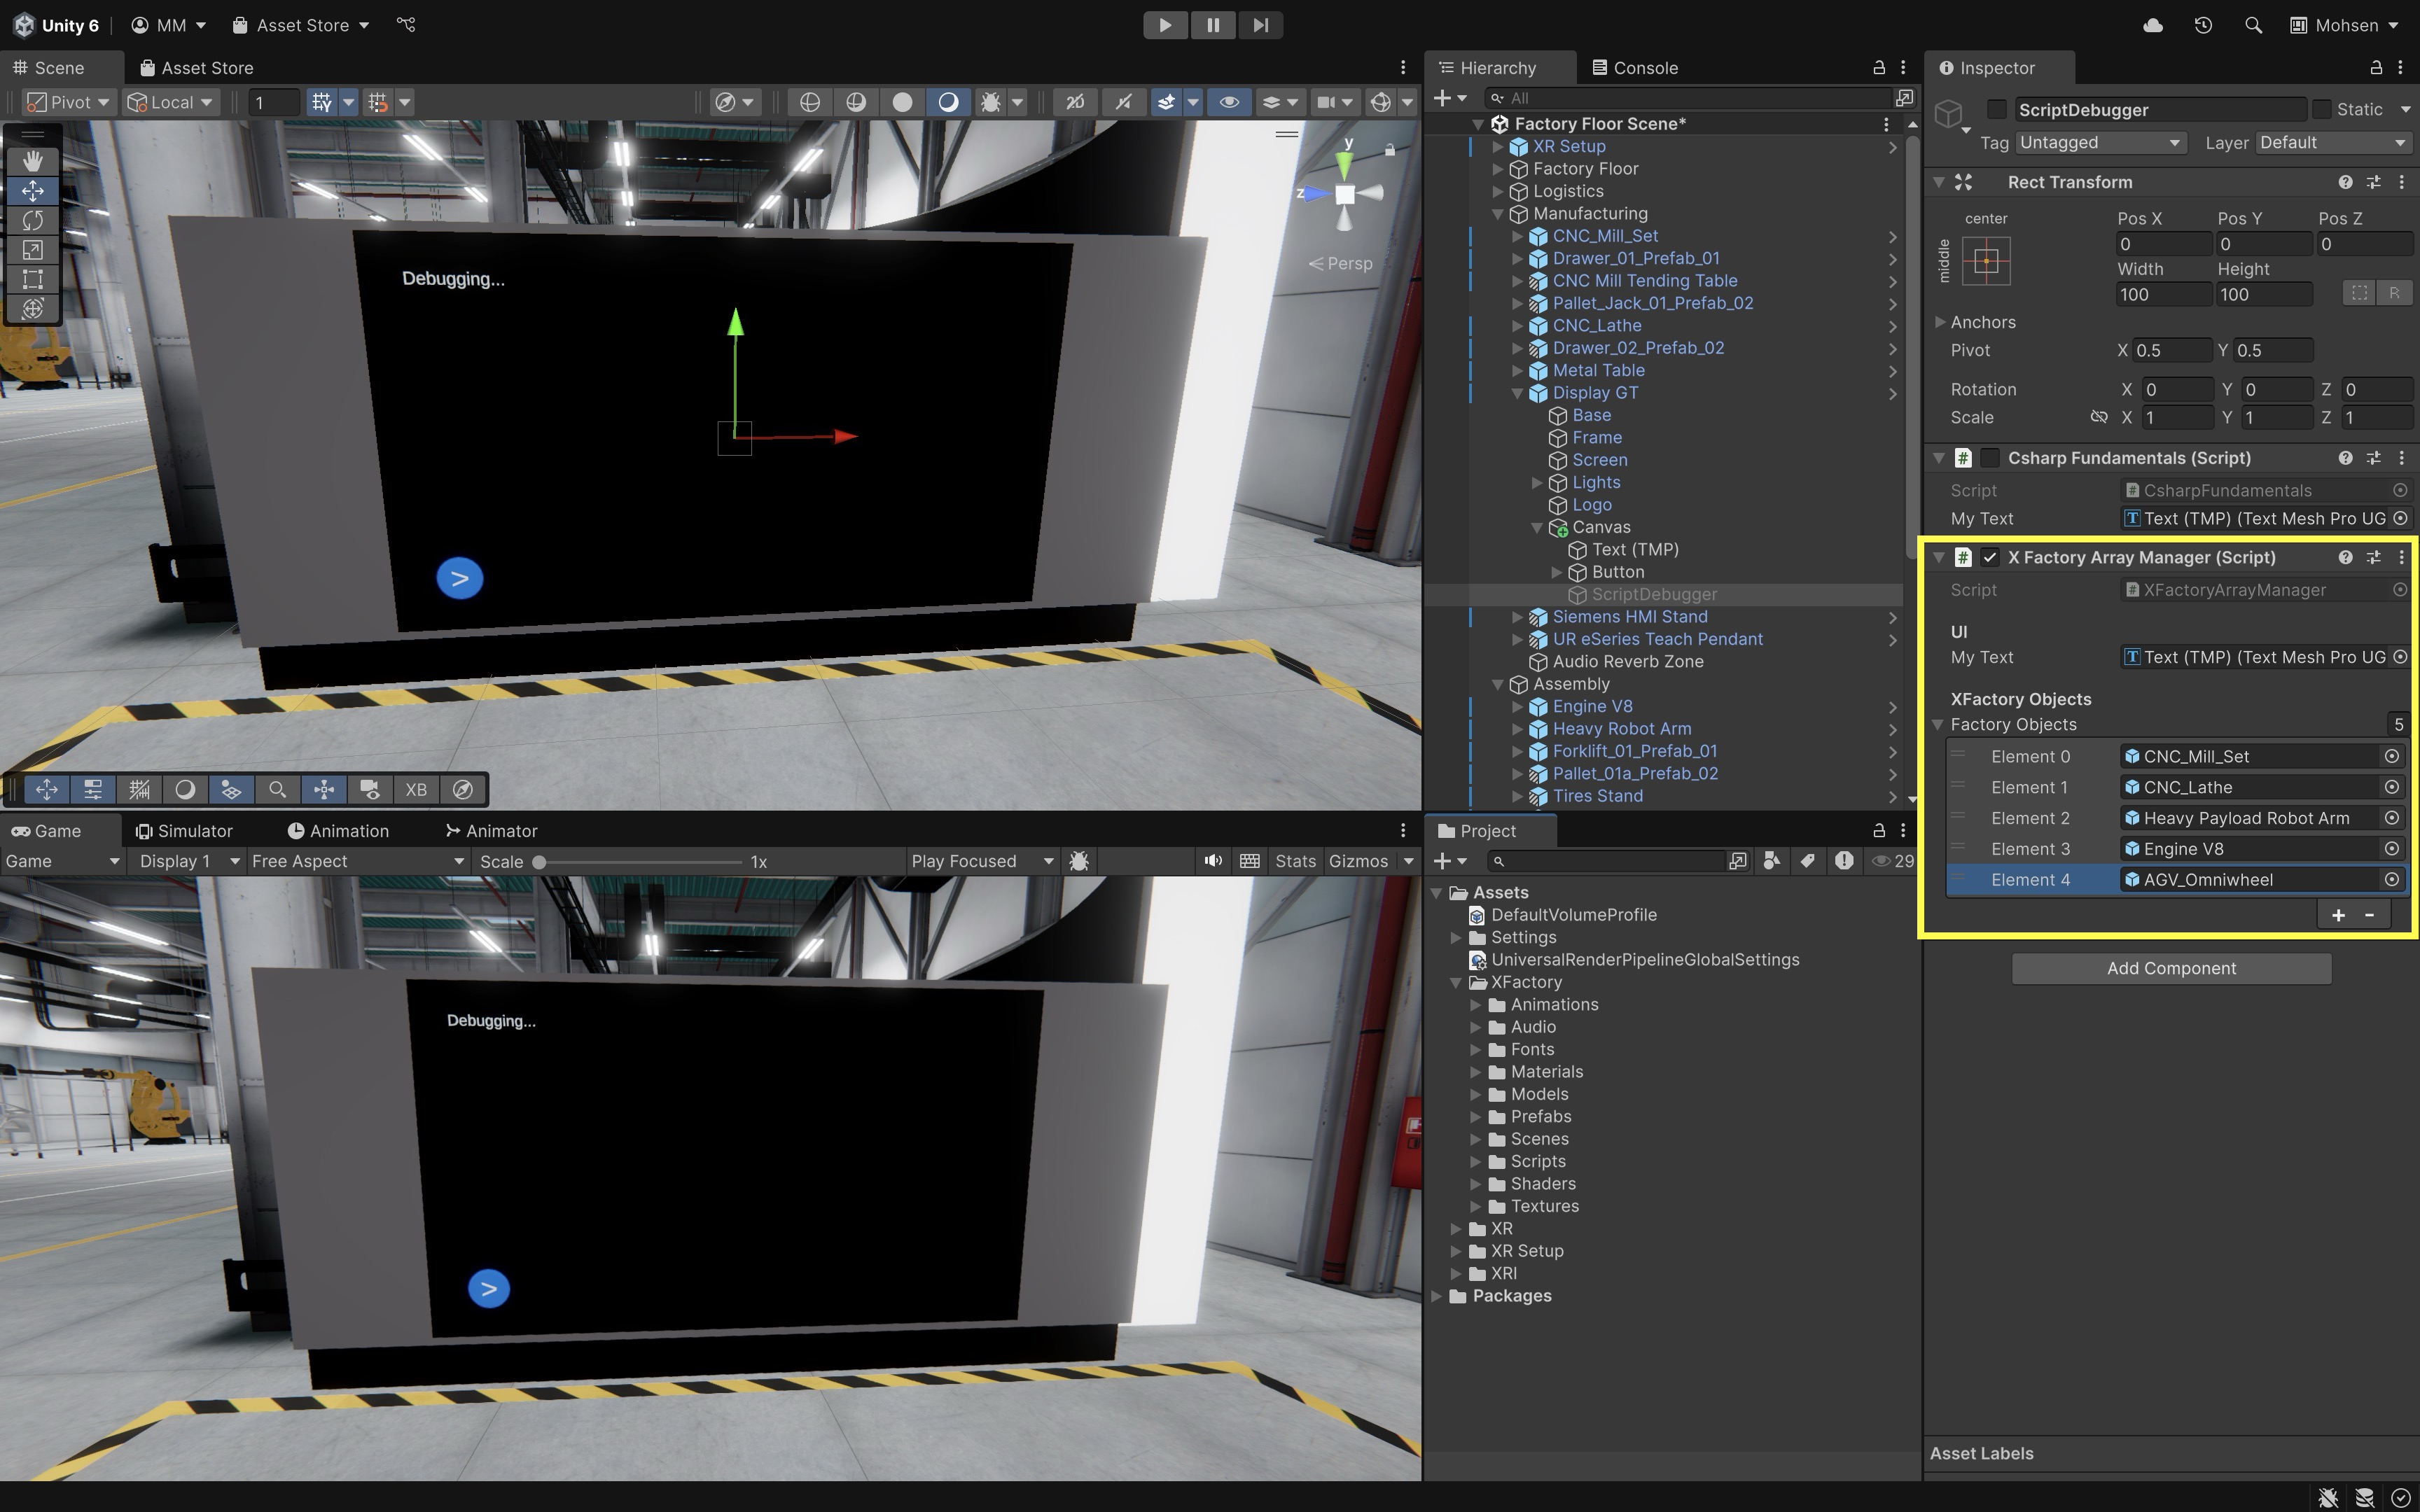
- In the
- Run the Scene:
- Click the Play button in Unity.
- Press the Play button (>) on Display GT.
- On the display, you should see the names of the five XFactory GameObjects assigned. If any element in the array is
null, the script will log a warning message.

Managing object references in arrays is a foundational skill when building multi-part simulation systems (e.g., machines, conveyor units, robots), interactive stations where components must be controlled together, or scenarios where looping over physical or logical elements is required (e.g., enabling/disabling systems, monitoring status, triggering events). You will use similar patterns in XR development to track interactables, sync visuals, or apply behaviors to groups of objects in AR/VR environments.
Lists
Lists are one of the most versatile data structures available in C#. They allow you to work with collections of data that can dynamically grow or shrink during runtime. Unlike arrays, which require you to define a fixed size ahead of time, lists adapt as your data changes. A List<T> is a generic collection class found in the System.Collections.Generic namespace. It allows you to store, manage, and manipulate a sequence of elements where the data type is specified by T. The benefits of lists over arrays include:
- Dynamic Sizing: Lists automatically resize when you add or remove items, eliminating the need to declare a fixed size—ideal for runtime scenarios such as tracking scanned boxes at the logistics station or dynamically spawning parts in the production line.
- Rich API: With built-in methods for common operations—such as adding, inserting, removing, sorting, and searching—lists streamline many data management tasks in your interactive XR factory simulation.
- Type-Safety and Flexibility: By defining the type of elements, lists prevent runtime type errors and work with any data type, including custom classes (like
MachineStatus) and Unity-specific types (likeGameObject,Vector3, orTransform).
Declaring Lists
-
Basic Declaration: You can declare a list for any data type using the following syntax:
List<string> stationNames = new List<string>(); -
Using Collection Initializers: Ideal for initializing lists with predefined values, such as a list of factory zones.
  List<string> stationNames = new List<string>
  {
      "Logistics",
      "Manufacturing",
      "Assembly",
      "Welding",
      "Exhibit"
  };
Basic Operations on Lists
-
Adding Elements: The
Add()method appends an element to the end of the list. This is especially useful when the size of your collection isn’t known until runtime.stationNames.Add("R&D Station"); -
Inserting Elements: Insert an element at a specific index using
Insert(). This method shifts the current element at that index and subsequent elements to accommodate the new value.stationNames.Insert(1, "Maintenance"); -
Removing Elements: You can remove elements by value, using the
Remove()method, or by index, using theRemoveAt()method.stationNames.Remove("QA Inspection"); // Removes first occurrence stationNames.RemoveAt(2); // Removes the third element -
Accessing Elements: Elements in a list can be accessed by their zero-based index.
Debug.Log(stationNames[0]); // Logs "Logistics" -
Getting the Count: Use the
Countproperty to determine the number of elements.Debug.Log("Total stations: " + stationNames.Count);
Searching and Sorting Lists
-
Searching for Elements: The
IndexOf()method helps locate the position of an element. Always check thereturnvalue sinceIndexOf()returns -1 if the element is not present. -
Sorting Lists: You can sort a list alphabetically or numerically using the
Sort()method. Sorting can be essential for displaying ordered data, such as leaderboards or inventories.
using System.Collections.Generic;
using UnityEngine;

public class StationListExample : MonoBehaviour
{
    void Start()
    {
        // Example list
        List<string> stationNames = new List<string>
        {
            "Logistics",
            "Assembly",
            "Quality Control"
        };

        // Searching for an element
        int index = stationNames.IndexOf("Assembly");
        Debug.Log("Assembly station index: " + index);  // Outputs 1 if found, -1 if not

        // Sorting alphabetically
        stationNames.Sort();

        // Displaying sorted list
        Debug.Log("Station A: " + stationNames[0]);
        Debug.Log("Station B: " + stationNames[1]);
        Debug.Log("Station C: " + stationNames[2]);
    }
}
Lists of Other Data Types
Lists are not limited to strings. They can hold any data type, from primitive types like int to complex custom classes. In XFactory, for example, you might use a list of Vector3 to represent waypoints for a mobile robot navigating between stations:
using System.Collections.Generic;
using UnityEngine;

public class WaypointListExample : MonoBehaviour
{
    void Start()
    {
        // A list of Vector3 waypoints for a mobile robot
        List<Vector3> waypoints = new List<Vector3>
        {
            new Vector3(0, 0, 0),
            new Vector3(1, 0, 2),
            new Vector3(2, 0, 4)
        };

        // Accessing waypoints directly
        Debug.Log("First waypoint: " + waypoints[0]);
        Debug.Log("Second waypoint: " + waypoints[1]);
        Debug.Log("Third waypoint: " + waypoints[2]);

        // Showing how many waypoints are stored
        Debug.Log("Total waypoints: " + waypoints.Count);
    }
}
Example
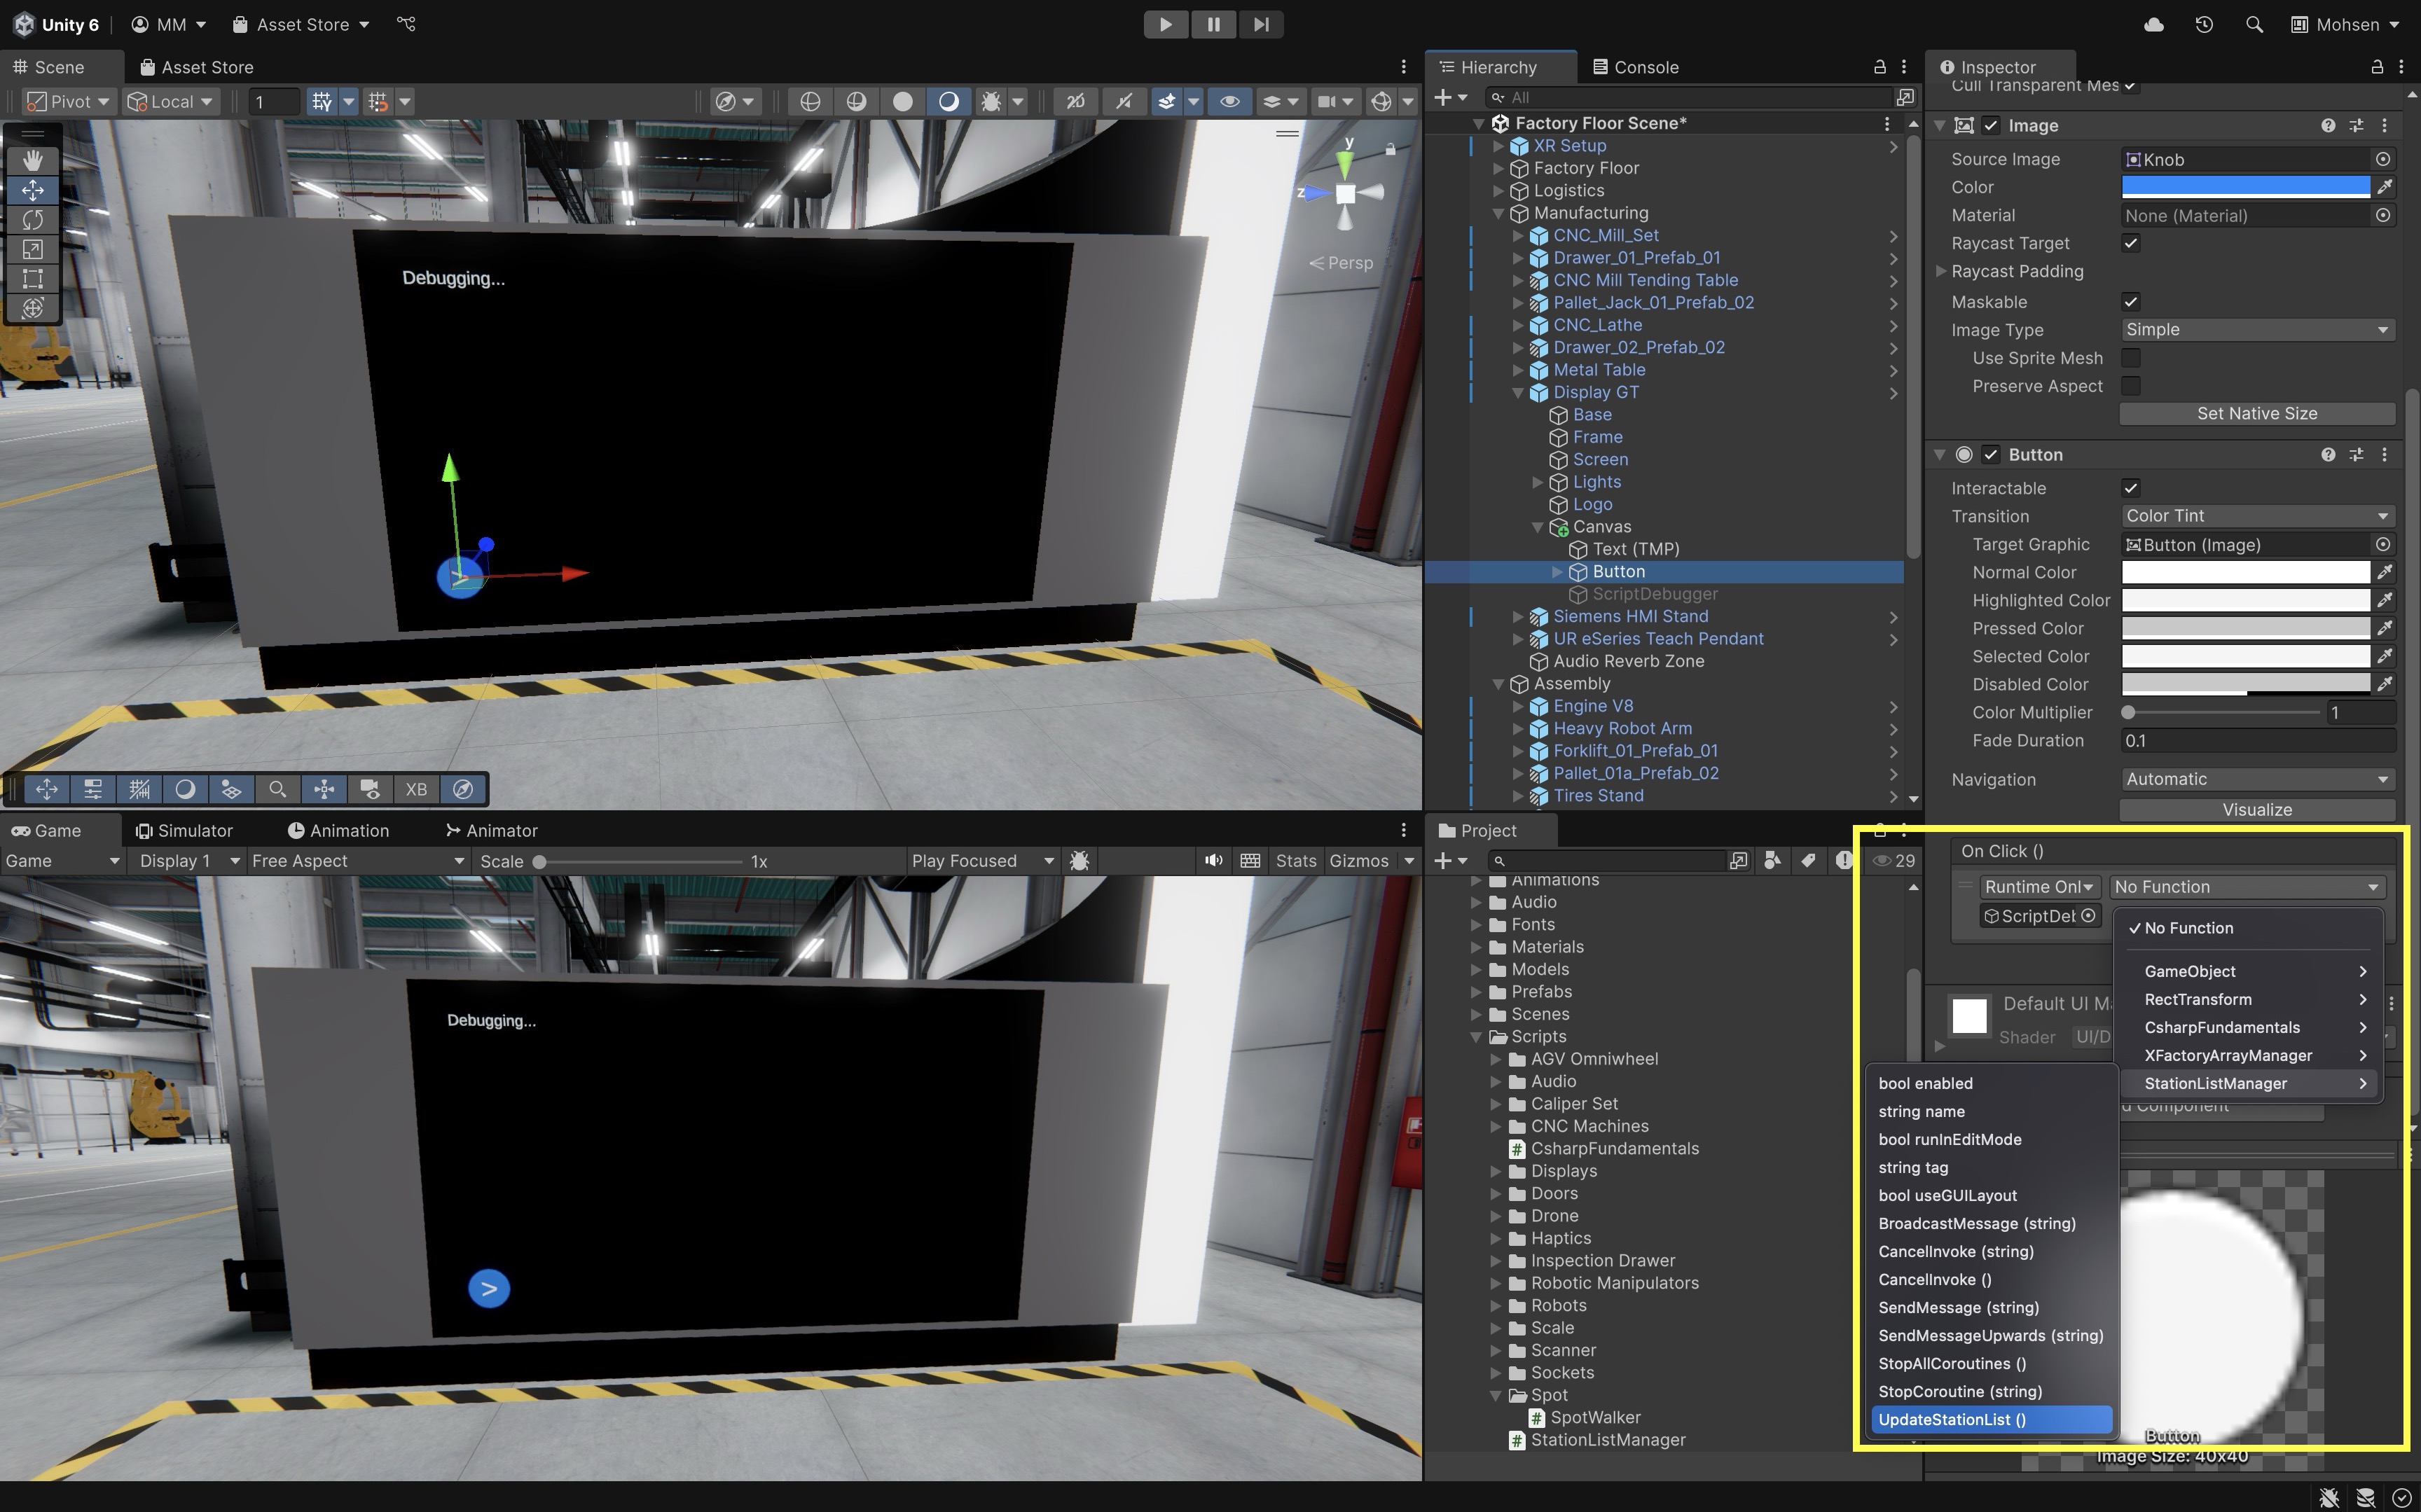
Now, let’s use a List<string> to store and manipulate the names of active stations in your XFactory scene. Instead of defining all stations up front like with an array, you will simulate dynamic updates at runtime—adding, inserting, and removing stations—then printing the list to Display GT at the manufacturing station. This exercise will help you learn how to use List<string> to manage a dynamic set of stations, practice Add(), Insert(), Remove(), and Sort(), and display the contents of the list in a UI text field using TextMeshPro.
- Create the Script:
- Create a new C# script named
StationListManager.cs. - Paste the following code:
using UnityEngine; using TMPro; using System.Collections.Generic; public class StationListManager : MonoBehaviour { [Header("UI")] public TextMeshProUGUI stationText; private List<string> stationNames = new List<string>(); public void UpdateStationList() { // Clear and add some initial stations stationNames.Clear(); stationNames.Add("Logistics"); stationNames.Add("Manufacturing"); stationNames.Add("Assembly"); stationNames.Add("Welding"); // Insert a new station dynamically stationNames.Insert(2, "Maintenance"); // Remove a station that is shut down stationNames.Remove("Welding"); // Sort alphabetically stationNames.Sort(); // Display in the UI stationText.text = "Active Stations:\n"; stationText.text += string.Join("\n", stationNames); stationText.text += $"\n\nTotal stations: {stationNames.Count}"; } } - Create a new C# script named
- Assign Components in the Editor:
- In the
Hierarchy, attach the script to theScriptDebuggerGameObject underManufacturing > Display GT > Canvas. - Drag the
Text (TMP)to theStation Textfield. - Select the
Buttonin theCanvas. - In the
Button (Script) > OnClick()section, click the+button to add a new event. - Drag in the
ScriptDebuggerGameObject and chooseStationListManager → UpdateStationList().
- In the
- Run the Scene:
- Click the Play button in Unity.
- Press the Play button (>) on Display GT.
- On the display, the content will be updated with a list of current stations: Assembly, Logistics, Maintenance, Manufacturing, Total stations: 4. You can modify the script to simulate runtime changes, such as adding a station when a new part is scanned, or removing one when a system goes offline.

This example shows how
List<string>can be used to reflect dynamic system state (e.g., active workstations), respond to user input or machine status in simulations, and prepare for runtime object management in XR systems, such as tracking parts, tools, or operators. In upcoming lessons, you’ll build on this pattern usingList<GameObject>orList<Vector3>for VR/AR development.
Dictionaries
Dictionaries in C# are generic collections that store data as key-value pairs. They are especially useful when you need fast lookups and want to ensure that each key is unique. In Unity development, dictionaries are invaluable for tasks like managing XR objects, mapping identifiers to game components, or organizing configuration data. Core concepts include:
- Key-Value Pair Structure: Each element consists of a key (which must be unique) and an associated value.
- Efficient Lookup: Dictionary operations—such as adding, retrieving, and removing entries—are typically O(1), making them ideal for time-sensitive lookups (e.g., scanning RFID tags at the logistics station).
- Dynamic Growth: Dictionaries expand as needed, supporting real-time interactions, such as assigning virtual parts to tracked objects in the factory.
Declaring a Dictionary
Include the System.Collections.Generic namespace and declare your dictionary using the generic syntax. In the example below, each string key represents a station name (e.g., “Welding”), and each GameObject represents the corresponding virtual asset in the XFactory scene:
using UnityEngine;
using System.Collections.Generic;

public class StationDictionary : MonoBehaviour
{
    public GameObject weldingStation;
    public GameObject assemblyStation;

    void Start()
    {
        Dictionary<string, GameObject> stationAssets = new Dictionary<string, GameObject>
        {
            { "Welding", weldingStation },
            { "Assembly", assemblyStation }
        };

        Debug.Log("Welding: " + stationAssets["Welding"].name);
        Debug.Log("Assembly: " + stationAssets["Assembly"].name);
    }
}
Initializing Dictionaries
-
Using Collection Initializers: The traditional way to initialize a dictionary. Each entry is added with a
{ key, value }pair. This style is very common in existing tutorials and older Unity projects, and it makes the “add a pair” concept explicit.Dictionary<string, GameObject> stationAssets = new Dictionary<string, GameObject>() { { "Welding", weldingRobot }, { "Assembly", assemblyRobot }, { "Exhibit", demoDisplay } }; -
Using Index Initializers: A newer, more concise syntax introduced in C# 6. It uses the familiar indexing notation (
["key"] = value) that matches how you would update dictionary values later. This style is increasingly popular in modern C# code because of its consistency and readability.Dictionary<string, GameObject> stationAssets = new Dictionary<string, GameObject>() { ["Welding"] = weldingRobot, ["Assembly"] = assemblyRobot, ["Exhibit"] = demoDisplay };
Accessing Elements
You can retrieve values using the key as an index:
GameObject weldingStation = stationAssets["Welding"];
But if the key doesn’t exist, this throws a KeyNotFoundException. To avoid crashes, use TryGetValue():
if (stationAssets.TryGetValue("Welding", out GameObject robot))
{
    // Use the robot object safely
}
else
{
    Debug.LogWarning("Welding station not found in dictionary.");
}
Adding Elements
-
Add()Method: Inserts a new key-value pair into the dictionary and throws an exception if the key is already present. Example:stationAssets.Add("Logistics", logisticsStationObject); -
Indexer: Directly assigns a value to a key, updating the existing entry if the key exists or adding a new entry if it does not. Example:
stationAssets["Logistics"] = logisticsStationObject; -
TryAdd()Method: Attempts to add a new key-value pair and returns a boolean indicating success without throwing an exception when the key already exists.if (!stationAssets.TryAdd("Logistics", logisticsStationObject)) { Debug.LogWarning("Key already exists: Logistics"); }
Removing Elements
-
Remove()Method: Removes the specified key and its associated value from the dictionary, if the key exists. Example:stationAssets.Remove("Assembly"); -
Clear()Method: Removes all key-value pairs from the dictionary, effectively emptying it. Example:stationAssets.Clear();
Example
Let’s assign five GameObjects of your choice (e.g., robots, machines, scanners, drones, boxes) to fixed station names in XFactory. You will use a Dictionary<string, GameObject> to map each station name to its corresponding GameObject, and display the mappings on the large display in the manufacturing station. This exercise will help you practice assigning GameObjects to logical roles (station names), use a Dictionary<string, GameObject> to map unique keys to values, and safely iterate and display dictionary content using a UI text field.
- Create the Script:
- Create a script called
StationAssignmentManager.cs. - Attach the script to the
ScriptDebuggerGameObject underManufacturing > Display GT > Canvas. Disable its other custom scripts to avoid conflict. - Paste the following code:
using UnityEngine; using TMPro; using System.Collections.Generic; public class StationAssignmentManager : MonoBehaviour { [Header("UI")] public TextMeshProUGUI stationText; [Header("Station Assignments")] public GameObject assemblyObject; public GameObject manufacturingObject; public GameObject logisticsObject; public GameObject weldingObject; public GameObject exhibitObject; private Dictionary<string, GameObject> stationMap = new Dictionary<string, GameObject>(); public void AssignStations() { // Clear existing data (if any) stationMap.Clear(); // Map each station to its assigned object stationMap.Add("Assembly", assemblyObject); stationMap.Add("Manufacturing", manufacturingObject); stationMap.Add("Logistics", logisticsObject); stationMap.Add("Welding", weldingObject); stationMap.Add("Exhibit", exhibitObject); // Display the station assignments in the UI stationText.text = "Station Assignments:\n\n"; // Assembly if (stationMap["Assembly"] != null) stationText.text += "Assembly → " + stationMap["Assembly"].name + "\n"; else stationText.text += "Assembly → No object assigned\n"; // Manufacturing if (stationMap["Manufacturing"] != null) stationText.text += "Manufacturing → " + stationMap["Manufacturing"].name + "\n"; else stationText.text += "Manufacturing → No object assigned\n"; // Logistics if (stationMap["Logistics"] != null) stationText.text += "Logistics → " + stationMap["Logistics"].name + "\n"; else stationText.text += "Logistics → No object assigned\n"; // Welding if (stationMap["Welding"] != null) stationText.text += "Welding → " + stationMap["Welding"].name + "\n"; else stationText.text += "Welding → No object assigned\n"; // Exhibit if (stationMap["Exhibit"] != null) stationText.text += "Exhibit → " + stationMap["Exhibit"].name + "\n"; else stationText.text += "Exhibit → No object assigned\n"; // Summary line stationText.text += $"\nTotal stations assigned: {stationMap.Count}"; } } - Create a script called
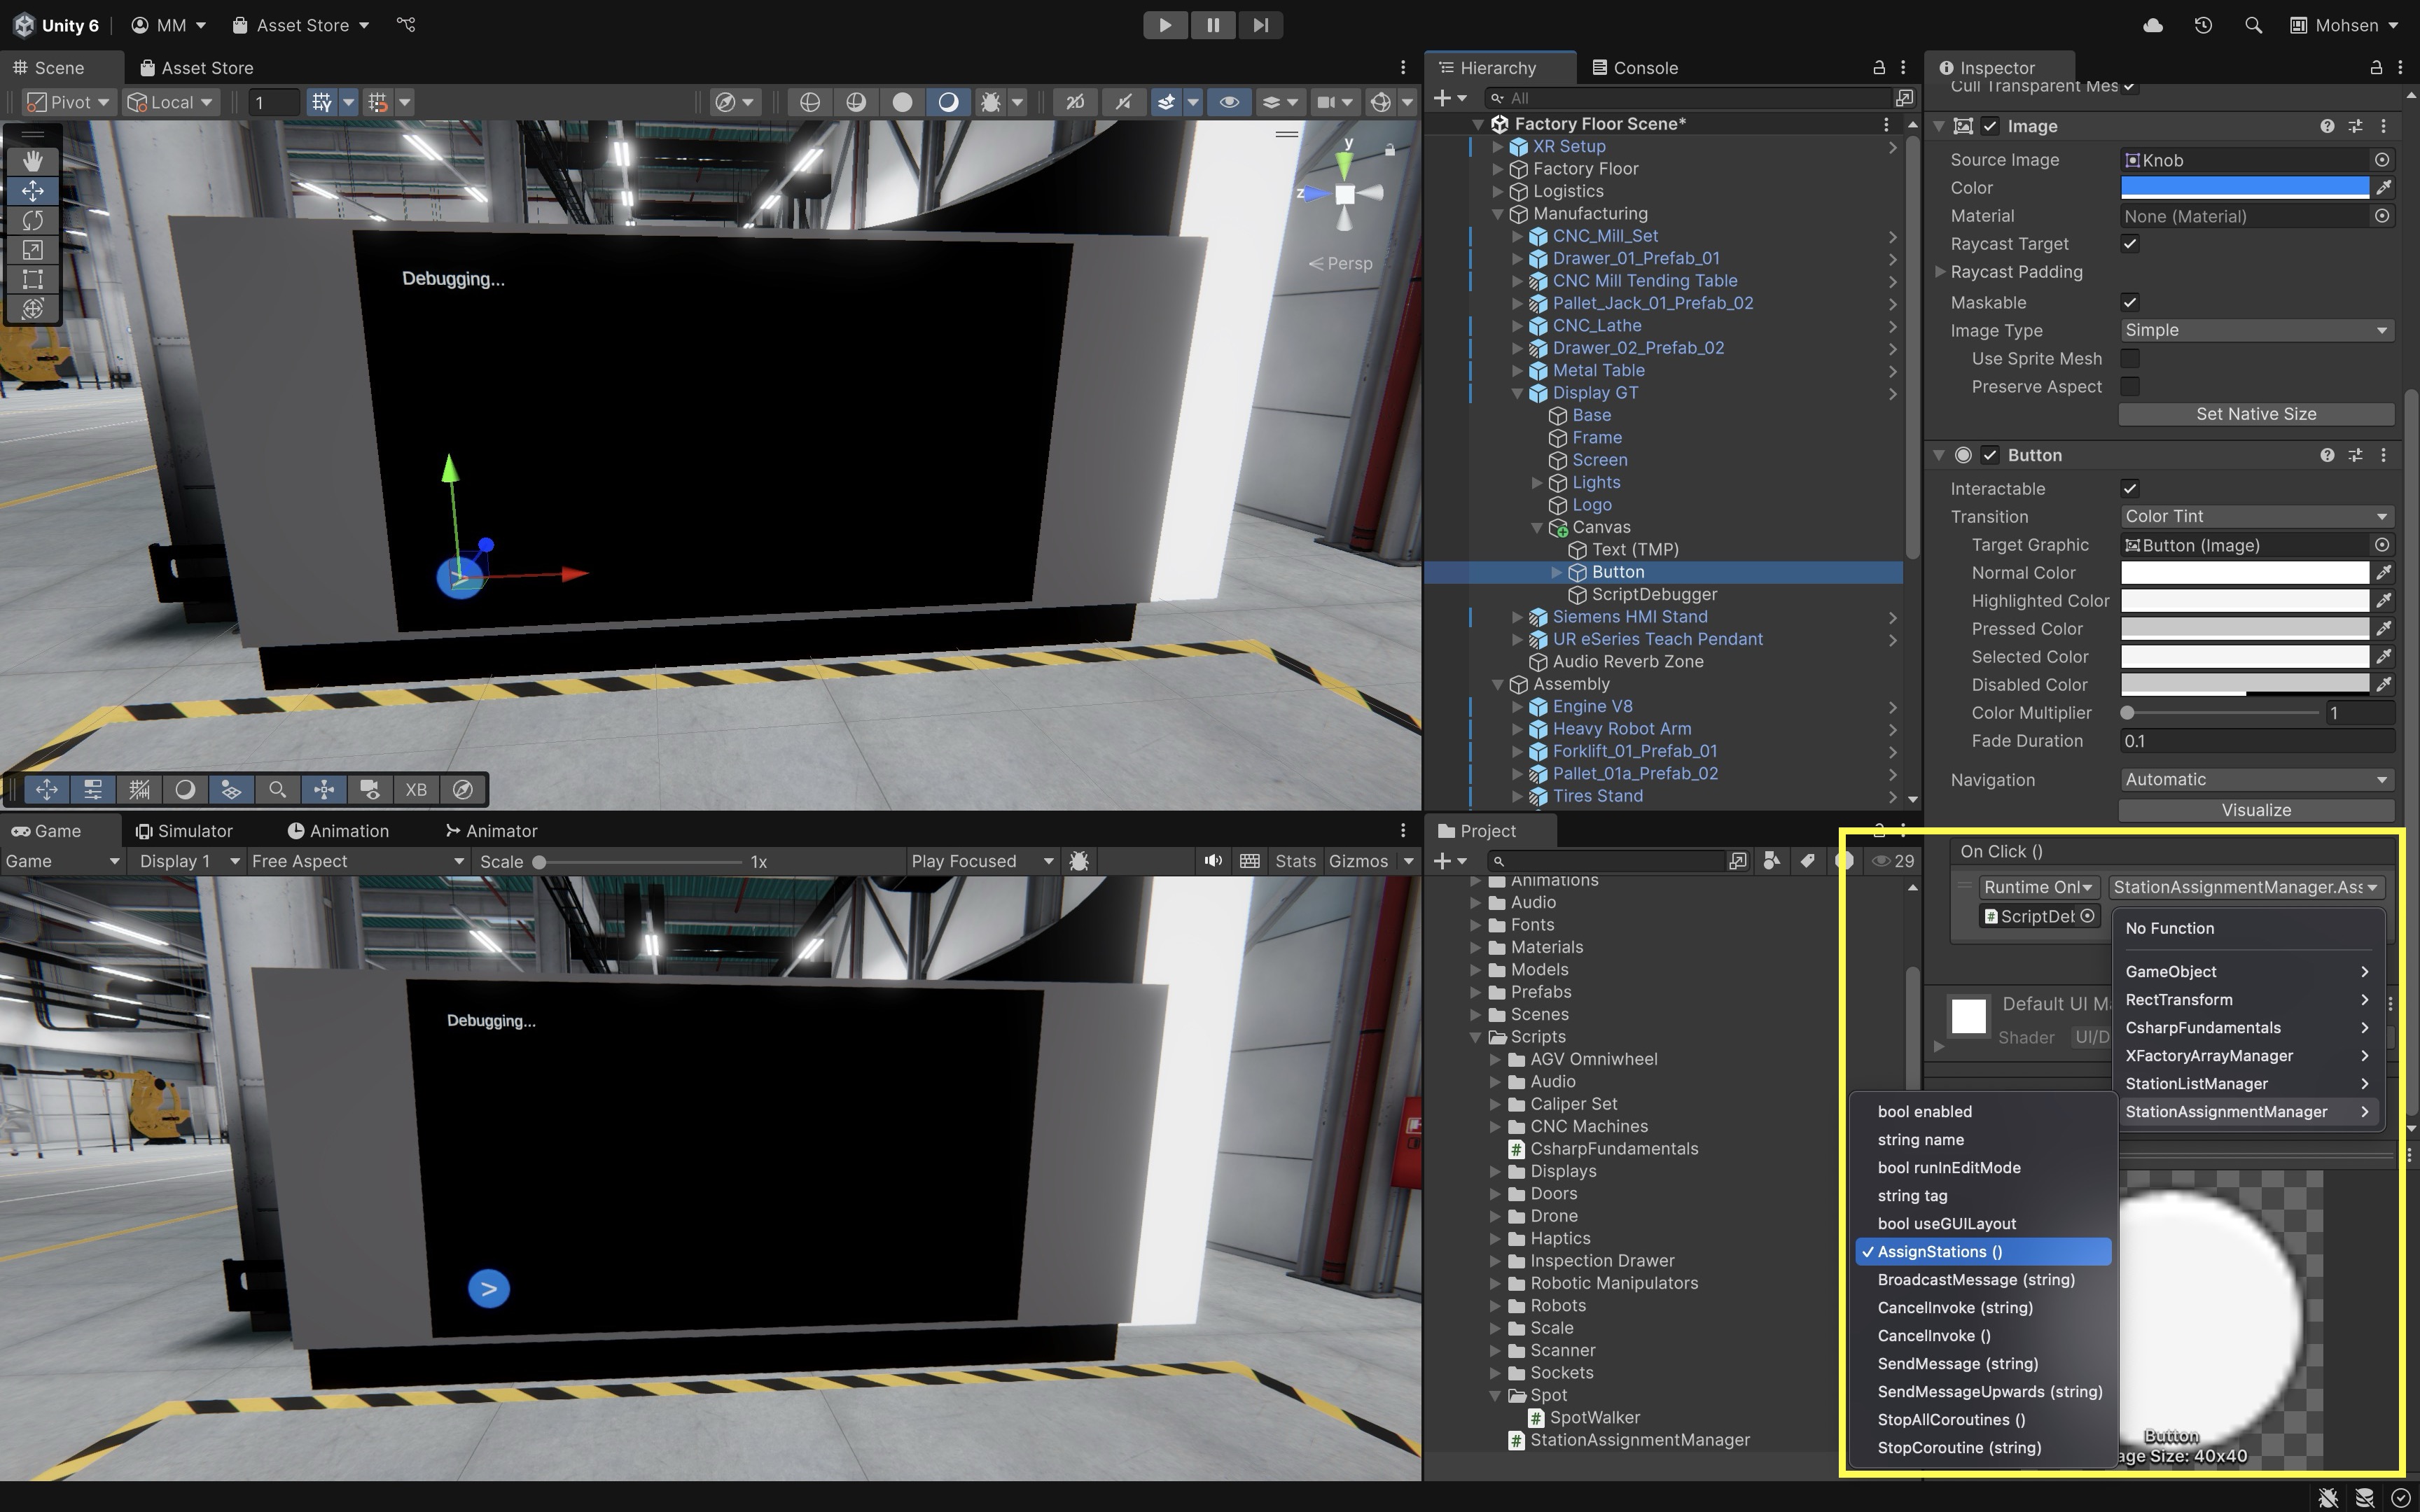
- Configure the Script in the
Inspector:- Drag the
Text (TMP)GameObject onto theStation Textfield in theInspector. - Select the
Buttonin yourCanvas. - In the
Inspector, scroll to theOnClick()section. - Click the
+to add a new event. - Drag the
ScriptDebuggerGameObject (the one with the script) into the event field. - From the dropdown, select
StationAssignmentManager → AssignStations().
- Drag the
- Assign GameObjects to Stations:
- Choose five GameObjects that represent equipment for each of the five stations in XFactory.
- Drag and drop your selected GameObjects into the station fields:
Engine V8 > Assembly ObjectCNC_Mill_Set > Manufacturing ObjectDrone > Logistics ObjectRobot Arm Arc Welder > Welding Object` Spot > Exhibit Object`

- Run the Scene:
- Click the Play button in Unity.
- Then, press the play button (>) in the UI.
- The display should update with the desired output as shown below. If any GameObject is unassigned (left
nullin the Inspector), the output will show:Exhibit → [No object assigned].

In engineering simulations and XR workflows, you often need to logically group machines or devices by location or function. Dictionaries offer quick, readable mapping between a station name and its associated object. This mirrors how real factories operate—with clear assignments and fast access to device metadata. Use this pattern when creating XR inspection tools, assigning tasks or behaviors to objects based on station identity, or managing assets in modular scenes.
Key Takeaways
In this session, we explored the fundamentals of C# scripting in Unity, from setting up Visual Studio Code as our development environment to creating and attaching MonoBehaviour scripts that drive interactive XR experiences. We covered how to declare variables, work with literals, choose appropriate data types, and understand the difference between value and reference types. We also introduced collections: arrays for storing fixed-size sets of values, lists for managing dynamic and resizable data, and dictionaries for mapping unique keys to corresponding objects. Together, these structures provide the foundation for organizing and managing data in Unity projects, enabling scalable, interactive, and efficient XR development.